
Safyr Lineage Scanner
Silwood Safyr extracts metadata from enterprise applications such as SAP, Oracle E-Business Suite, and Salesforce, and exports it as JSON files that describe lineage. The Safyr integration allows Ataccama ONE to read those exports from your Amazon S3 bucket and import them as lineage into the platform.
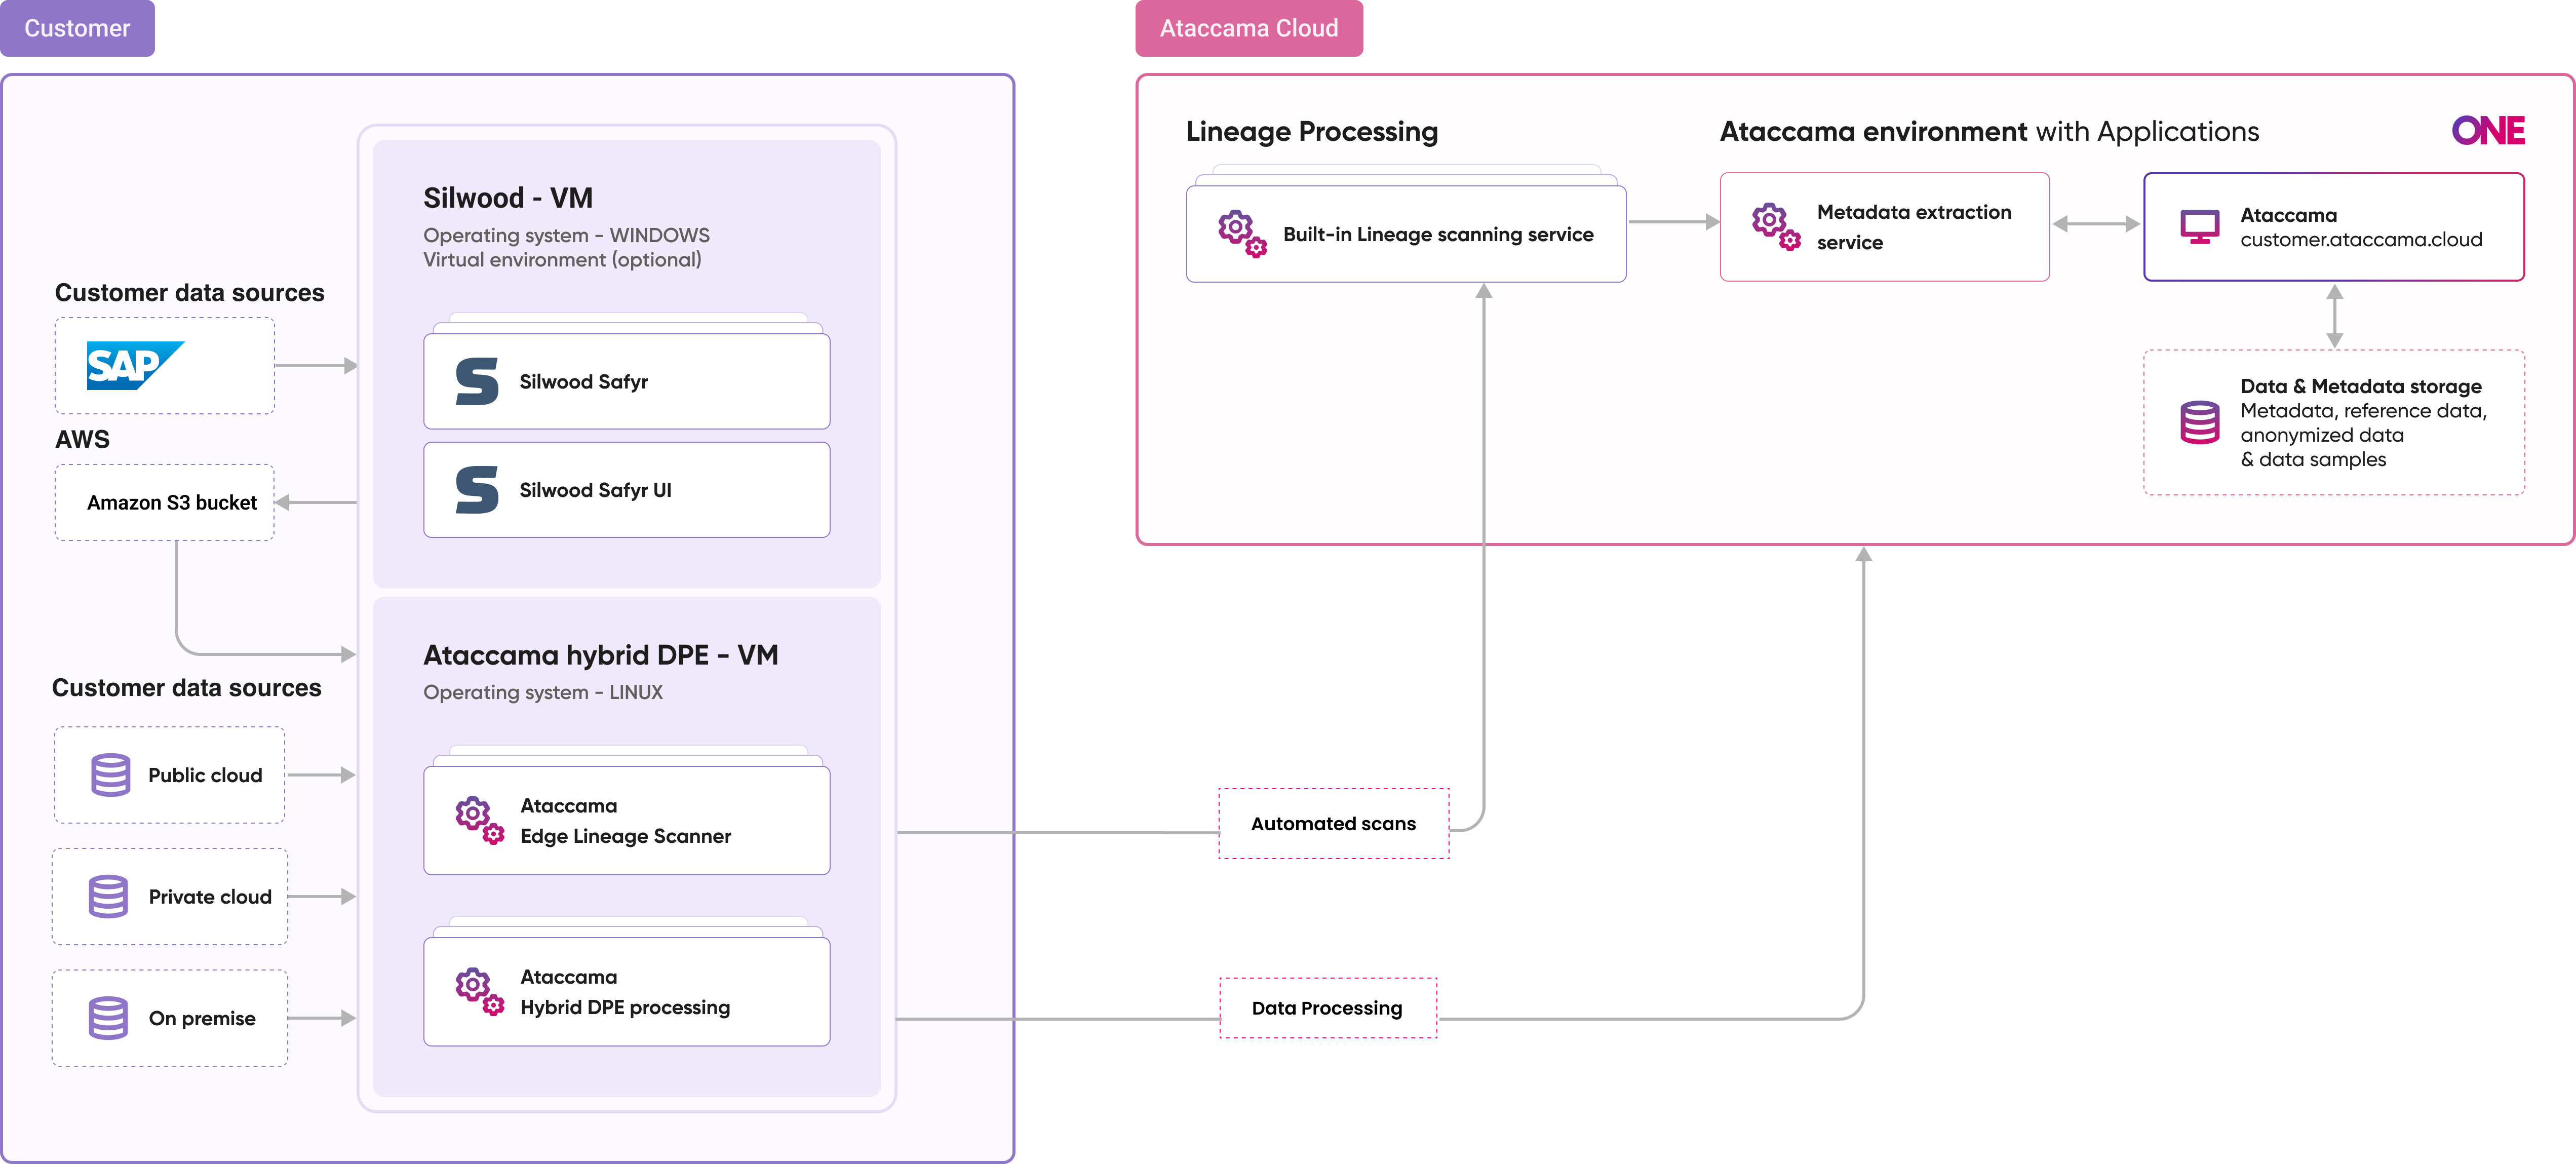
How the Safyr integration works
The integration is push-based and file-based, with Amazon S3 acting as the handoff point between Safyr and Ataccama ONE:
-
Safyr writes the latest metadata export as JSON files to a prefix in your S3 bucket.
-
On a schedule that you define, ONE lists every file under that prefix and converts it into lineage.
-
Each import processes the entire prefix and replaces the lineage produced by the previous import.
Take note of the following:
-
The prefix defines what lineage exists in ONE. It always contains the latest snapshot from Safyr, and Silwood is responsible for keeping it current. Any lineage no longer in the prefix is removed from ONE on the next successful import.
-
ONE never writes to your bucket. The integration is read-only and ONE never creates, copies, deletes, or tags objects.
What Silwood needs to maintain
The prefix is the single source of lineage, so its quality and freshness depend on how Silwood keeps it up to date. Make sure your Safyr admins are aware of the following:
-
Keep the snapshot current. The prefix must always hold the latest complete export as its contents are fully replaced at every run.
-
Let uploads finish before a scan runs. The scanner reads only fully uploaded files, so make sure each export file is completely written before the next scan starts.
-
Use one prefix per source. Keep a single Safyr tenant per prefix. See S3 bucket layout.
Prerequisites
Before you configure the scanner, make sure you have:
-
An Amazon S3 bucket, with Safyr configured to export JSON files to a known prefix within it. See S3 bucket layout.
-
The bucket name, the AWS Region the bucket is in, and the prefix Safyr writes to.
-
Permission to create an AWS Identity and Access Management (IAM) policy and either a role or access keys for that bucket. See S3 permissions.
S3 bucket layout
Safyr writes all export files under a single prefix, and ONE treats that prefix as one complete snapshot.
Use one prefix per scan plan. Multiple scan plans can point at different prefixes in the same bucket, as long as each prefix belongs to a single Safyr tenant.
For example, a bucket named customer-safyr-exports might hold the snapshot under the prefix silwood-full-export/.
S3 permissions
The scanner requires read-only access, with the following permissions:
-
s3:ListBucketon the bucket, restricted to the configured prefix. -
s3:GetObjecton the objects under that prefix.
If the bucket uses server-side encryption with AWS Key Management Service (SSE-KMS) and a customer-managed key, the scanner also needs kms:Decrypt on that key.
No write, delete, or tagging permissions are required.
The following policy grants exactly these permissions.
Replace the bucket name, prefix, Region, and key identifier with your own values.
Omit the kms:Decrypt statement if the bucket does not use SSE-KMS.
For step-by-step instructions, see Create IAM policies in the AWS documentation.
{
  "Version": "2012-10-17",
  "Statement": [
    {
      "Sid": "AllowListUnderPrefix",
      "Effect": "Allow",
      "Action": "s3:ListBucket",
      "Resource": "arn:aws:s3:::customer-safyr-exports",
      "Condition": {
        "StringLike": { "s3:prefix": "silwood-full-export/*" }
      }
    },
    {
      "Sid": "AllowGetUnderPrefix",
      "Effect": "Allow",
      "Action": "s3:GetObject",
      "Resource": "arn:aws:s3:::customer-safyr-exports/silwood-full-export/*"
    },
    {
      "Sid": "AllowDecryptForSseKms",
      "Effect": "Allow",
      "Action": "kms:Decrypt",
      "Resource": "arn:aws:kms:eu-north-1:<ACCOUNT_ID>:key/<KMS_KEY_ID>"
    }
  ]
}
Scanner authentication
On Amazon EKS, attach the policy to a role and use IAM Roles for Service Accounts (IRSA) so the scanner authenticates without long-lived credentials. The role’s trust policy, including any required external ID, is configured on your side in AWS. For details, see Methods to assume a role.
Alternatively, you can use a static access key and secret key.
Provide them through the Ataccama secret mechanism and reference them from the scan plan with the @@ref:ata:[<secret_name>] placeholder to avoid storing them in the scan plan.
Scanner configuration
All fields marked with an asterisk (*) are mandatory.
| Property | Description |
|---|---|
|
Identifies the source type to be scanned.
Must be set to |
|
A name for the scan configuration. |
|
A human-readable description of the scan. |
|
The source type.
Must be set to |
|
The name of the S3 bucket Safyr writes to. |
|
The prefix that holds the snapshot. The scanner processes every object under this prefix. |
|
The AWS Region the bucket is in, for example |
|
The authentication method. Possible values:
|
|
The Amazon Resource Name (ARN) of the AWS role the scanner assumes.
Required when authentication method ( |
|
A name for the assumed-role session, used to identify it in AWS logs (CloudTrail).
Required when |
|
The external ID required by the role’s trust policy, if one is configured. This is an AWS mechanism that helps prevent the confused deputy problem when a third party assumes a role in your account. Optional and only used when |
|
The AWS access key ID.
Required when |
|
The AWS secret access key.
Required when |
{
  "scannerConfigs": [
    {
      "sourceType": "SAP_SAFYR",
      "name": "safyr-full-export",
      "description": "Safyr S3 integration",
      "source": {
        "type": "S3",
        "bucket": "customer-safyr-exports",
        "prefix": "silwood-full-export/",
        "region": "eu-north-1",
        "credentials": {
          "type": "ASSUME_ROLE",
          "roleArn": "arn:aws:iam::123456789012:role/AtaccamaSafyrScanner",
          "sessionName": "safyr-scan-job",
          "externalId": "optional-external-id"
        }
      }
    }
  ]
}{
"scannerConfigs": [
{
"sourceType": "SAP_SAFYR",
"name": "safyr-full-export",
"description": "Safyr S3 integration",
"source": {
"type": "S3",
"bucket": "customer-safyr-exports",
"prefix": "silwood-full-export/",
"region": "eu-north-1",
"credentials": {
"type": "ACCESS_KEY",
"accessKeyId": "@@ref:ata:[SAFYR_ACCESS_KEY_ID]",
"secretAccessKey": "@@ref:ata:[SAFYR_SECRET_ACCESS_KEY]"
}
}
}
]
}Scan schedule
The Safyr integration runs on a schedule that you set on the scan plan.
When configuring the schedule, take into account how often Silwood refreshes the snapshot in S3. Running the integration more often only reprocesses the same data.
For instructions about how to schedule scans, see Schedule scan plan.
Catalog items for SAP assets
By default, Safyr lineage import produces lineage only and does not create corresponding catalog items.
If you want the SAP assets from the export to also appear as catalog items — so you can govern them, document them, and assign data quality rules — map your source connection to a SAP Safyr connection during import. With this mapping in place, ONE creates catalog items from the lineage export as part of the same import and you don’t need to create them manually.
For details on how to set up the connection, see SAP Safyr.
Troubleshooting Safyr integration
The scan fails with an access or permission error
The role or credentials are missing one of the required permissions, or the policy does not cover the configured prefix.
-
Confirm that the policy grants the necessary permissions, as described in S3 permissions.
-
Check that the prefix in the policy matches the prefix in the scan plan.
The scan cannot reach the bucket
The last scan status is FAILED, and the error points to an incorrect bucket name or AWS Region, or to the scanner being unable to reach the S3 endpoint.
To see the error, download the debug archive and check the console-out.log file.
Verify the bucket and region values, and confirm that the deployment allows network egress to the S3 endpoint.
Some objects are missing from lineage
Individual files that cannot be parsed are skipped so that the rest of the snapshot still produces lineage. Each skipped file is logged with its object key and its location in the file.
Correct the file in Silwood and the next scan will fix the issue automatically.
Was this page useful?