Azure SQL Connection
Create a source
First, create a new data source.
-
Navigate to Data Catalog > Sources.
-
Select Create.
-
Provide the following:
-
Name: The source name.
-
Description: A description of the source.
-
Deployment (Optional): Choose the deployment type.
You can add new values if needed. See Lists of Values. -
Stewardship: The source owner and roles. For more information, see Stewardship.
-
| Alternatively, add a connection to an existing data source. See Connect to a Source. |
Add a connection
-
Select Add Connection.
-
In Select connection type, choose Relational Database > MSSQL Server.
Unlike other data sources, Azure SQL does not have its own entry in the list of relational databases. Use MSSQL Server and follow the instructions on this page to connect to the respective databases. -
Provide the following:
-
Name: A meaningful name for your connection. This is used to indicate the location of catalog items.
-
Description (Optional): A short description of the connection.
-
Dpe label (Optional): Assign the processing of a data source to a particular data processing engine (DPE) by entering the DPE label assigned to the engine. For more information, see DPM and DPE Configuration in DPM Admin Console.
-
JDBC: A JDBC connection string pointing to the IP address or the URL where the data source can be reached. For a list of supported sources and JDBC drivers, see Supported Data Sources.
You can add a property to this connection string to authenticate with Azure AD Service Principle. See Azure AD Service Principal via connection string.
-
-
In Spark processing, select Spark enabled if you want to process large volumes of data using your Spark cluster. This improves how ONE works with relational databases during profiling and data quality tasks.
-
If selected, choose the Spark processing method:
-
JDBC: ONE Spark DPE creates a number of JDBC connections directly to the database to process data in parallel.
-
SPARK_CONNECTOR: ONE Spark DPE sources the data via another data provider, such as an ADLS Gen2 container or Amazon S3 bucket. This method might be faster for very large datasets.
-
-
Select the Spark cluster to process your data.
Only previously configured clusters are shown in ONE.
To add and configure a new cluster, refer to Metastore Data Source Configuration and Metastore Connection.
-
-
In Additional settings:
-
Select Enable exporting and loading of data if you want to export data from this connection and use it in ONE Data or outside of ONE.
If you want to export data to this source, you also need to configure write credentials. See Connection credentials.
Consider the security and privacy risks of allowing the export of data to other locations.
-
Add credentials
Different sets of credentials can be used for different tasks. One set of credentials must be set as default for each connection.
To determine whether you need to configure more than a single set of credentials, see Connection credentials.
-
Select Add Credentials.
-
Choose an authentication method and proceed with the corresponding step:
-
Username and password: Basic authentication using your username and a password.
-
Azure AD Service Principal via Service Principal Certificate authentication.
-
| These sections include references to Azure AD, which you might also know as Microsoft Entra ID. |
Username and password
-
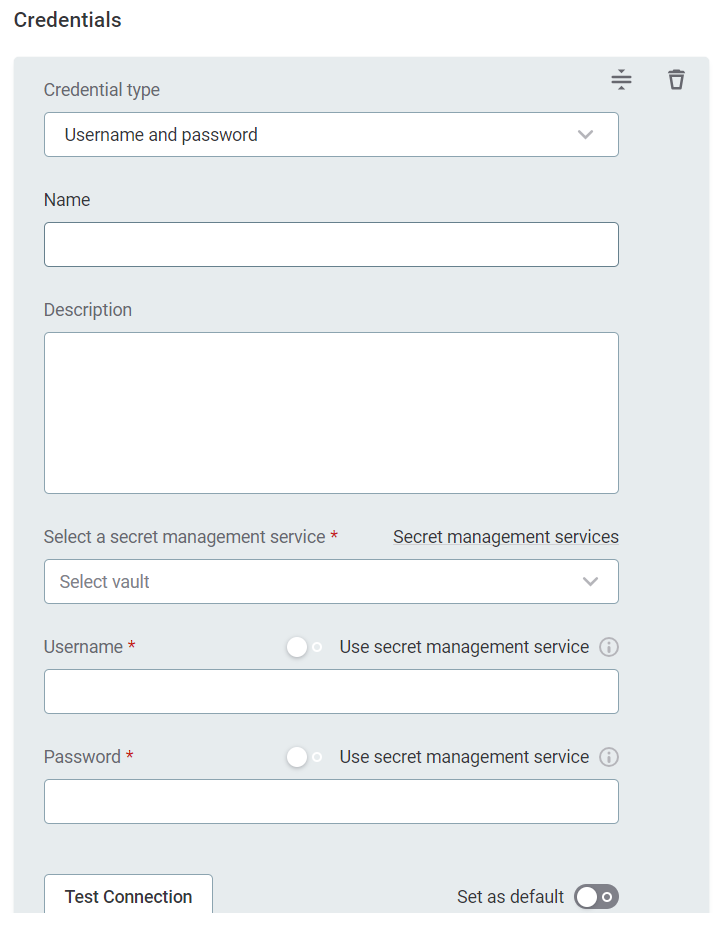
Select Username and password.
-
Provide the following:

-
Name (Optional): A name for this set of credentials.
-
Description (Optional): A description for this set of credentials.
-
Select a secret management service (optional): If you want to use a secret management service to provide values for the following fields, specify which secret management service should be used. After you select the service, you can enable the Use secret management service toggle and provide instead the names the values are stored under in your key vault. For more information, see Secret Management Service.
-
Username: The username for the data source. Alternatively, enable Use secret management service and provide the name this value is stored under in your selected secret management service.
-
Password: The password for the data source. Alternatively, enable Use secret management service and provide the name this value is stored under in your selected secret management service.
-
-
If you want to use this set of credentials by default when connecting to the data source, select Set as default.
See also Connection credentials.
-
Proceed with Test the connection.
Azure AD Service Principal via connection string
| This method is supported only for version 10.2 and newer of SQL Server JDBC driver. For older versions, see Azure AD Service Principal via driver properties. |
-
In the connection details, add the property
authentication=ActiveDirectoryServicePrincipalto the JDBC connection string. For examplejdbc:sqlserver://at…33;database=database-name;encrypt=true;trustServerCertificate=false;hostNameInCertificate=*.database.windows.net;authentication=ActiveDirectoryServicePrincipal. -
In Credentials, select Username and password and provide the following:
-
Username: Your
client_id -
Password: Your
client_secret
-
-
If you want to use this set of credentials by default when connecting to the data source, select Set as default.
See also Connection credentials.
-
Proceed with Test the connection.
Azure AD Service Principal via driver properties
| This method can be used for older JDBC drivers which can’t authenticate via the connection string. |
-
Select Integrated credentials and provide the following:
-
Name (Optional): A name for this set of credentials.
-
Description (Optional): A description for this set of credentials.
-
-
If you want to use this set of credentials by default when connecting to the data source, select Set as default.
See also Connection credentials.
-
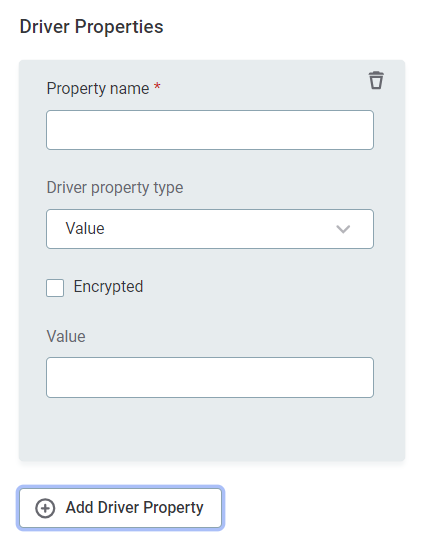
Use Add Driver property to add the following driver properties:
Driver property name Driver property type Encrypted Value Content authenticationValue
False
ActiveDirectoryServicePrincipaln/a
AADSecurePrincipalIdValue
False
<service principal client ID (UUID format)>n/a
AADSecurePrincipalSecretValue
True
<service principal client secret>n/a
When adding these properties in the app, the following format is used:

In the case of the first property above you enter:
-
Driver property name: authentication
-
Driver property type: value
-
Encrypted: false
-
Value: ActiveDirectoryServicePrincipal
Repeat this process for each of the properties in the code block. Always select Encrypted for client secrets and other sensitive information.
-
-
Proceed with Test the connection.
Azure AD Managed Identity via driver properties
|
If you want to use Azure AD Managed Identity, Data Processing Engine (DPE) must be installed in your Azure cloud subscription on a virtual machine (VM) instance, and a Managed Role must be assigned in the Microsoft Azure Portal. To fulfill this requirement, if you are using the Cloud Portal, DPE must be installed in hybrid mode. See Hybrid Deployment. If you have multiple DPEs running, you might need to specify additional constraints. See Constraints Configuration. |
-
Select Integrated credentials and provide the following:
-
Name (Optional): A name for this set of credentials.
-
Description (Optional): A description for this set of credentials.
-
-
If you want to use this set of credentials by default when connecting to the data source, select Set as default.
See also Connection credentials.
-
Use Add Driver property to add the following driver properties:
Driver property name Driver property type Encrypted Value Content authenticationValue
False
ActiveDirectoryManagedIdentityn/a
Azure AD Service Principal via Service Principal Certificate authentication
-
In Credentials, select Username and password and provide the following:
-
Username: Your
client_id -
Password: Enter a value at random, this is not used in the connection.
-
-
If you want to use this set of credentials by default when connecting to the data source, select Set as default.
See also Connection credentials.
-
Use Add Driver property to add the following driver properties:
Driver property name Driver property type Encrypted Value Content authenticationValue
False
ActiveDirectoryServicePrincipalCertificaten/a
clientCertificateFile
True
n/a
Upload your
.crtfileclientKeyFile
True
n/a
Upload your
.keyfileclientKeyPassword (optional)Value
True
<password>n/a
-
Proceed with Test the connection.
Test the connection
To test and verify whether the data source connection has been correctly configured, select Test Connection.
If the connection is successful, continue with the following step. Otherwise, verify that your configuration is correct and that the data source is running.
Save and publish
Once you have configured your connection, save and publish your changes. If you provided all the required information, the connection is now available for other users in the application.
In case your configuration is missing required fields, you can view a list of detected errors instead. Review your configuration and resolve the issues before continuing.
Next steps
You can now browse and profile assets from your connection.
In Data Catalog > Sources, find and open the source you just configured. Switch to the Connections tab and select Document. Alternatively, opt for Import or Discover documentation flow.
Or, to import or profile only some assets, select Browse on the Connections tab. Choose the assets you want to analyze and then the appropriate profiling option.
Was this page useful?
