
Databricks JDBC
Prerequisites
Whether the necessary JDBC driver exists out of the box or not depends on your deployment type. To learn more about possible deployment types, see Ataccama Cloud.
Ataccama Cloud
Databricks JDBC is available out of the box: proceed to Create a source.
Hybrid deployment, self-managed, and Custom Ataccama Cloud
Set up Databricks JDBC in the application-JDBC_DRIVERS.properties file using the configuration included in the JDBC driver pack.
From the Support Service Desk, access Downloads and choose your product version. In Downloads - Upgrades > Data Quality & Catalog section, find and download JDBC Drivers.
If you are using a self-managed or hybrid deployment, you can find the same configuration in your DPE installation.
The default location is <dpe>/etc/configs/application-JDBC_DRIVERS.properties.
Create a source
First, create a new data source.
-
Navigate to Data Catalog > Sources.
-
Select Create.
-
Provide the following:
-
Name: The source name.
-
Description: A description of the source.
-
Deployment (Optional): Choose the deployment type.
You can add new values if needed. See Lists of Values. -
Stewardship: The source owner and roles. For more information, see Stewardship.
-
| Alternatively, add a connection to an existing data source. See Connect to a Source. |
Add a connection
-
Select Add Connection.
-
In Select connection type, choose Relational Database > Databricks JDBC.
-
Provide the following:
-
Name: A meaningful name for your connection. This is used to indicate the location of catalog items.
-
Description (Optional): A short description of the connection.
-
Dpe label (Optional): Assign the processing of a data source to a particular data processing engine (DPE) by entering the DPE label assigned to the engine. For more information, see DPM and DPE Configuration in DPM Admin Console.
-
Override catalog item name: Select this option if you want metadata imports to overwrite the names of existing catalog items with the latest names from the data source.
If the option is not selected, catalog item names you set in ONE are preserved when metadata is reimported. See Edit catalog item metadata.
-
JDBC: A JDBC connection string pointing to the IP address or the URL where the data source can be reached.
The required string format depends on your chosen authentication method:
-
For token authentication, see JDBC string for token authentication.
-
For M2M authentication, see JDBC string for M2M authentication.
-
For EntraID authentication, see JDBC string for EntraID authentication.
-
-
-
Ignore the Spark processing section: this is not relevant for this use case.
-
In Additional settings:
-
Select Enable exporting and loading of data if you want to export data from this connection and use it in ONE Data or outside of ONE.
If you want to export data to this source, you also need to configure write credentials. See Connection credentials.
Consider the security and privacy risks of allowing the export of data to other locations.
-
Add credentials
Different sets of credentials can be used for different tasks. One set of credentials must be set as default for each connection.
To determine whether you need to configure more than a single set of credentials, see Connection credentials.
-
Select Add Credentials.
-
Choose an authentication method and proceed with the corresponding step:
PAT authentication
A Personal Access Token (PAT) is a secure, time-limited credential for Databricks. Before adding the credentials in ONE, you need to generate the token in Databricks.
Generate PAT
Before adding the credentials in ONE, you need to generate your token in Databricks:
-
In your Databricks workspace, click your avatar and select Settings.
-
Select Developer from the left-hand menu and then select Access Tokens.
-
Select Generate New Token. Optionally provide a comment and expiration date, and then select Generate.
-
Save the token securely.
You will only see the token once. Treat tokens like a password and do not expose them. You can now use this value for authentication, proceed to Add credentials in ONE.
Add credentials in ONE
-
Select Username and password.
-
Provide the following:
-
Name (Optional): A name for this set of credentials.
-
Description (Optional): A description for this set of credentials.
-
Username: Type
token. -
Password: Provide the generated token.
-
-
If you want to use this set of credentials by default when connecting to the data source, select Set as default.
See also Connection credentials.
-
Proceed with Test the connection.
JDBC string for token authentication
Based on this authentication method, your JDBC string should take the following format:
- Azure Databricks
-
jdbc:databricks://adb-<WORKSPACE_ID>.<REGION_ID>.azuredatabricks.net:443/<DATABASE_NAME>;transportMode=http;ssl=1;httpPath=sql/protocolv1/o/<WORKSPACE_ID>/<CLUSTER_OR_WAREHOUSE_ID>;AuthMech=3 - Databricks on AWS
-
jdbc:databricks://<WORKSPACE_NAME>.cloud.databricks.com:443/<DATABASE_NAME>;transportMode=http;ssl=1;httpPath=sql/protocolv1/o/<WORKSPACE_ID>/<CLUSTER_OR_WAREHOUSE_ID>;AuthMech=3
Placeholder definitions
-
<WORKSPACE_ID>: Your Databricks workspace identifier (numeric). -
<DATABASE_NAME>: Target database/schema name (often "default"). -
<CLUSTER_OR_WAREHOUSE_ID>: Your SQL warehouse or cluster identifier. -
(Azure specific)
<REGION_ID>: Azure region number (for example, 19 for East US 2). -
(AWS specific)
<WORKSPACE_NAME>: AWS workspace deployment name (usually includes workspace ID).
| You can find JDBC strings with this information already populated in your Databricks workspace. Go to Compute, select your cluster, and then select Connection details and look for JDBC. |
|
If you are using Unity Catalog:
|
OAuth M2M authentication
OAuth M2M is an OAuth 2.0 flow designed specifically for machine-to-machine scenarios.
A service principal authenticates to Databricks and exchanges the client ID and client secret for an access token. The access token is then used to authenticate the connection to Databricks.
Before adding the credentials in ONE, you need to create the service principal in Databricks and obtain the clientId and clientSecret for this service principal.
| OAuth M2M authentication requires the Databricks OSS JDBC driver. It is not supported by the legacy Simba driver. |
OAuth M2M service principal
-
In your Databricks workspace, select your avatar (located in the top-right corner) and then select Settings.
-
Select Identity and access from the left-hand menu.
-
Select the Manage option for Service principals.
-
Select Add new service principal.
-
You are given a choice between selecting an existing service principal or adding a new one. Select Add new.
-
Select Databricks managed.
-
Provide a name for the new service principal.
-
Select Add.
-
Open the newly-created service principal by clicking the name.
-
Select the Secrets tab.
-
Select Generate secret.
-
Specify the lifetime of the secret (in days) and then select Generate.
-
You see the Secret and Client ID. You can now use these values for authentication, proceed to Add credentials in ONE.
Add credentials in ONE
-
Select Integrated credentials and provide the following:
-
Name (Optional): A name for this set of credentials.
-
Description (Optional): A description for this set of credentials.
-
-
If you want to use this set of credentials by default when connecting to the data source, select Set as default.
See also Connection credentials.
-
Use Add Driver property to add the following driver properties:
Driver property name Driver property type Encrypted Value OAuth2ClientidValue
False
<CLIENT_ID>OAuth2SecretValue
True
<CLIENT_SECRET>AzureTenantIdValue
False
<TENANT_ID>AzureTenantIdis optional and applies to Azure Databricks only. When set, the driver includes refreshed Azure Active Directory (AAD) Service Principal OAuth tokens with every request.When adding these properties in the app, the following format is used:
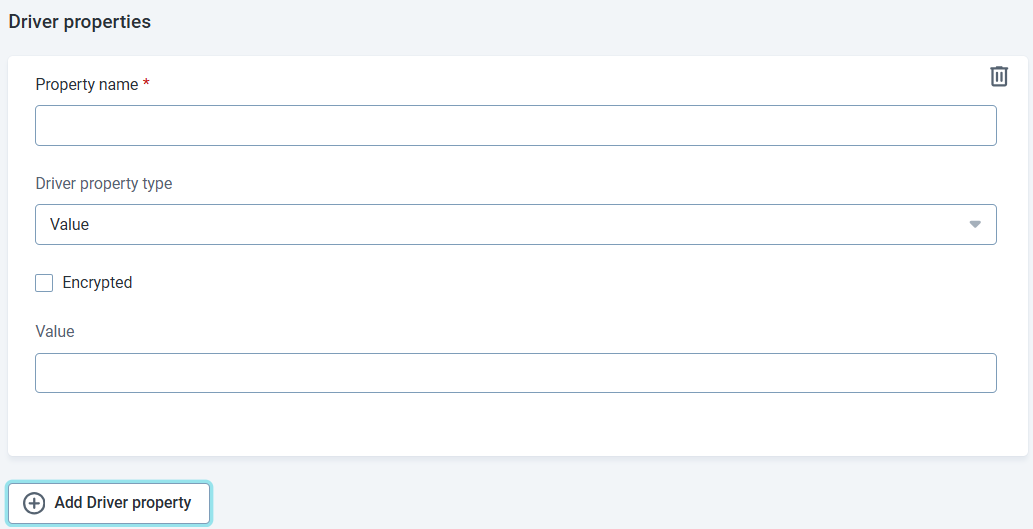
In the case of the first property above you enter:
-
Driver property name: OAuth2Clientid
-
Driver property type: Value
-
Encrypted: False
-
Value:
<<CLIENT_ID>
Repeat this process for each of the properties in the code block. Always select Encrypted for client secrets and other sensitive information. Similarly, some users prefer to encrypt all values, including client IDs. Change
falsetotruewherever preferred. -
-
Proceed with Test the connection.
JDBC string for M2M authentication
Based on this authentication method, your JDBC string should take the following format:
- Azure Databricks
-
jdbc:databricks://adb-<WORKSPACE_ID>.<REGION_ID>.azuredatabricks.net:443/<DATABASE_NAME>;transportMode=http;ssl=1;httpPath=sql/protocolv1/o/<WORKSPACE_ID>/<CLUSTER_OR_WAREHOUSE_ID>;AuthMech=11;Auth_Flow=1 - Databricks on AWS
-
jdbc:databricks://<WORKSPACE_NAME>.cloud.databricks.com:443/<DATABASE_NAME>;transportMode=http;ssl=1;httpPath=sql/protocolv1/o/<WORKSPACE_ID>/<CLUSTER_OR_WAREHOUSE_ID>;AuthMech=11;Auth_Flow=1
Placeholder definitions
-
<WORKSPACE_ID>: Your Databricks workspace identifier (numeric). -
<DATABASE_NAME>: Target database/schema name (often "default"). -
<CLUSTER_OR_WAREHOUSE_ID>: Your SQL warehouse or cluster identifier. -
(Azure specific)
<REGION_ID>: Azure region number (for example, 19 for East US 2). -
(AWS specific)
<WORKSPACE_NAME>: AWS workspace deployment name (usually includes workspace ID).
| You can find JDBC strings with this information already populated in your Databricks workspace. Go to Compute, select your cluster, and then select Connection details and look for JDBC. |
|
If you are using Unity Catalog:
|
|
When using token passthrough with the OSS JDBC driver, add |
Entra ID authentication
| This option is only available for Azure Databricks. |
Before adding the credentials in ONE, you need to create the service principal in Azure and obtain the tenantId, clientId, and clientSecret for this service principal.
|
ONE obtains the Entra ID access token once at connection time and does not refresh it automatically. By default, Azure AD access tokens expire after one hour. Once the token expires, any new or re-established connection will fail with an authentication error.
For long-running or unattended workloads, use OAuth M2M authentication instead — the OSS driver manages token renewal transparently when |
EntraID-managed service principal
-
In the Azure Portal, select Microsoft Entra ID > Manage > App registrations.
-
Search for
<APPLICATION_NAME>and click the name to open the Overview. -
In the left-hand menu, select Manage > Certificates & secrets.
-
In the Client secrets tab, select + New client secret.
-
Provide Description and Expiry values.
-
Select Add.
-
Copy the value of the secret immediately — you won’t see it again.
-
You’ll need the following values for authentication:
-
Tenant ID: Found in Microsoft Entra ID > Overview
-
Client ID: Found in App registrations >
<APPLICATION_NAME>> Overview. -
Client Secret: From step 4.
You can now use these values for authentication.
Add credentials in ONE
-
Select Integrated credentials and provide the following:
-
Name (Optional): A name for this set of credentials.
-
Description (Optional): A description for this set of credentials.
-
-
If you want to use this set of credentials by default when connecting to the data source, select Set as default.
See also Connection credentials.
-
Use Add Driver property to add the following driver properties:
Driver property name Driver property type Encrypted Value ata.jdbc.authTypeValue
False
AAD_CLIENT_CREDENTIALata.jdbc.aad.tenantIdValue
False
<TENANT_ID>ata.jdbc.aad.clientIdValue
False
<CLIENT_ID>ata.jdbc.aad.clientSecretValue
True
<CLIENT_SECRET>ata.jdbc.aad.scopeValue
False
2ff814a6-3304-4ab8-85cb-cd0e6f879c1d/.defaultata.jdbc.tokenPropertyKeyValue
False
Auth_AccessToken
This value is fixed. Omitting the property results in a No access token providederror when testing the connection.When adding these properties in the app, the following format is used:
In the case of the first property above you enter:
-
Driver property name: ata.jdbc.authType
-
Driver property type: Value
-
Encrypted: False
-
Value:
AAD_CLIENT_CREDENTIAL
Repeat this process for each of the properties in the code block. Always select Encrypted for client secrets and other sensitive information.
Similarly, some users prefer to encrypt all values, including client IDs. Change
falsetotruewherever preferred. -
-
Proceed with Test the connection.
JDBC string for EntraID authentication
Based on this authentication method, your JDBC string should take the following format:
jdbc:databricks://adb-<WORKSPACE_ID>.<REGION_ID>.azuredatabricks.net:443/<DATABASE_NAME>;transportMode=http;ssl=1;httpPath=sql/protocolv1/o/<WORKSPACE_ID>/<CLUSTER_OR_WAREHOUSE_ID>;AuthMech=11;Auth_Flow=0
Placeholder definitions
-
<WORKSPACE_ID>: Your Databricks workspace identifier (numeric). -
<DATABASE_NAME>: Target database/schema name (often "default"). -
<CLUSTER_OR_WAREHOUSE_ID>: Your SQL warehouse or cluster identifier. -
<REGION_ID>: Azure region number (for example, 19 for East US 2).
| You can find JDBC strings with this information already populated in your Databricks workspace. Go to Compute, select your cluster, and then select Connection details and look for JDBC. |
|
If you are using Unity Catalog:
|
|
When using token passthrough with the OSS JDBC driver, add |
Test the connection
To test and verify whether the data source connection has been correctly configured, select Test Connection.
If the connection is successful, continue with the following step. Otherwise, verify that your configuration is correct and that the data source is running.
Save and publish
Once you have configured your connection, save and publish your changes. If you provided all the required information, the connection is now available for other users in the application.
In case your configuration is missing required fields, you can view a list of detected errors instead. Review your configuration and resolve the issues before continuing.
Troubleshooting Databricks JDBC connection
Slow write operations
Starting with Databricks Simba JDBC driver version 2.6.38 and OSS JDBC driver version 3.0.5, the JDBC Writer inserts one record at a time by default. This can cause slow performance when writing data and occasionally result in operations timing out.
The resolution depends on which driver you are using.
Simba JDBC driver
-
Upgrade to version 2.7.0–2.7.x. In these versions, Ataccama ONE automatically appends
EnableNativeParameterizedQuery=0and no manual action is required. -
For version 2.6.38–2.6.x, add
;EnableNativeParameterizedQuery=0to your JDBC connection string. Earlier versions are not affected.All Simba 2.6.x drivers share the same filename (
DatabricksJDBC42.jar). To check the actual version, open the JAR as a ZIP archive and look inMETA-INF/maven/Spark/SparkJDBC42/pom.properties.If you are not sure about the version, test the connection before propagating the change to production. If it returns
[CONFIG_NOT_AVAILABLE] Configuration EnableNativeParameterizedQuery is not available, your version is not affected and you can remove the parameter.
OSS JDBC driver
For version 3.0.5 and later, Ataccama ONE automatically appends EnableBatchedInserts=1 and supportManyParameters=1.
No manual action is required.
Turn off batched inserts
Databricks chunks batched writes for execution. As there is no transaction rollback, using staging tables for critical workflows is recommended.
To turn off batched inserts, set the following property in the JDBC connection string depending on your driver:
-
Simba:
EnableNativeParameterizedQuery=1 -
OSS:
EnableBatchedInserts=0
Token federation error with token passthrough authentication
When using token passthrough authentication with the OSS JDBC driver, the connection might fail with the following error:
SEVERE: Failed to retrieve the exchanged token
java.lang.NullPointerException: Cannot invoke "String.trim()" because "s" is null
    at com.databricks.internal.nimbusds.jose.JOSEObject.split(JOSEObject.java:218)
    at com.databricks.internal.nimbusds.jwt.SignedJWT.parse(SignedJWT.java:129)
    at com.databricks.jdbc.auth.DatabricksTokenFederationProvider.createToken(DatabricksTokenFederationProvider.java:176)
    at com.databricks.jdbc.auth.DatabricksTokenFederationProvider.retrieveToken(DatabricksTokenFederationProvider.java:221)
    at com.databricks.jdbc.auth.DatabricksTokenFederationProvider.exchangeToken(DatabricksTokenFederationProvider.java:199)
This happens because the driver attempts token federation by default, which is incompatible with token passthrough.
To resolve this, add ;EnableTokenFederation=0 to your JDBC connection string.
Next steps
You can now browse and profile assets from your connection.
In Data Catalog > Sources, find and open the source you just configured. Switch to the Connections tab and select Document. Alternatively, opt for Import or Discover documentation flow.
Or, to import or profile only some assets, select Browse on the Connections tab. Choose the assets you want to analyze and then the appropriate profiling option.
Was this page useful?