
Lakehouse SQL Analytics Endpoint
When you create a Lakehouse in Microsoft Fabric, it automatically generates an SQL analytics endpoint. Using this endpoint, you can work with delta lake files in the Lakehouse as if they were stored in an SQL database. For more information, see What is the SQL analytics endpoint for a Lakehouse?.
| To connect to the SQL Analytics Endpoint your service principal must have access to the Microsoft Fabric workspace. |
Obtain SQL connection string
-
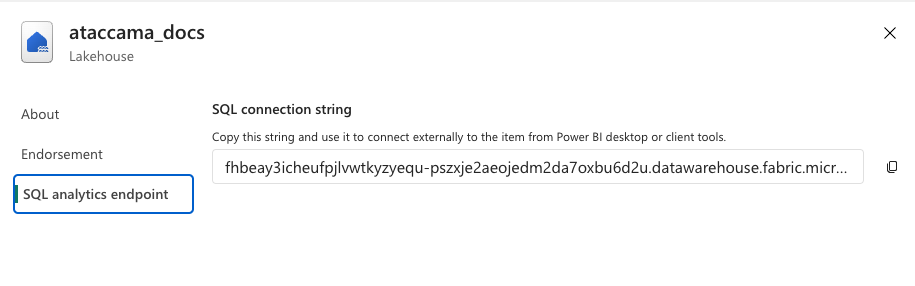
In Lakehouse, locate the SQL connection string either in Details or Settings.

-
Copy this value to use during the next step, Create connection.
Create connection
-
In Select connection type, choose Relational Database > Fabric Lakehouse SQL Endpoint.
-
Provide the following:
-
Name: A meaningful name for your connection. This is used to indicate the location of catalog items.
-
Description (Optional): A short description of the connection.
-
Dpe label (Optional): Assign the processing of a data source to a particular data processing engine (DPE) by entering the DPE label assigned to the engine. For more information, see DPM and DPE Configuration in DPM Admin Console.
-
Override catalog item name: Select this option if you want metadata imports to overwrite the names of existing catalog items with the latest names from the data source.
If the option is not selected, catalog item names you set in ONE are preserved when metadata is reimported. See Edit catalog item metadata.
-
JDBC: Construct a connection string for Microsoft Fabric using the SQL connection string. This takes the form
jdbc:sqlserver://+<_sql-connection-string_>+;authentication=ActiveDirectoryServicePrincipal;databaseName=+<_Lakehouse_Name_>. In our example, this would be:jdbc:sqlserver://fhbeay3icheufpjlvwtkyzyequ-pszxje2aeojedm2da7oxbu6d2u.datawarehouse.fabric.microsoft.com;authentication=ActiveDirectoryServicePrincipal;databaseName=ataccama_docs.If you do not provide the Lakehouse name in the JDBC connection string, Ataccama ONE will connect to the default lakehouse. If the Lakehouse name contains spaces or other special characters, URL-encode them in the databaseNameparameter. For example, replace each space with%20:databaseName=My%20Lakehouse.
-
-
Proceed to Add credentials.
|
The Enable exporting and loading of data option in Additional settings can be ignored as the Lakehouse SQL Analytics Endpoint only supports read-only mode. |
Add credentials
Different sets of credentials can be used for different tasks. One set of credentials must be set as default for each connection.
To determine whether you need to configure more than a single set of credentials, see Connection credentials.
-
Select Add Credentials.
-
In Credential type, select Username and password.
-
Provide the following:
-
Name (Optional): A name for this set of credentials.
-
Description (Optional): A description for this set of credentials.
-
Select a secret management service (optional): If you want to use a secret management service to provide values for the following fields, specify which secret management service should be used. After you select the service, you can enable the Use secret management service toggle and provide instead the names the values are stored under in your key vault. For more information, see Secret Management Service.
-
Username: Enter your
client_id. This takes the following form (GUID):ab12c456-789d-01ef-gg22-3h44i5jkl67m. Alternatively, enable Use secret management service and provide the name this value is stored under in your selected secret management service. -
Password: Enter the client secret you generated during app registration in Azure AD. Alternatively, enable Use secret management service and provide the name this value is stored under in your selected secret management service.
-
-
If you want to use this set of credentials by default when connecting to the data source, select Set as default.
See also Connection credentials.
-
Proceed with Test the connection.
Test the connection
To test and verify whether the data source connection has been correctly configured, select Test Connection.
If the connection is successful, continue with the following step. Otherwise, verify that your configuration is correct.
Save and publish
Once you have configured your connection, save and publish your changes. If you provided all the required information, the connection is now available for other users in the application.
In case your configuration is missing required fields, you can view a list of detected errors instead. Review your configuration and resolve the issues before continuing.
Was this page useful?