
Keycloak Active Directory Integration
Use Azure Active Directory (AAD) to provide a seamless and secure login experience through Single Sign-On (SSO). With SSO, users can access all their applications using one set of credentials. Acting as an identity provider (IdP), AAD enables centralized access and permissions management through AD groups.
Integrating AAD with Keycloak via SAML SSO simplifies user management. When users log in to Ataccama for the first time, Keycloak automatically creates a user record with their email address as the username and their first and last names. This means there is no need to manually create users or assign permissions since permissions are centrally managed in AAD based on AD group membership.
Prerequisites
Ensure the following requirements are met before proceeding:
-
You are familiar with the Keycloak Admin Console and SAML concepts.
-
You have access to the Azure AD portal with permissions to configure enterprise applications.
-
For self-managed deployments, ONE must be hosted with a fully-qualified domain name (FQDN), such as
customer.prod.ataccama.online, typically pointing to a gateway server or load balancer. For Ataccama-hosted deployments, this is already configured. -
ONE is registered as an application in the Azure AD Enterprise applications section using the FQDN.
-
AD groups (with appropriate user membership) must be associated with the registered AD application.
-
Keycloak roles must be created to map to AD groups.
Connect Keycloak to AAD
Prepare the Keycloak realm for SAML integration
-
Log in to the Keycloak Admin Console.
-
Select the target realm (for example,
Ataccamaone). -
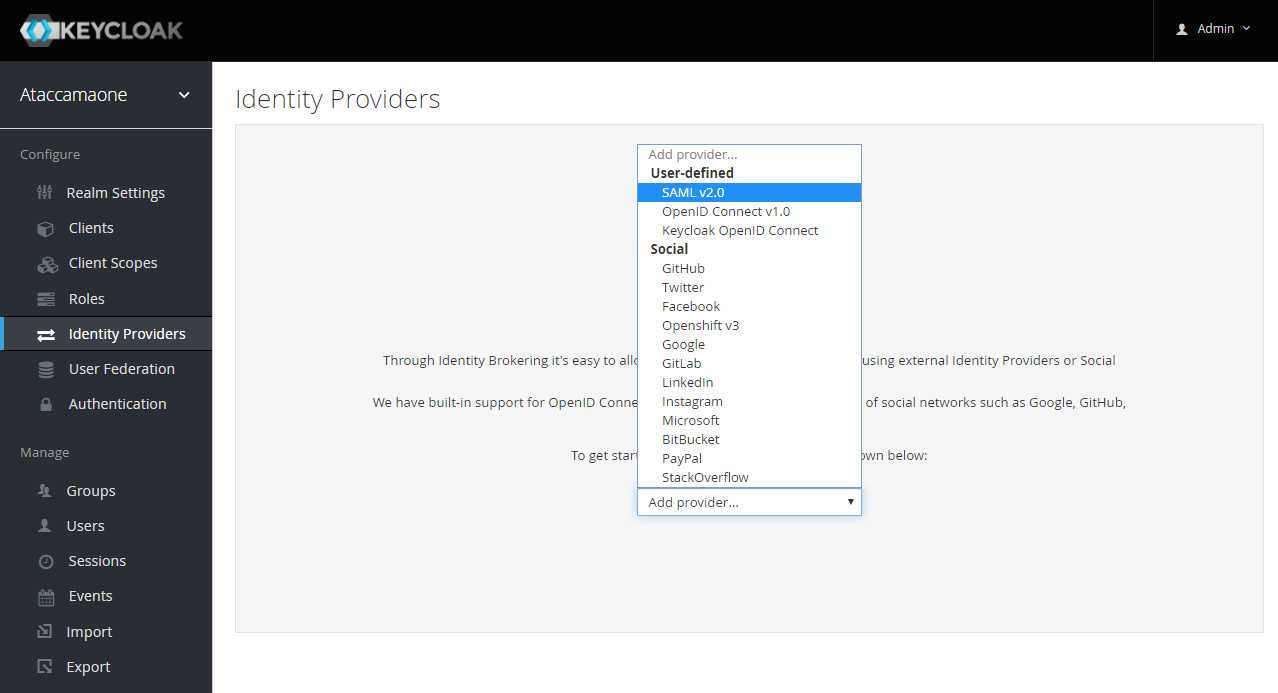
Navigate to Identity Providers in the left-side menu.
-
Select SAML v2.0 from the available options.
-
On the Add SAML provider screen, configure the following:
-
Redirect URI: Use the generated URI (for example,
https://ataccama.customer.com/auth/realms/ataccamaone/broker/saml/endpoint). -
Alias:
saml. -
Display Name: Optional name visible on the Ataccama login page.
-
Complete other required fields according to your AAD setup.
-
-
Keep the page open to complete the next steps without saving changes.
|
Provide your Identity and Access Management (IAM) team with the following details to complete the setup:
The IAM team should provide an XML file with the Identity Provider metadata for the next steps. |
Configure Azure AD
-
Log in to the Azure AD portal.
-
Navigate to Enterprise applications and select the application registered for Keycloak integration.
-
Go to Manage > Single sign-on > User Attributes & Claims section.
-
Add a Group Claim (if not already present) to pass group membership information to Keycloak.
-
In the Group Claim Settings, verify and adjust the following:
-
Source Attribute: Set to
user.assignedgroups. -
Claim Name: Must match the expected field in Keycloak (for example,
groups).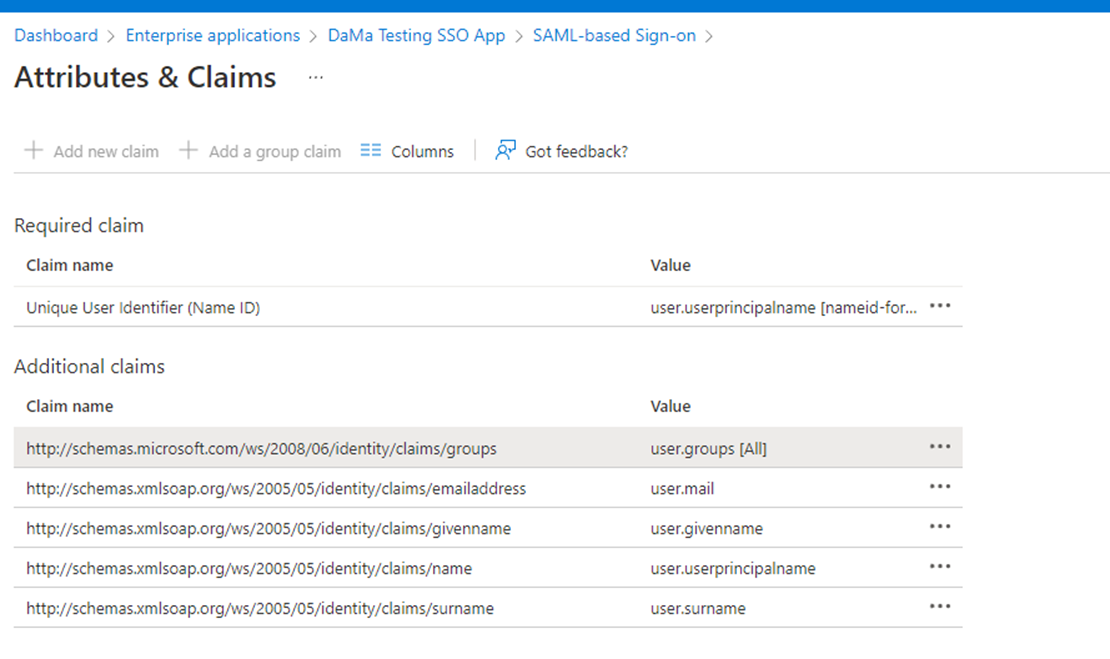
-
-
Save the changes.
Import Identity Provider metadata to Keycloak
-
Return to the Add SAML provider page in the Keycloak Admin Console.
-
In the SAML entity descriptor field, paste the metadata link provided by your IAM team.
-
Expand Show metadata. If the format is correct, Single Sign-On Service URL and other fields should be populated automatically. If they are not, refer to the Testing and troubleshooting section for possible solutions.
-
Save the configuration.
Single sign-on configuration
-
Ensure the Ataccamaone realm is selected.
-
Under Identity Providers, select the name of the previously created identity provider.

-
In Advanced Properties, set the First login flow field to the
first broker loginflow.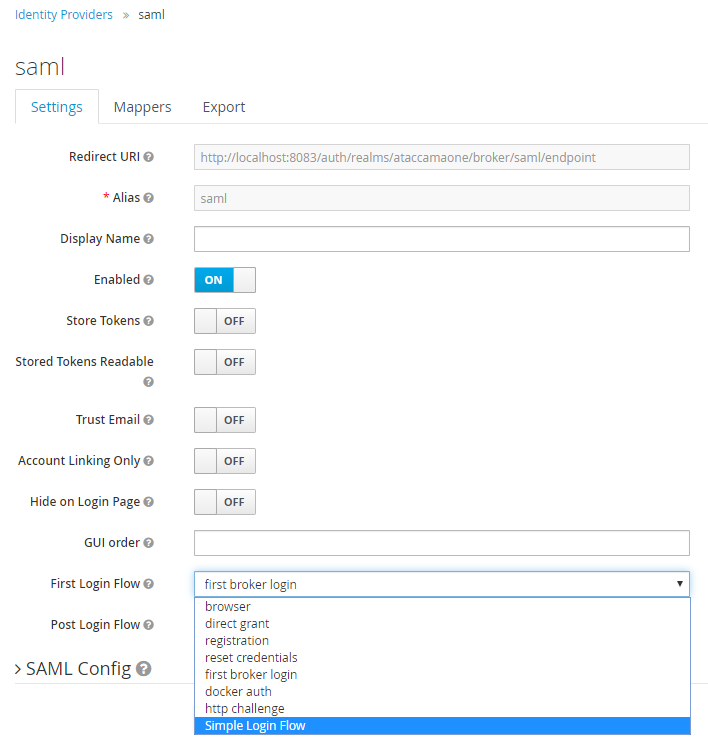
-
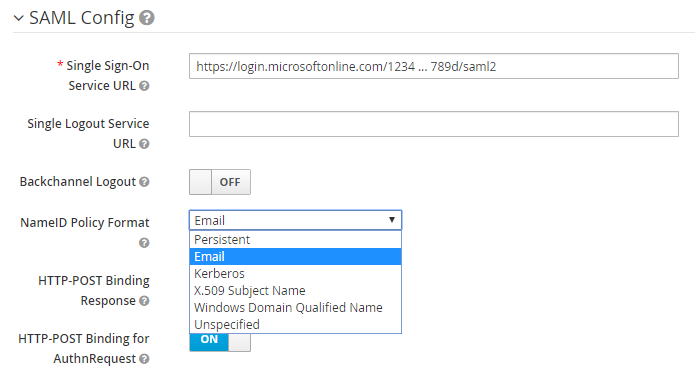
In SAML Config, set NameID Policy Format to Email.
-
Save the configuration.
Configure admin SSO access to Keycloak
We recommend configuring additional admin-level SSO access to Keycloak. This allows platform administrators to access the Keycloak Admin Console with their individual accounts instead of shared credentials, ensuring their actions are auditable. For instructions, see Admin Access to Keycloak via SSO.
Map user attributes and groups
To import user details (for example, name, email, and group memberships), configure attribute mappers:
-
Navigate to Identity Providers in the Keycloak Admin Console.
-
Select the created identity provider (for example,
saml) and go to the Mappers tab.
-
Create mappers for the required attributes, with Attribute Importer selected as the Mapper Type:
-
Last name: Map Attribute name
http://schemas.xmlsoap.org/ws/2005/05/identity/claims/surnameto User attribute namelastName.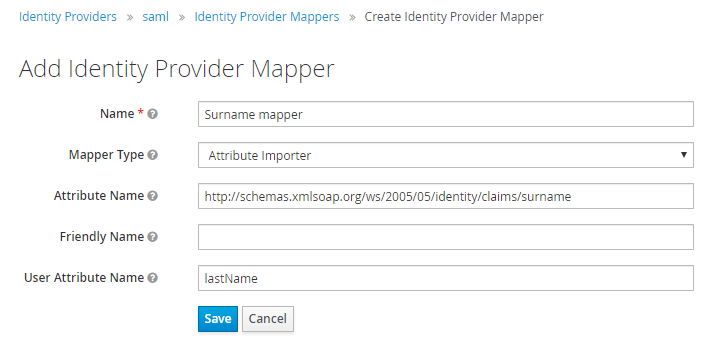
-
First name: Map Attribute name
http://schemas.xmlsoap.org/ws/2005/05/identity/claims/givennameto User attribute namefirstName.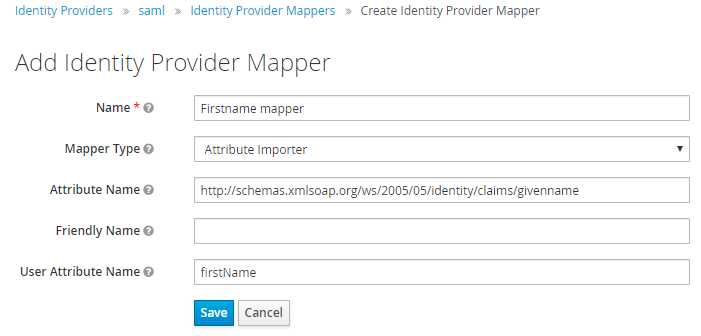
-
Email: Map Attribute name
http://schemas.xmlsoap.org/ws/2005/05/identity/claims/emailaddressto User attribute nameemail.The value of the Attribute Name must match the name of the attribute provided in the Azure AD claims. To identify the correct attribute:
-
Review the example XML where claims are listed under the
<fed:ClaimTypesOffered>section. -
These attributes might not always be included in the security handshake.
For confirmation, refer to the Debug the SAML response section to retrieve and decode the claims returned during the login process.
Use camel case for User Attribute Names (for example, firstName). -
-
-
Save the mappers and repeat the steps for additional attributes as required.
Map AD groups to Keycloak roles
| For information about mappers for identity providers, see the Keycloak Admin REST API documentation. |
To centrally manage permissions, map Azure AD groups to Keycloak roles:
|
To ensure proper permissions and role alignment:
|
-
Navigate to Identity Provider > Identity Provider Mappers in the Keycloak Admin Console.
-
Identify the claim representing groups from Azure AD. For example:
<Attribute Name="http://schemas.microsoft.com/ws/2008/06/identity/claims/groups"><AttributeValue>a8dfc3d4-c0c3-48f1-9d8e-157c645ef26e</AttributeValue></Attribute> -
Use SAML Attribute to Role mappers to link groups to roles:
-
Attribute name:
http://schemas.microsoft.com/ws/2008/06/identity/claims/groups. -
Attribute value: The group object ID from Azure AD.
-
Role: The corresponding Keycloak role.
-
-
Save the mappers.
-
Repeat these steps for additional groups if needed.
Testing and troubleshooting
Log in as a test user
To validate the configuration, log in as a new or test user in a known AD group. Confirm the following:
-
The AAD login option appears on the ONE login page.
-
You can log in successfully.
-
The test user is listed in Keycloak Admin Console under Users.
-
Roles in Keycloak match the user’s AD group memberships.
Common issues
If there are issues with logging in or users do not receive proper roles, check the following:
-
Users are set up correctly in Azure AD and belong to the appropriate AD groups.
-
AD groups are correctly linked to the application in the Enterprise applications section of the AAD Admin Console.
-
User attributes and roles are mapped properly in Keycloak.
Debug the SAML response
|
Enable debug logging in Keycloak to capture detailed error messages and diagnose issues effectively. If the common issues listed previously do not resolve your problem, examine the SAML response sent from AAD to Keycloak. This should help confirm whether Keycloak is receiving the necessary attributes. Missing or incorrect attributes typically indicate an issue with the AAD configuration. If all attributes are correctly sent, the issue likely lies in the Keycloak setup. For more information, refer to Azure AD documentation and Keycloak documentation. |
| This guide uses Google Chrome for demonstration, but similar features are available in other browsers, such as Mozilla Firefox, Safari, Microsoft Edge, and Opera. |
Follow these steps to analyze the SAML response:
-
Log in to the Keycloak Admin Console.
-
Ensure the test user does not already have a record in Keycloak. If a record exists, note the roles, delete the record, and proceed.
-
Open an Incognito window in Google Chrome (Ctrl+Shift+N or Cmd+Option+N).
-
Open Developer Tools (Ctrl+Shift+J or Cmd+Option+J).
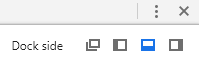
For better usability, reposition the developer console to the bottom of the screen: in the three dots menu in the Developer Tools interface, select the third Dock Side option.
-
In the console settings (the gear icon), ensure the Preserve Log option is selected.
-
Attempt to log in to Ataccama via the SAML button (for example,
https://ataccama.customer.com). -
Locate the Azure AD response containing the
SAMLResponsein the console.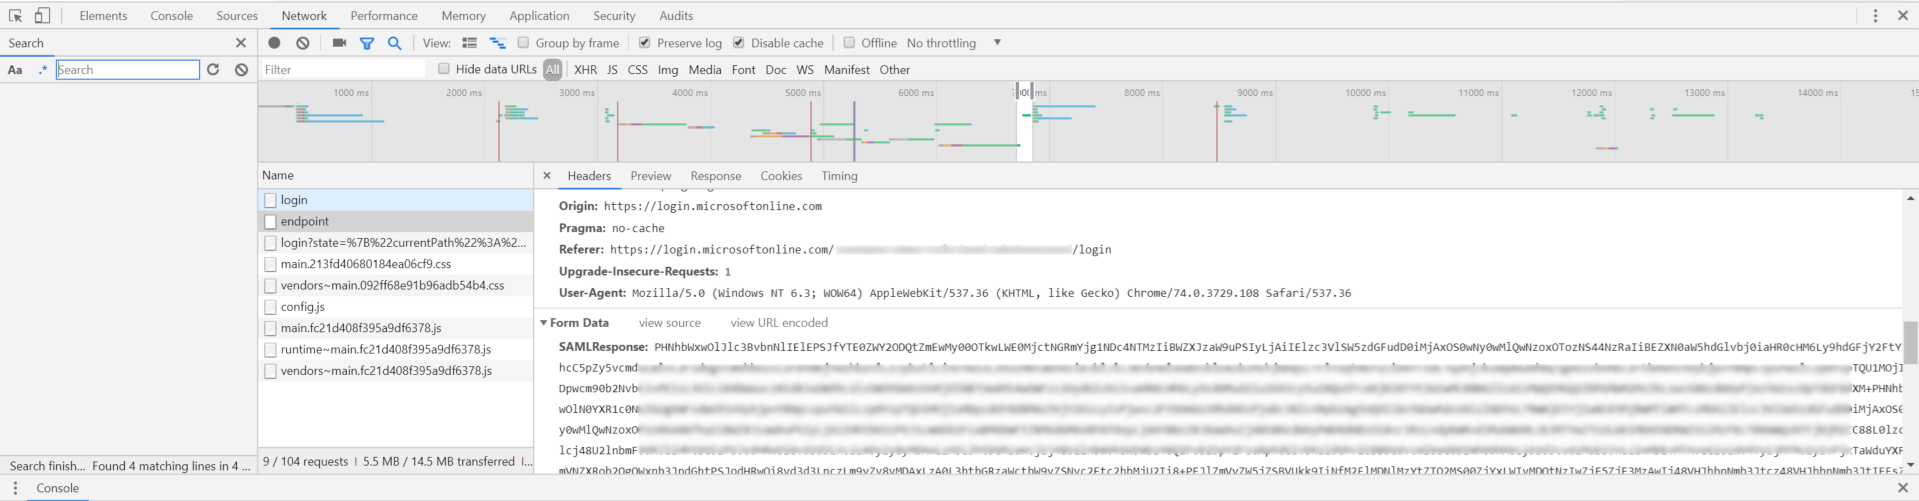
-
Copy the full
SAMLResponse(for example, starting withPHNhbWxwOlJlc3BvbnNlIElEPSJfYTE0ZWY2ODQtZmEwMy00OT) and decode it using an online tool such as SAMLTool decoder.The decoded XML should resemble the following:
Example SAML Response
<?xml version="1.0" encoding="UTF-8"?>
<samlp:Response xmlns:samlp="urn:oasis:names:tc:SAML:2.0:protocol" ID="_a14ef684-fa03-4990-a427-4dfb85478533" Version="2.0" IssueInstant="2019-07-02T07:19:35.874Z" Destination="https://ataccama.customer.com/auth/realms/ataccamaone/broker/saml/endpoint" InResponseTo="ID_9338c443-1ecd-4f6f-8a24-4622ded87ca7">
   <Issuer xmlns="urn:oasis:names:tc:SAML:2.0:assertion">https://sts.windows.net/97160e56-eb00-44fe-b31d-0d6d351c636d/</Issuer>
   <samlp:Status>
      <samlp:StatusCode Value="urn:oasis:names:tc:SAML:2.0:status:Success" />
   </samlp:Status>
   <Assertion xmlns="urn:oasis:names:tc:SAML:2.0:assertion" ID="_3ae03e36-e461-4f61-b204-720f19f17300" IssueInstant="2019-07-02T07:19:35.858Z" Version="2.0">
      <Issuer>https://sts.windows.net/97160e56-eb00-44fe-b31d-0d6d351c636d/</Issuer>
      <Signature xmlns="http://www.w3.org/2000/09/xmldsig#">
         <SignedInfo>
            <CanonicalizationMethod Algorithm="http://www.w3.org/2001/10/xml-exc-c14n#" />
            <SignatureMethod Algorithm="http://www.w3.org/2001/04/xmldsig-more#rsa-sha256" />
            <Reference URI="#_3ae03e36-e461-4f61-b204-720f19f17300">
               <Transforms>
                  <Transform Algorithm="http://www.w3.org/2000/09/xmldsig#enveloped-signature" />
                  <Transform Algorithm="http://www.w3.org/2001/10/xml-exc-c14n#" />
               </Transforms>
               <DigestMethod Algorithm="http://www.w3.org/2001/04/xmlenc#sha256" />
               <DigestValue>FnfGJo8O5APMB4PmFvtZTB576PLZIeb9UVpjblYU7Kk=</DigestValue>
            </Reference>
         </SignedInfo>
         <SignatureValue>J9jhAHU4OH5UygNPVA…VmpGpZusSoCrRxJH6ysswQ==</SignatureValue>
         <KeyInfo>
            <X509Data>
<X509Certificate>MIIC8DCCAdigAwIB…r645jGSdHxtK</X509Certificate>
            </X509Data>
         </KeyInfo>
      </Signature>
      <Subject>
         <NameID Format="urn:oasis:names:tc:SAML:1.1:nameid-format:emailAddress">adrian.anderson@somewhere.com</NameID>
         <SubjectConfirmation Method="urn:oasis:names:tc:SAML:2.0:cm:bearer">
            <SubjectConfirmationData InResponseTo="ID_1234…7ca7" NotOnOrAfter="2019-07-02T07:24:35.858Z" Recipient="https://ataccama.customer.com/auth/realms/ataccamaone/broker/saml/endpoint" />
         </SubjectConfirmation>
      </Subject>
      <Conditions NotBefore="2019-07-02T07:14:35.858Z" NotOnOrAfter="2019-07-02T08:19:35.858Z">
         <AudienceRestriction>
            <Audience>https://ataccama.customer.com/auth/realms/ataccamaone</Audience>
         </AudienceRestriction>
      </Conditions>
      <AttributeStatement>
         <Attribute Name="http://schemas.microsoft.com/identity/claims/tenantid">
            <AttributeValue>1234…636d</AttributeValue>
         </Attribute>
         <Attribute Name="http://schemas.microsoft.com/identity/claims/objectidentifier">
            <AttributeValue>ad00b932-…-69a90d9eadaf</AttributeValue>
         </Attribute>
         <Attribute Name="http://schemas.microsoft.com/identity/claims/displayname">
            <AttributeValue>Anderson, Adrian</AttributeValue>
         </Attribute>
         <Attribute Name="http://schemas.microsoft.com/identity/claims/identityprovider">
            <AttributeValue>https://sts.windows.net/1234...636d/</AttributeValue>
         </Attribute>
         <Attribute Name="http://schemas.microsoft.com/claims/authnmethodsreferences">
            <AttributeValue>http://schemas.microsoft.com/ws/2008/06/identity/authenticationmethod/password</AttributeValue>
            <AttributeValue>http://schemas.microsoft.com/ws/2008/06/identity/authenticationmethod/windows</AttributeValue>
         </Attribute>
         <Attribute Name="http://schemas.xmlsoap.org/ws/2005/05/identity/claims/givenname">
            <AttributeValue>Adrian</AttributeValue>
         </Attribute>
         <Attribute Name="http://schemas.xmlsoap.org/ws/2005/05/identity/claims/surname">
            <AttributeValue>Anderson</AttributeValue>
         </Attribute>
         <Attribute Name="http://schemas.xmlsoap.org/ws/2005/05/identity/claims/emailaddress">
            <AttributeValue>Adrian.Anderson@somewhere.com</AttributeValue>
         </Attribute>
         <Attribute Name="http://schemas.xmlsoap.org/ws/2005/05/identity/claims/name">
            <AttributeValue>Adrian.Anderson@somewhere.com.au</AttributeValue>
         </Attribute>
      </AttributeStatement>
      <AuthnStatement AuthnInstant="2019-07-02T07:19:35.101Z" SessionIndex="_3ae03e36-e461-4f61-b204-720f19f17300">
         <AuthnContext>
            <AuthnContextClassRef>urn:oasis:names:tc:SAML:2.0:ac:classes:Password</AuthnContextClassRef>
         </AuthnContext>
      </AuthnStatement>
   </Assertion>
</samlp:Response>
The attribute names can be clearly seen in the response.
-
Verify that the attributes in the response match the configuration in Keycloak. If attributes are missing or incorrect, update the mappers, delete the user record, and test again.
Set up the first login flow
|
In the default Keycloak version 23.0.7 or later, the first broker login flow is already preconfigured. This section is only relevant if your current Keycloak realm does not include a first broker login flow. If you need to create one, follow the steps described here. |
The First Login Flow ensures that a user record is created in Keycloak when a user logs in to ONE for the first time. The user email address is used as their username, along with their first and last names.
-
In the Keycloak Admin Console, after selecting Ataccamaone realm, navigate to Authentication > Flows.
-
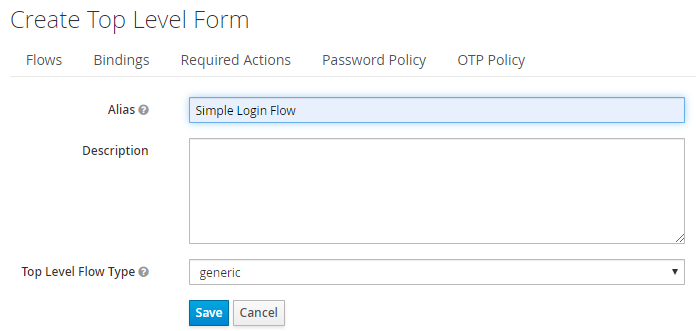
Select Create flow and name it (for example, Simple Login Flow).
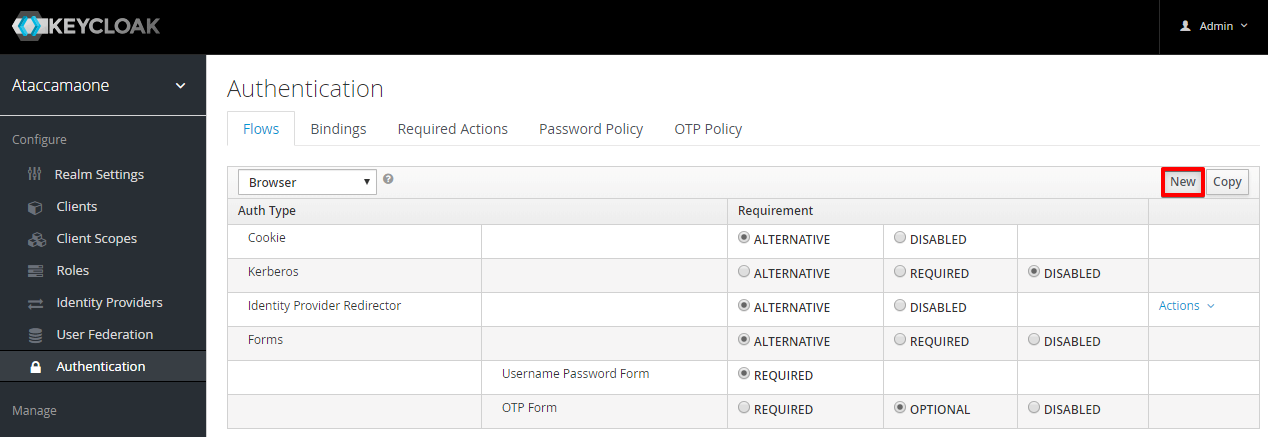
-
Select Create.
-
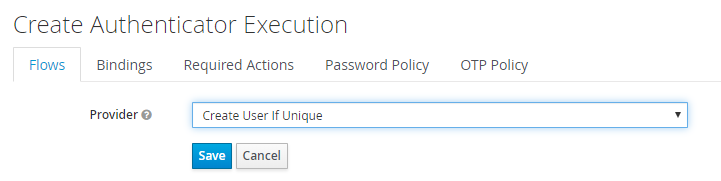
Select the newly created flow and then Add Execution.

-
In the Add Step to Simple Login Flow dialog, choose Create User If Unique and select Add.
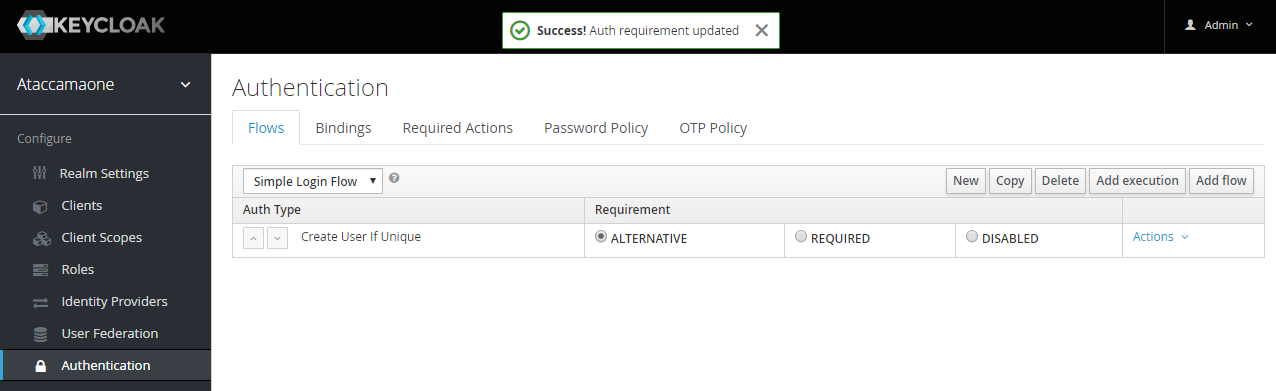
-
Set the requirement to Alternative and save the flow.
-
The next time the user logs in, they should go directly to the platform. This involves the Browser Authentication flow:
-
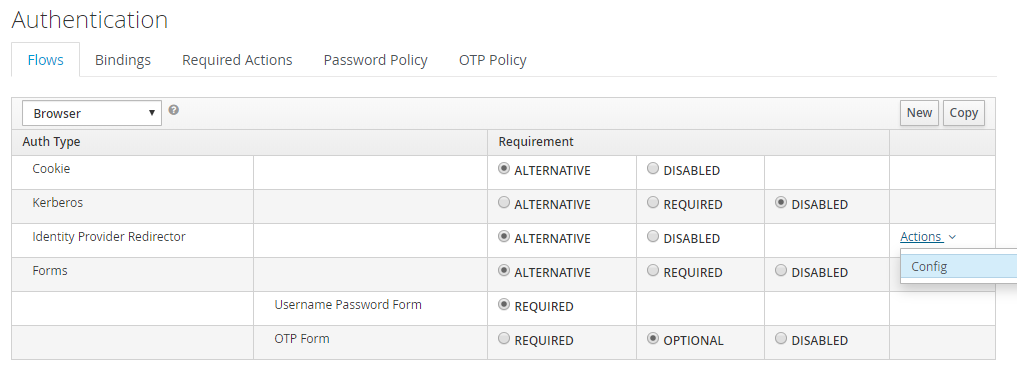
Under Flows, select Browser.
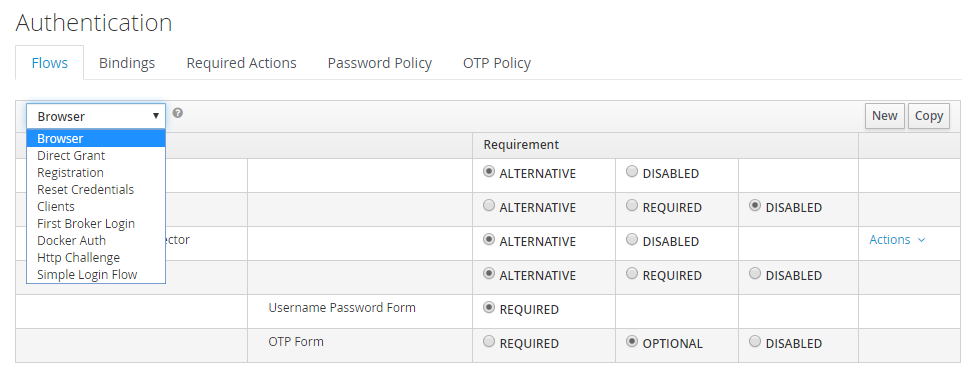
-
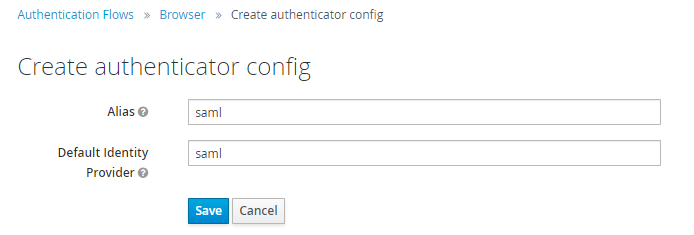
Navigate to the Identity Provider Redirector step and open the settings (the gear icon).
-
In the Identity Provider Redirector Config dialog, enter the identity provider (for example,
saml) in both the Alias and Default Identity Provider fields. -
Save your changes.
-
Was this page useful?