
Connect to Snowflake Using JWT Authentication
The following article describes how to configure Snowflake using JWT authentication.
Prerequisite
Create a Snowflake connection following the instructions in Relational Database Connection, steps Create a source and Add a connection.
Add credentials
Different sets of credentials can be used for different tasks. One set of credentials must be set as default for each connection.
To determine whether you need to configure more than a single set of credentials, see Connection credentials.
-
Select Add Credentials.
-
In Credentials type, select Username and password.
-
Provide the following:
-
Username: The username for the data source.
-
Password: Enter any value. While the password isn’t used to connect to Snowflake, the credentials cannot be saved if the field is left empty.
-
-
If you want to use this set of credentials by default when connecting to the data source, select Set as default.
See also Connection credentials.
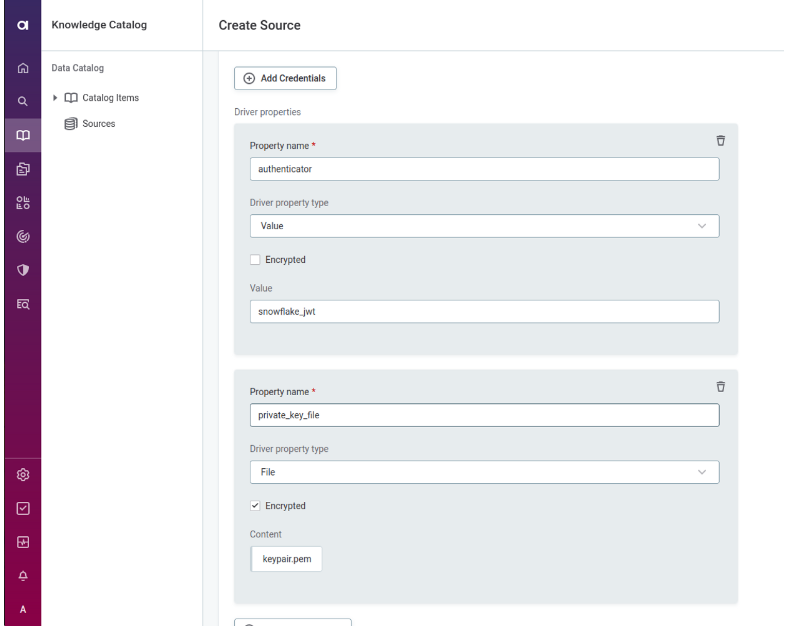
Add driver properties
Alternatively, you can set additional driver properties as parameters in the JDBC connection string when setting up the connection.
For example, &authenticator=snowflake_jwt.
-
Select Add Driver Property.
-
Provide the following:
-
Driver property name:
authenticator. -
Driver property type:
Value. -
Value:
snowflake_jwt.
-
-
Select Add Driver Property.
-
Provide the following:
-
Driver property name:
private_key_file. -
Driver property type:
File. -
Encrypted: Select this option.
-
In Content, upload your private key.
-
Test the connection
To test and verify whether the data source connection has been correctly configured, select Test Connection.
If the connection is successful, continue with the following step. Otherwise, verify that your configuration is correct and that the data source is running.
Save and publish
Once you have configured your connection, save and publish your changes. If you provided all the required information, the connection is now available for other users in the application.
In case your configuration is missing required fields, you can view a list of detected errors instead. Review your configuration and resolve the issues before continuing.
Next steps
You can now browse and profile assets from your connection.
In Data Catalog > Sources, find and open the source you just configured. Switch to the Connections tab and select Document. Alternatively, opt for Import or Discover documentation flow.
Or, to import or profile only some assets, select Browse on the Connections tab. Choose the assets you want to analyze and then the appropriate profiling option.
Was this page useful?