
Standalone Lineage Scanner
| This guide is intended for admin users. |
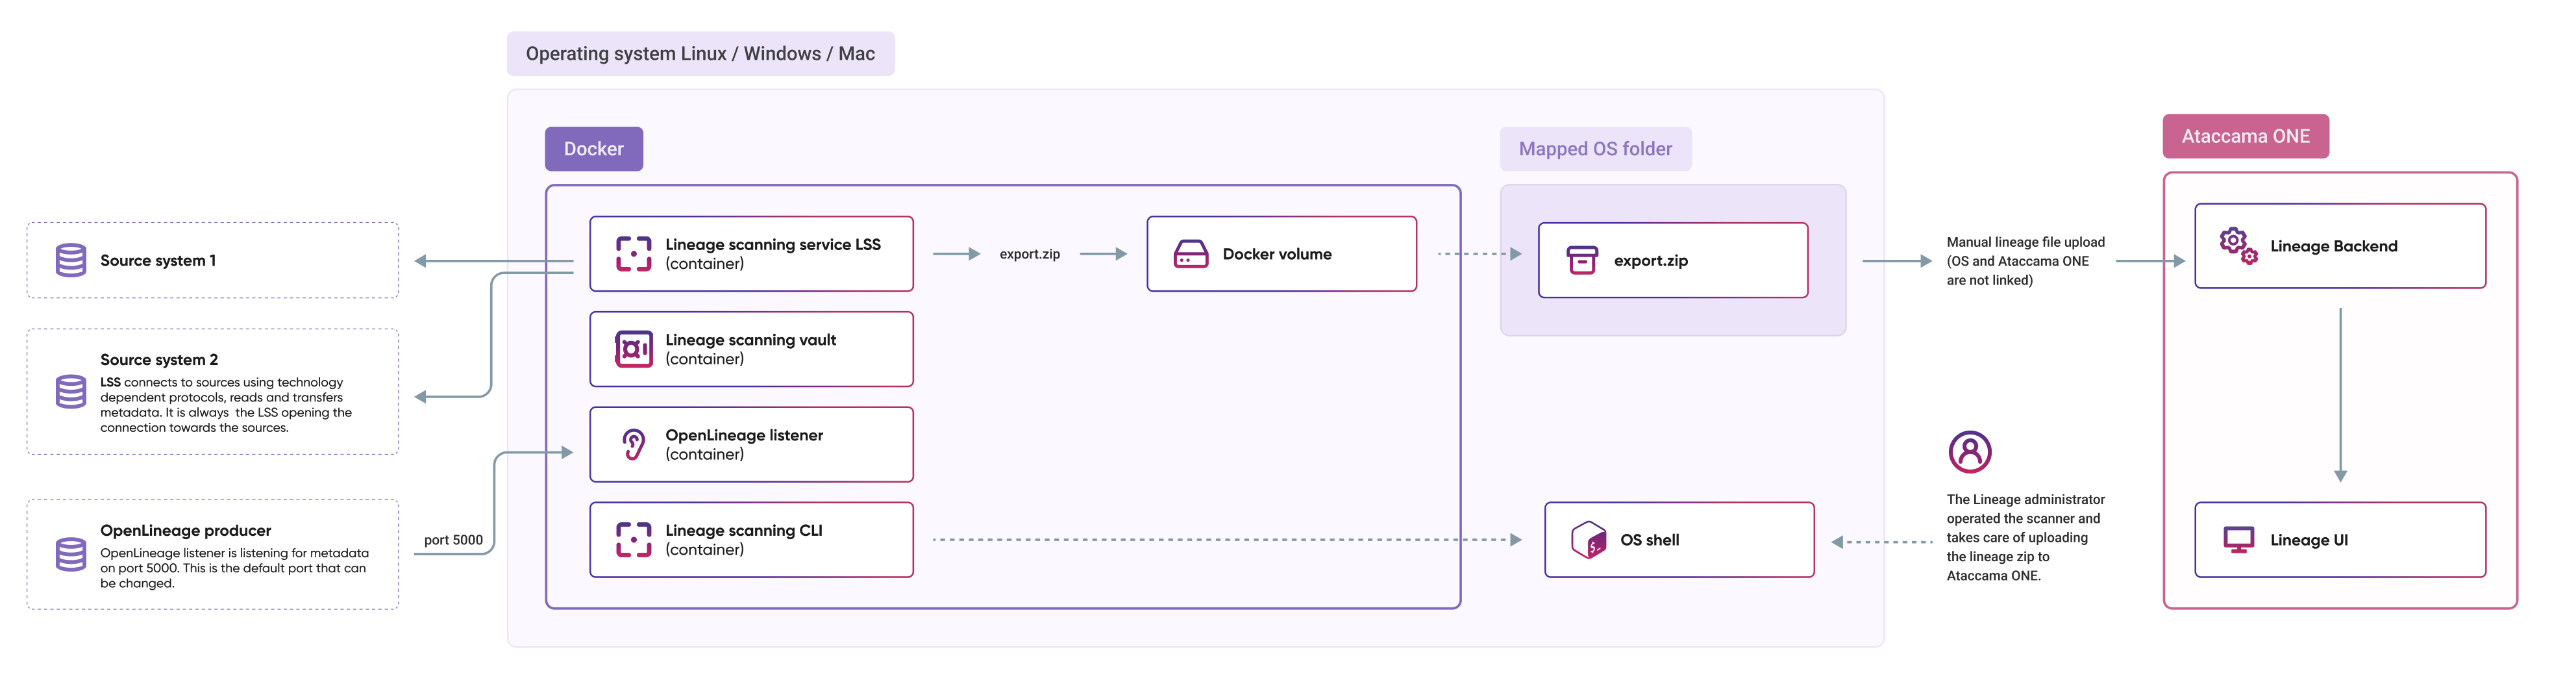
Deployment architecture
The Ataccama standalone lineage scanner is deployed as an independent application using Docker Compose. One of the most important security aspects of this solution is ensuring that the hosting environment of the Docker Compose service is secured at both the OS and networking levels.
System requirements
-
Operating system: Linux, macOS, or Windows.
-
Minimum system requirements:
-
Disk space: 10 GB
-
RAM: 4 GB
-
CPU cores: 2
-
-
Docker Compose: Version 2.32.0 or higher must be installed on the OS.
-
To check your Docker Compose version, run:
docker-compose --versionor:
docker info
-
As an alternative to Docker Compose, you can use Podman running in Docker compatibility mode.
| When installing on Windows, you need to use a Bash terminal. We recommend using Git Bash, which comes with the Git client. |
Install the scanner
Prerequisites
To install and run the scanner, you need to have permissions to run Docker. To verify this, run:
docker image lsThe command should return no errors.
Download and install
-
Depending on your OS, start the following:
-
Linux: Start the Docker daemon.
-
Windows or macOS: Start the Docker Desktop.
-
-
Open the terminal and change your current directory to the folder containing the downloaded installation file.
-
Make the file executable by running
chmod 775:chmod 775 <installation file> -
Run the installer:
./lineage-scanners-installer.sh -
When prompted, choose whether you want to use the current directory for installation. If you select No, enter the target installation directory.
In the following steps, we’ll refer to this folder as
<install>.
Installer arguments
Arguments for the installer script need an extra double hyphen (--) before the argument list:
./lineage-scanners-installer.sh -- --use-podman --install-dir=/path/to/dirThe following installer arguments are supported:
Standard installation:
-
Enforce Podman runtime
-
--use-podman
-
-
Enforce Docker runtime
-
--use-docker
-
-
Specify target installation directory (absolute path is required). Creates subdirectories if necessary.
-
--install-dir=/path/to/dir
-
-
Force unique Docker project and container names for this installation
-
--use-unique-name
-
Marquez bundle:
-
Specify the Marquez HTTP port.
5005by default.-
--marquez-port=5006
-
-
Enable Marquez HTTPS communication and specify a host value to be used in the generated TLS certificate.
-
--marquez-https-host=marquez.internal.example.com(a DNS name or an IP address)
-
-
Specify the Marquez HTTPS port (only if HTTPS is enabled).
5443by default.-
--marquez-https-port=443
-
Rocket Software integration:
-
Enable Rocket Software integration and specify a custom gateway address
-
--rocket-software-gateway-url=http://172.25.128.1:8085
-
-
Enable Rocket Software integration with the default address
172.18.0.1:8085-
--enable-rocket-software
-
Start the lineage scanner service
-
Open the terminal and change your current directory to
<install>/bin. -
Execute the following command:
./lineage-scanners system start -
Check whether the service is running:
./lineage-scanners system statusIf you receive a similar message, it is safe to ignore it and proceed with the installation:
! lss The requested image's platform (linux/amd64) does not match the detected host platform (linux/arm64/v8) and no specific platform was requested 0.0s
Configure and run scans
Configure a scan plan
-
Place your scan plan in the
<install>/user-data/scan-plansfolder. The plan must be in valid JSON format.If you are deploying on Windows, restart the service after you have copied the scan plan or modified an existing one.
-
Open the terminal and change your current directory to
<install>/bin. -
Run the following command to check if your scan plan was successfully registered:
./lineage-scanners plan ls
Configure scan plan secrets
We recommend encrypting sensitive information such as passwords, secrets, and other credentials. For this purpose, in the JSON scan plan file, you can use placeholders for secrets that ensure actual values are safely stored and encrypted in a key vault service.
The following key vaults are supported:
- Internal key vault
-
A placeholder for an internal key vault secret has the syntax
@@ref:ata:[<secret-name>]. These secrets are stored in the lineage service key vault.We will refer to these secrets as ATA secrets.
- Azure Key Vault
-
A placeholder for an Azure Key Vault secret has the syntax
@@ref:akv:[<secret-name>]. These secrets are stored in the Azure Key Vault.We will refer to these secrets as AKV secrets. The
<secret-name>must match the Azure Key Vault secret name.
Create an ATA secret
If you use a secret in your scan plan, you need to set its value before you run the scan.
The following example shows how an ATA secret named powerbi_client_secret is used in a JSON file.
"clientSecret" : "@@ref:ata:[powerbi_client_secret]"Secrets entered from command line
To create a secret directly from the command line, use the following command.
The maximum length for the secret is 256 characters. For longer secrets, see File secrets.
When prompted, provide the actual value.
./lineage-scanners secret create <secret-name>File secrets
For secrets that are longer than 256 characters or for key file secrets, use the following command.
The <secret-file> parameter refers to the filename that contains the secret.
This file must be located in the <install>/user-data/ folder.
./lineage-scanners secret create <secret-name> -f <secret-file>Once the secret is added, you can delete the file from the filesystem.
The <secret-name> is a unique identifier of the secret across all scan plans.
The same secret can therefore be used in multiple scan plans.
|
Remove an ATA secret
To remove a secret, use the following command:
./lineage-scanners secret rm <secret-name>Update an ATA secret
To update a secret, remove the secret and then recreate it.
Configure Azure Key Vault
Configure Azure Key Vault only if your scan plans use AKV secrets (@@ref:akv:[secret-name] placeholders).
|
Configure the connection and credentials to your Azure Key Vault by creating the following ATA secrets. Once these secrets are configured correctly and the Azure Key Vault can be accessed from the standalone scanner location, the AKV secrets used in the JSON scan plan files will be retrieved from this Azure Key Vault.
-
The full URL to your Azure Key Vault instance:
./lineage-scanners secret create lss.akv.url -
The application (client) ID of the Azure AD Service Principal (or managed identity) you’re using to authenticate.
./lineage-scanners secret create lss.akv.clientId -
The password or secret associated with the client ID.
./lineage-scanners secret create lss.akv.clientSecret -
The Azure Active Directory tenant ID that your app and Key Vault belong to.
./lineage-scanners secret create lss.akv.tenantId
Run a scan
-
Open the terminal and change your current directory to
<install>/bin. -
Run the scan using the following command.
Provide the scan plan name without the .jsonextension../lineage-scanners plan exec <scan-plan-name>The scan should now be in progress and you should see the scan
<scan-run-id>and status. The<scan-run-id>is a unique identifier of the scan. For a list of possible scan statuses, see Scan statuses.Scan run id: 0295650d-7302-43ec-9d7e-8fa799cf7ca7 Scan run status: CREATED -
To check if the scan successfully finished, run the following command:
./lineage-scanners scanrun status <scan-run-id>
Scan statuses
A scan can be in one of the following statuses:
-
CREATED: The status assigned immediately after the scan is initiated.
-
RUNNING: The scan is currently running.
-
FINISHED: The scan has completed successfully.
-
FAILED: The scan has failed.
-
REJECTED: The scan was not initiated because the scan plan JSON file is corrupt or a secret value used in the scan plan is undefined.
Next steps
Once you generate the lineage file, it needs to be uploaded to Ataccama ONE. See Import Lineage.
Upgrade the scanner
Before upgrading the standalone lineage scanner, stop the lineage service.
./lineage-scanners system shutdownOnce the service is stopped, install the service again using a new software version. Specify the same target directory that the existing installation uses — the upgrade procedure preserves your setup such as the edge registration or scan plans.
Uninstall the scanner
Uninstalling the lineage scanner completely removes the scanner from the system, including scan plans, secrets, logs, and scan results.
If you want to keep the scan plans, create a backup of the folder <install>/user-data/scan-plans.
To remove the lineage scanner:
-
Open the terminal and stop the lineage scanner:
./lineage-scanners system shutdown -
Change the current directory to the following one:
cd compose -
Execute the lineage scanner environment variables file:
source ../bin/lineage-scanners.env -
Stop and remove the Docker containers and associated files:
docker compose down --rmi local -v -
Delete the
<install>folder.
Troubleshooting
Scan failure
In case the scan finished with an error, check the content of the <install>/user-data/work-area/scan-runs/<scan-run-id> folder.
To find out more about the folder structure and learn what to look for, see Scanner Output File Structure.
In the case there is an issue with the lineage service instead, check the log information in the <install>/logs/lss folder.
Vault service failure: Container lineage-scanners-vault-1 exited (1)
When the lineage scanner vault service fails to start and there is an error message Error initializing core: Failed to lock memory: cannot allocate memory in the service log, modify the /etc/docker/daemon.json and add a "memlock" section to "default-ulimits" as follows:
{
  "default-ulimits": {
    "memlock": {
      "Name": "memlock",
      "Hard": -1,
      "Soft": -1
    }
  },
  "log-opts": {
    "max-size": "100m"
  }
}
After modifying the file, perform these steps:
-
Shut down the lineage service:
./lineage-scanners system shutdown -
Restart the Docker service:
sudo systemctl restart docker -
Start the lineage service again:
./lineage-scanners system start
Out of memory error
If you encounter an out of memory error while scanning a large data source, check the file <install>/compose/lss/config/application-lineage-scanners.yaml
The file contains jvm-args with content such as:
jvm-args: "-Xms2048m -Xmx2048m -XX:+ExitOnOutOfMemoryError --add-opens=java.base/java.nio=org.apache.arrow.memory.core,ALL-UNNAMED "Increase the Xmx parameter as allowed by the virtual machine you are using.
After modifying the file, restart the lineage scanners service using the following commands:
./lineage-scanners system shutdown
./lineage-scanners system start
dbt and OpenLineage local file scan failure
In case a dbt or OpenLineage local file scan fails, this typically occurs because the scanner, which is operating inside the lineage-scanners-lss container, lacks access to the host machine’s entire filesystem.
This is a key consideration when setting up scan plans and their respective paths.
To fix the issue, place your input files in the <install>/user-data folder.
The user-data directory is mapped into the lss container at /opt/ataccama/lineage-scanning/user-data, so the path in the scan plan must use the container path, not the host path.
For a dbt scan, this means:
"file": {
        "path": "/opt/ataccama/lineage-scanning/user-data/dbt_files",
        "manifest": "manifest.json",
        "catalog": "catalog.json"
      }
For an OpenLineage local file scan, this means:
"eventsDirectory": "/opt/ataccama/lineage-scanning/user-data/open_lineage_dir"The path in the scan plan configuration specifies the folder structure that is valid inside the lss container, not that of the host machine.
Marquez bundle for OpenLineage
An extended installer that includes Marquez and OpenSearch in addition to the lineage scanner service is available. This distribution is designed for OpenLineage integrations where you need a local Marquez instance to collect and scan lineage data.
HTTP and HTTPS communication
The Marquez API is exposed to the host over HTTP. To additionally expose it over HTTPS, pass a host at installation time. This host is the name or IP that clients will use to reach Marquez, and it becomes the TLS certificate’s Subject Alternative Name (SAN). See Installer arguments.
Passing the host starts a small Caddy reverse proxy on the private container network alongside Marquez.
Caddy issues and automatically renews a certificate signed by its own internal certificate authority (CA) – there is nothing to generate, install, or rotate.
Because this CA is internal to the installation, clients do not trust it by default: they must either trust Caddy’s CA root or skip certificate verification (for example, curl --insecure).
Such an internally issued certificate is appropriate for internal or trusted networks. Producers that cannot be configured to trust it (for example, managed cloud services) require a certificate from a CA they already trust. Terminate that certificate at your own reverse proxy or load balancer.
Port mapping
By default, Marquez is exposed on port 5005 for HTTP communication, and port 5443 for HTTPS if HTTPS is enabled.
If a port is already taken, you can remap it during installation.
See Installer arguments.
First startup
Marquez and OpenSearch container images are not included in the installer.
They are downloaded automatically when you first run the command lineage-scanners system start and reused afterward.
Import lineage to Marquez
After the lineage scanner service starts, import your lineage data to Marquez by sending a POST request with raw JSON body:
POST http://localhost:5005/api/v1/lineageTo verify the import succeeded:
GET http://localhost:5005/api/v1/events/lineageUsage in scan plans
OpenLineage scan plans automatically use bundled Marquez when apiUrl specification is not provided in the plan definition.
For full scan plan configuration options, see OpenLineage Lineage Scanner.
Was this page useful?