
Okta OIDC Integration with Impersonation
This guide is focused on Okta and Snowflake but can also be applied to other identity providers and data sources that adhere to standards like OpenID Connect and OAuth 2.0.
| Scheduling monitoring projects is not supported when using Okta OIDC Integration. For more information, see Align Keycloak SSO timeouts with Okta and Monitoring projects. |
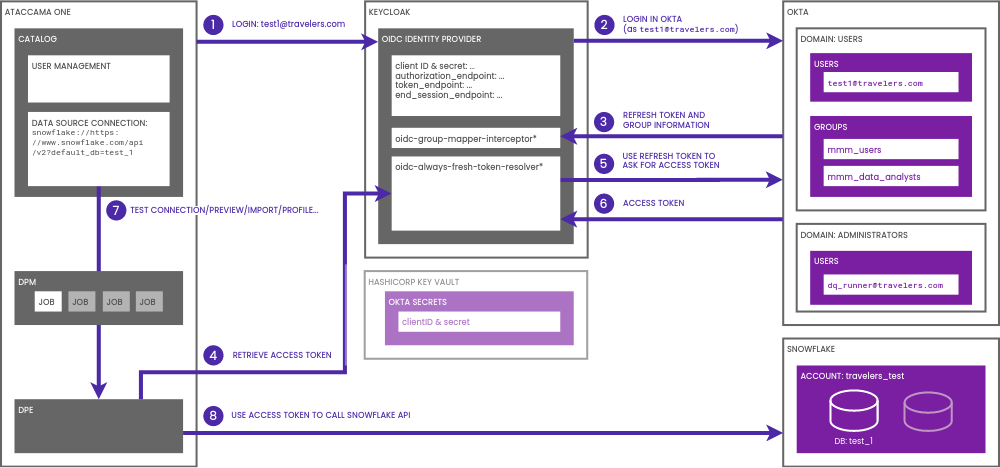
With this setup, users can log into ONE via an external OIDC identity provider (such as Okta) and utilize their identity when accessing a data source (like Snowflake).
Before you start
In order for Keycloak to obtain impersonated tokens from the identity provider, it must run with the KC_EXTENSION_ATACCAMA_ENABLED=true environment property.
Create an application in Okta
-
Navigate to the Okta admin console (for example,
https://<your_okta_account_id>-admin.okta.com). -
From the left-hand menu, select Applications and then Applications from the submenu.
-
Select Create App Integration.
-
Select OIDC - OpenID Connect > Web Application.
-
In General Settings, enable Refresh Token under Client acting on behalf of a user.
-
In Sign-in redirect URIs, add the redirect URI from the Keycloak identity provider (for example,,
https://<your_keycloak_domain>/auth/realms/ataccamaone/broker/<idp_alias>/endpoint). -
In Sign-out redirect URIs, add the redirect URI and append
/logout_responseto it (for example,https://<your_keycloak_domain>/auth/realms/ataccamaone/broker/<idp_alias>/endpoint/logout_response). -
Select Save.
The next screen displays important information for the Keycloak identity provider configuration, including Client ID and Client secret.
-
Navigate to Assignments panel and add the users who can log in.
Create Authorization Server in Okta
| Ensure that the Okta refresh token validity rules are aligned with Keycloak SSO timeouts. |
-
Log in to the Okta admin console (for example,
https://<your_okta_account_id>-admin.okta.com). -
From the left-hand menu, select Security and then API from the submenu.
-
Select Add Authorization Server.
-
In the Audience field, enter the URL of your data source (for example,
https://<your_snowflake_id>.<region>.azure.snowflakecomputing.com). -
On the Settings tab, select the Metadata URI link and collect the following:
-
authorization_endpoint: For example,https://<your_okta_account_id>/oauth2/<auth_server_id>/v1/authorize. -
token_endpoint: For example,https://<your_okta_account_id>/oauth2/<auth_server_id>/v1/token. -
end_session_endpoint: For example,https://<your_okta_account_id>/oauth2/<auth_server_id>/v1/logout.
-
-
On the Scopes tab, add the following scopes:
-
Mandatory:
openid,offline_access,email,profile. -
Scopes required by your data source (for example,
session:role:DEV_QA,session:role_any). -
Group scope for group-role mapping in Keycloak.
-
-
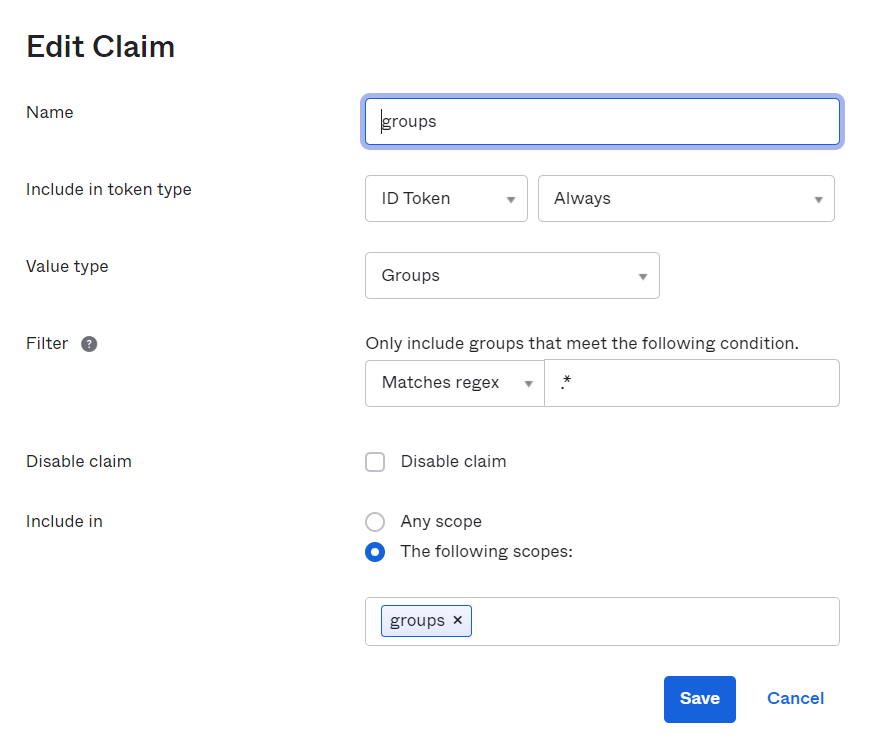
On the Claims tab, add a claim for group-role mapping and edit the settings as needed.
-
On the Access Policies tab, select Add Policy > Add Rule and configure your access and refresh token validity rules.
Configure an identity provider in Keycloak for Okta
| As an example of what the identity provider configuration should look like, see the following JSON file: Sample identity provider. |
-
Log in to Keycloak.
-
Open the realm in which you want to configure the identity provider.
-
Go to Identity Providers.
-
Select Add Provider.
-
From the dropdown list select OpenID Connect v1.0 as the provider type.
-
On the Add identity provider screen that opens, do the following:
-
Set the Alias to a value that identifies the identity provider. This alias will be used in the redirect URL.
-
You can also add a Display Name, which will be visible on the Ataccama Login page.
-
-
On the Settings tab, select Store Tokens and Stored Token Readable.
-
On the Discovery tab, enter the URLs gathered from the Okta authorization server metadata URI:
-
Authorization URL =
authorization_endpoint -
Token URL =
token_endpoint -
Logout URL =
end_session_endpoint
-
-
On the Credentials tab, set Client Authentication to Client Secret Sent as Post.
-
Enter Client ID and Client Secret obtained from the Okta application in the corresponding fields.
-
On the Scopes tab, set Default Scopes to
openid,email,profile,groups,offline_access, and add any additional scopes required for your data source (for example,session:role:DEV_QA,session:role_any). -
Save your changes.
Configure an identity mapper in Keycloak to import groups
-
Log in to Keycloak.
-
Open the realm with which you want to work.
-
Go to Identity Providers.
-
Select the identity provider you configured previously.
-
Open the Mappers tab and select Create.
-
Fill in the details:
-
Set Mapper Type to Claim to Group Mapper (note that you need the Ataccama Keycloak extension for this mapper type).
-
Set Sync Mode Override to Force.
-
Set Claim to groups.
-
Enable Create Groups if Not Exist if you want Keycloak to create any missing groups.
-
-
Save your changes.
Map Okta groups to Keycloak roles
-
Log in to Keycloak.
-
Open the realm with which you want to work.
-
Go to Groups.
-
Select Add Group. Ensure the name matches the name of the user group in Okta.
-
On the Role Mappings tab, assign the appropriate Keycloak (ONE) roles to the group.
-
Save your changes.
Align Keycloak SSO timeouts with Okta
| SSO Session Idle and SSO Session Max values must be aligned with Okta refresh token validity rules. |
-
Log in to Keycloak.
-
Open the realm with which you want to work.
-
Go to Realm Settings.
-
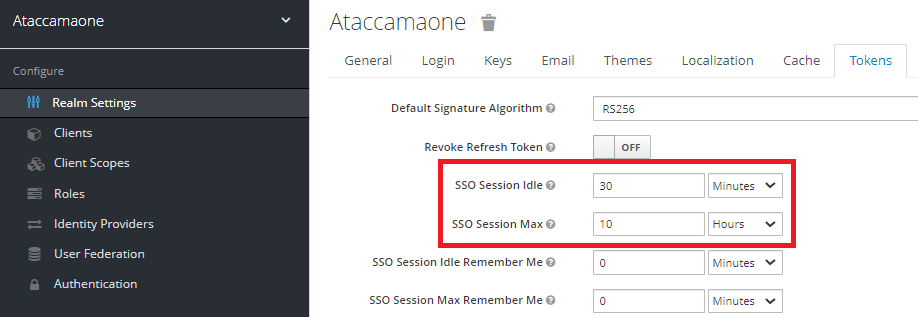
On the Tokens tab, configure the following:
-
Set SSO Session Max value to a value equal to or less than SSO Session Idle value.
-
Set SSO Session Max value plus a reserve time to be less than or equal to the value of Refresh token lifetime setting in Okta.
-
-
Go to the Okta admin console.
-
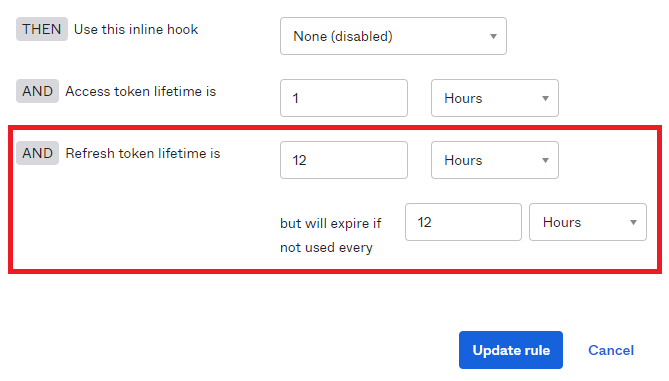
Navigate to Security > API > Authorization server > Access policies > Rule.
-
Set the but will expire if not used every value to a value equal to or less than Refresh token lifetime is setting.
-
Select Update rule to save your changes.
The reserve time should be long enough to account for job preprocessing, which is the time between the last user interaction with ONE and the creation of a JDBC connection in Data Processing.
For example, if Refresh token lifetime in Okta is 12 hours, set the SSO Session Max in Keycloak to 10 hours to provide a reserve time of 2 hours.
Monitoring projects
The previous steps prompt users to log in to ONE again and obtain a new refresh token before the Okta token expires. This prevents authentication issues and ensures uninterrupted access to ONE.
When creating a monitoring project, it runs under the creator’s identity and utilizes their valid refresh token. However, if the refresh token expires at the scheduled execution time, the project fails to run successfully.
To avoid this, refresh the connection or perform other actions with the data source in ONE. This keeps the refresh token valid, ensuring that the monitoring project runs without disruptions.
Was this page useful?