
Azure Private Link for Hybrid DPE
Azure Private Link creates a secure, private connection between your Azure-hosted hybrid Data Processing Engine (DPE) and Ataccama Cloud, routing all traffic through the Azure backbone network.
This guide walks through the setup process, whether you’re working with Ataccama Support or configuring things yourself.
Why use Private Link for hybrid DPEs?
In a hybrid deployment, your DPE runs in your own Azure environment, close to your data sources, while Ataccama Cloud (the control plane) runs in an Ataccama-managed Azure environment. With Private Link, all communication between these components happens within Azure’s private network, which means:
-
Stronger security: Data never touches the public internet, reducing your attack surface.
-
Better data privacy: Sensitive information stays on a private network path.
-
Simpler architecture: No need for complex firewall rules or VPN configurations to secure the connection.
For production deployments handling sensitive data, Private Link is the recommended approach.
Setup options
You can establish Private Link connectivity in three ways:
-
Collaborative setup with Ataccama Support: You provide configuration details (your Azure Subscription ID, Private Endpoint Resource ID), and Ataccama handles the service-side configuration and DPE updates. Recommended if you want guidance through the process or prefer Ataccama to manage the technical details.
-
Self-service setup: You configure everything through the Ataccama Cloud Portal, including registering your subscription, providing endpoint details, and updating your DPE via Helm commands. Recommended if your team is comfortable with Azure networking and wants to move quickly.
-
Hybrid approach: A combined approach, where, for example, you configure connectivity settings, subscription ID, and the Private Endpoint yourself but have Ataccama handle the final DPE update.
Choose the approach that best fits your team’s expertise and preferences.
Key concepts
To effectively set up Private Link, it helps to understand a few key terms.
- Azure Private Link Service (Ataccama side)
-
Allows your Private Endpoint to securely connect to Ataccama Cloud. Sits within the Ataccama Azure environment, often behind an internal load balancer.
- Azure Private Endpoint (your side)
-
A network interface you create in your Azure Virtual Network (VNet) and subnet. It has a private IP address within your VNet and serves as the entry point for your DPE to reach Ataccama’s Private Link Service.
- Hybrid Data Processing Engine
-
The component for running data processing tasks locally. You deploy it in your Azure subscription (for example, a Kubernetes pod), and it initiates outbound connections to Ataccama Cloud via the Private Endpoint.
DPE also connects to Azure Key Vault for credentials and to your local data sources.
- Communication flow and DNS
-
Instead of directly interacting with your Private Endpoint ID, your hybrid DPE uses Fully Qualified Domain Names (FQDNs) that resolve (through your DNS configuration) to the Private Endpoint’s private IP address. Azure then routes this traffic privately to Ataccama Cloud.
The connection is one-directional: the hybrid DPE initiates all communication and the platform makes no inbound calls to your network.
Collaborative setup with Ataccama Support
This section covers the setup process when working with Ataccama Support. For self-service configuration, see Self-service setup.
Phase 1: Provide your Azure Subscription ID
Provide Ataccama Support with the Azure Subscription ID where your DPE is deployed and where you’ll create the Private Endpoint. To find your Subscription ID, see Find your Azure Subscription ID in the Microsoft documentation, or contact your cloud team.
Ataccama uses this ID to allowlist your subscription on the Private Link Service, allowing auto-approval for any Private Endpoints you create.
Phase 2: Create your Private Endpoint
First, Ataccama Support provides you with the Alias and Resource ID of the Private Link Service.
| Typically, this is configured by your network or cloud team. |
-
Create a Private Endpoint in your Azure Portal, as described in the following steps. Alternatively, use infrastructure-as-code tools like Terraform.
-
In your Azure Portal, go to Private Link Center and create a Private Endpoint.
-
Specify a name, your Azure Subscription, Resource Group, and Region. If possible, we recommend using the same service region (or cross-region) as the rest of your environment.
-
Select the Virtual Network and Subnet where the endpoint will reside.
-
On the Resource tab, select Connect to an Azure resource by resource ID or alias and enter the Alias or Resource ID that Ataccama Support shared with you.
-
-
Once you create your Private Endpoint, share the endpoint Resource ID with Ataccama Support.
Ataccama uses this unique ID to filter traffic at the ingress controller, ensuring only connections from your authorized endpoint can access your resources in Ataccama Cloud.
For detailed instructions, see Create a private endpoint in the Microsoft documentation.
Phase 3: Connection approval
Once you create the Private Endpoint, the connection is automatically approved (as your subscription was allowlisted in phase 1). Ataccama then configures the ingress controller in the Kubernetes cluster to recognize your Private Endpoint’s connection ID.
No action is needed on your side in this phase.
Phase 4: DNS configuration
Configure DNS records in your Azure Private DNS Zone (or internal DNS solution) to map the FQDNs for the Data Processing Module (DPM) and ONE Object (MinIO) services to your Private Endpoint’s private IP address. Reach out to your network team for assistance.
Ataccama Support provides the specific hostnames you need to configure.
| Azure can automatically integrate with a Private DNS Zone when creating the Private Endpoint. |
| Until DNS is properly configured, your DPE continues to connect over the public internet even if the endpoint is created and approved. |
Phase 5: DPE reconfiguration
Once DNS is configured, Ataccama updates the DPE configuration to use the private addresses. Or, if you prefer, you can update the configuration files yourself.
You don’t need to wait for the Private Link to be in place before installing DPE. For testing or non-production environments, DPE can initially communicate over the public internet, but it must use Private Link before going into production.
| During platform upgrades, the ingress controller is updated to ensure secure routing of Private Link connections. If your DPE is not upgraded to a version compatible with the platform, jobs fail until DPE is up-to-date. |
Self-service setup
This section covers configuring Azure Private Link through the Ataccama Cloud Portal, which is the Ataccama Cloud administration and configuration interface. For setup with Ataccama Support, see Collaborative setup with Ataccama Support.
Prerequisites
Before you begin, ensure you have:
-
Access to the Ataccama Cloud Portal.
-
Your Azure Subscription ID.
-
Permissions to create Private Endpoints in your Azure subscription.
-
Access to your Azure DNS configuration.
-
Access to your self-managed Kubernetes cluster with:
-
kubectlconfigured and authenticated. -
Helm 3.x installed.
-
Permissions to install and upgrade Helm charts.
-
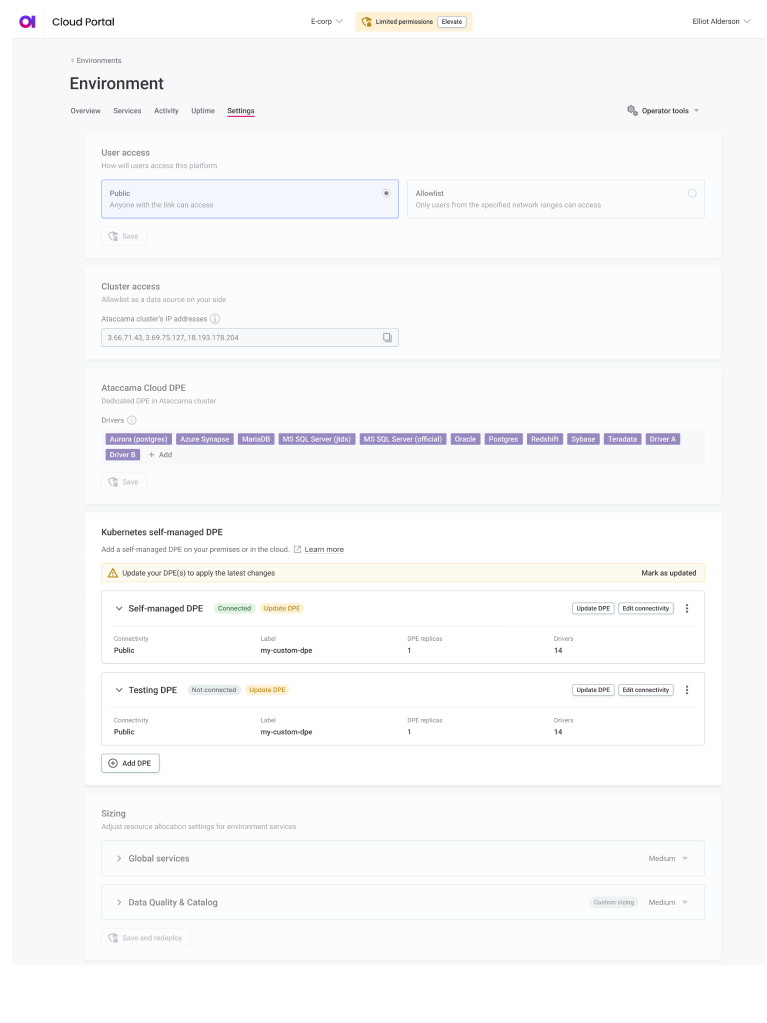
Step 1: Edit connectivity settings
-
In the Ataccama Cloud Portal, select your environment from the list.
-
Go to the Settings tab. This is where all configuration is done on the Ataccama side, unless indicated otherwise.
-
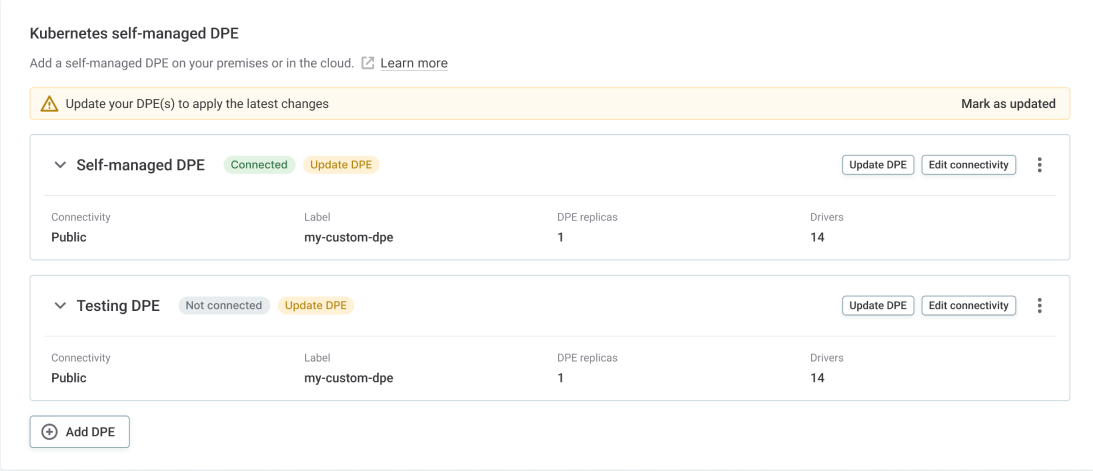
In the Kubernetes self-managed DPE section, select Edit connectivity.
-
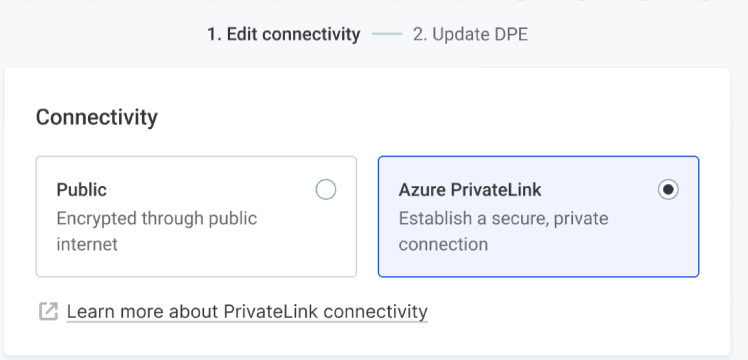
Select Azure PrivateLink as the connectivity option. This establishes a secure, private connection between your VNet and the Ataccama ONE platform.
Step 2: Register your Azure Subscription ID
-
In your Azure Portal, locate your Subscription ID.
For details, see Find your Azure Subscription ID in the Microsoft documentation.
-
In your environment settings in the Cloud Portal, enter the Subscription ID in the corresponding field. The format is
11111111-2222-3333-4444-555555555555.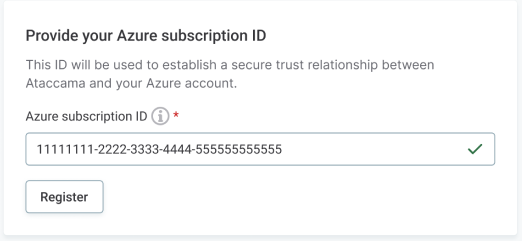
-
Select Register. Once registered, your subscription is allowlisted on the Private Link Service for auto-approval of Private Endpoint connections.
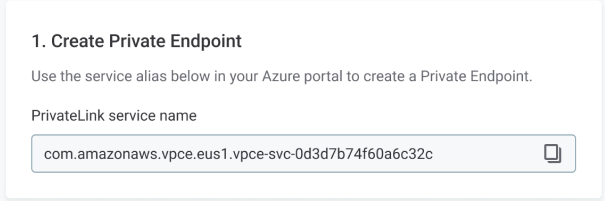
Step 3: Create Private Endpoint in Azure
-
In your environment settings in the Cloud Portal, find and copy the PrivateLink service name (alias).
-
In your Azure Portal, go to Private Link Center and create a new Private Endpoint:
-
Specify a name, your Azure Subscription, Resource Group, and Region. If possible, we recommend using the same service region (or cross-region) as the rest of your environment.
-
Select the Virtual Network and Subnet where the endpoint will reside.
-
On the Resource tab, select Connect to an Azure resource by resource ID or alias and enter the alias you copied in step 1.
-
-
Finish creating the Private Endpoint. For detailed instructions, see Create a private endpoint in the Microsoft documentation.
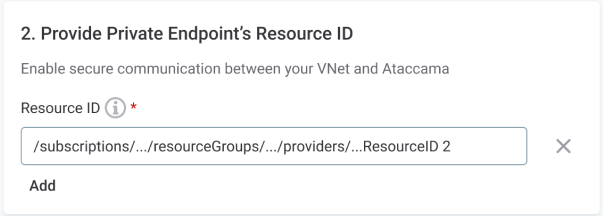
Step 4: Provide Private Endpoint Resource ID
-
In your Azure Portal, copy the Resource ID of the Private Endpoint you just created.
The format is:
/subscriptions/…/resourceGroups/…/providers/Microsoft.Network/privateEndpoints/…. -
In your environment settings in the Cloud Portal, paste the Resource ID into the corresponding field.
-
Select Add. This registers your Private Endpoint connection.
Ataccama uses this ID to filter traffic at the ingress controller, ensuring only connections from your authorized endpoint can access your resources.
Step 5: Create DNS records
-
In the Cloud Portal, note the hostnames shown for:
-
DPM address (for example,
dpm-43ooq-worker-01-eus1.ataccama.link). -
MinIO address (for example,
minio-43ooq-worker-01-eus1.ataccama.link).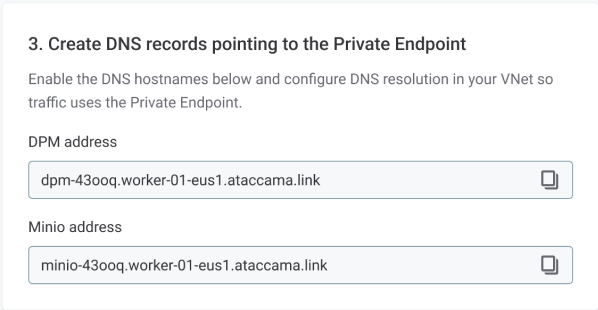
-
-
In your Azure Private DNS Zone (or internal DNS solution), create records for these hostnames that resolve to your Private Endpoint’s private IP address.
| Azure can automatically integrate with a Private DNS Zone while creating the endpoint (recommended). |
| Until DNS is configured, your DPE continues to connect over the public internet. |
Step 6: Save and redeploy
-
Select Save and redeploy to apply the configuration.
-
Wait for redeployment to complete. This prepares the environment for connecting through Private Link.
Step 7: Update DPE
After saving the configuration, update your DPE by running commands on your self-managed Kubernetes cluster.
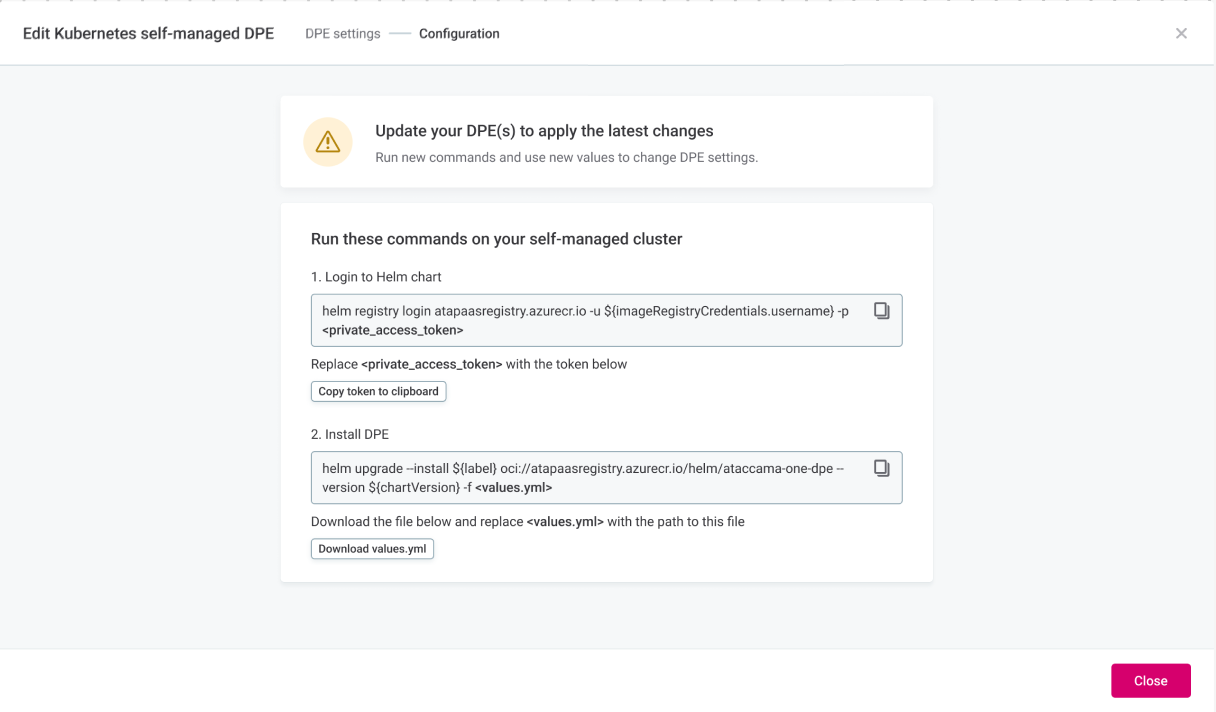
Log in to Helm chart registry
-
In the Cloud Portal, go to Step 2: Update DPE.
-
Select Copy token to clipboard to copy your private access token.
-
Run the following command, replacing
<private_access_token>with the token you copied:helm registry login atapasareqistry.azurecr.io -u $(ImageRegistryCredentials.username) -p <private_access_token>
Install or upgrade DPE
-
In the Cloud Portal, select Download values.yml and save the file.
This file contains your DPE configuration, including the new Private Link settings.
-
Run the following command, replacing
<values.yml>with the path to the file you downloaded:helm upgrade --install $(label) oci://atapasareqistry.azurecr.io/helm/ataccama-one-dpe --version $(chartVersion) -f <values.yml> -
Wait for the Helm upgrade to complete. Your DPE now uses private addresses for communicating with Ataccama ONE via Private Link.
| During platform upgrades, the ingress controller is updated for secure Private Link routing. If your DPE is not upgraded to a version compatible with the platform, jobs fail until DPE is up-to-date. |
Setup checklist
Use this table as a quick reference for who is responsible for each step.
| Task | Owner | Notes |
|---|---|---|
Provide Private Link Service details |
Ataccama |
Available in the Cloud Portal (self-service) or shared by Ataccama Support. |
Register Azure Subscription ID |
Customer |
Via Cloud Portal or by sharing with Ataccama Support. |
Create Private Endpoint |
Customer |
In your Azure subscription and VNet (via Portal, CLI, or Terraform). |
Share Private Endpoint Resource ID |
Customer |
Via Cloud Portal or by sharing with Ataccama Support. |
Approve Private Endpoint connection |
Ataccama |
Automatic once your subscription is allowlisted. |
Configure DNS |
Customer |
Update your DNS to resolve service hostnames to the Private Endpoint IP. |
Update DPE configuration |
Ataccama or Customer |
Via Cloud Portal (self-service) or with Ataccama Support assistance. |
Mark setup as complete |
Customer |
Self-service only, in the Cloud Portal. |
Clean up removed environments |
Ataccama |
Ataccama removes stale endpoint connections from the Private Link Service. |
Architecture and flexibility
Ataccama provides a single Private Link Service for hybrid DPE connectivity. On your side, you have flexibility in how you connect.
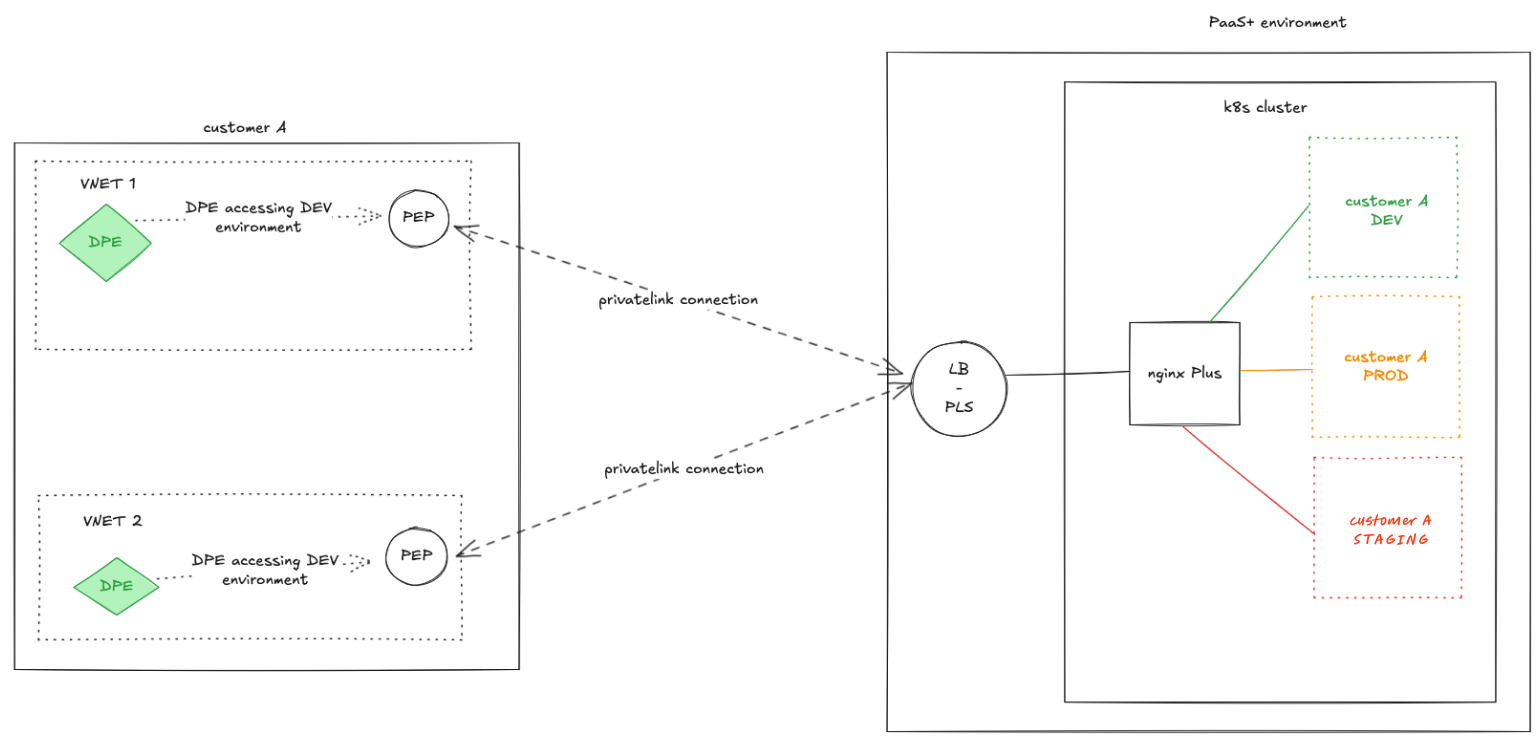
Multiple Private Endpoints
You can connect multiple Private Endpoints to Ataccama’s Private Link Service.
Common scenarios include:
- Isolated environments
-
Separate endpoints for development, testing, and production, each connected to the Ataccama Private Link Service.
- Regional redundancy
-
Endpoints in different Azure regions for disaster recovery and high availability, allowing your DPE to switch connectivity if one region goes down.
- Disconnected networks
-
If you have multiple VNets or on-premises segments (via ExpressRoute/VPN), set up an endpoint in each network that needs access.
Multiple subscriptions
Ataccama can allowlist multiple Azure Subscription IDs. Private Endpoints in different subscriptions can all connect to the same Private Link Service, which can be particularly useful for large organizations with distributed cloud resources.
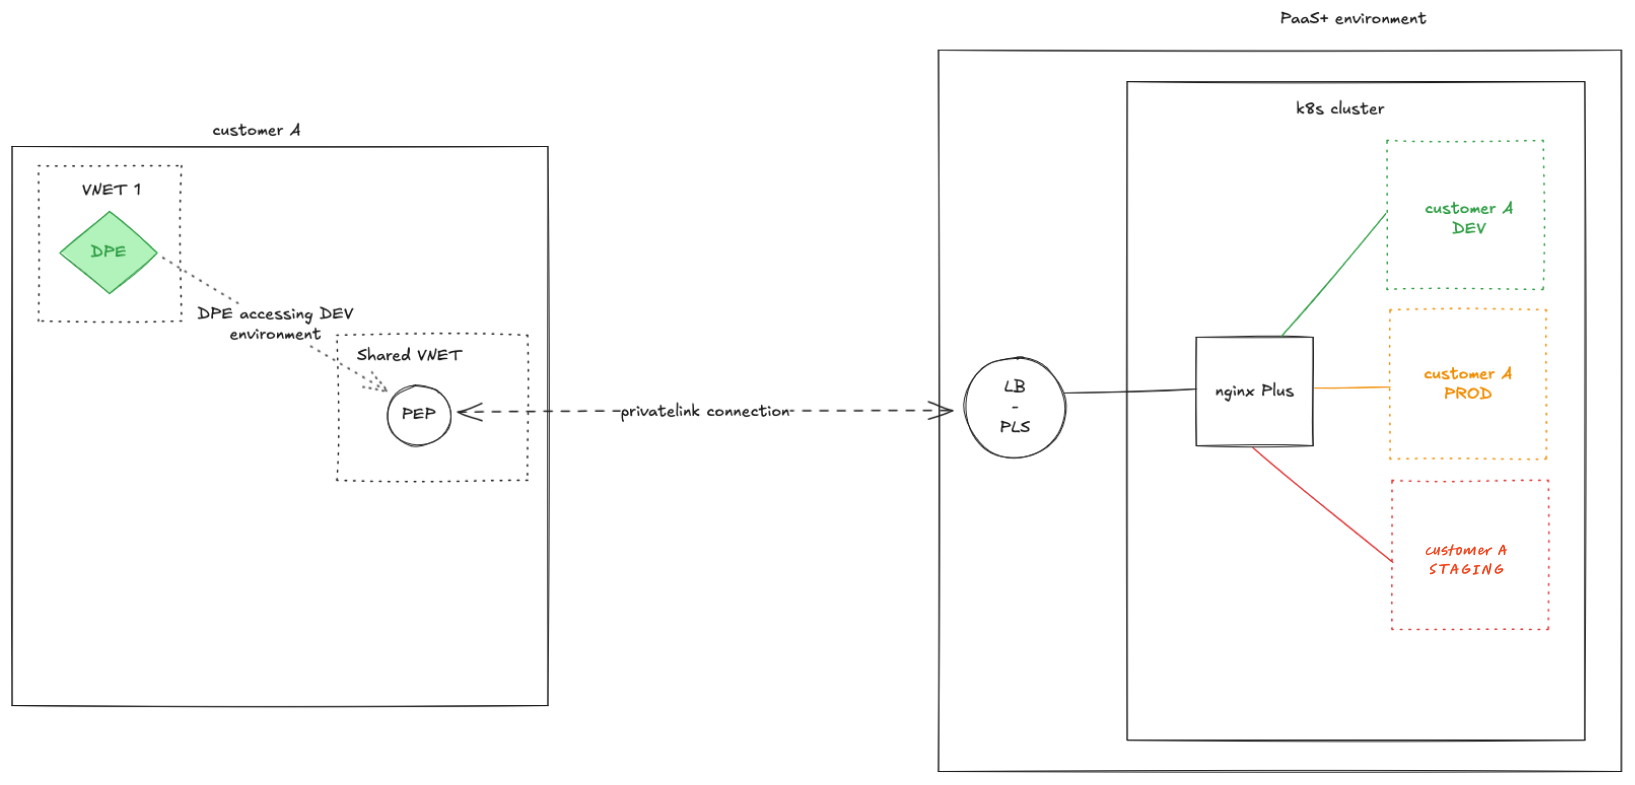
DPE and endpoint relationships
The relationship between DPEs and Private Endpoints is flexible.
Multiple DPEs can use a single Private Endpoint (if they’re in the same VNet). A single DPE can connect through multiple Private Endpoints (for disaster recovery or high availability across availability zones or regions).
There’s no required 1:1 mapping. You can adapt the architecture to your needs.
Was this page useful?