
Configure Search
This page explains how to configure full-text search in ONE.
To learn about all available search methods and how to use search in ONE, see Search.
|
The default search configurations are ready to use out of the box. Only modify these configurations if you need to add custom entities to the search functionality. |
View search configurations
Search configurations define which entities are searchable and how they appear in search results.
To view all available full-text search configurations, go to Global Settings > Search Configurations.
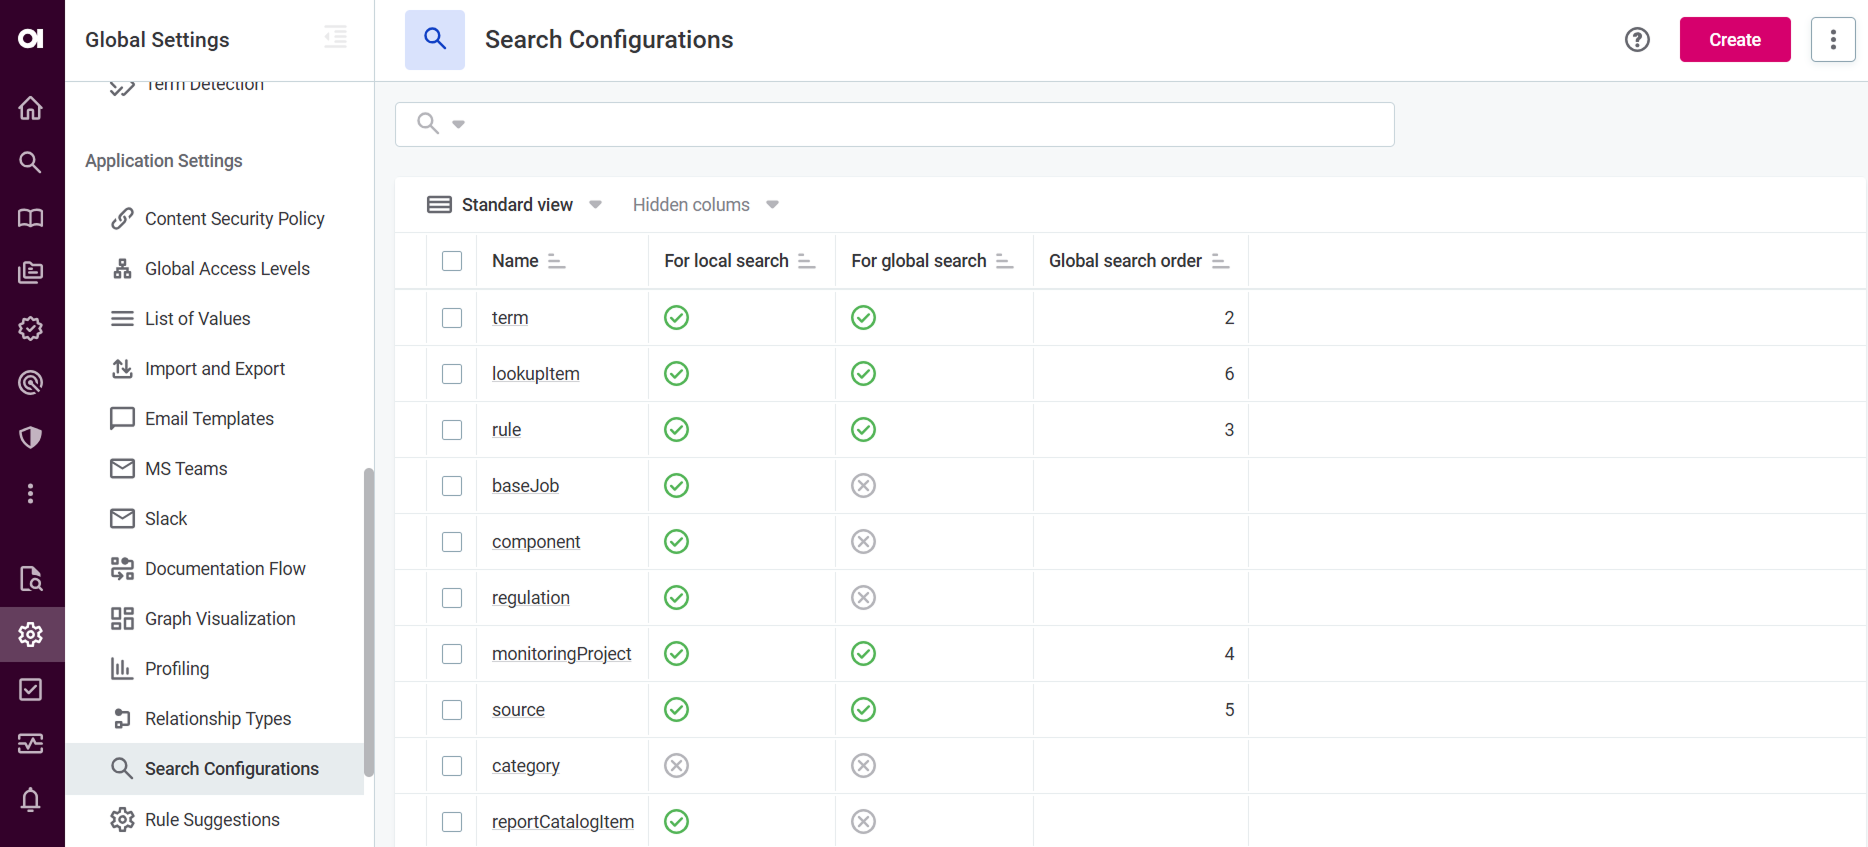
The Search Configurations page displays:
-
Name: Name of the configuration. The name corresponds to the name of the entity it is configured for.
-
For local search: Indicates whether entity-specific search is enabled.
-
For global search: Indicates whether global search is enabled for the entity. Entities with global search configurations enabled participate in the global search requests.
-
Global search order: Display order of entity tabs on the global search results page (lower numbers appear first).
Where can you enable full-text search?
Full-text search can be configured for global search (across all entities) and for individual entity pages.
For entity-specific search, full-text search is available on entity pages, with the following considerations:
-
Each entity must be configured separately—configuring search on a parent entity does not enable it on child pages.
For example, configuring full-text search on the
termentity enables it on the main Terms page, but not on the Business Terms page. To enable search on Business Terms, you must create a separate configuration for that entity. -
Full-text search is only available when viewing Published assets. When viewing Unpublished or All assets, alternative search methods are used instead.
-
For hierarchical entities, full-text search is only available on Flat listing views.
Create new search configuration
Create search configuration to include an entity into the full-text search. The process involves selecting your entity, indexing its searchable properties, and optionally adding filters to help users refine results.
Create the configuration
To create a new search configuration:
-
Navigate to Global Settings > Search Configurations.
-
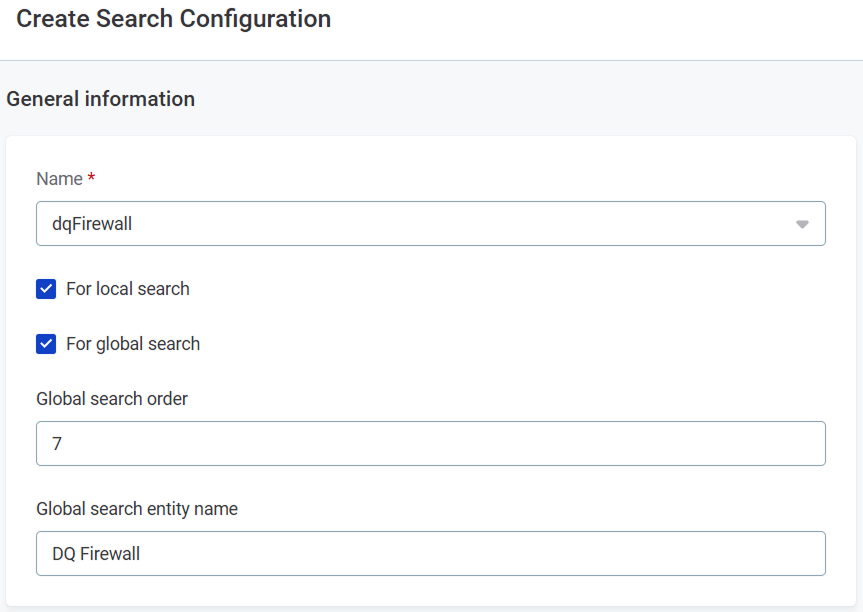
Select Create and configure:
-
In the Name field, select the entity type you want to make searchable (for example,
term,lookupItem).Start typing to filter the available entities. The name must match the entity exactly.
-
Select which search type(s) to enable:
-
For local search: Enables entity-specific search (full-text search on the entity’s page).
-
For global search: Includes the entity into the global search in ONE.
-
-
If you selected global search, configure these additional settings:
-
Global search order: Enter a number to define where the entity tab appears on the global search results page. Lower numbers appear first. For example, number 7 in the order for the
dqFirewallentity means that the DQ Firewall is displayed as the seventh entity tab.Ordering rules-
Entities with the same number appear in alphabetical order.
-
Skipped numbers are ignored (for example, using 1, 2, and 5 results in three consecutive tabs).
-
An empty or blank order places the entity tab first.

-
-
Global search entity name: Enter the display name for this entity’s tab on the global search results page (for example, "DQ Firewall" instead of "dqFirewall").
-
-
-
In the Indexed nodes section:
-
Select Add Indexed node.
-
Set the Name of the node by selecting the entity from the dropdown list.
Make sure the name matches exactly with the name of the entity you want to enable the search for.
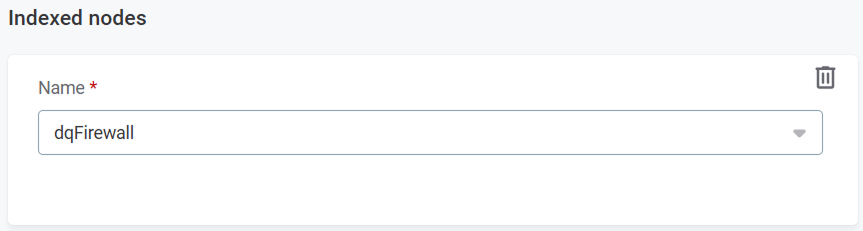
-
-
Select Save without adding property filters yet.
Do not add property filters yet. Entity properties must be indexed first before filters can be configured.
Add indexed properties
To index the properties that should be used for searching and filtering:
-
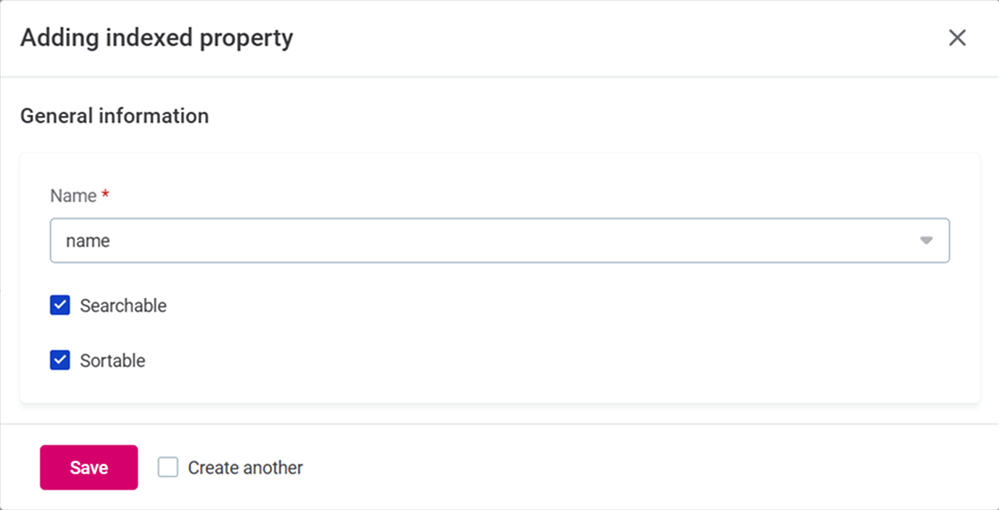
Select the indexed node you just created.
-
Select Add Indexed property.
-
Configure the property:
-
Name: Select the entity property to index (for example,
name,description,key) -
Choose the indexing behavior:
-
Searchable: Users can search by this property’s values.
-
Sortable: Users can sort search results by this property.
You can enable both options for the same property. For example, making
nameboth searchable and sortable allows you to find entities by name and organize results alphabetically.
-
-
-
Select Save.
-
Repeat steps 2-4 to add additional properties.
Add search filters (optional)
Search filters let you narrow search results by specific property values. They appear on both the global search results page and on entity listing pages.
To add a search filter:
-
Navigate back to the search configuration page and select Add Property search filter.
-
Configure the filter:
-
Name: User-friendly name of the filter.
-
Order: Position on which the filter appears in the filter list.
-
Property: Select to which indexed property this filter applies to.
Only indexed properties appear in this list. If a property is missing, return to Add indexed properties to index it first.
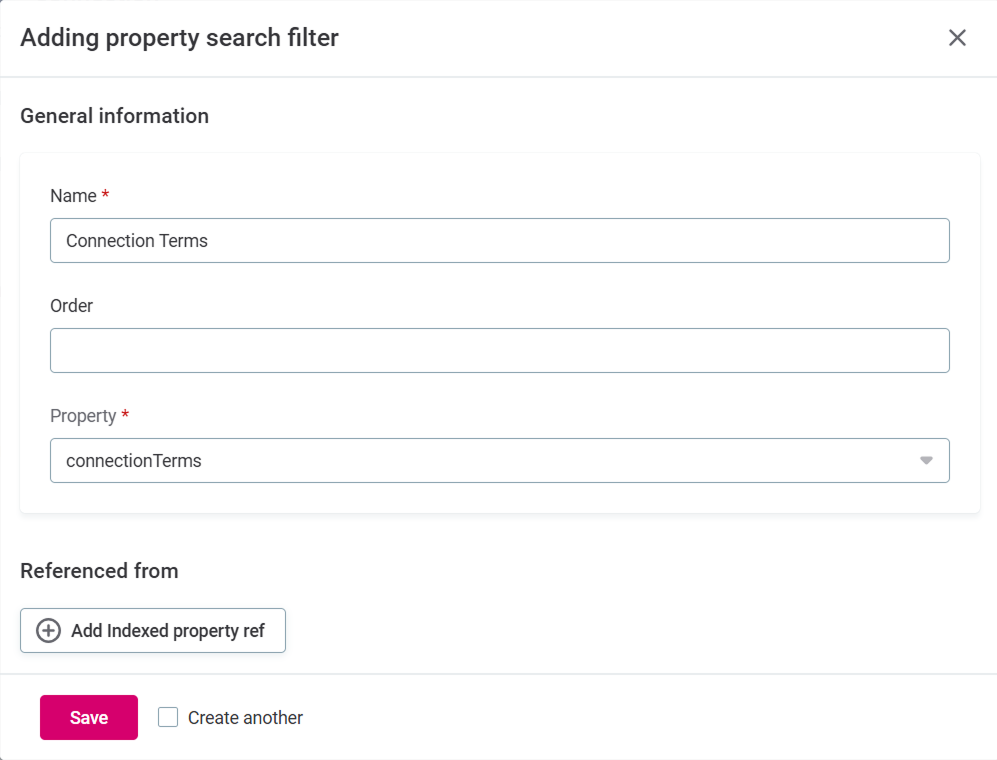
-
Referenced from: Complete this field only when the selected property references another entity rather than containing a direct value.
-
Check if your property needs a reference:
-
Go to Global Settings > Metadata Model.
-
Search for your entity (for example,
lookupItem). -
In the properties list, find your property and check its type:
-
Scalar properties (direct values) - leave Referenced from empty.
-
Referenced properties (values from related entities) - configure the reference below.
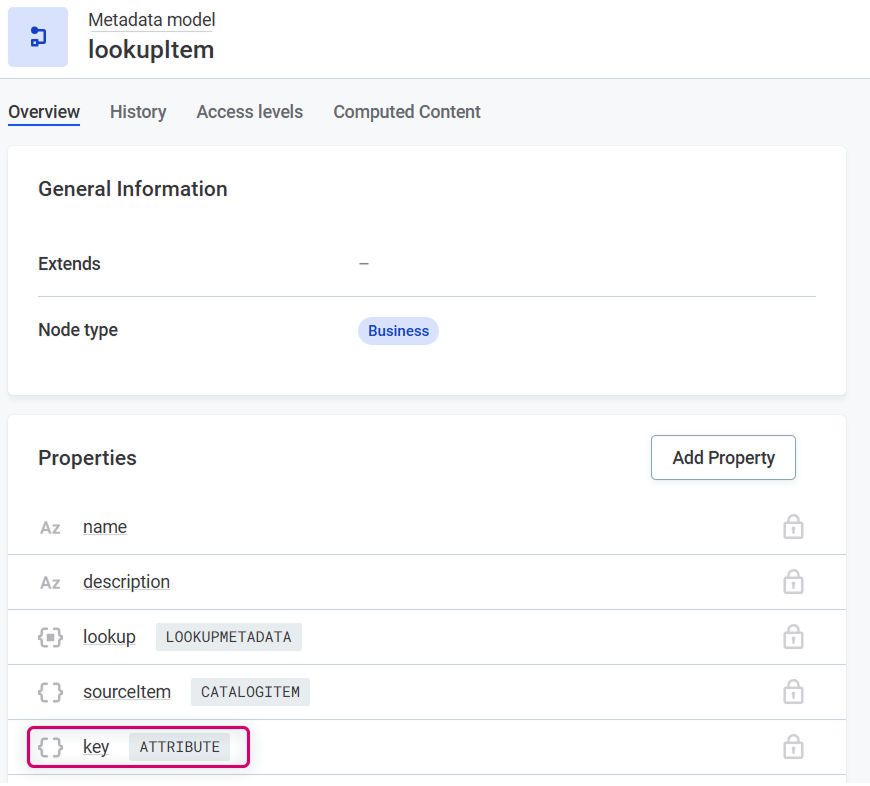
For example, in the
lookupItemproperties list, thekeyproperty shows it’s referenced from theattributenode.
-
-
-
If the property requires a reference:
-
Add the referenced entity as an indexed node with the necessary indexed property.
-
Set the Property to the indexed property under the referenced entity path.
-
Set the Referenced from field to the property you want to use as a filter.
ExampleIn the
lookupItemproperties list, thekeyproperty shows it’s referenced from theattributenode.To make the
keyproperty a filter: Addattributeas an indexed node with thenameindexed property. Then set Property to thenameunder thelookupItem > attributepath. Finally, setkeyin the Referenced from field.
-
-
-
-
Select Save.
-
Repeat to add additional filters as needed.
Publish and verify
-
Publish the changes.
-
After saving all settings, the search index rebuilds to include your changes.
Indexing might take several hours depending on the number of entities (up to 3-4 hours for large datasets). New items become searchable once indexing completes.
-
Navigate to the entity page or use global search to verify the configuration works as expected.
Reindex search
Reindexing is a routine maintenance task that rebuilds the search index to reflect configuration changes or resolve indexing issues.
Reindex search after making any of the following changes:
-
Adding or removing a searchable entity.
-
Adding or removing a searchable property from an entity.
Also reindex periodically to maintain optimal search performance.
|
The Reindex option is only available when you have the |
| Search is unavailable or limited while reindexing is in progress, though users can continue to search items that have been successfully reindexed. Reindexing typically takes several minutes to a few hours depending on the indexing speed and the number of items that should be reindexed (up to 3-4 hours for large datasets). |
To reindex:
-
Navigate to Global Settings > Search Configurations.
-
From the three dots menu, select Reindex.
Recover search
Search recovery is a troubleshooting task for when there are inconsistencies between primary storage and search storage, such as outdated or deleted data appearing in search results (ghost entries). This typically occurs when reindexing fails due to a change that cannot be processed (such as deleting an item from the search storage) or after an upgrade.
The recovery process deletes all indexed items, clears any changes from the queue, and reindexes from scratch.
|
The Recover option is only available when you have the |
| Search is unavailable or limited while recovery is in progress, though users can continue to search items that have been successfully reindexed. Recovery typically takes several minutes to a few hours depending on the indexing speed and the number of items that should be reindexed (up to 3-4 hours for large datasets). |
To recover search:
-
Navigate to Global Settings > Search Configurations.
-
From the three dots menu, select Recover.
Troubleshoot search
Full-text search not working due to the 'Socket closed' error
Problem: Full-text search is broken for some users. Instead of search results, you see a "Full-text Search is experiencing problems" error and after refreshing a "Socket closed" error message.
Cause: Ataccama ONE communicates with the web browser using WebSocket. If your proxy removes headers from server responses, the WebSocket communication cannot be established between the browser and the servers where Ataccama ONE is installed. Consequently, the servers cannot push notifications to the client browser, causing issues such as non-functional search.
WebSocket is used for all functionalities that are updated in real time while you’re on the page, including:
-
Search status
-
Processing Center notifications
-
Notifications about the progress of monitoring projects, term suggestions, and documentation flow
-
Notification about another user changing the application mode
-
Some options that use a toggle switch in the application
To confirm that the issue is with the WebSocket communication, open the developer tools of your browser and look for the "Error during WebSocket handshake: 'Connection' header is missing" error message.
Solution: Your network administrator must allowlist the Connection header for network communication for the platform domain, subdomain, or link.
Was this page useful?