
API Authentication
The Ataccama ONE API uses OAuth 2.0 Bearer token authentication to secure API requests. All API endpoints require a valid access token to be included in the request headers.
Before you start
Ensure you have admin access to the Ataccama Cloud Portal administration interface.
API client types
There are two types of API clients:
-
Full access: The client can call all REST API endpoints. There are no permissions to configure.
-
Role-based access (recommended): The client follows role-based access control (RBAC). It is created without any access and has a dedicated role derived from the client name:
publicapi-<client_name>. The role identifies the client in ONE, where you grant the client access to the assets it needs. See Manage API Client Access.
| Role-based API clients are turned off by default and might not be available in your environment yet. If you don’t see the Access type option in the Create API Client dialog, contact your Customer Success Manager to enable them. |
Create an API client
|
The client secret is displayed only once during creation. Copy and securely store the client ID and client secret immediately. If you lose the client secret, you need to create a new API client. |
To create an API client:
-
Go to the Ataccama Cloud Portal.
-
Open your environment and select the Settings tab.
-
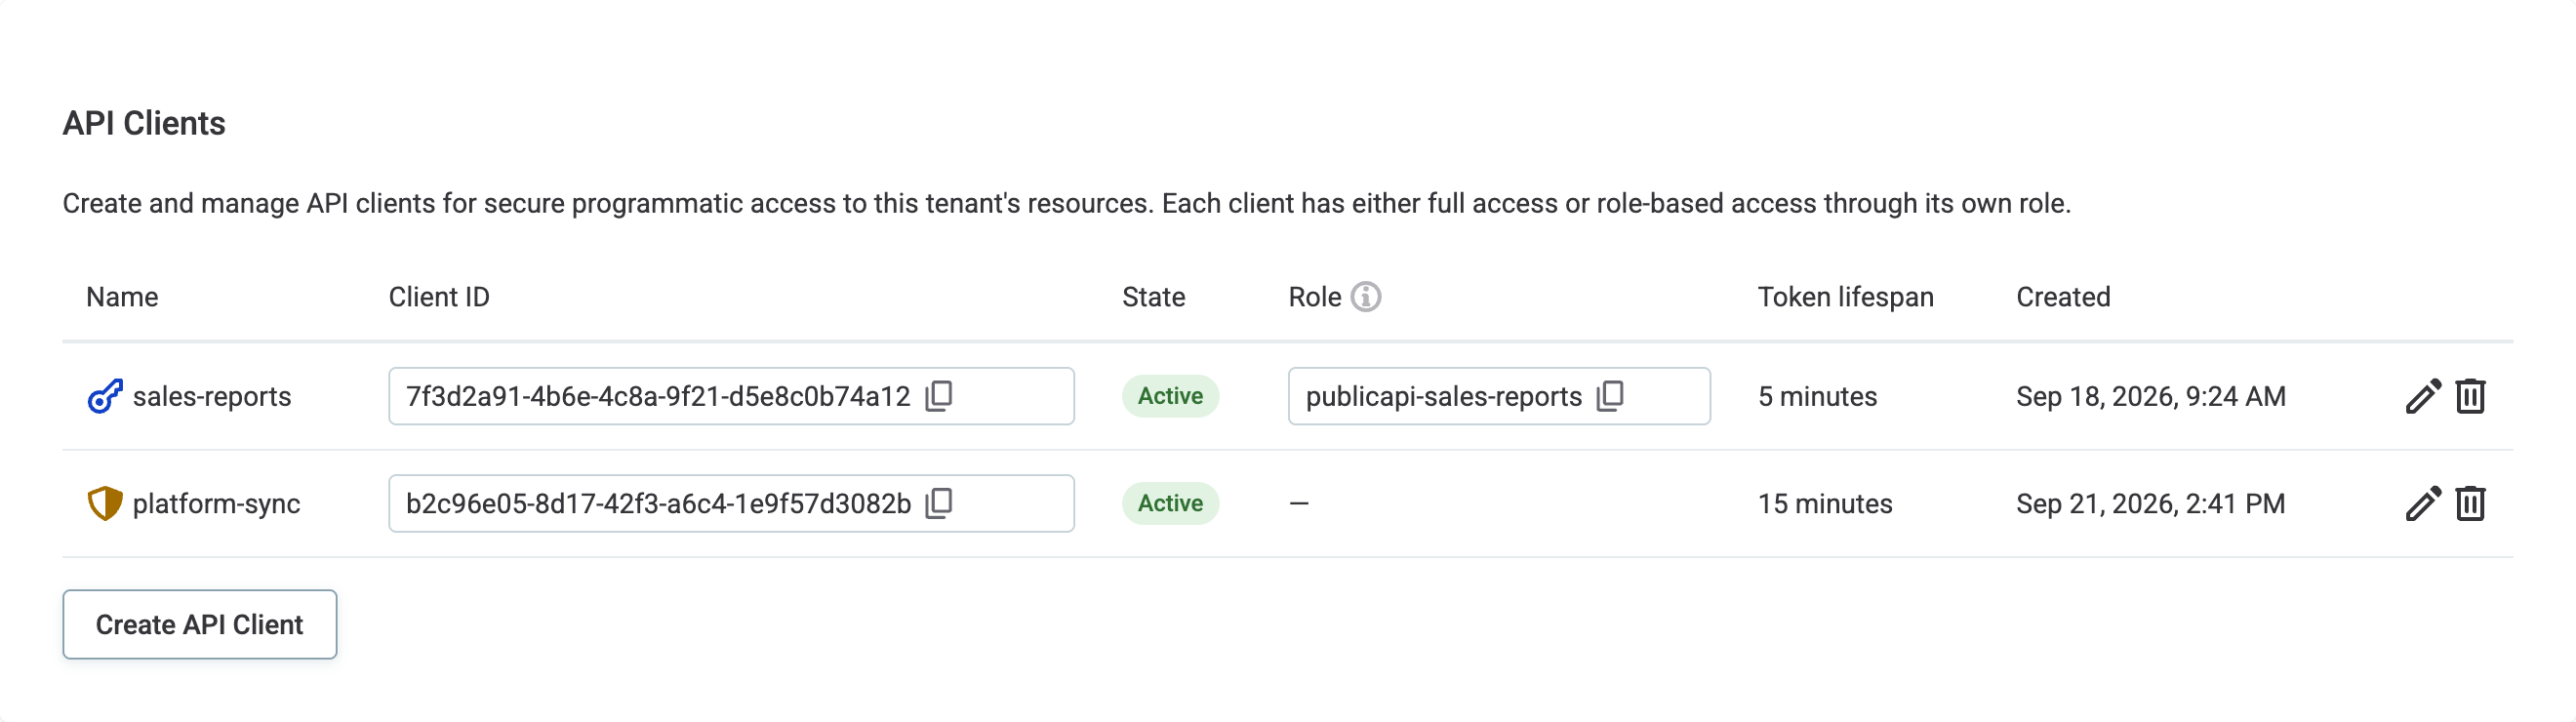
In the API Clients section, select Create API Client.
-
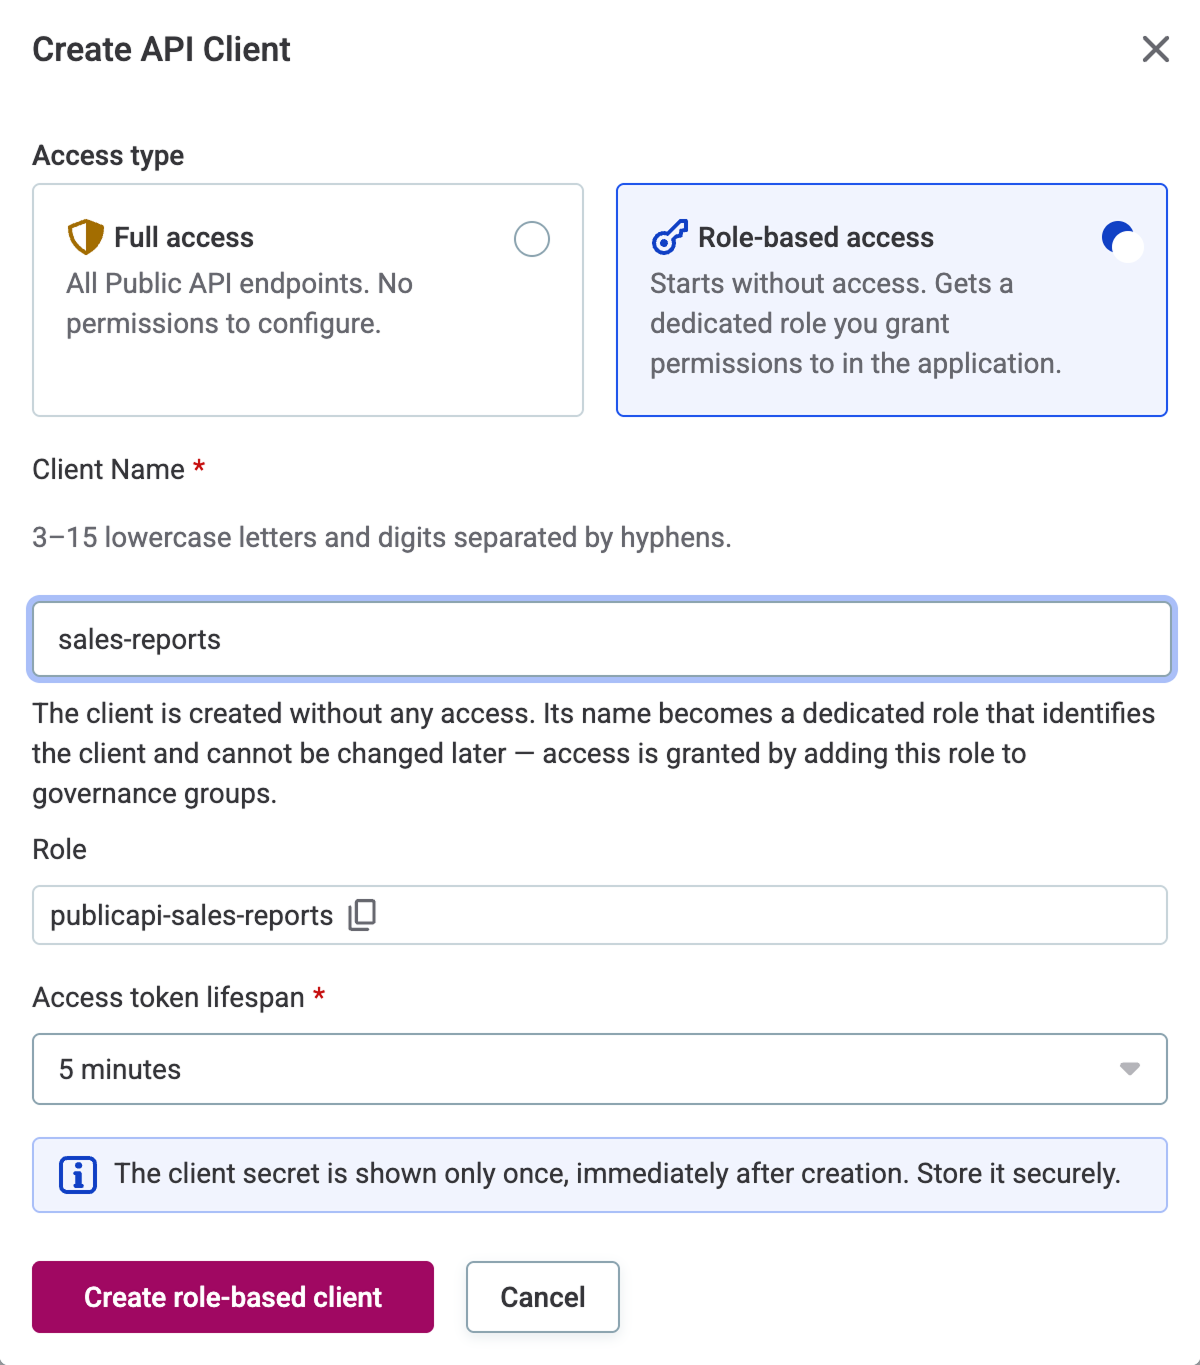
In the Create API Client dialog, fill in the following:
-
Access type: Select Full access or Role-based access.
-
Client Name: Enter a name for the API client.
For role-based clients, the name must be 3-15 characters long, can contain lowercase letters and digits separated by hyphens, and must be unique among the role-based clients in your environment.
Choose the name of a role-based client carefully. The client’s role is derived from the name, as shown in the dialog preview. Neither can be changed after the client is created.
-
Access token lifespan: Select how long the issued access tokens stay valid. You can change the lifespan later using the edit icon in the API client list.
-
-
Select Create role-based client or Create full-access client, depending on the Access type you selected.
-
Copy and securely store the generated credentials.
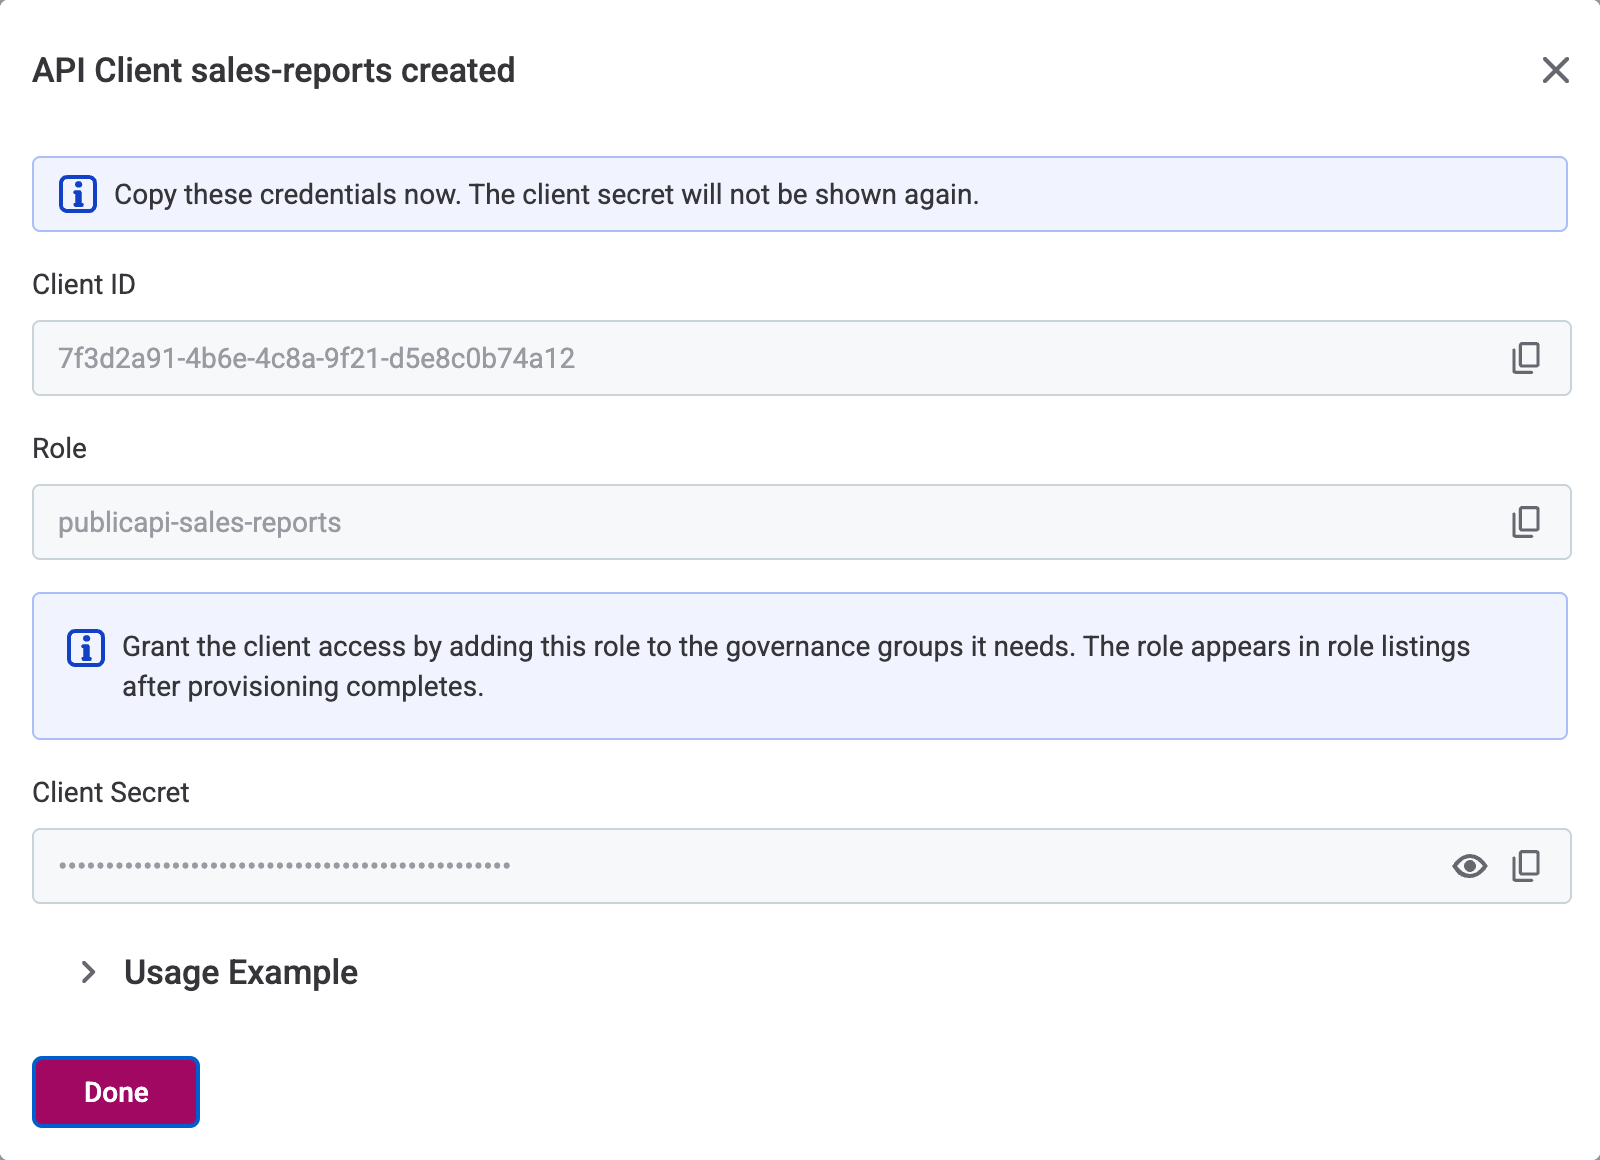
For role-based clients, the dialog also shows the client’s role. You can copy the role later at any time from the Role column in the API client list.
-
Wait until the client’s state in the API client list changes from Provisioning to Active. This typically takes a few minutes.
Full-access clients are ready to use as soon as their state is Active. For role-based clients, grant the client access to assets before you request a token. See Manage API Client Access.
Obtain an access token
After creating your API client, use the OAuth 2.0 Client Credentials flow to obtain an access token.
Token request
Send a POST request to the token endpoint with your client credentials:
curl -X POST "https://{your-environment}.ataccama.one/auth/realms/{realm}/protocol/openid-connect/token" \
  -H "Content-Type: application/x-www-form-urlencoded" \
  -d "grant_type=client_credentials" \
  -d "client_id={your-client-id}" \
-d "client_secret={your-client-secret}"| Parameter | Description |
|---|---|
|
Domain as stated in the Cloud Portal. |
|
Tenant name as stated in the Cloud Portal. |
|
The client ID from your API client. |
|
The client secret from your API client. |
Token response
The token endpoint returns a JSON response containing the access token:
{
  "access_token": "eyJhbGciOiJSUzI1NiIsInR5cCI6IkpXVCJ9...",
  "expires_in": 300,
  "token_type": "Bearer",
  ...
}| Field | Description |
|---|---|
|
The JWT bearer token for API requests. |
|
Token expiration time in seconds. |
|
Always |
Use the access token
Include the access token in the Authorization header of your API requests using the Bearer authentication scheme:
curl -X GET "https://{your-environment}.ataccama.one/api/reference-data/v1/tables" \
  -H "Authorization: Bearer {access_token}"
Token expiration and renewal
Access tokens expire after the time specified in the expires_in field.
You set the lifespan (5, 10, or 15 minutes) when you create the API client and can change it later in the API client list.
When a token expires, you will receive a 401 Unauthorized response.
To continue making API requests, obtain a new access token by repeating the token request.
| Implement token refresh logic in your application to automatically obtain a new token before the current one expires. This ensures uninterrupted API access. |
Best practices for API authentication
-
Secure storage: Store client credentials securely using environment variables, secrets management systems, or secure configuration files. Never commit credentials to version control.
-
Token reuse: Reuse access tokens until they expire rather than requesting a new token for each API call.
-
Error handling: Implement proper error handling for authentication failures and token expiration.
-
Least privilege: Prefer role-based clients and grant each one access only to the assets it needs. See Manage API Client Access.
Example: Complete authentication flow
Here’s a complete example using cURL to authenticate and make an API request:
curl -X POST "https://{your-environment}.ataccama.one/auth/realms/{your-realm}/protocol/openid-connect/token" \
  -H "Content-Type: application/x-www-form-urlencoded" \
  -d "grant_type=client_credentials" \
  -d "client_id={your-client-id}" \
-d "client_secret={your-client-secret}"curl -X GET "https://{your-environment}.ataccama.one/api/reference-data/v1/tables" \
-H "Authorization: Bearer eyJhbGciOiJSUzI1NiIsInR5cCI6IkpXVCJ9..."Troubleshooting
401 Unauthorized error
If you receive a 401 Unauthorized error, verify the following:
-
The access token is valid and has not expired.
-
The
Authorizationheader is properly formatted with theBearerprefix.
403 Forbidden or empty results
If your requests authenticate successfully but return 403 Forbidden or fewer results than expected, the role-based client does not have access to the assets yet.
To grant the client access, see Manage API Client Access.
Was this page useful?