
Cross-Table Rules
Cross-table rules let you validate consistency between two tables — including tables in different systems — within a single DQ monitor. You join a related table to the primary table, apply a rule that references attributes from both, and get results reported on the primary table.
This removes the need to prepare data in advance with catalog items built on SQL, so you can define these checks directly, without SQL expertise.
The join runs in Ataccama Cloud or on an edge instance, and only the data needed for the rule is processed.
When to use cross-table rules
Use cross-table rules for consistency and existence checks between two related tables, for example:
-
Confirm that every
customer_idin a Sales table exists in the Customers table, even when the two tables come from different systems. -
Reconcile values across the two tables, for example checking that an amount in one table exactly matches the corresponding amount in the other.
-
Compare values that should match when the join keys are formatted differently, for example stripping a
0000prefix so that0000abcd123in one table matchesabcd123in the other.
For validating values against a fixed reference list, such as country codes or product SKUs, use the is (not) from Catalog item condition to evaluate data against catalog items instead.
Before you start
Make sure you have:
-
A DQ monitor on the primary table (the table you want results reported on).
-
Access to both the primary table and the related table you want to join.
-
Ataccama Cloud or an edge instance that can connect to both tables. If the tables are in different data sources, Ataccama Cloud or the edge instance needs access to both sources.
-
A cross-table rule in the rule library. To create one, see Define the rule.
How results are reported
Results are reported only on the primary table. Attributes joined from the related table participate in the rule logic but are not scored: their DQ score and invalid samples are unaffected. Reporting on the primary table only keeps the data quality score on the single table that users and downstream tools expect, rather than splitting it across the SQL or transformation catalog items you’d otherwise build to prepare the data.
The Scored or Hidden setting controls which attribute a result is reported on:
-
Scored: Results of data quality evaluation are shown for this attribute.
-
Hidden: The attribute can be used in the rule logic, but the rule’s DQ result isn’t reported on it.
Create and apply a cross-table rule
There are two ways to start:
-
Create the rule in the rule library, then apply it to the primary table from its DQ monitor.
-
Create the rule directly from the DQ monitor: select Apply rules, then Add rule under the attribute, and Create rule. The wizard lets you define the join and the rule logic together, and it saves the rule to the rule library so you can reuse it.
In both cases, you configure the join between the two tables when you apply the rule.
Define the rule
-
Create or open a rule in the rule library. See Create DQ Rule in the Rule Library.
-
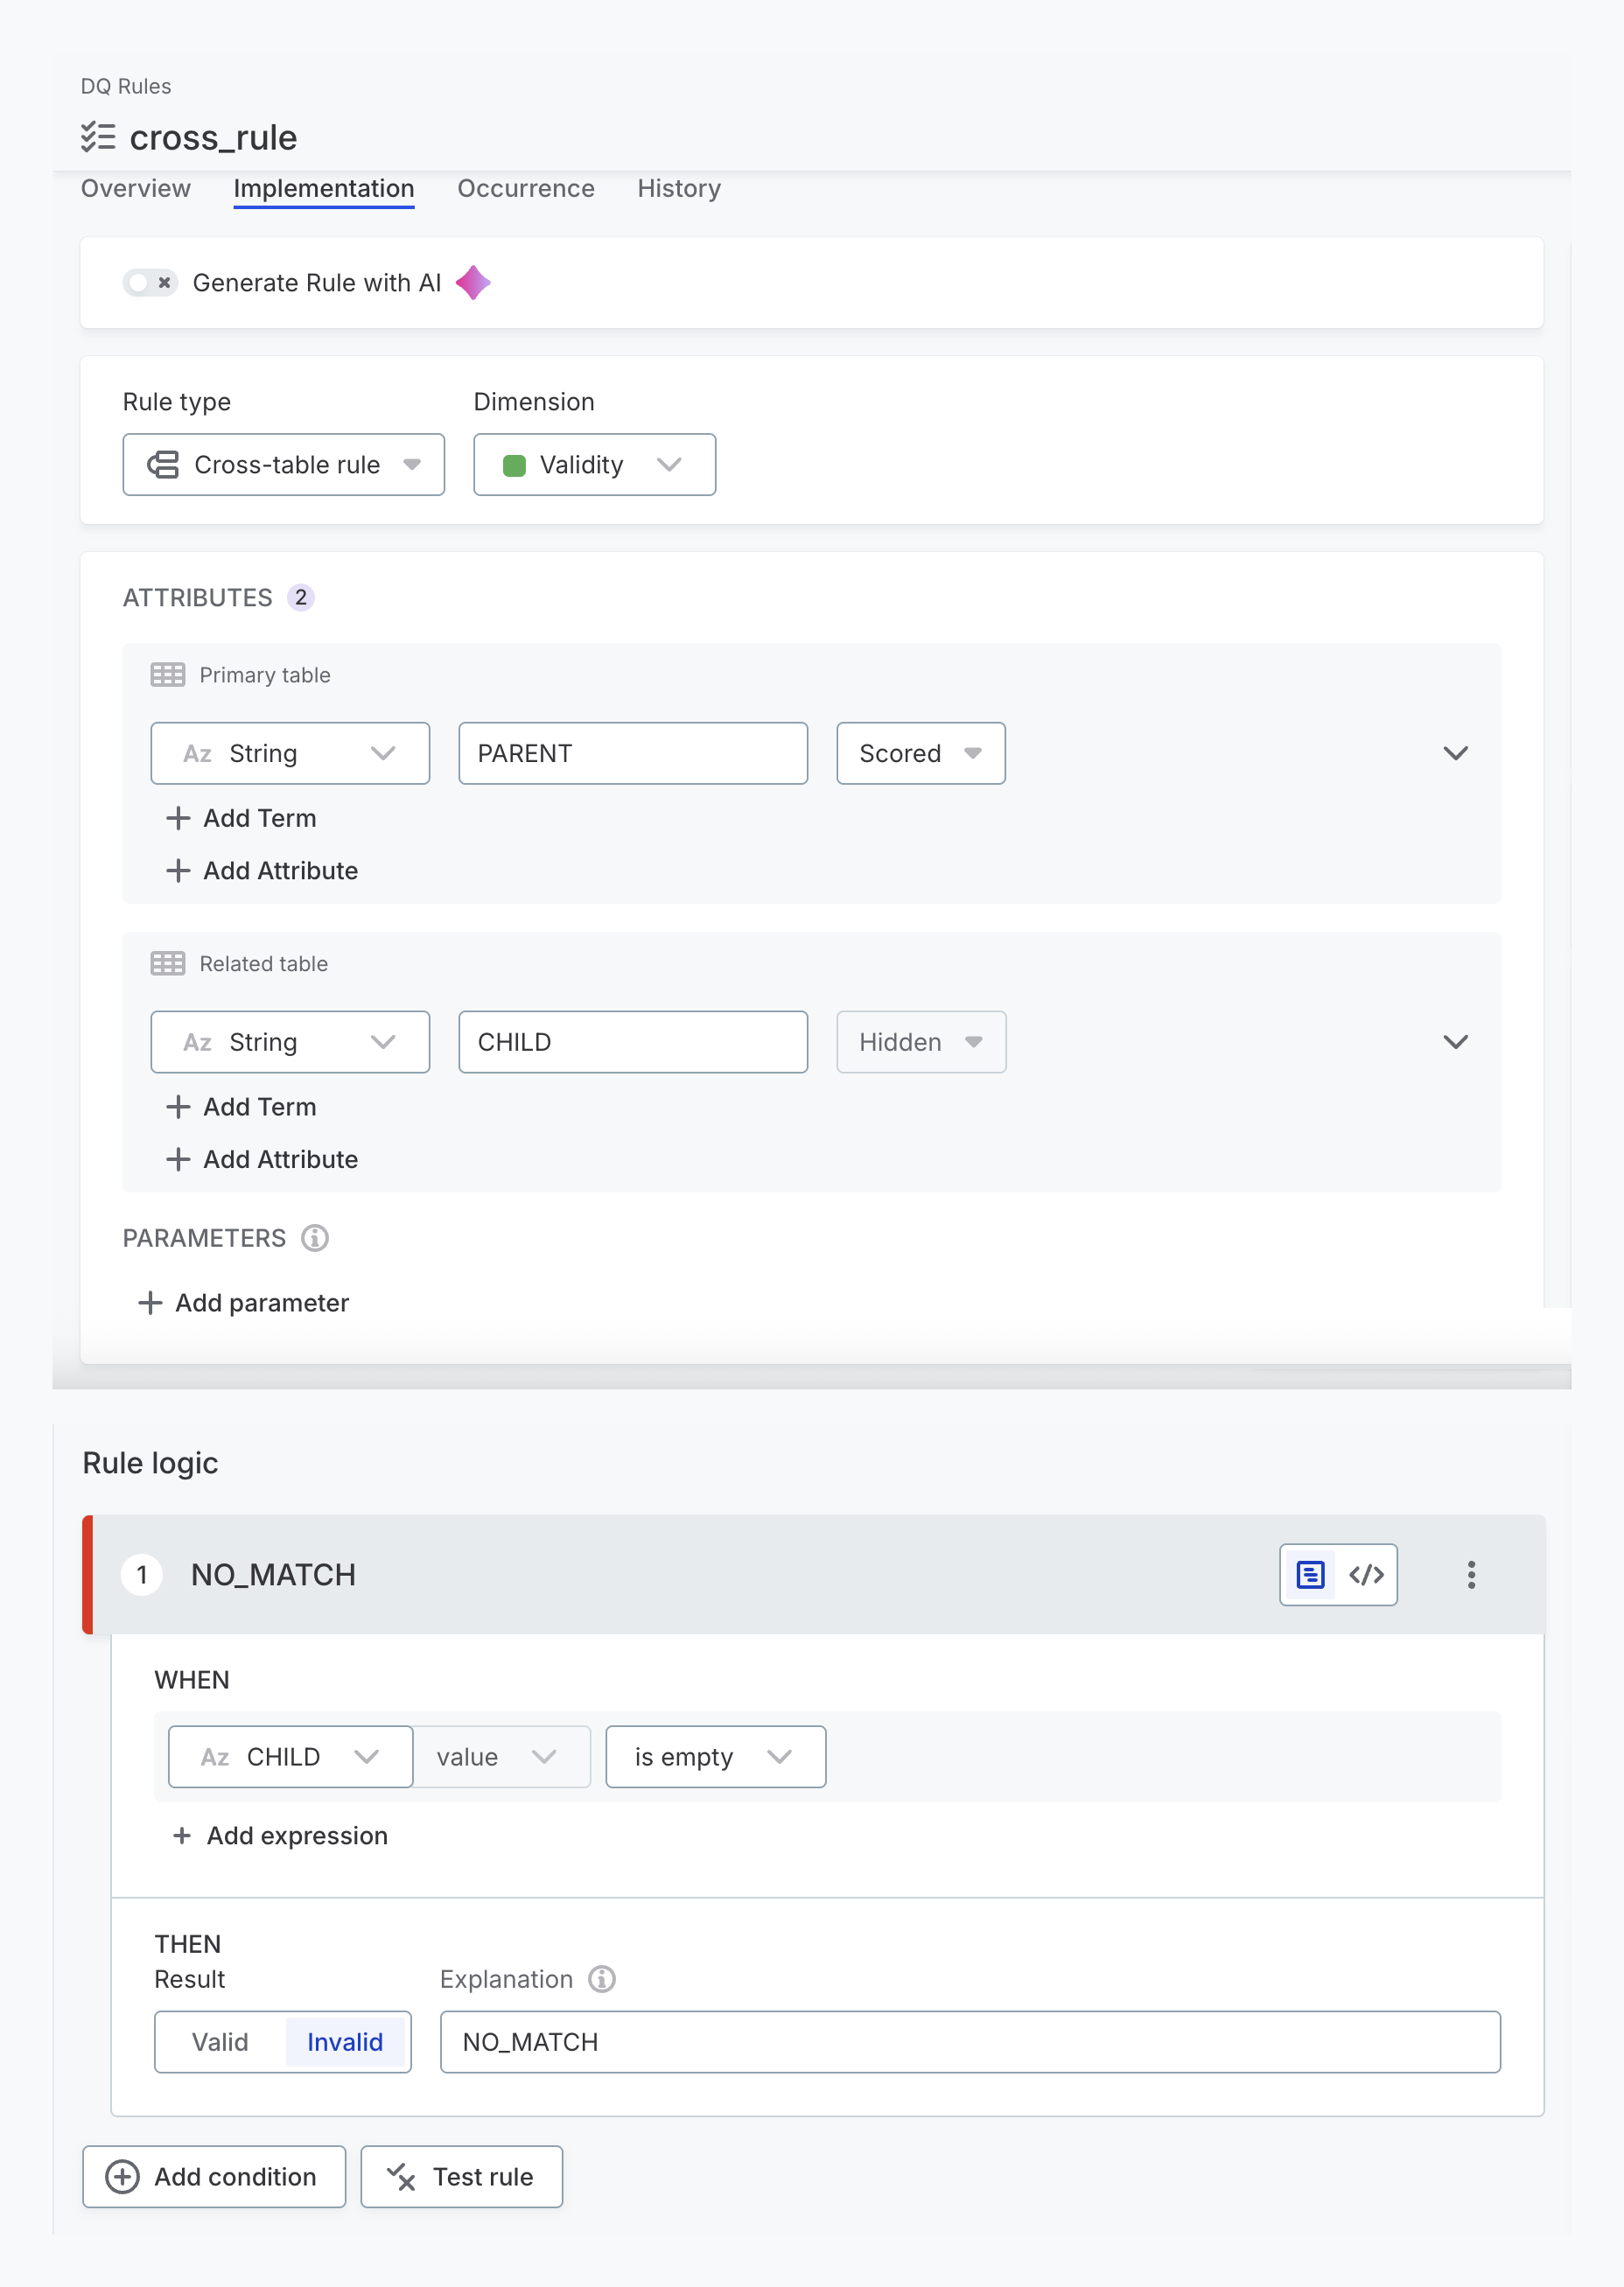
On the rule’s Implementation tab, in Rule type, select Cross-table rule.
The rule inputs are then organized into two groups: Primary table and Related table.
-
Under Primary table, add the attribute or attributes the rule reports on.
-
Under Related table, add the attribute or attributes that come from the joined table.
-
Define the rule logic.
-
Test the rule.
-
Select Test rule.
-
Add or generate sample rows for the primary and related tables, and give each row a Join key value.
Rows that share the same join key are treated as joined, so you can simulate several related records matching one primary-table row and check the result before running a full evaluation.
-
-
Publish the rule.
Each primary-table row is evaluated against the set of related records it matches, which can be empty.
This matching lets you flag rows with no match, compare values across the tables (for example, with the exactly matches condition), or aggregate the matched records (for example, with count()).
When you write the rule logic as an Advanced Expression, prefix each primary-table input with parent., for example parent.<input_name>.
Attributes from the related table are referenced by name, without a prefix.
Apply the rule and configure the join
Apply the cross-table rule from the DQ monitor of the primary table.
-
Open the DQ monitor and select Apply rules.
-
Under the attribute you want the rule to report on, select Add rule.
-
Search for your cross-table rule, then select Configure beside it.
-
In the Configuration of "<rule name>" rule dialog:
-
Enter a Rule instance name.
-
Under Primary attribute, select the primary-table attribute for each rule input, and set it to Scored or Hidden.
-
Under Joined attribute, select Select for each attribute that comes from the related table.
-
-
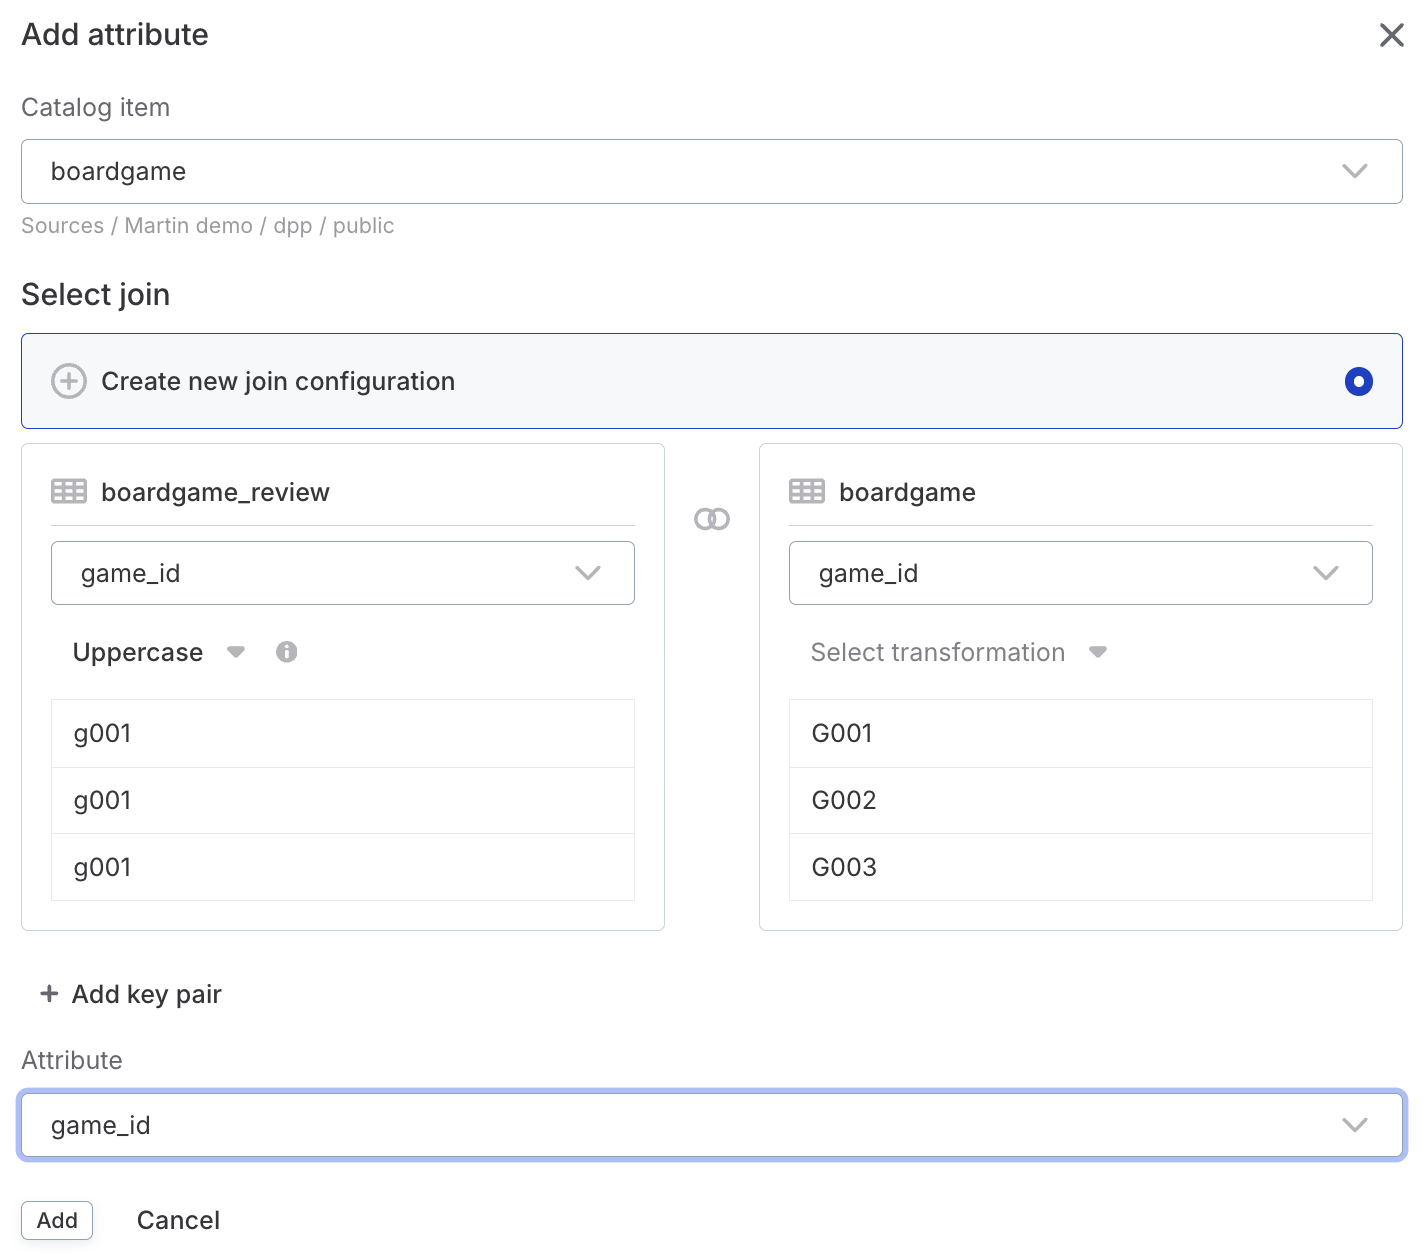
In the Add attribute dialog, configure the join:
-
In Catalog item, select the related table to join. This can be a table from a different data source.
-
Under Select join, select Create new join configuration.
-
For each join key pair, select the join column on the primary table and on the related table.
-
(Optional) To match keys that are formatted differently, transform a join key before the values are compared. See Transform join keys.
-
To join on more than one column, select Add key pair.
-
In Attribute, select the related-table column the rule uses.
-
Select Add.
-
-
Back in the rule configuration dialog, select Apply rule.
-
Publish the changes.
Transform join keys
When join keys are stored in different formats, apply a transformation to normalize them before they are matched. A transformation must not change the attribute’s data type.
Under a join column, select Select transformation and choose one of the following:
-
First N characters: Keep the first characters, up to the Length you set.
-
Last N characters: Keep the last characters, up to the Length you set.
-
Lowercase: Convert the value to lowercase.
-
Pad left: Pad the start of the value up to a total Length, using the character you enter in Pad.
-
Pad right: Pad the end of the value up to a total Length, using the character you enter in Pad.
-
Replace: Replace a Search string with a Replacement string.
-
Substring: Take a portion of the value from a Start position for a set Length.
-
Uppercase: Convert the value to uppercase.
-
Expression: Combine functions in an expression — for example,
upper(value), wherevalueis the join column.
For the Expression option, you can use any standalone function that keeps the same data type and doesn’t require additional context.
For example, you can use left, lower, lpad, replace, right, rpad, substr, and upper.
For the full list of functions and their syntax, see ONE Expressions Reference.
Example: Check that every sale has a valid customer
Suppose your SALES table is in Snowflake and your CUSTOMERS table is in an Oracle CRM, and you want to confirm that every sale references a real customer.
Map the example in the application as follows:
-
Primary table:
SALES— the table the score is reported on. Add itsCUSTOMER_IDattribute here. -
Related table:
CUSTOMERS— add itsIDattribute here. -
Catalog item (in the Add attribute dialog): Select
CUSTOMERS, which is in a different data source. -
Join key pair: Pair
CUSTOMER_IDinSALESwithIDinCUSTOMERS. -
Select transformation: The
SALESIDs have a0000prefix (0000abcd123) but theCUSTOMERSIDs don’t (abcd123), so apply Replace to theSALESkey to remove the prefix before the values are matched. -
Rule logic: Flag a record as invalid when no matching customer is found.
After you select Apply rule and run evaluation, the rule appears as a rule instance on the SALES monitor’s Rules tab, with its own passed and failed counts.
Sales records with no matching customer in CUSTOMERS fail the rule, so you can identify and investigate them.
The attribute’s Overall data quality score is the percentage of records that pass all rules applied to it, so check this rule instance’s own passed and failed figures on the Rules tab rather than reading the overall percentage.
Edit or reuse a join configuration
A join configuration is scoped to the monitor. Define it once, and any cross-table rule in the monitor that uses the same tables can reuse it — so related rules stay consistent and you don’t reconfigure the join each time.
Under Select join, if no join configuration exists between the two selected tables, select Create new join configuration and define the join. If a join configuration already exists between them, it appears here and is reused, and you select only the Attribute.
You can’t create a second join between the same two tables. To join a different table, define a new join.
You can manage a monitor’s join configurations in two places.
To edit a join from an applied rule:
-
On the Rules, Attributes, or Terms tab, select the rule to open its sidebar.
-
On the Configuration tab, in the Joined attribute card, select the three-dot menu and then Edit join configuration.
To create, edit, or delete joins from the monitor settings:
-
Open the monitor Settings and go to Cross-table joins.
-
Select Create join, or use a join’s three-dot menu to Edit or Delete a join.
The Cross-table joins list also shows which rules each join is Used in.
In the Edit cross-table joins dialog, you can change a join’s columns, transformations, or key pairs. The change affects every rule that uses that join in the monitor.
A join that a rule uses can’t be deleted. To delete it, remove the rule first.
Avoid creating joins you don’t apply in a rule, because an unused join still runs during evaluation and adds processing overhead.
Limitations of cross-table rules
-
You can use one join (two tables) per rule. You can reference more than one attribute from the related table.
-
Results are reported only on the primary table; attributes from the related table are not scored.
-
Processing runs in Ataccama Cloud or on an edge instance. Pushdown processing is not supported.
-
Invalid record samples and exports of invalid records include values from the primary table only, not the related (joined) table.
-
The AI agent can’t create cross-table rules.
-
Join keys are matched by key pairs; there is no separate join-type setting.
-
Join-key transformations must preserve the attribute’s data type.
Was this page useful?