
Microsoft OneDrive Storage Connection
This article describes how to connect to Microsoft OneDrive Storage or Microsoft SharePoint.
Availability
| Data processing & catalog | Edge processing | Lineage | Exceptions |
|---|---|---|---|
✔ |
✗ |
✗ |
|
Prerequisites
-
Review how sources and connections work.
-
Create a source to add this connection to.
-
Register ONE in the Azure Portal and create a client secret. See Register an application in Microsoft Entra ID in the Microsoft documentation.
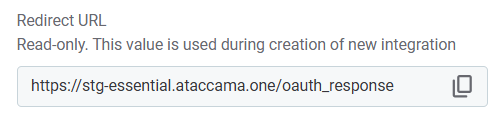
To set up the connection in Microsoft Azure Portal, you need to provide the redirect URL for ONE. The value you need to use can be found in the Redirect URL field when configuring the connection Credentials in ONE.
Add a connection
-
Go to [your source] > Connections and select Add Connection.
-
In Connection type, select OneDrive Storage.
-
Fill in the following:
-
Name: A meaningful name for your connection. Used to indicate the location of catalog items.
-
Description (Optional): A short description of the connection.
-
Drive ID (Optional): If you have multiple drives, enter the ID of the drive if you want to limit the connection to a specific drive.
-
Add credentials
Only OAuth 2.0 authentication is supported.
Always use the dedicated credential fields for authentication details such as passwords, secrets, and tokens. This ensures credentials are handled with the appropriate level of protection and reliably preserved across environments.
To keep credentials in your existing infrastructure and have ONE retrieve them at runtime, configure a secret management service instead. See secret-management-service.adoc.
| One set of credentials must be defined as default for each connection. Otherwise, DQ evaluation fails and previewing data in the catalog is not possible. |
-
Select Add Credentials.
-
Fill in the following:
-
Name: Provide a clear name for this set of credentials.
-
Description (Optional): Explain what the credentials are used for or provide other useful information.
-
Secret management service (Optional): The secret management service used to retrieve connection credentials at runtime. Available if a secret management service is configured. See secret-management-service.adoc.
-
Redirect URL: Copy this value and add it to your app registration in Azure (see Prerequisites).
-
-
Provide your Entra ID application details (found on the Overview pane of your application in Azure):
-
Client ID: The Application (client) ID.
-
Client secret: The client secret. For details about adding and accessing the client secret, see Add a client secret in the Microsoft documentation.
Client secrets expire (maximum 24 months). Plan to renew them before expiration to avoid connection failures. -
Tenant ID: The directory (tenant) ID of your Microsoft Entra instance.
This appears as a GUID (for example,
12345678-1234-1234-1234-123456789012) and is found in the Entra ID portal in App registrations > [app name] > Overview, or in Azure Active Directory > Overview.
-
-
In Refresh token, select Generate to create a new token.
This might open a Microsoft login screen. Log in to your Microsoft account and confirm access. Select Allow to continue. Once generated, the token’s expiration date is shown in Refresh token valid till.
-
To use this set of credentials by default when connecting to the data source, select Assign as default.
Add write credentials
If you want to export data to this source, add write credentials. Select Add Credentials and follow the instructions in Add credentials.
Was this page useful?