
Set Up Bring Your Own Key (BYOK)
This guide describes how to configure customer-managed AWS KMS keys to encrypt your Ataccama ONE environment’s data at rest during environment creation.
For details about data stores in scope, cross-account access, and shared responsibilities, see Bring Your Own Key (BYOK).
Prerequisites
-
An AWS account in which to create your KMS keys.
-
IAM permissions to create KMS keys in that account.
-
Access to Ataccama Cloud Portal to create an environment.
|
BYOK is configured during environment creation, as part of the Create SaaS environment wizard in Cloud Portal. Both KMS keys must exist and be validated before the wizard provisions the environment — the S3 bucket and Aurora cluster reference the keys at creation time. BYOK cannot be enabled retroactively on an environment that was provisioned with Ataccama-managed keys. |
Setup overview
To set up BYOK, complete these steps in order:
-
Step 1: Start the Create SaaS environment wizard: Start the wizard and read the onboarding values you’ll need.
-
Step 2: Create your KMS keys: Use the provided CloudFormation template or create the keys manually.
-
Step 3: Provide the key ARNs and complete provisioning: Paste the ARNs back into the wizard and finish creating the environment.
-
Step 4: Add tenant-name aliases and tags (optional): After provisioning, update the keys with the tenant (environment) name Ataccama assigned.
Step 1: Start the Create SaaS environment wizard
-
Go to portal.ataccama.com.
-
Start the Create SaaS environment wizard.
-
Proceed through the wizard until you reach the Encryption at rest step.
-
Select Customer-managed (Bring Your Own Key).

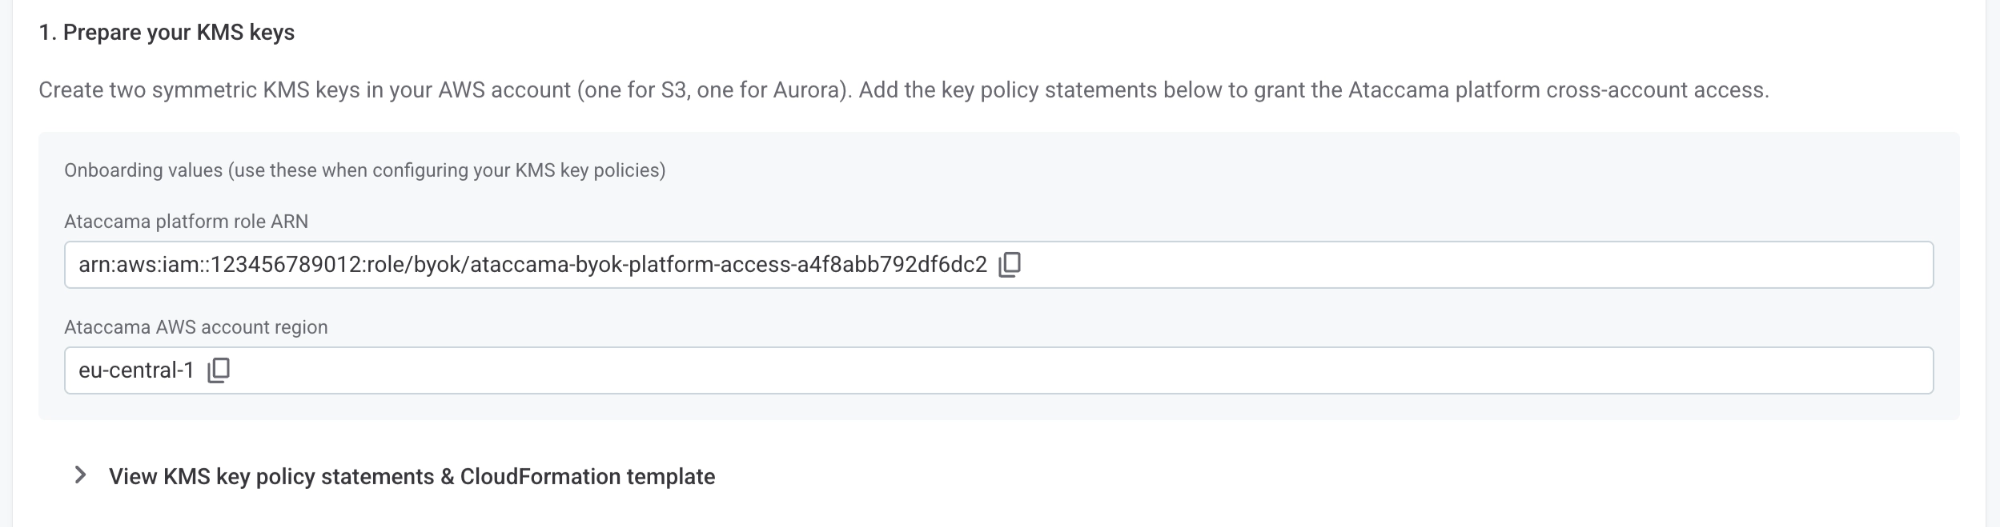
Cloud Portal displays the onboarding values you need to construct your key policies:
-
Ataccama platform role ARN: The IAM role in the Ataccama platform AWS account that the platform uses to access your KMS keys via the S3 and RDS services. This is the only Ataccama-side principal referenced in your key policies.
-
Ataccama AWS Region: The AWS Region where your environment will be deployed. Your KMS keys must be created in the same Region.
You can leave the wizard open in a browser tab while you complete Step 2, then return to finish.
Step 2: Create your KMS keys
Create the keys using either:
We recommend using CloudFormation as a single stack creates both keys with the correct policies in place.
Option A: CloudFormation
Cloud Portal provides a ready-to-deploy CloudFormation template that creates both KMS keys with the correct policies, and a deploy command with the parameter values pre-filled from your onboarding context.
-
In the wizard’s Encryption at rest step, expand View KMS key policy statements & CloudFormation template.
-
On the CloudFormation template tab, select Download to save the template (
byok-kms-keys.yaml) to your machine. -
Copy the deploy command from the Cloud Portal and run it in your terminal. The command looks as follows, with parameter values already filled in:
aws cloudformation deploy \
    --profile byok \
    --template-file byok-kms-keys.yaml \
    --stack-name <stack-name> \
    --parameter-overrides \
        AtaccamaPlatformRoleArn=<ataccama-platform-role-arn> \
        PlatformRegion=<region> \
    --region <region>
Update the
--profileflag to match the named AWS CLI profile that has permission to create KMS keys in your account. Alternatively, upload the downloaded template through the AWS CloudFormation console and create the stack from there using the same parameter values.The template automatically tags both keys with
byok=true. This tag is required: the Ataccama platform role can use your keys only while it is present. For details, see Access control model. -
After the stack reaches
CREATE_COMPLETE, retrieve the onboarding payload from the stack outputs. The template exposes both key ARNs together in a singleAtaccamaOnboardingPayloadoutput:aws cloudformation describe-stacks \ --profile byok \ --region <region> \ --stack-name <stack-name> \ --query "Stacks[0].Outputs[?OutputKey==\`AtaccamaOnboardingPayload\`].OutputValue" \ --output textThe payload contains the
S3KmsKeyArnandRdsKmsKeyArnvalues you’ll provide in Step 3.
Option B: Create keys manually
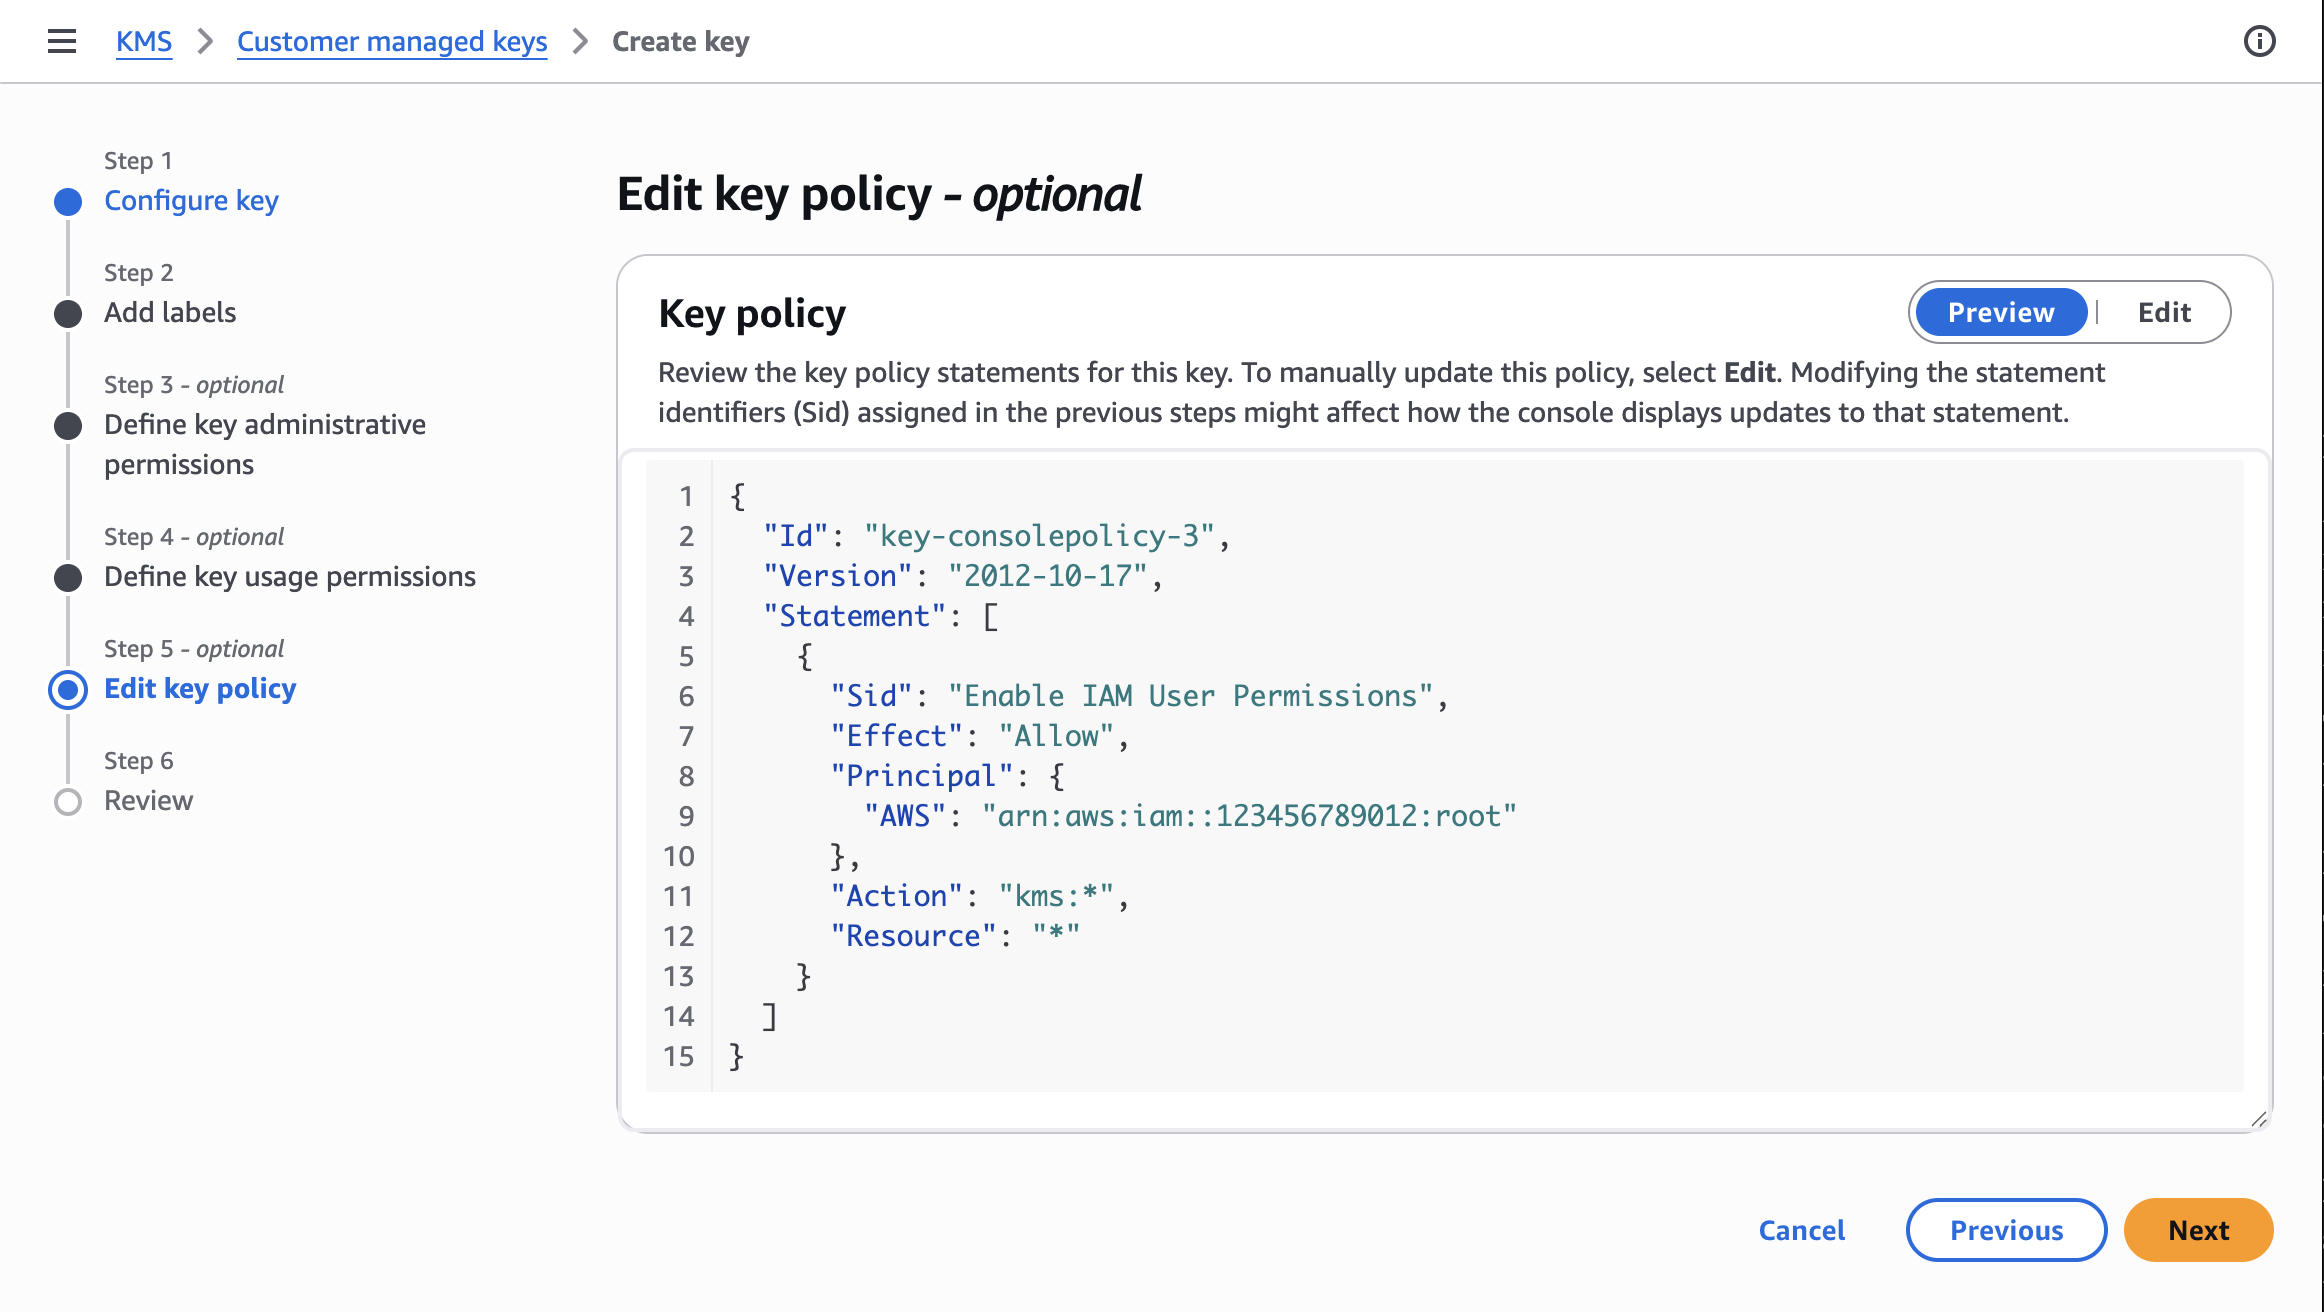
If you can’t use CloudFormation, create each key in the AWS KMS console using the symmetric "Encrypt and decrypt" key flow. Follow the Create a KMS key guide: AWS console walks you through choosing the key type, administrators, and users.
These decisions follow your own internal practices and are not BYOK-specific, except for the Edit key policy step at the end of the key-creation flow.
Create one key for S3 and one for Aurora, both in the same Region as your Ataccama environment.
|
Don’t delete or alter the default key policy statements that AWS pre-populates. They grant your account’s root user, key administrators, and key users the permissions they need to manage and use the key. Removing them can leave you unable to administer your own key. |
In the Edit key policy step, append the BYOK statements shown in Cloud Portal to the Statements array of the policy:
-
For the S3 key, append the single S3 statement (see S3 key policy statement).
-
For the Aurora key, append both Aurora statements (see Aurora key policy statements).
Cloud Portal renders the statements with all ${…} placeholders already replaced with your platform role ARN, Region, and account ID — copy them verbatim from View KMS key policy statements & CloudFormation template > Key policy statements.
Then, tag both keys with byok = true:
|
The This is a hard gate and is separate from the optional tenant-name tags in Step 4. The CloudFormation option applies this tag for you; when creating keys manually you must add it yourself. |
After saving each key, record its key ARN for use in Step 3.
The conditions on these statements enforce that the call originates from the Ataccama platform role, is made through the corresponding AWS service (S3 or RDS), and comes from the Ataccama platform AWS account.
For Aurora grant-management actions, kms:GrantIsForAWSResource further ensures grants on your key can only be issued to AWS services.
For more on how the policy statements enforce least-privilege cross-account access, see Access control model.
S3 key policy statement
{
    "Sid": "AllowAtaccamaPlatformS3Encryption",
    "Effect": "Allow",
    "Principal": {
        "AWS": "${ataccamaPlatformRoleArn}"
    },
    "Action": [
        "kms:Encrypt",
        "kms:Decrypt",
        "kms:ReEncrypt*",
        "kms:GenerateDataKey*",
        "kms:DescribeKey"
    ],
    "Resource": "*",
    "Condition": {
        "StringEquals": {
            "kms:ViaService": "s3.${platformRegion}.amazonaws.com",
            "aws:PrincipalAccount": "${platformAccountId}"
        }
    }
}
Aurora key policy statements
{
"Sid": "AllowAtaccamaPlatformDescribeKey",
"Effect": "Allow",
"Principal": {
"AWS": "${ataccamaPlatformRoleArn}"
},
"Action": ["kms:DescribeKey"],
"Resource": "*",
"Condition": {
"StringEquals": {
"kms:ViaService": "rds.${platformRegion}.amazonaws.com",
"aws:PrincipalAccount": "${platformAccountId}"
}
}
},
{
"Sid": "AllowAtaccamaPlatformRDSGrantManagement",
"Effect": "Allow",
"Principal": {
"AWS": "${ataccamaPlatformRoleArn}"
},
"Action": [
"kms:CreateGrant",
"kms:ListGrants",
"kms:RevokeGrant"
],
"Resource": "*",
"Condition": {
"StringEquals": {
"kms:ViaService": "rds.${platformRegion}.amazonaws.com",
"aws:PrincipalAccount": "${platformAccountId}"
},
"Bool": {
"kms:GrantIsForAWSResource": "true"
}
}
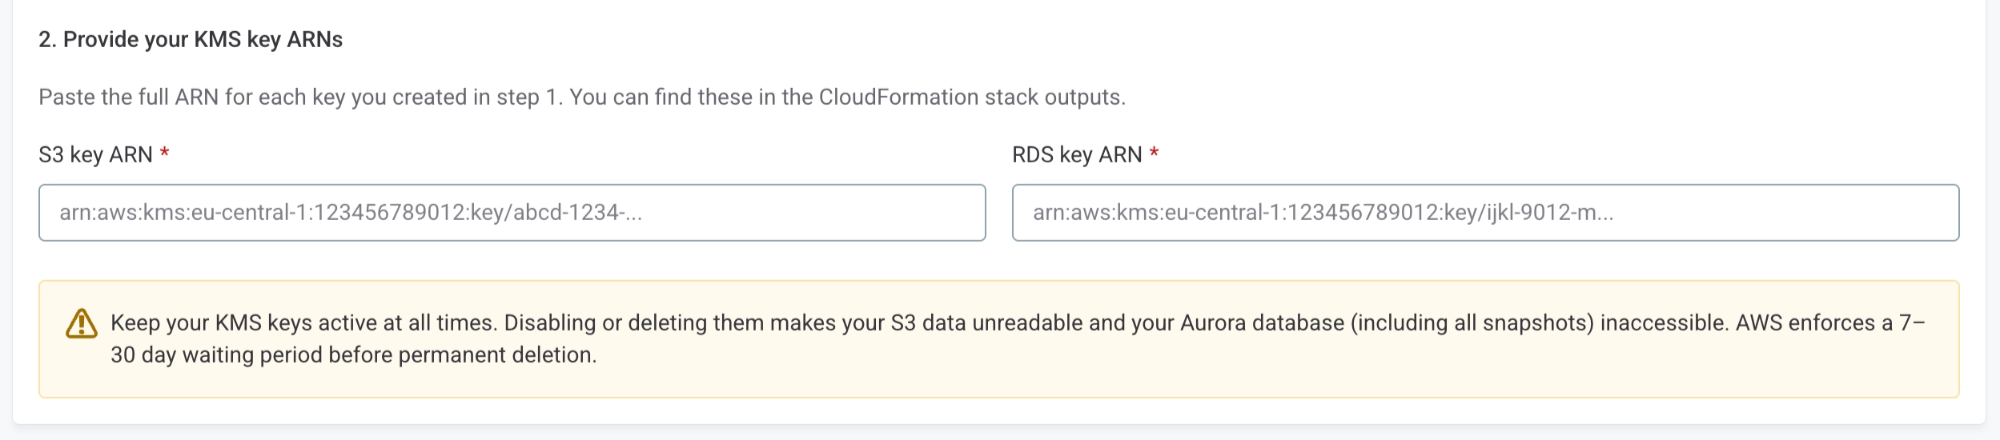
}Step 3: Provide the key ARNs and complete provisioning
-
Return to the Create SaaS environment wizard at the Encryption at rest step.
-
Under Provide your KMS key ARNs, paste the full ARN for each key into the corresponding field:
-
S3 key ARN
-
RDS key ARN
Provide full key ARNs, not alias ARNs. Aliases can be repointed to a different key over time, which would silently change what’s used to encrypt your data and could lead to corruption.
-
-
Complete the remaining wizard steps and confirm environment creation.
Provisioning uses your keys when creating the environment resources. A misconfiguration on either side, such as a wrong ARN, wrong Region, broken key policy, disabled key, causes provisioning to fail with the underlying KMS error in the wizard:
-
Aurora: When RDS creates the cluster with your key ARN, it validates access to the key and creates a grant. If the key can’t be used,
CreateDBClusterfails and provisioning stops. -
S3: Environment provisioning creates the required S3 buckets and writes the initial objects each service depends on. The first SSE-KMS write calls
GenerateDataKeyagainst your key, which fails if the key can’t be used. Provisioning stops.
Once provisioning succeeds, the S3 buckets and the Aurora cluster all use your customer-managed keys for encryption at rest.
Step 4: Add tenant-name aliases and tags (optional)
After the Create SaaS environment wizard finishes, Ataccama assigns a tenant name to your environment. You can update your keys with that name so they’re easier to identify in your AWS account.
The tags and aliases in this step are optional and cosmetic — they don’t affect access.
They’re separate from the mandatory byok = true tag you applied when creating the keys (see Step 2).
This step adds:
-
Tenant-name tags on both keys (
ataccama:automation:TenantName,aatn). -
Human-readable aliases on both keys:
-
alias/ataccama-objectstorage-byok-encryption-key-alias-for-<tenant-name>on the S3 key. -
alias/ataccama-database-byok-db-key-alias-<tenant-name>on the Aurora key.
-
The keys themselves are not replaced and the key IDs and ARNs remain unchanged, so no further action is required in Cloud Portal.
If you created the keys with CloudFormation
Redeploy the same stack with TenantName set:
aws cloudformation deploy \
    --template-file byok-kms-keys.yaml \
    --stack-name <stack-name> \
    --parameter-overrides \
        AtaccamaPlatformRoleArn=<ataccama-platform-role-arn> \
        PlatformRegion=<region> \
        TenantName=<your-tenant-name> \
    --region <region>
The stack picks up the new parameter and applies the aliases and tags to both keys.
Operational considerations
Keep your keys active
|
Disabling or deleting your KMS keys makes your data inaccessible.
AWS KMS enforces a 7–30 day waiting period before permanent key deletion, during which you can cancel the deletion. |
Key rotation
AWS KMS supports automatic annual rotation for symmetric keys.
When rotation is enabled, AWS creates new key material and retains the old material for decrypting data encrypted before rotation. This is transparent and no action is required from Ataccama.
For details about enabling rotation, see Enable automatic key rotation.
Region constraints
The KMS key ARN you provide must be for a key in the same AWS Region as your Ataccama environment. This is an AWS constraint: S3 SSE-KMS and Aurora storage encryption both require the KMS key to live in the same Region as the encrypted resource. Provide the ARN of the key located in the environment’s Region.
We strongly recommend creating multi-region keys. Should you ever need to migrate the environment to a different Region, a multi-region key can be replicated into the target Region while keeping the same key material, which makes a cross-regional migration far smoother. Single-region keys are still supported, but converting one to multi-region later isn’t possible — you would have to create and re-encrypt with a new key.
Was this page useful?