
Deploy a Self-Managed Edge
This guide describes how to deploy a self-managed Ataccama edge instance in your own AWS account using Terraform.
See Edge Processing for background on edge processing and how responsibilities are split between Ataccama and your organization.
The deployment splits into four phases:
-
You set up AWS infrastructure (VPC, S3 bucket, IAM role) and register the edge instance in the Cloud Portal.
-
Ataccama provides a Terraform deployment package customized for your environment.
-
You run Terraform from your workstation or CI/CD runner to deploy the edge into your account.
-
Ataccama confirms control plane connectivity, and the edge is registered.
Prerequisites
Complete Prepare AWS Infrastructure before starting.
After completing AWS infrastructure preparation, use those values to register the edge instance directly in the Cloud Portal.
In the Cloud Portal, open your environment and select the Settings tab. In the Edge section, switch to the Self-managed tab.
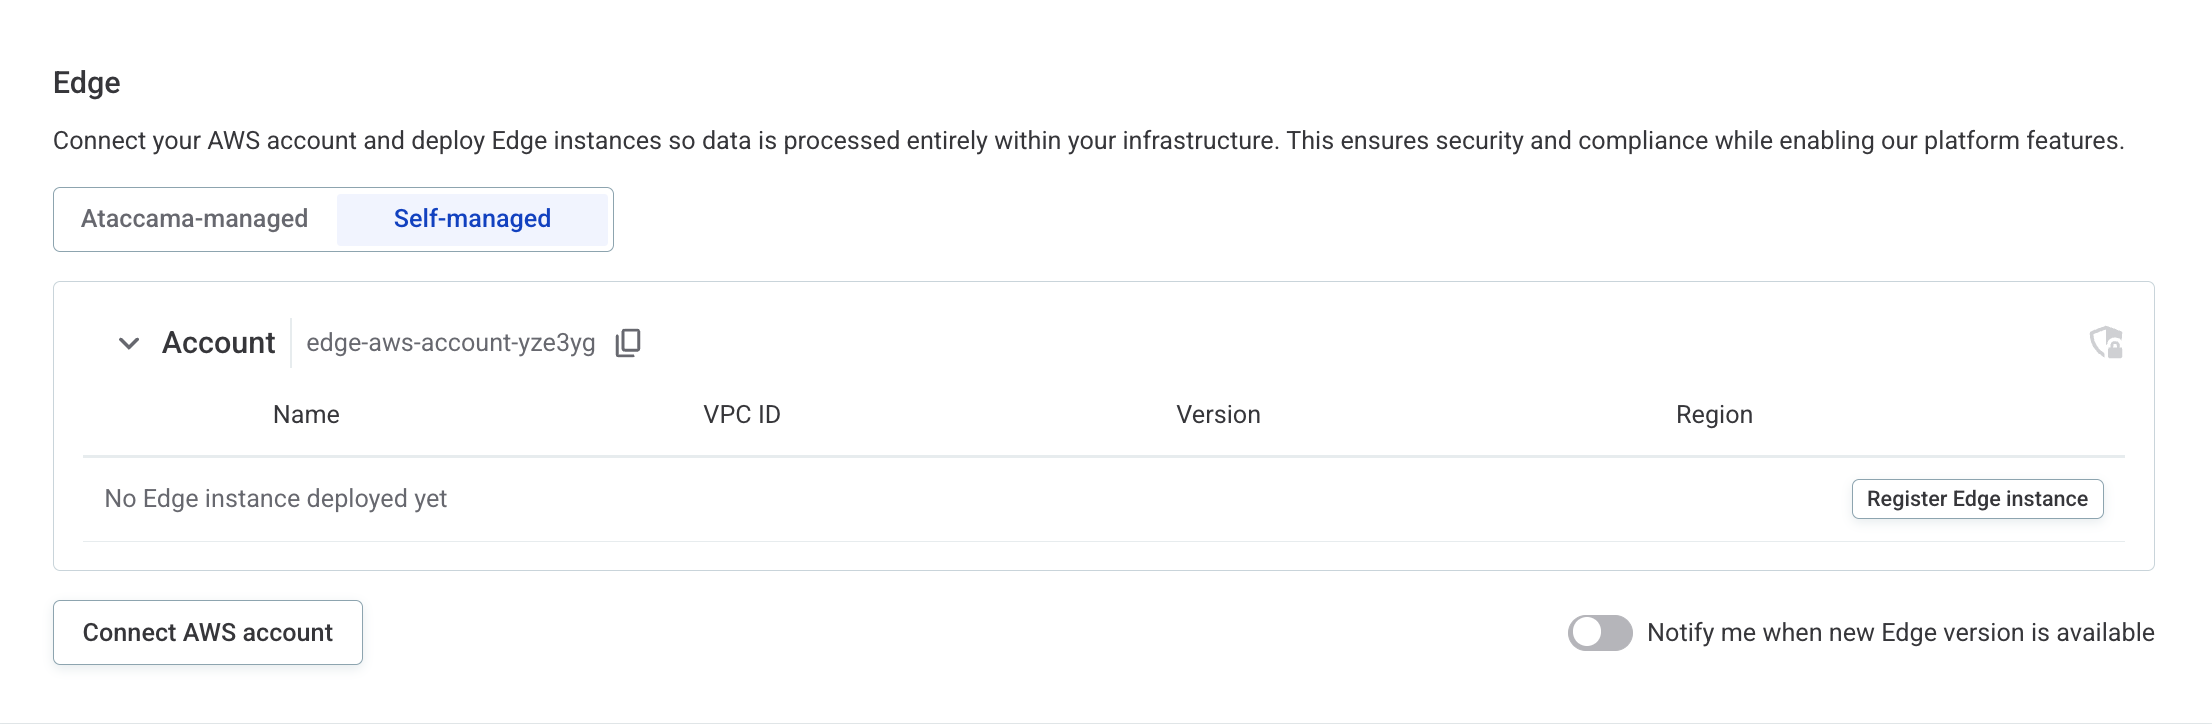
Select Register Edge instance and fill in the values from your AWS infrastructure preparation.
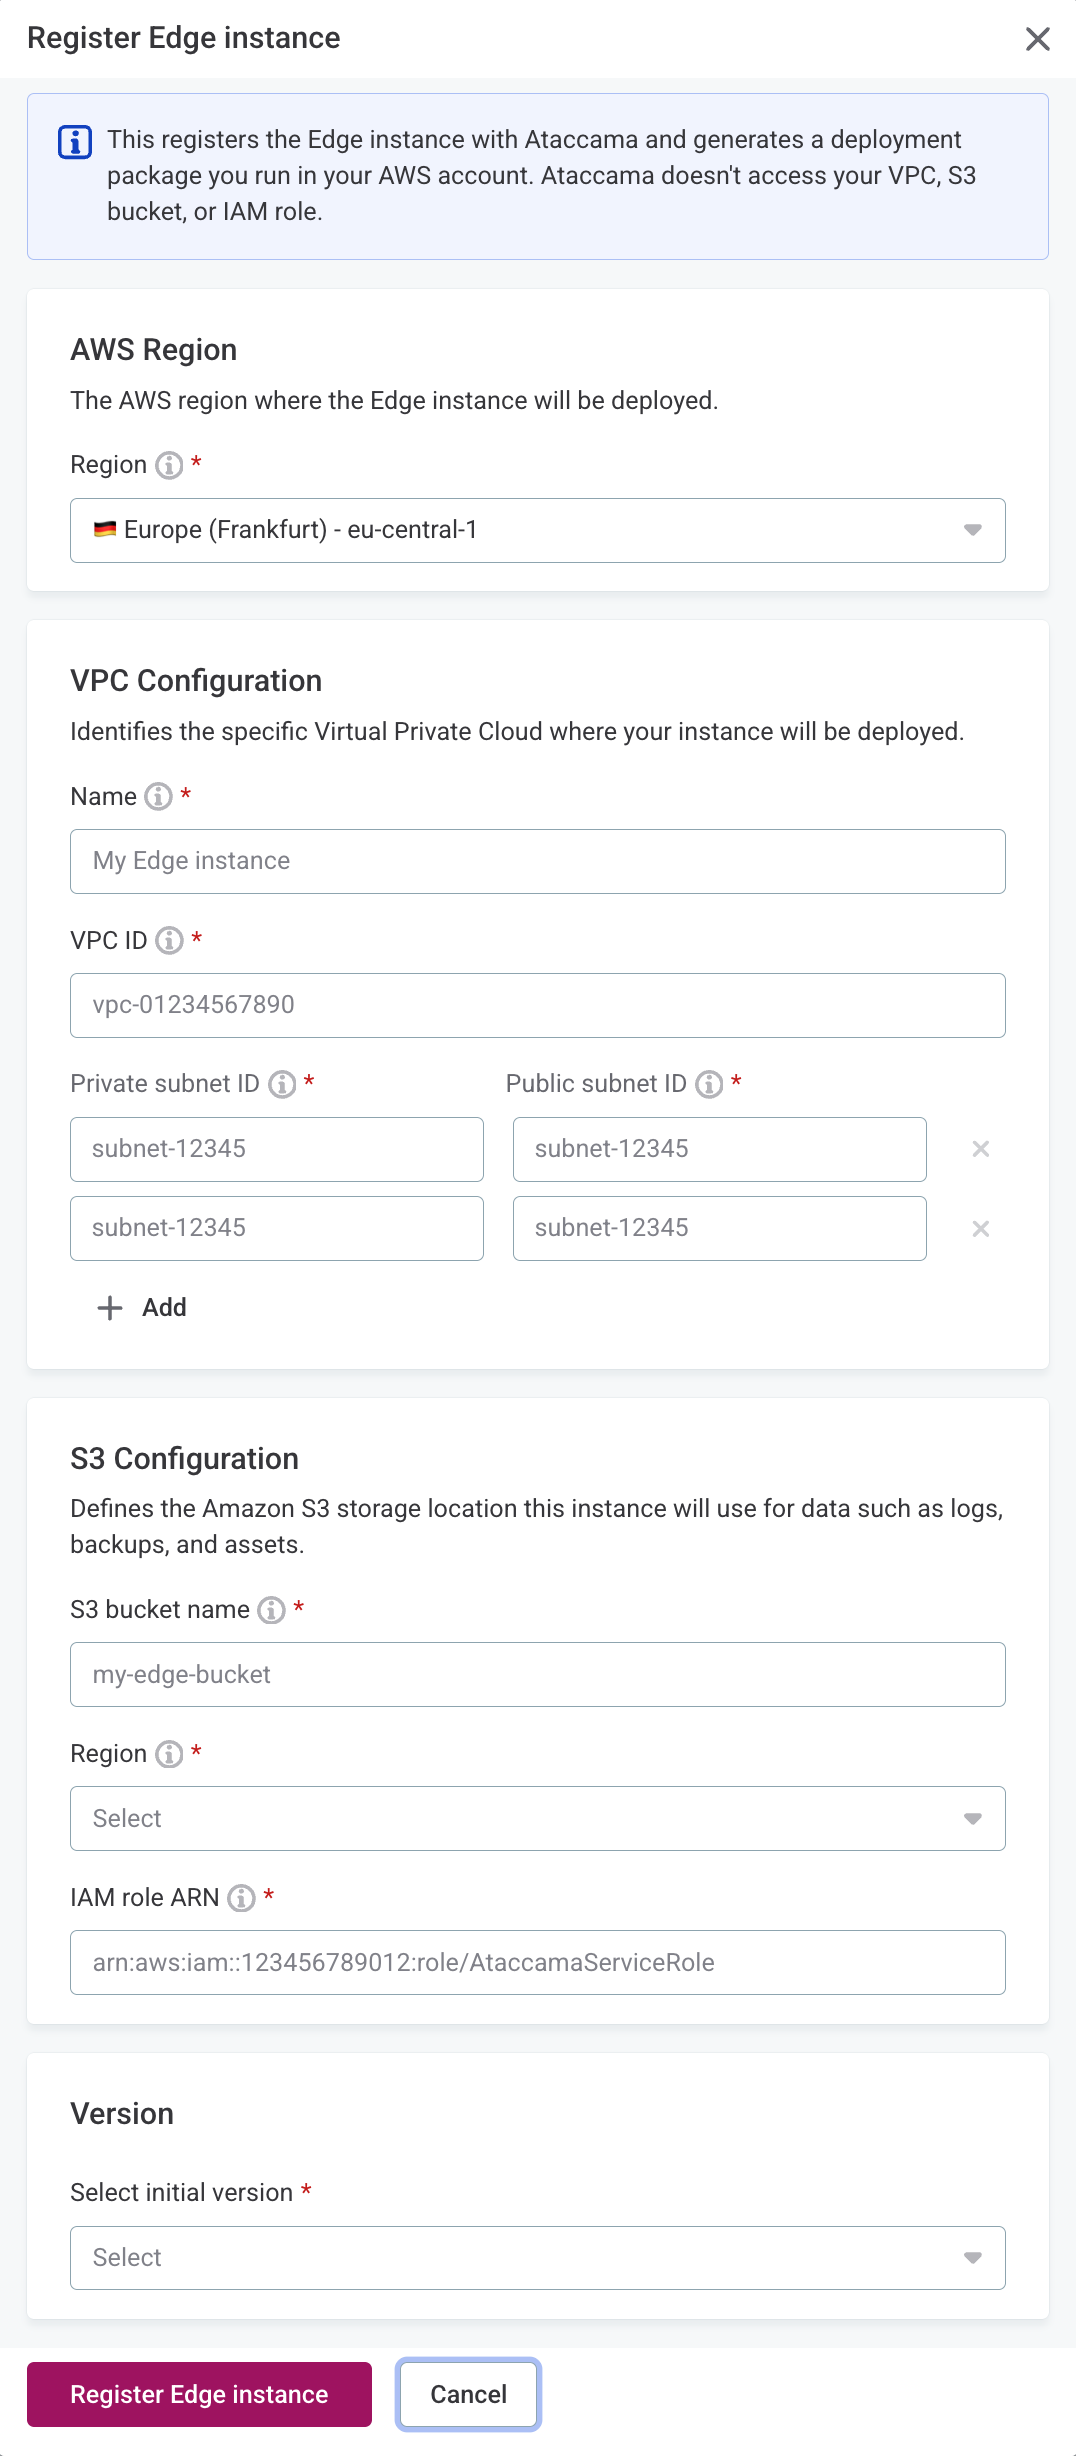
Registering the edge instance generates a deployment package. Your Ataccama Customer Success Manager then provides you with the edge deployment ZIP to run in your AWS account.
Tooling
Install the following on the machine where you will run Terraform — your workstation or a CI/CD runner:
-
Terraform CLI version 1.14 or later. See Install Terraform
-
AWS CLI v2 latest version. See Install the AWS CLI.
Confirm the AWS CLI is authenticated before proceeding:
aws sts get-caller-identityWorkstation network access
The machine running Terraform needs outbound HTTPS access to:
-
registry.terraform.io: For downloading Terraform providers (for example, the AWS provider). -
ataccama.azurecr.io: For pulling container images and OCI artifacts. -
AWS service endpoints (ECS, IAM, S3, SQS, Lambda, CloudWatch): For Terraform AWS provider API calls.
IAM permissions for Terraform
The IAM principal used to run Terraform needs administrative access to the target AWS account, or at minimum permissions to create and manage the following resources:
-
ECS
-
IAM
-
S3
-
SQS
-
Lambda
-
EFS
-
KMS
-
CloudWatch
|
Ataccama doesn’t receive an IAM role in your account. Cross-account communication is initiated outbound by the edge using an IAM role created by Terraform and scoped to the SQS operations required for control plane messaging. |
Deployment artifacts
Before starting installation, confirm you have received the following materials from Ataccama:
-
Edge deployment ZIP via secure download. Contains Terraform manifests, component configurations, Lambda artifacts, and the bundled
terraform-aws-edgeinstancemodule.Bucket name, IAM role ARN, and Region are pre-populated from values you supplied during onboarding.
-
Container registry credentials via secure credential sharing. Username and password for
ataccama.azurecr.io. Unique to your environment.
|
Store credentials in a secrets manager or a Each credential set is issued per environment; do not reuse across environments. |
Bundle contents
The edge deployment ZIP contains all Terraform configuration and component definitions.
|
Do not modify the bundled module or the preconfigured variable files. |
<edge_name>-<version>-<timestamp>-bundle.zip
├── main.tf                          # Root Terraform configuration
├── terraform.tf                     # Provider version constraints
├── variables.tf                     # Input variable declarations
├── outputs.tf                       # Output definitions
├── terraform.tfvars.json            # Edge + cluster configuration (pre-populated)
├── *.auto.tfvars.json               # Component configurations (pre-populated, ~10 files)
├── registry.auto.tfvars.json        # Container registry credentials — you fill this in
├── vpc-endpoint-policy.json         # VPC endpoint policy — apply to customer-provisioned VPC endpoints (see VPC endpoints in the Prepare AWS Infrastructure guide)
├── artifacts/                       # Lambda deployment packages
│   ├── edgeinteractivejobs/*.zip
│   └── dqresultsreader/*.zip
└── terraform-aws-edgeinstance/      # Bundled Ataccama module — do not modify
Install the edge
Step 1: Fill in container registry credentials
Extract the edge deployment ZIP, open registry.auto.tfvars.json, and fill in the credentials provided by Ataccama:
{
  "registry_secret": {
    "username": "<username-from-ataccama>",
    "password": "<password-from-ataccama>"
  }
}|
To avoid writing secrets to disk, export them as an environment variable: |
|
If you pull images from Amazon ECR (see (Optional) Use a custom registry prefix), do not provide ECR does not support registry credentials; authentication uses the ECS task execution role’s IAM permissions instead, which the module grants automatically.
Setting |
(Optional) Use a custom registry prefix
By default, container images are pulled from ataccama.azurecr.io/saas-edge/.
To pull from your own registry or pull-through cache, set registry_prefix in registry.auto.tfvars.json:
{
  "registry_prefix": "internal-registry.corp.local/saas-edge/",
  "registry_secret": {
    "username": "",
    "password": ""
  }
}
With this example, image references resolve as follows:
ataccama.azurecr.io/saas-edge/dqc-runtime-job:16.6.5-saas-edge
→ internal-registry.corp.local/saas-edge/dqc-runtime-job:16.6.5-saas-edge
Amazon ECR
When registry_prefix points to an Amazon ECR registry (host format <account-id>.dkr.ecr.<region>.amazonaws.com/), omit registry_secret entirely.
ECR authentication is handled through IAM on the ECS task execution role, no username and password are used:
{
  "registry_prefix": "111122223333.dkr.ecr.eu-west-1.amazonaws.com/saas-edge/"
}
For end-to-end examples of serving the edge images from ECR — including an ECR pull-through cache setup with Terraform — see Set Up Amazon ECR for Edge Container Images.
Step 2: Configure optional parameters
The deployment runs without any changes for most environments. Some AWS accounts have organizational requirements that need an additional variable to be set.
Set optional parameters by creating a new *.auto.tfvars.json file in the bundle root.
Terraform automatically loads any file matching *.auto.tfvars.json, so you don’t need to edit the pre-populated variable files.
If none of the following applies to your environment, continue to the next step.
(Optional) Attach an IAM permissions boundary
If your organization requires an IAM permissions boundary on every IAM role, set iam_permissions_boundary_arn to the ARN of your boundary policy.
Terraform then attaches it to every IAM role the edge module creates: ECS task and task execution roles, Lambda execution roles, the cleanup scheduler role, and the EventBridge target role.
Create a file named, for example, permissions-boundary.auto.tfvars.json in the bundle root:
{
  "iam_permissions_boundary_arn": "arn:aws:iam::<your-account-id>:policy/<boundary-policy-name>"
}
When the variable is left unset, no permissions boundary is attached and role creation is unchanged.
|
The permissions boundary must allow the actions the edge roles need (ECS, SQS, S3, KMS, Secrets Manager, CloudWatch Logs, STS, and Lambda operations).
A boundary that is too restrictive can let |
(Optional) Disable the S3 public access block
By default, the edge creates an S3 public access block (all four block settings enabled) on its S3 buckets.
If your organization denies the s3:PutBucketPublicAccessBlock action through a Service Control Policy (SCP), creating this resource fails and the deployment stops with an AccessDenied error.
To opt out, set s3_block_public_access to false by creating a new file, for example s3.auto.tfvars.json, in the bundle root:
{
  "s3_block_public_access": false
}
This is safe: AWS blocks public access on all new buckets by default (since April 2023), so the buckets stay non-public without the explicit resource.
(Optional) Restrict security group egress
By default, the edge security groups allow broad outbound access: HTTPS (443) to 0.0.0.0/0 on every component, in addition to — on the processing job components — HTTP (80, for Snowflake JDBC OCSP checks) and TCP 1024–65535 to 0.0.0.0/0 for reaching customer data sources on any port.
If your organization requires tightly scoped outbound access, two variables let you replace these rules with your own narrowed set:
-
vpc_external_egress_rules: General egress (container registry, platform and AWS APIs), applied to every edge component. -
vpc_external_datasource_egress_rules: Data source egress (Snowflake OCSP, JDBC), applied only to the processing job components that connect to your data sources.
Each rule targets exactly one of cidr_ipv4, cidr_ipv6, prefix_list_id, or referenced_security_group_id (for example, a VPC endpoint prefix list instead of the open internet), and ip_protocol defaults to tcp.
To override, create a new file, for example egress.auto.tfvars.json, in the bundle root:
{
  "vpc_external_egress_rules": {
    "aws_and_platform_apis": {
      "description": "AWS and platform APIs via VPC endpoints",
      "from_port": 443,
      "to_port": 443,
      "prefix_list_id": "pl-0123456789abcdef0"
    },
    "container_registry": {
      "description": "Ataccama container registry",
      "from_port": 443,
      "to_port": 443,
      "cidr_ipv4": "0.0.0.0/0"
    }
  },
  "vpc_external_datasource_egress_rules": {
    "corporate_postgres": {
      "description": "Corporate PostgreSQL",
      "from_port": 5432,
      "to_port": 5432,
      "cidr_ipv4": "10.20.0.0/24"
    }
  }
}
When both variables are left unset, these built-in rules are used and behavior is unchanged.
|
Setting a variable fully replaces its default rules — the values are not merged with the built-ins. Include every destination the edge still needs, or it will fail at runtime: HTTPS (443) to the container registry and the platform and AWS APIs, HTTP (80) if you use public Snowflake as a data source, and one rule per data source. See Edge runtime network access for the full list of outbound destinations. |
|
A map key used in |
(Optional) Attach sidecar containers
Attach additional containers — for example a security agent, log forwarder, or APM collector — alongside the edge’s own containers. Sidecars are injected into every edge ECS task: the processing jobs and the management services. A single definition therefore applies uniformly across the edge.
Set the sidecars variable by creating a new file, for example sidecars.auto.tfvars.json, in the bundle root.
The following example shows every available field; only image is required:
{
  "sidecars": {
    "security-agent": {
      "image": "111122223333.dkr.ecr.eu-west-1.amazonaws.com/security-agent:1.4.2",
      "essential": false,
      "cpu": 128,
      "memory": 256,
      "user": "1000",
      "entrypoint": ["/bin/sh", "-c"],
      "command": ["/opt/agent/run.sh"],
      "readonly_root_filesystem": true,
      "environment": {
        "AGENT_MODE": "monitor",
        "LOG_LEVEL": "info"
      },
      "volumes": ["agent-scratch"],
      "mount_points": [
        {
          "source_volume": "agent-scratch",
          "container_path": "/var/run/agent",
          "read_only": false
        }
      ],
      "iam_statements": [
        {
          "sid": "AgentPutMetrics",
          "effect": "Allow",
          "actions": ["cloudwatch:PutMetricData"],
          "resources": ["*"]
        }
      ]
    }
  }
}
Each entry is keyed by the container name.
image is required and is used exactly as given.
The edge’s task execution role pulls it: an image in a private Amazon ECR registry in the edge’s own AWS account needs no extra setup, because the execution role already has ECR pull permissions.
An image in any other registry must be reachable from the edge subnets, and a private one must allow the pull.
All other fields are optional:
-
essential(defaulttrue): Whether a failed sidecar stops the whole task. Set it tofalsefor non-critical sidecars. -
cpuandmemory: CPU units and memory (MiB) reserved for the sidecar. -
user: The user or UID the container runs as. -
entrypointandcommand: Override the image’s entry point and command. -
readonly_root_filesystem(defaulttrue): Mount the container root filesystem read-only. -
environment: A map of environment variables. -
volumesandmount_points: Ephemeral Fargate volumes to declare and mount into the sidecar. -
iam_statements: Additional IAM policy statements appended to each task role.
Each edge task’s Fargate size is computed automatically as the smallest valid CPU and memory combination that covers the task’s own containers plus all sidecar reservations, so a sidecar reservation never overflows the task budget.
If the combined total exceeds the largest Fargate task size (16 vCPU / 120 GiB), terraform plan fails with a message telling you to lower the reservations.
When the variable is left unset, no sidecars are added and behavior is unchanged.
|
Sidecars are added to every edge task, so each If you restricted security group egress (see (Optional) Restrict security group egress), make sure the sidecar’s image registry and any endpoints the sidecar calls are covered by your egress rules, or the image pull or the sidecar itself fails at runtime. |
(Optional) Customize the driver registry prefixes
Driver bundles for the Generic connector and native connectors such as Palantir Foundry are pulled at runtime from repository prefixes in the Amazon ECR of the edge instance’s own AWS account and region: generic-connectors for the Generic connector and byod for native connectors.
The deploy driver job is scoped to pull only from these prefixes, so a bundle published anywhere else is refused at deployment.
The defaults work for most deployments. Override them only if they collide with an existing repository layout, for example, an Amazon ECR pull-through-cache prefix that fronts another registry.
To override, create a new file, for example driver-registry.auto.tfvars.json, in the bundle root and set your own prefixes.
The following example moves both under a dedicated ataccama/ namespace (replace with values that fit your layout):
{
  "driver_generic_repository_prefix": "ataccama/generic-connectors",
  "driver_native_repository_prefix": "ataccama/byod"
}
Publish each driver bundle under the configured prefix and set the connection’s Artifact URL to match.
Whether you use the default or a custom prefix, the pull permissions are scoped to the edge instance’s own AWS account and region: an Amazon ECR repository in another account or region cannot be used, even with an allowlist entry.
To additionally trust a registry outside Amazon ECR, for example, a customer-operated Artifactory or Harbor, list it as a host/repository-prefix entry in the same file:
{
  "driver_additional_allowed_registries": ["harbor.example.com/ataccama-drivers"]
}|
Anonymous registries are not supported: the connection must reference the registry credentials (see Use other registries). Do not add the Ataccama-managed registry. |
When the variables are left unset, the default prefixes apply and behavior is unchanged.
(Optional) Allow pull-through-cache imports for a customer-controlled driver registry
If your driver prefix is served by an Amazon ECR pull-through cache — the same mechanism many edges use to source application images — the deploy driver job cannot import a bundle that is not yet cached, because it is not granted ecr:BatchImportUpstreamImage by default.
Opt in per edge in your driver-registry.auto.tfvars.json:
{
  "driver_registry_allow_pull_through_cache": true
}
This re-grants ecr:BatchImportUpstreamImage, scoped to your driver prefixes, so the first pull of a bundle that is not yet cached succeeds.
|
You control the upstream. The registry a cached prefix fronts is fixed by your ECR pull-through-cache rule (its upstream registry URL), not by Ataccama — so point the driver prefix’s rule only at a registry you operate. Enabling this makes every image reachable through that upstream namespace deployable as a driver by anyone with connection-edit rights on the edge, so front a dedicated, narrow upstream repository rather than your whole registry. Amazon ECR has no setting to restrict which repositories a pull-through cache may import, but an ECR repository creation template scoped to the driver prefix (applied for pull-through cache) lets you stamp immutable image tags and a restrictive repository policy onto each cached repository as it is created — and lets the cache create those repositories without granting the deploy driver job Never enable this where the fronted upstream is a shared or Ataccama-managed registry. |
Step 3: Configure a Terraform backend
Configure a Terraform backend according to your organization’s standards — for example, an S3 backend with DynamoDB state locking.
Add a backend block to terraform.tf or create a separate backend configuration file.
This stores your Terraform state remotely and enables collaboration and state locking.
Step 4: Initialize Terraform
From the root of the extracted bundle directory:
cd <extracted-bundle-directory>
terraform init
The Ataccama edge module is bundled locally; no external module registry access is required. However, access to the public Terraform Registry is required to download Terraform providers (such as the AWS provider).
Initializing the backend...
Initializing provider plugins...
- Installing hashicorp/aws ...
Terraform has been successfully initialized!
Step 5: Review and apply
terraform plan -out=edge.tfplanReview the planned resources. Terraform creates resources in your AWS account only, including:
-
ECS cluster and Fargate task definitions.
-
IAM roles and policies (scoped to your account; no Ataccama access).
-
SQS queues for control plane communication.
-
Lambda functions for auxiliary processing jobs.
-
CloudWatch log groups.
-
VPC security groups.
When satisfied with the plan, apply it:
terraform apply edge.tfplanDeployment typically completes in 10–20 minutes. Don’t interrupt the process once it has started.
Terraform waits for ECS tasks to start successfully before completing.
Step 6: Verify and register
After terraform apply completes:
-
Navigate to CloudWatch > Log groups >
/ataccama/edge/and confirm log streams are being written without repeated errors. -
Email your Ataccama contact with:
-
The edge name (from Terraform outputs).
-
Your AWS account ID and Region.
-
Confirmation that
terraform applycompleted without errors.
-
Ataccama will verify control plane connectivity and confirm the edge is registered.
|
Terraform waits for ECS tasks to start successfully during the |
Configure data sources to use the edge
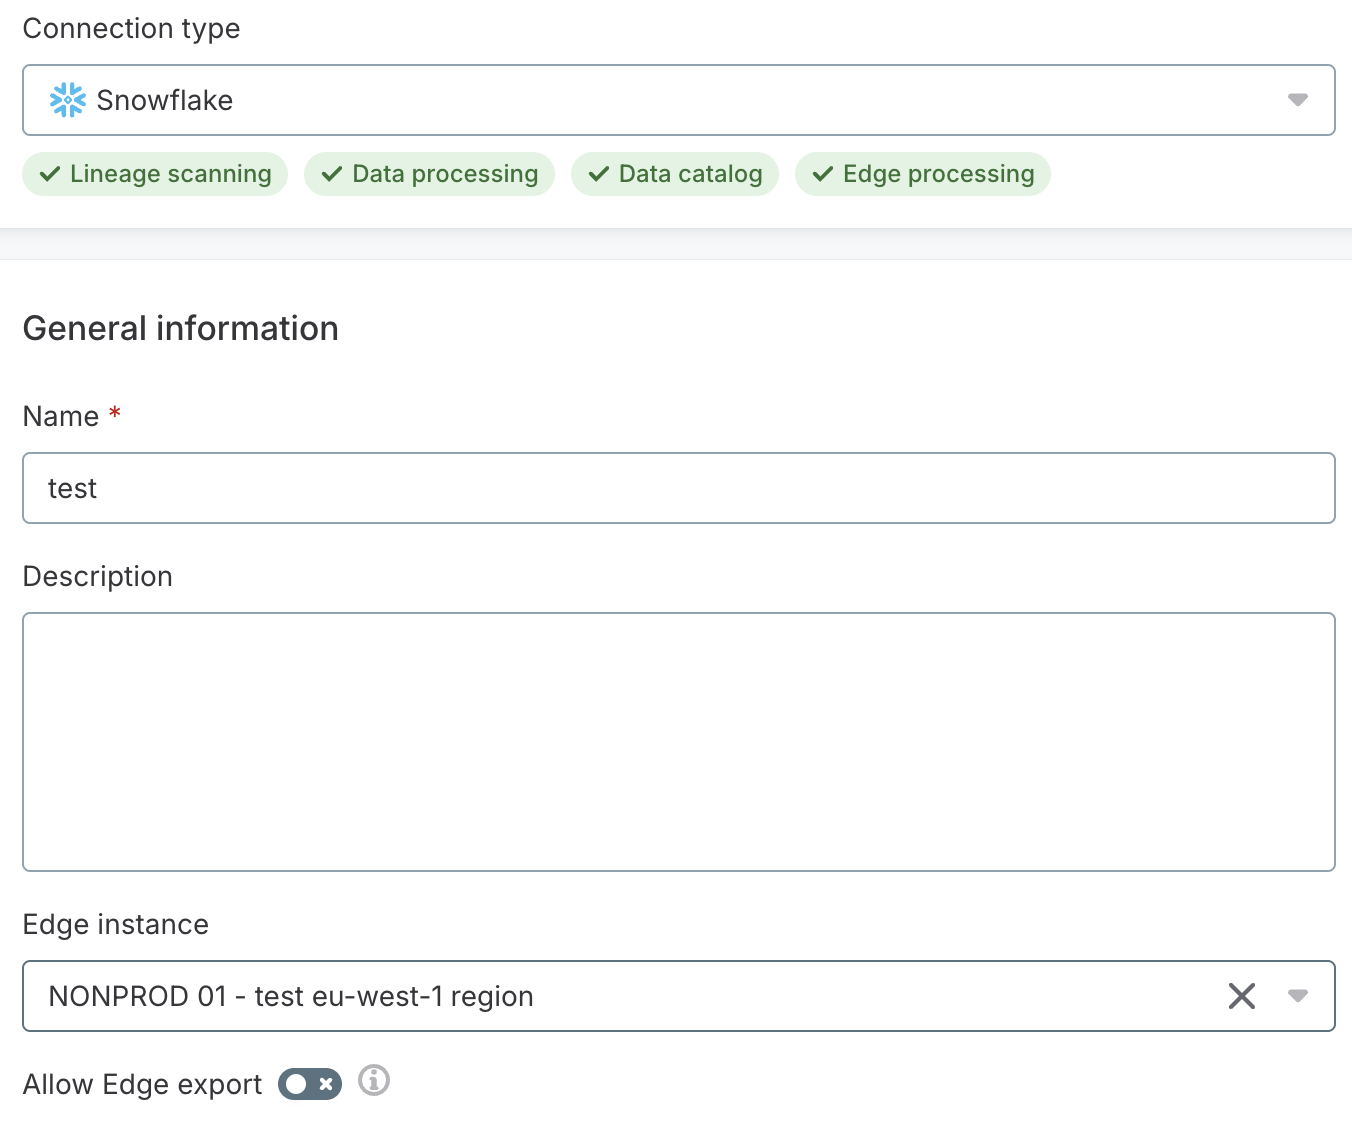
When creating or editing your data source connection, select the edge instance you want to use. All edge instances available for your environment appear in this list.
Then select a Compliance mode for the connection. It controls which processing results can leave your edge environment:
-
Strict (no data leaves Edge): No sensitive data leaves your edge environment.
-
Normal (DQ results visible): DQ results, including invalid record samples and full profiling results, are available in Ataccama ONE.
-
Allow exports: The same as Normal (DQ results visible), and data processed on this connection’s edge can also be loaded to Reference data.
For details, see Compliance mode.
| See also Data source connectivity. |
If your data source credentials are stored in AWS Secrets Manager, see Set Up AWS Secrets Manager Access for Edge Processing.
Test and save the connection. Then browse and import metadata for a schema, table, or file of your choosing. As a result, a new catalog item appears in your Catalog.
For detailed instructions, see Sources and Import Metadata.
If any step results in an error, contact Ataccama Support.
Edge runtime network access
All edge traffic is outbound from your VPC. No inbound firewall rules, VPN tunnels, or peering connections are required.
The Terraform module does not create VPC endpoints for self-managed edges.
By default, AWS API traffic and traffic to ataccama.azurecr.io leave your VPC through the NAT gateway.
We recommend provisioning your own VPC endpoints to keep AWS API traffic on the AWS network:
See VPC endpoints for setup details. NAT-only egress is supported but highly discouraged. Although AWS API calls are TLS-encrypted in transit, NAT routing exposes them to public-internet paths and incurs NAT data-transfer charges. Only use it if you cannot provision VPC endpoints in your environment.
Allow the following outbound destinations:
| Destination | Protocol | Port | Purpose |
|---|---|---|---|
|
HTTPS |
443 |
Pull container images and OCI artifacts. |
AWS SQS (your Region) |
HTTPS |
443 |
Control plane task exchange (cross-account IAM). |
AWS S3 (your Ataccama environment’s Region) |
HTTPS |
443 |
Data exchange with the Ataccama-managed cloud bucket via presigned URLs. |
AWS service APIs |
HTTPS |
443 |
S3, KMS, Secrets Manager, SQS, CloudWatch Logs, STS, CloudWatch, ECS, IAM, and Lambda API calls. Routed through the NAT gateway or, if provisioned, through your VPC endpoints. |
|
For provisioning details — including the endpoint policy to apply and how to keep cross-region traffic private when the edge runs in a different AWS region than your Ataccama control plane — see VPC endpoints. |
Upgrade the edge
Your edge version remains supported for 90 days after a new release is available. When your version is approaching the end of this window, a warning is displayed in the Ataccama Cloud Portal.
Upgrades are not applied automatically; you control the timing.
|
Exceeding the 90-day supported window might result in degraded functionality or loss of control plane connectivity. Don’t skip versions: apply each release in sequence. If you have missed multiple versions, contact Ataccama Support before proceeding. |
To upgrade:
-
Download the new edge deployment ZIP from the Cloud Portal.
-
Extract it into a new directory. Keep the previous directory as a backup.
-
Open
registry.auto.tfvars.jsonand fill in your container registry credentials (same as for the initial installation). -
Copy the
*.auto.tfvars.jsonfiles you created for optional parameters (see Step 2: Configure optional parameters) from the previous directory into the new one. The deployment ZIP does not contain them; without them, the upgrade silently drops your custom tags, IAM permissions boundary, egress rules, or sidecars. Copy them by name, never with a glob (see Promote configuration between environments). -
Configure the Terraform backend. Must match the backend used for the initial installation.
-
Run the following sequence:
terraform init
terraform plan -out=edge.tfplan
terraform apply edge.tfplan
Terraform applies only the changes between the previous and new versions. Resources that haven’t changed are not touched and no data is lost during an upgrade.
Deploy the edge in multiple environments
A typical rollout uses separate Ataccama Cloud environments for development and production, each with its own edge instance deployed in its own AWS account.
Each edge instance is registered separately and deployed from its own edge deployment ZIP: the pre-populated variable files and the VPC endpoint policy identify that edge instance and its control plane resources, and the bundled module, component versions, and Lambda artifacts form a single version-consistent set.
|
Never retarget a deployment package to another edge instance by editing individual values. The control plane resources it points to (the cross-account access role, messaging, and cloud storage) exist only for the environment it was generated for. Every environment requires its own registration and its own generated package, even when you derive the deployment from another environment’s bundle (see Derive the production deployment from the development bundle). |
Promote configuration between environments
Only the configuration you added on top of the bundle moves from development to production, never the bundle itself. Everything pre-populated in the package is environment-specific or release-specific and always comes from the new environment’s own package (in the derivation flow, verified against it).
Copy the following from development and then adjust:
-
The
*.auto.tfvars.jsonfiles you created for optional parameters (see Step 2: Configure optional parameters), such as custom resource tags, an IAM permissions boundary, security group egress rules, or sidecar containers. Update the per-environment values inside them: anEnvironmenttag value, account-specific ARNs, a sidecar image registry.
Recreate the following with production values:
-
Container registry access: a custom
registry_prefixpointing at the production account’s registry, in addition to whatever credentials that registry needs — none for Amazon ECR. Credentials for the Ataccama registry are issued per environment and never carry over. -
Your Terraform backend configuration. Each environment needs its own state: never point two edge deployments at the same state.
-
The operational setup around the deployment: your registry mirror (see Set Up Amazon ECR for Edge Container Images), CI/CD pipeline, and firewall rules toward your data sources.
Changes made directly to pre-populated files or to the bundled module are neither supported nor carried over.
Move such values into your own *.auto.tfvars.json files where a variable exists, or contact Ataccama where none does.
The derivation flow (Derive the production deployment from the development bundle) flags every such change in its verification diff.
Deploy the production edge
-
Prepare the production AWS account following Prepare AWS Infrastructure. The production edge needs its own VPC, subnets, S3 bucket, and IAM role and, if used, its own VPC endpoints and registry mirror.
-
Register the edge instance in the production environment in the Cloud Portal, as described in Prerequisites. To keep production on the release you validated in development, see Keep environments comparable.
-
Extract the production edge deployment ZIP into a new directory, separate from the development deployment. Keep an untouched copy of the ZIP for later comparison.
-
Configure production registry access in
registry.auto.tfvars.json: fill in the credentials issued for the production environment or, if you pull images through your own registry, setregistry_prefixfor the production registry with the credentials that registry requires — omitted entirely for Amazon ECR (see Step 1: Fill in container registry credentials). -
Copy the files you created in Step 2: Configure optional parameters from the development deployment into the bundle root, and update per-environment values (see Promote configuration between environments). Copy them by name: your files share the
*.auto.tfvars.jsonsuffix with the pre-populated component files andregistry.auto.tfvars.json, so a glob drags those along and overwrites the production package. -
Configure a separate Terraform backend for the production deployment (see Step 3: Configure a Terraform backend).
-
Initialize, plan, and apply as described in Step 4: Initialize Terraform and Step 5: Review and apply, then verify following Step 6: Verify and register.
Keep environments comparable
A deployment package is generated at the release selected at registration, by default the latest. If the development edge was deployed some time ago, a default production registration therefore produces a newer release than the one you reviewed in development.
To promote a reviewed configuration unchanged:
-
Find the release your development edge runs, shown on the edge instance in the Cloud Portal and in the upgrade dialog. The version in the deployment ZIP file name is the bundled module version, not the release identifier.
-
Confirm that release is still within the support window (see Upgrade the edge): the Select initial version field offers earlier releases without checking the window.
Registering at an older release also consumes what remains of its support window and both environments must then upgrade through each intermediate release to catch up. When in doubt, upgrade the development edge to the current release first and revalidate your review there.
-
Register the production edge, choosing that release in the Select initial version field of the Register Edge instance dialog, and download its deployment package.
-
Compare freshly extracted copies of the two deployment ZIPs with a recursive diff. Use the original packages, not your working directories.
On the same release, the packages differ only in the environment-specific values described in Environment-specific values in the package. Differences beyond those files, for example, different component versions, mean the environments are not on the same release. Upgrade the older one first, then review the comparison results.
A matching package does not make the environments identical. The package encodes only what you provided at registration; the infrastructure you built following Prepare AWS Infrastructure lives outside it and can differ between the two accounts (for example, in VPC endpoints and their endpoint policy, egress routing and firewall rules, the registry mirror and its repository settings, and organization-level controls such as service control policies or policy checks on your Terraform runs). Verify the production account against the same Prepare AWS Infrastructure checklist you used for development rather than relying on the package comparison.
Derive the production deployment from the development bundle
The standard flow in Deploy the production edge starts from the production package.
If your change management requires proof that production runs the artifact validated in development, derive the production deployment from the development bundle instead. With both edge instances on the same release, the two flows produce the same content, and the final diff is the proof:
-
Register the production edge at the same release as the development edge and download its deployment package (see Keep environments comparable).
-
Copy the validated development bundle directory, excluding Terraform working files: the
.terraform/directory, state files, and plan files. Keep.terraform.lock.hclas it pins the provider builds you validated and appears in the final diff because generated packages are delivered without one. -
Remove the development backend configuration (the
backendblock interraform.tfor your separate backend file) from the copy and configure a new, empty production backend (see Step 3: Configure a Terraform backend). Initializing the copy against the development backend produces a plan that replaces the live development edge. -
Replace
terraform.tfvars.json,vpc-endpoint-policy.json, andregistry.auto.tfvars.jsonin the copy with the files from the production package. Replace whole files, never merge values manually.Replacing
vpc-endpoint-policy.jsononly keeps the package consistent: you still apply the production policy to the VPC endpoints you provisioned in the production account (see VPC endpoints). -
Configure production registry access in
registry.auto.tfvars.jsonand update the per-environment values in the files you created, as in Deploy the production edge. -
Search the assembled directory, including files you did not create, for leftover development identifiers, such as the development AWS account ID, Region, registry hosts, and environment tag values.
-
Compare the assembled directory against the extracted production package with a recursive diff, reviewing files that exist on only one side the same way as content changes.
Expect differences in the files you created, the registry and per-environment values you updated, and
.terraform.lock.hcl.Differences inside
terraform-aws-edgeinstance/or in pre-populated variable files are unsupported changes that the next upgrade discards. Revert them and use a supported variable to achieve the same result (see Bundle contents and Set Up Amazon ECR for Edge Container Images).Any other difference is a change your organization introduced in development. Review every one and confirm it is intended in production; carried-over changes remain yours to maintain.
-
Continue with Step 4: Initialize Terraform through Step 6: Verify and register.
Environment-specific values in the package
The environment identity of a deployment package is contained in two files:
-
terraform.tfvars.json: The edge instance name and display name, the environment (tenant) name, your AWS account ID and Region, the S3 bucket and IAM role you provided during registration, VPC and subnet IDs, the resource name prefix, the Ataccama control plane coordinates, and the ARN of the access role created for this edge instance in the Ataccama platform account. -
vpc-endpoint-policy.json: The same identity projected into the endpoint policy, such as your account ID, the edge role name prefix, and the environment-scoped Ataccama bucket names.
All remaining pre-populated files are release-specific (component versions and Lambda artifact references), not environment-specific.
Observability
Observability ships telemetry to Ataccama’s monitoring stack using the configuration included in the edge deployment ZIP.
Troubleshooting edge deployment
terraform init fails: module not found
Run terraform init from the root of the extracted directory, where main.tf is located.
The terraform-aws-edgeinstance/ subdirectory must be present alongside main.tf.
terraform apply fails with UnauthorizedAccess
Run aws sts get-caller-identity to confirm which IAM principal is active.
Verify it has the permissions listed in IAM permissions for Terraform.
Deployment fails with AccessDenied when creating the S3 public access block
Running terraform apply fails with an AccessDenied error while creating aws_s3_bucket_public_access_block when your organization denies the s3:PutBucketPublicAccessBlock action through a Service Control Policy (SCP).
Opt out by setting s3_block_public_access to false, then run terraform apply again.
For instructions, see (Optional) Disable the S3 public access block.
ECS tasks stuck in PENDING or immediately STOPPED
Check CloudWatch Logs for the affected task. Common causes include:
-
Incorrect container registry credentials: Verify
usernameandpasswordinregistry.auto.tfvars.json. -
No internet egress: Confirm the subnet’s route table points to a NAT gateway and that outbound HTTPS (port 443) is permitted by security groups and network ACLs.
-
SCP or firewall blocking egress: If your organization enforces AWS Service Control Policies, ensure ECS task roles aren’t blocked from calling SQS or pulling from
ataccama.azurecr.io.
Destroy the edge
|
The resources Terraform creates hold only technical, re-provisionable content (artifact and configuration storage and the EFS cache), which destroy completely removes. The DQ-encryption KMS key is scheduled for deletion with a 7-day recovery window; if you need to restore DQ results encrypted under it, cancel the scheduled deletion in your AWS account within that window. Before proceeding, save any other data you need from the edge environment. Notify Ataccama afterwards so the edge registration can be removed from the control plane. |
terraform destroyAppendix: AWS resources deployed by Terraform
The following AWS resources are created by Terraform in your account.
Foundation (always deployed)
-
KMS: Two customer-managed keys (general and DQ-encryption), plus a KMS alias. Rotation every 90 days, 7-day deletion window.
For how these keys are used and why, see Encryption and key management.
-
Secrets Manager: One secret holding the Ataccama container registry credentials (KMS-encrypted), used when the Ataccama registry is accessed directly.
The credential is issued per edge instance and can be re-issued by Ataccama at any time. The secret is deleted immediately on uninstall (no recovery window) to keep
terraform destroyclean. Keep your own backup if your policy requires one. -
S3: One bucket for Lambda artifacts. Versioned, KMS-encrypted; lifecycle rule expires old versions after seven days.
Holds only Lambda deployment artifacts shipped with each release and no customer data. Contents are fully recreated on the next deployment, so the bucket is removed together with the installation when the edge is destroyed.
An explicit per-bucket public access block (all four block settings enabled) is created by default on the edge’s S3 buckets. If your organization denies the
s3:PutBucketPublicAccessBlockaction through an SCP, the deployment fails; opt out withs3_block_public_access = false, see Deployment fails with AccessDenied when creating the S3 public access block. AWS blocks public access on all new buckets by default (since April 2023), so the buckets stay non-public either way. -
EFS: One file system, KMS-encrypted. Two access points (
drivers,otel). Mount target per private subnet. Dedicated security group with NFS ingress rules from each workload.Mounts Ataccama connectors to processing jobs and the metadata-browsing Lambda, and collects observability data before shipping (when enabled).
The file system is a distribution cache and temporary workspace only. Content is re-downloaded automatically, which is why AWS Backup is not enabled for it.
-
VPC endpoints: Not created by the Terraform module for self-managed edges. Customers provision their own (recommended) or rely on NAT egress; see VPC endpoints.
ECS management cluster
-
Plane Manager: Permanent ECS service, two replicas. Owns its security group and IAM task role.
Consumes the local SQS job-status queue and uses
sts:AssumeRoleto reach both the Ataccama edge-access role and the customer result-S3 role. -
Connectors Rollout: Task definition only; no permanent service. Run on demand by EventBridge when the container image changes. Mounted to the EFS
driversaccess point. -
Observability service An ECS service running an OpenTelemetry collector, CloudWatch Exporter, and config-init container. S3 bucket stores configuration; EFS provides supporting storage.
ECS job cluster
-
Processing jobs: Six task definitions (DQC, anomaly detection, anomaly detection auxiliary, metadata import, Snowflake pushdown, create-table). Ephemeral — started on demand by the Plane Manager, stopped when work completes.
-
One shared security group for all job tasks, egress any.
-
Per task definition: Task execution role, task role, CloudWatch log group.
Lambda functions
-
Metadata Browsing / Connection Testing: Java 21, 1.3 GB, x86_64, VPC-attached. Mounts the EFS
driversaccess point.Alias current plus provisioned concurrency. Event-source mapping on the Ataccama-managed SQS request queue.
-
DQ Results Reader: Java 21, 1 GB, x86_64, VPC-attached. Alias current plus provisioned concurrency.
Event-source mapping on the Ataccama-managed result-reader SQS queue.
-
Cleanup: Python 3.12, non-VPC, no EFS. Invoked daily by EventBridge Scheduler. Trims old Lambda versions (keeps three).
Messaging and events (local)
-
SQS: One main queue and one DLQ for ECS job-status-changed events. KMS-encrypted. Max-receive 3 → DLQ.
-
EventBridge rule: ECS Task State Change on the job cluster forwards to the local SQS queue.
-
EventBridge rule: Custom event
com.ataccama.edge.connectorsrollout / image_updatetriggersecs:RunTaskon Connectors Rollout. -
EventBridge Scheduler: Daily invocation of the Cleanup Lambda via a dedicated scheduler IAM role.
Was this page useful?