
Configure Matching Plan and Step
This article explains how to configure a matching plan and the Matching step to define the business rules and logic for identifying, comparing, and grouping duplicate records.
|
The guide builds on the concepts described in Working with Matching and How the Matching Step Works. In addition, it assumes you are familiar with the ONE Desktop tool and ONE plans specifically. |
Before you start
Before configuring your matching plan, you must first configure matching on your entities:
-
For instance layer entities (consolidation implementation style): See Configure Instance Layer Matching.
-
For master layer entities (mixed implementation style): See Configure Master Layer Matching.
What is a matching plan?
When you configure matching on your entity and generate your project, ONE MDM automatically creates a matching plan based on your configuration settings.
A matching plan is a visual representation of the actual matching logic and rules that will be applied to your data. It contains:
- The necessary input and output columns
-
Columns needed for the matching process, from raw input data to final matching results.
These columns are mapped in the respective Integration Input and Integration Output steps, which are used to read incoming data and write the matching results respectively.
The matching plan writes back only the columns mapped in its Integration Output step (the entity’s matching columns). A value the plan computes for a column that belongs to another layer (for example, a source or cleansing column) is used during matching but is not stored and is not available to later consolidation actions.
To persist such a value, compute it in the transition plan of the layer that owns the column. See Creating an Instance Layer Model.
- Matching proposals output
-
Used in instance layer matching if matching proposals are configured.
Additional output columns are mapped in a second Integration Output step, supporting the manual review and approval workflow. This step needs to be connected to the appropriate endpoint of the Matching step.
- Input and output Record Counters
-
Steps that count records entering and exiting the matching process and log data flow progress. As such, they also allow you to monitor how quickly the data was processed at this point of the data flow (end-to-end or for a specific batch size).
While optional, we highly recommend including them in manually built plans. Generated transformation plans include them by default (configurable in metadata Preferences).
Key transformation steps
In addition to the steps included by default in the generated matching plan, there are two core steps you need to add manually:
- Matching Values step
-
Handles the preparation, standardization, and transformation of input values before they enter the matching logic to improve matching accuracy.
While not required, the Matching Values step is the most commonly used approach for creating
mat_attributes, as it provides built-in transformations for matching preparation. - Matching step
-
The core matching engine that implements your business rules and performs the actual record comparison and grouping logic.
Where to find generated matching plan
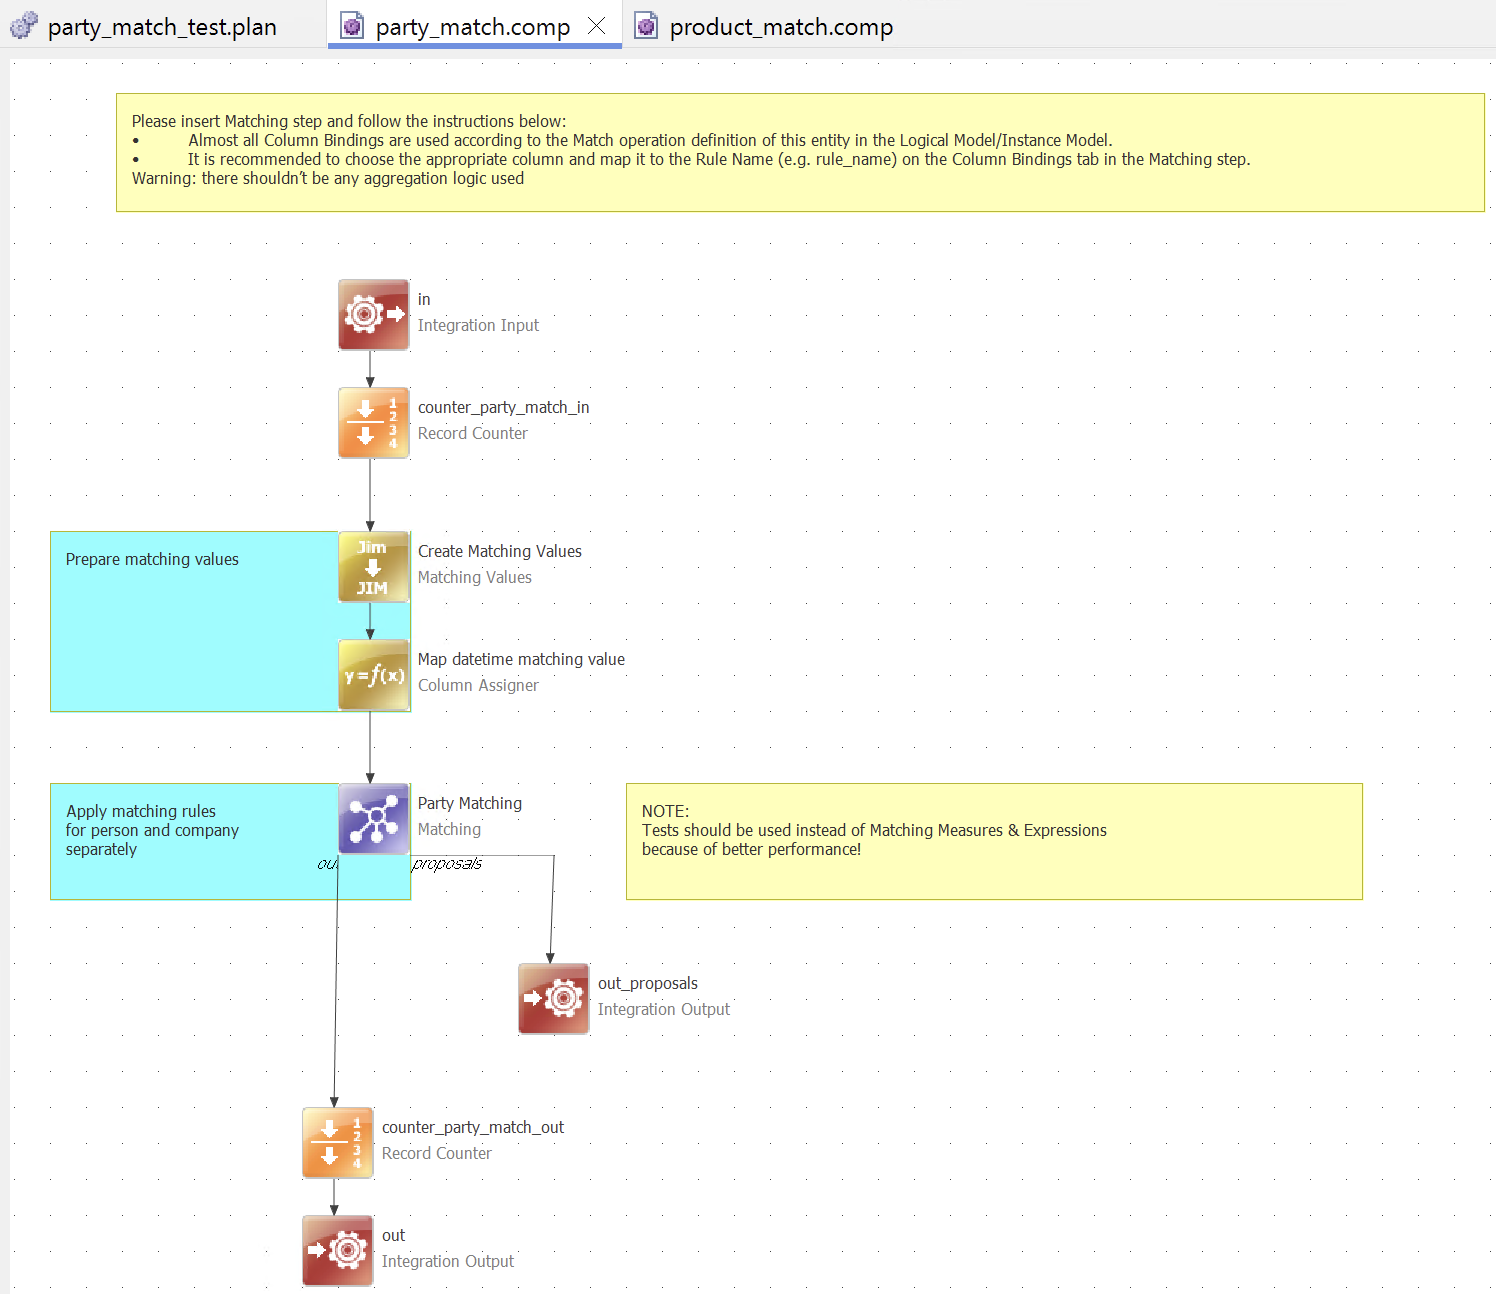
After generating your project, you can find your matching plans in the MDM project structure.
In ONE Desktop, navigate to Transformations > <entity_name> > <entity_name>_match. For example: Transformations > party > party_match.
Double-click the matching plan to open it on the canvas. Or, right-click and select Open.
|
For an example of what a matching plan can look like, run the MDM example project and navigate to Files > test > matching folder in ONE Desktop.
Open the This opens the underlying matching plan wrapped in the |
Configure the Matching Values step
Prepare data for matching by standardizing data format and addressing inconsistencies.
Typically, this includes converting all text to uppercase, removing double spaces, repeated characters, diacritics, and other special characters. You can also substitute specific characters or remove all digits or letters from the column.
Double-click the Matching Values step to open the configuration.

For each attribute that is included in the matching, define the following:
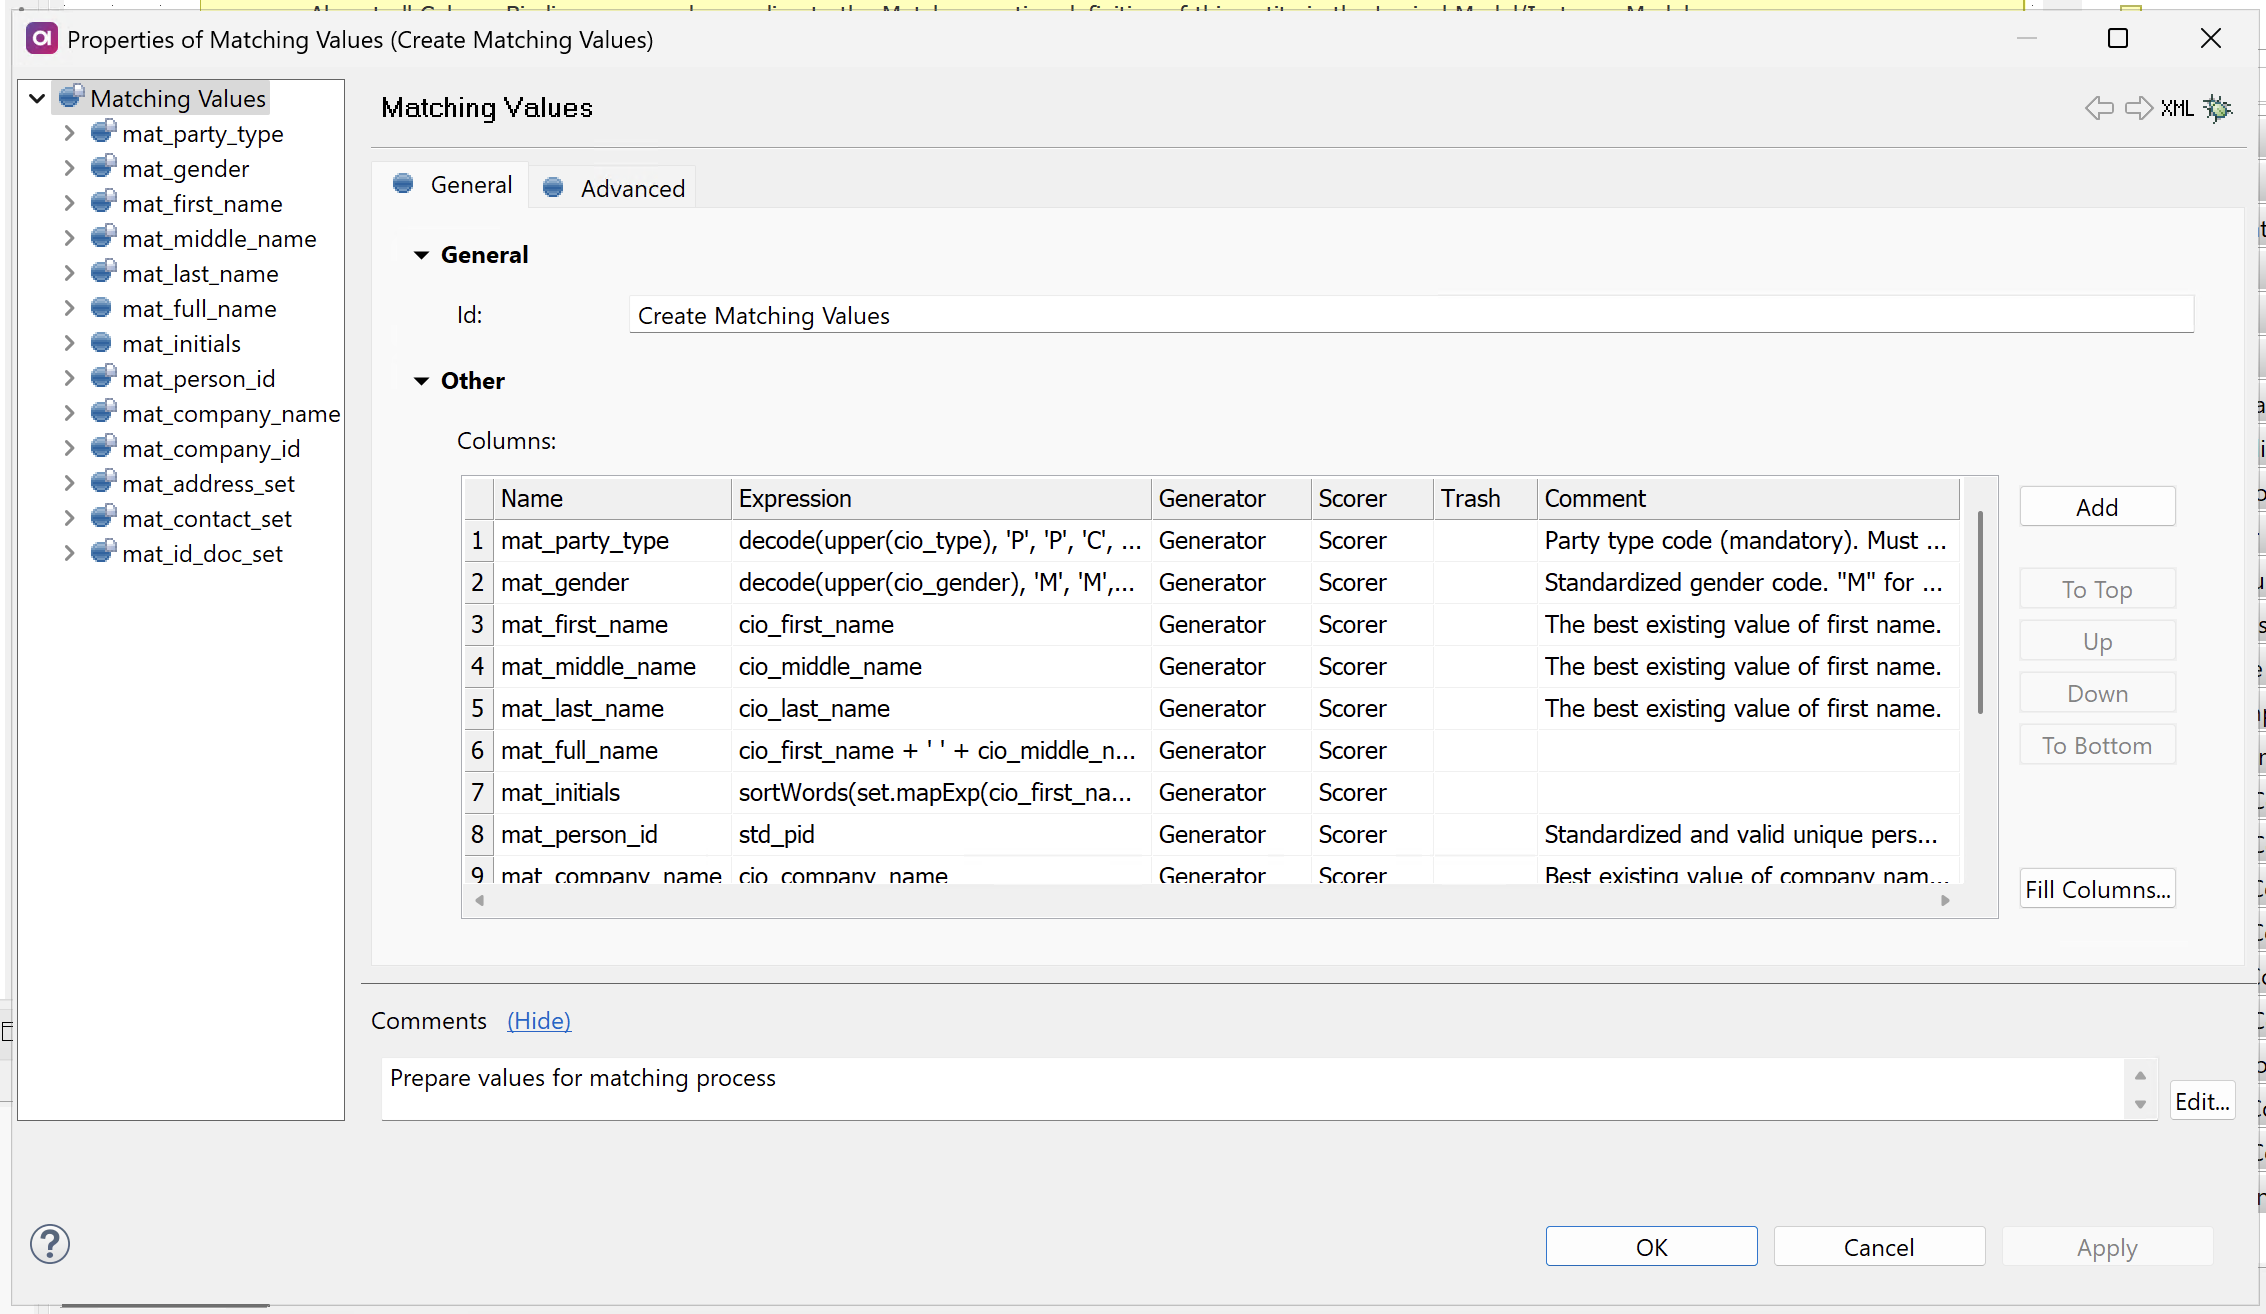
-
Name: The name of the column for storing the transformed value.
The standard naming convention is to use the attribute name prefixed by
mat_. This helps differentiate it from values from other attributes and layers (such assrc_for the source layer,cio_,std_,exp_,sco_,dic_for the cleanse layer,cmo_for the master layer).For an overview of the most commonly used prefixes, see Column naming conventions > Prefixes.
-
Expression: Defines how the target
mat_attribute is populated from input data for the matching process. For example,std_first_name + " " + std_last_namewould create a full name for matching (mat_full_name).Non-string inputs require explicit conversion. Use expressions like iif (sco_birth_date < 10000, toString(cio_birth_date,'yyyy-MM-dd'), null)or handle non-strings in a separate Column Assigner step to preserve data types. -
Generator: Defines how the input value is transformed. The following options are available:
-
Supported Characters: Specifies which characters are allowed in the value. Any other characters are removed or substituted, as defined in Substitute With (typically not used).
Use Ctrl+Space to choose from the list of predefined character sets (all, only letters, only digits, only lowercase or only uppercase letters, only whitespaces). If left empty, all characters are supported.
For example, setting this to "only letters" (
[:letter:]) would transformJohn123toJohn. -
Substitute With: Specifies how unsupported characters (as defined in Supported Characters) are replaced. If left empty (typical setting), unsupported characters are removed without any substitution.
-
Do Remove Accents: If selected, diacritics are removed (for example,
åbecomesa). -
Do Remove Repeated Chars: If selected, repeated characters are removed (for example,
aaabecomesa). This setting is typically not needed. -
Do Squeeze Whitespaces: If selected, repeated whitespace characters are replaced with a single space character.
-
Do Upper Case: If selected, all strings are converted to uppercase.
-
-
Scorer: Used to indicate that the input value has been changed. By default, the Key is defined as
MV_CHANGED. -
Trash: The name of the column for storing removed characters. You can use this to verify whether the step performs as expected as well as to gain a better understanding of the state of your input data.
Configure the Matching step
Within your matching plan, you need to configure the Matching step to define your business rules and logic. Drag the Matching step from the step palette to the canvas and connect the endpoints to other steps in the plan.
In case your plan includes an Integration Output step for matching proposals, connect it to the proposal_out endpoint of the Matching step (for reference, see the image in What is a matching plan?).
This connection is required for the server to start and run the plan successfully.
Double-click the Matching step to open the configuration.

| If you’re using the Matching step for testing matching logic in a ONE plan or for match rule sandboxing, you also need to configure standalone bindings. See Configure standalone bindings. |
Configure partitions
Start by defining partition expressions to split your data appropriately.
In the left navigation menu of your Matching step, select Partitions.
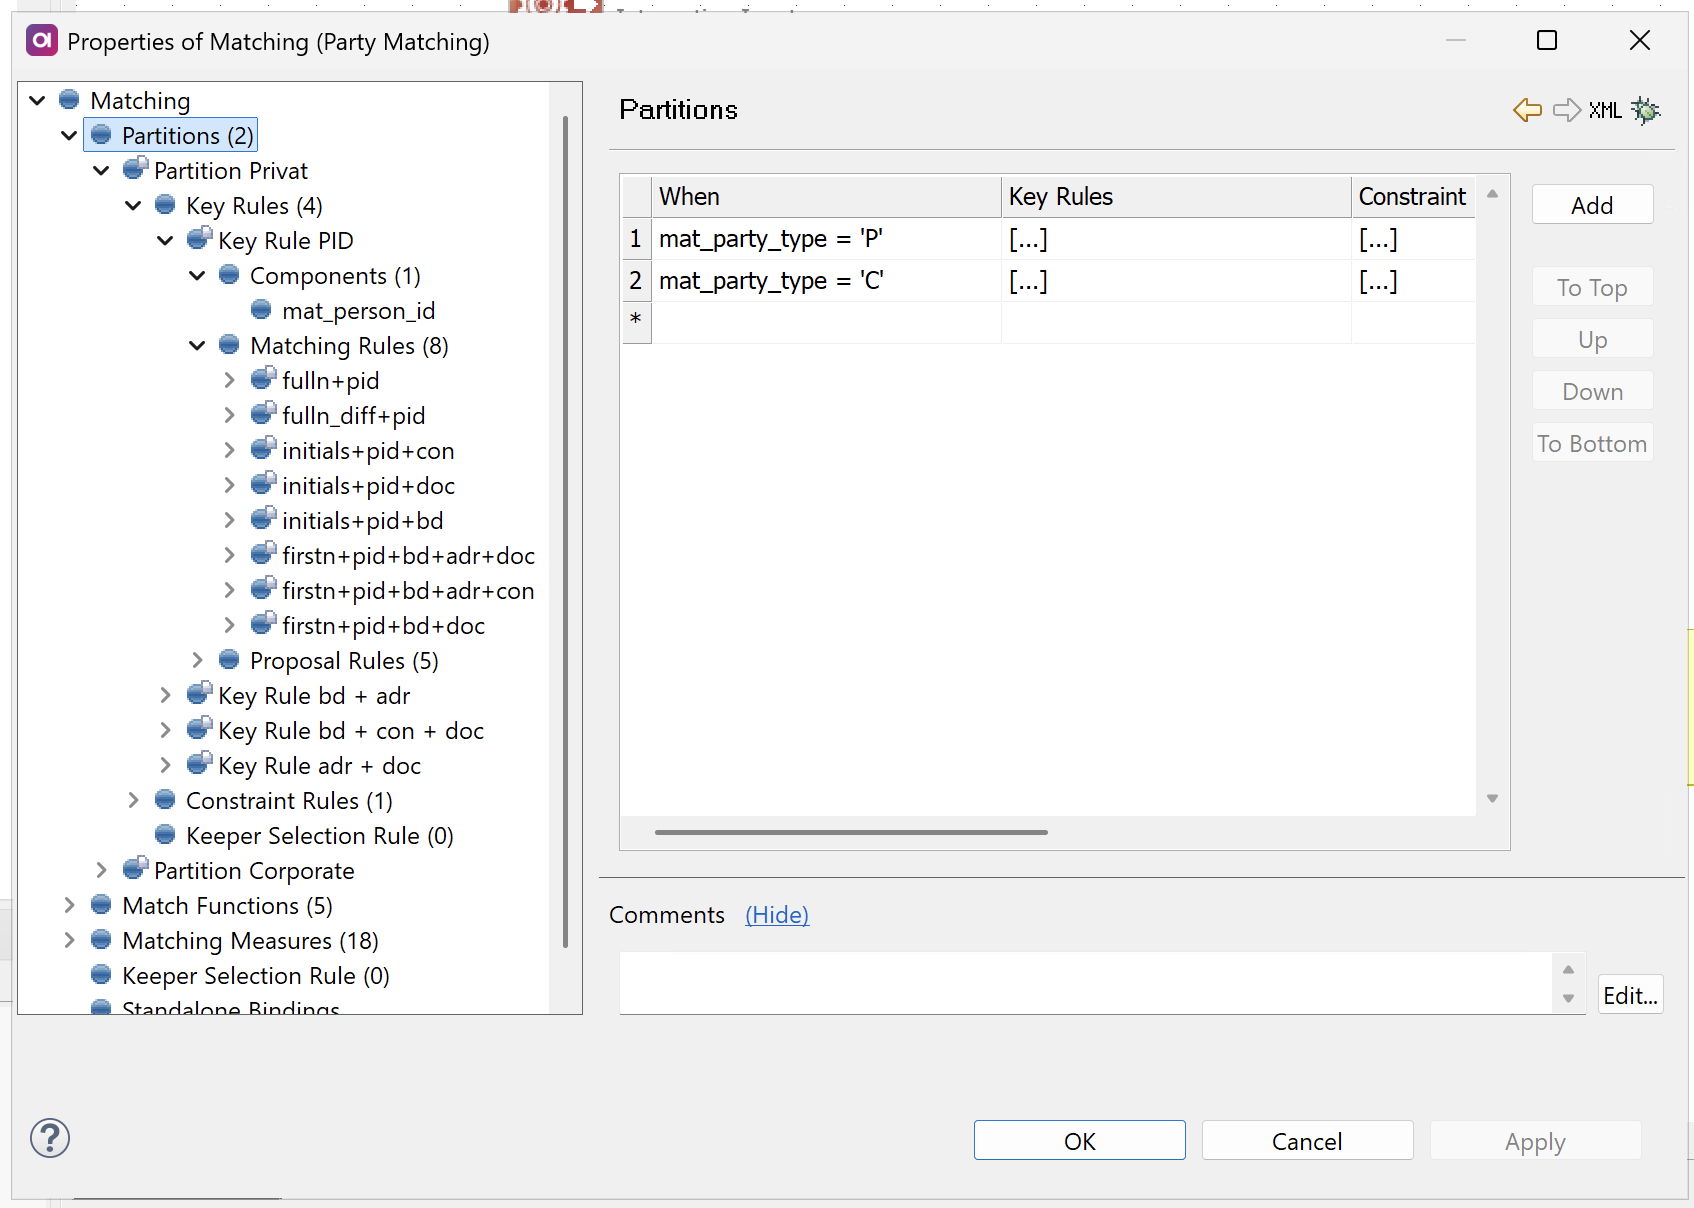
Define your partition expressions using Boolean conditions. Records that satisfy an expression will be assigned to that partition.
If you want all records in one partition, create a partition with an expression that evaluates to true.
Keep in mind records are evaluated against partitions sequentially from top to bottom. If a record satisfies multiple partition expressions, it’s assigned to the first matching partition in the list.
Records that don’t satisfy any partition expression are excluded from matching entirely.
| To name partitions, use the Comments field. |
Configure key rules
Next, configure key rules to create candidate groups within each partition.
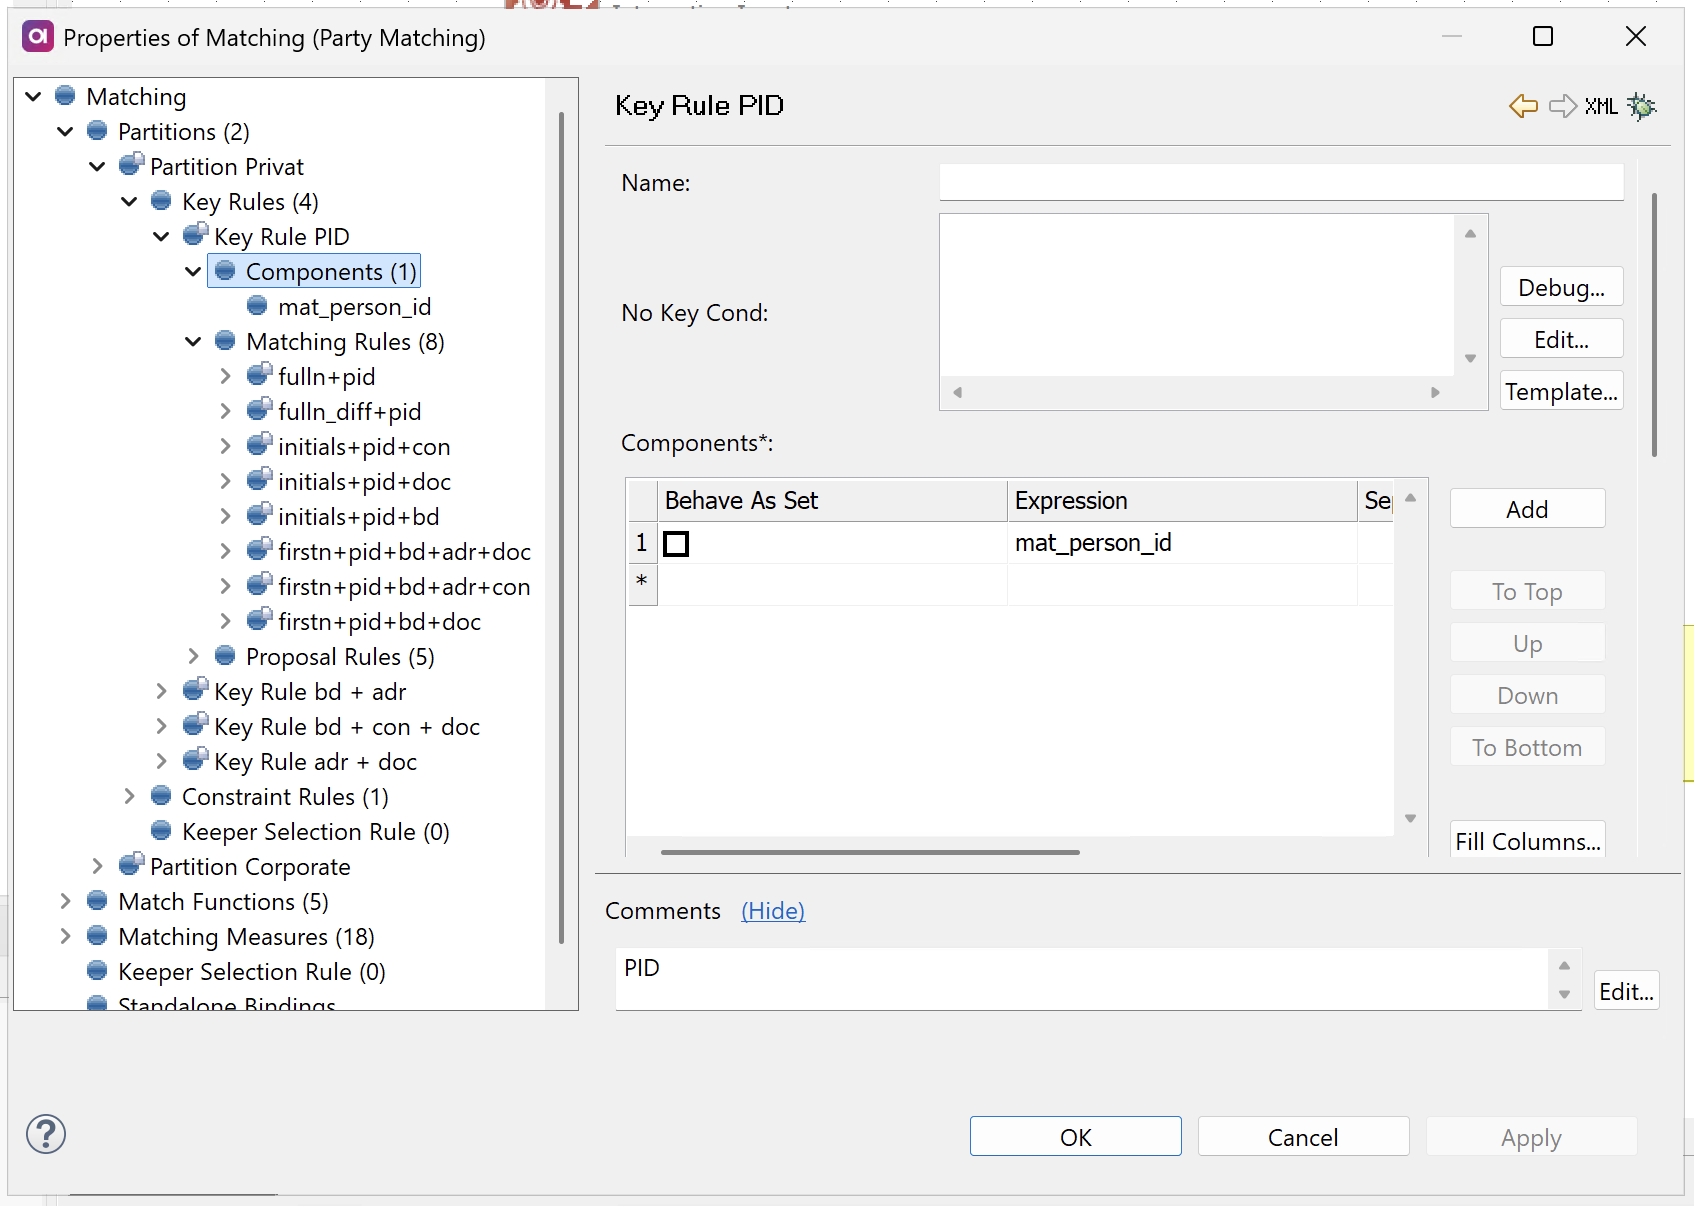
Key rules are defined within each partition. In the left navigation menu, first select your partition, then configure the key rule settings.
Key rules are evaluated independently of each other and can be executed in parallel (if configured). Records can belong to multiple key rule groups simultaneously if they satisfy multiple key rules.
When a record belongs to multiple key rule groups, those groups become linked for evaluation during the matching process. The order of key rules only affects tiebreaking when final grouping results are determined, but it does not control which key rules a record can join.
| You cannot use the first key rule to trap a record and prevent it from being evaluated by subsequent key rules. If you need exclusive grouping logic, use partitions instead. |
For each key rule, define the following:
-
Name: The name of the rule.
-
No Key Cond: If specified, records meeting this condition are excluded from key rule grouping.
-
Components: The data fields used for grouping records (records with matching component values are grouped together).
-
Behave as Set: If selected, component values are treated as lists of strings. Records match if their lists share at least one common value.
-
Separator: Characters used to split values when Behave as Set is selected (default: single space).
-
Expression: Expression calculating one key component value. Non-string values are converted to strings.
-
-
No Empty Component:
-
If selected: All components must be non-null for a valid key.
-
If not selected: You need at least one non-null component for a valid key.
-
-
Matching Rules: Define how records within the key group are compared. You need at least one matching rule within each key rule, but there can be as many as needed.
If no matching rules are defined, all records in the key group automatically receive the same
master_id.
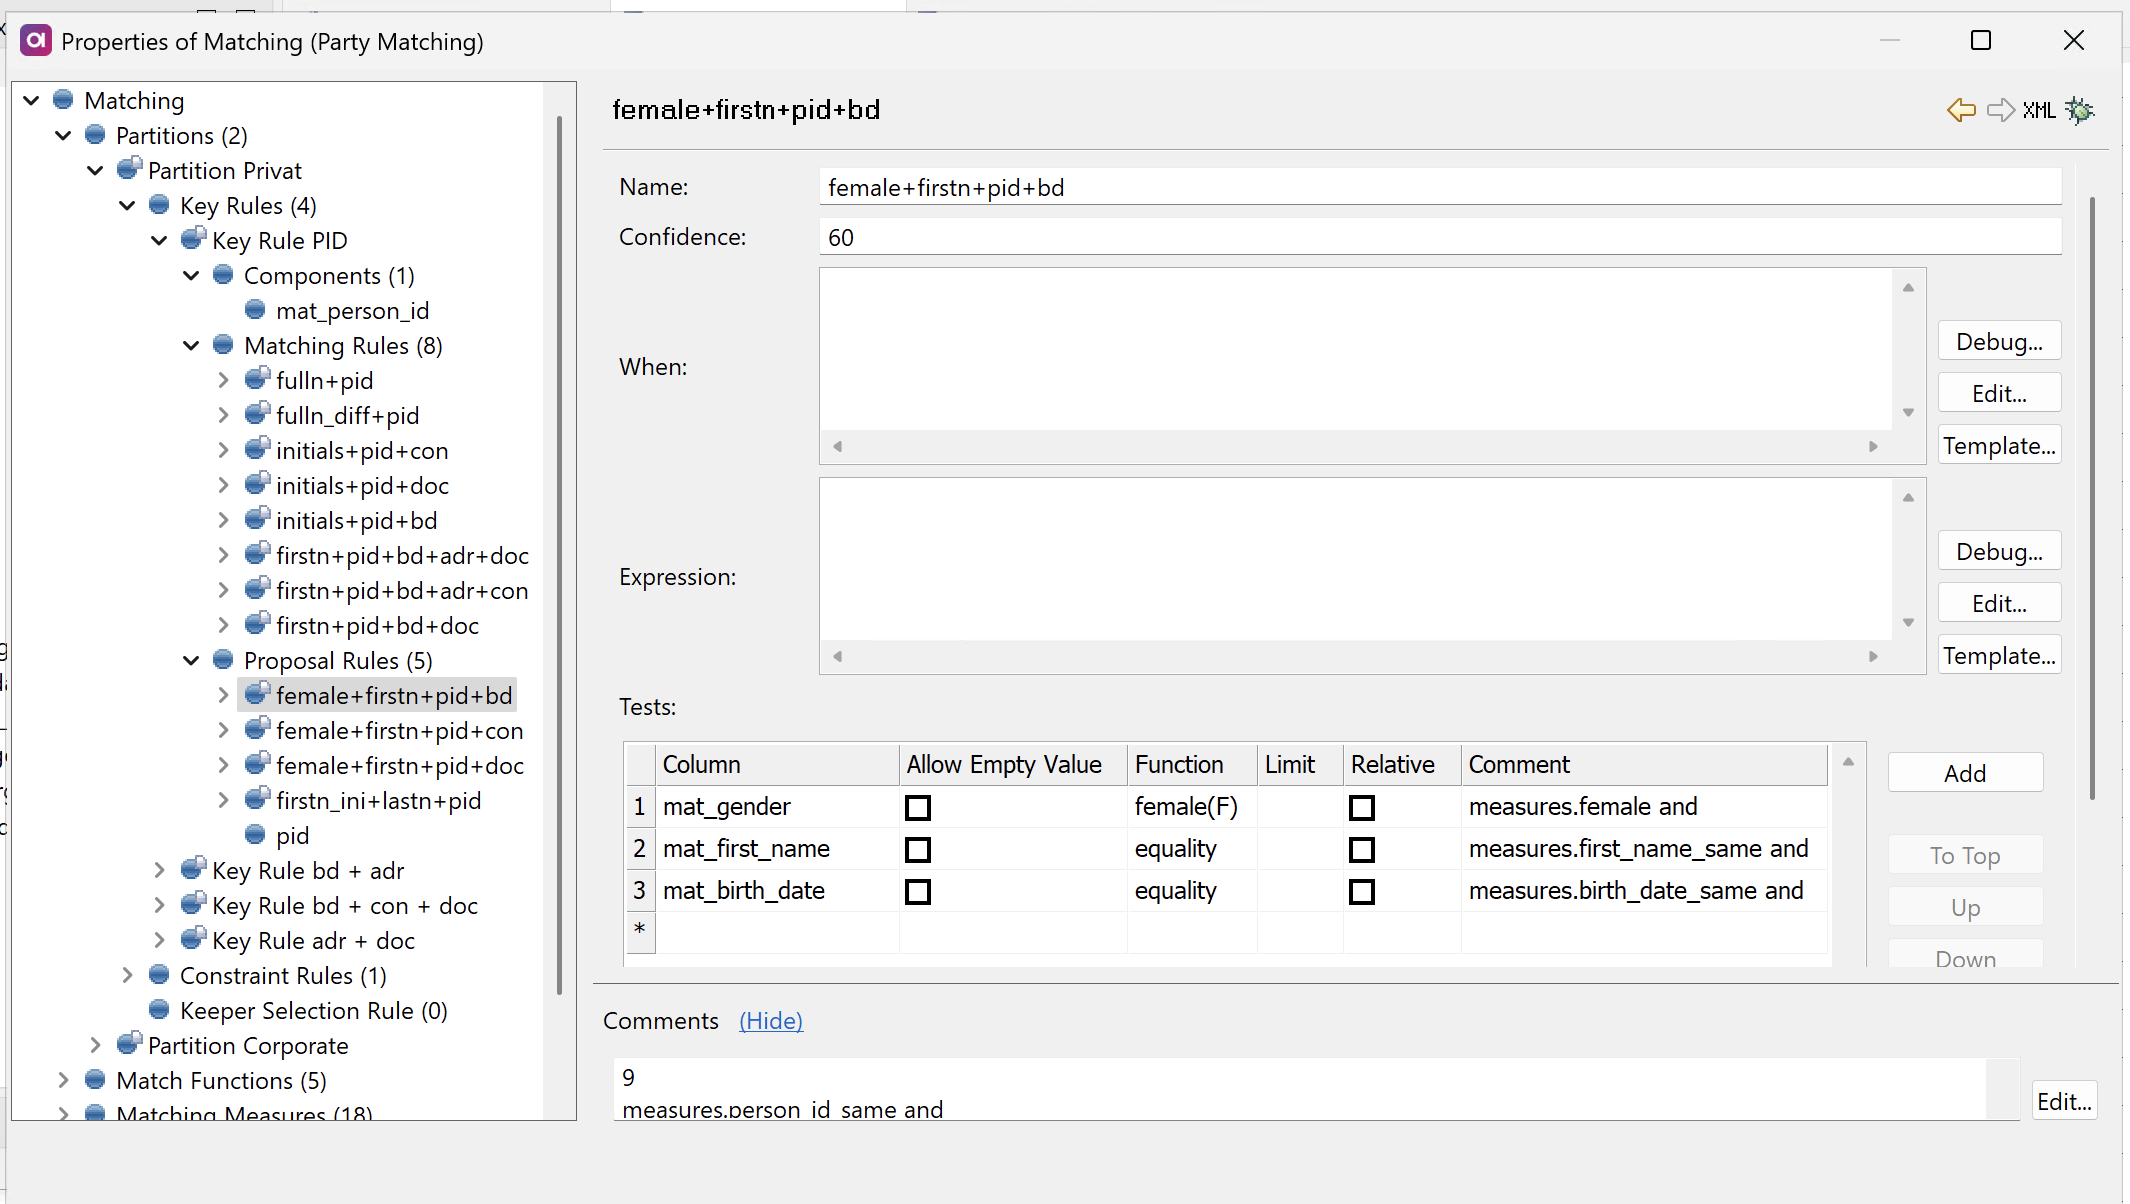
Configure matching rules
Matching rules determine which records are finally matched together and assigned the same master_id.
The order of matching rules matters: records are evaluated against matching rules sequentially within each key rule group and assigned to the first matching rule they satisfy.
Configure matching rules within each key rule by defining the following settings:
-
Name: The name of the matching rule, displayed in the output Rule Name column.
-
Confidence: The confidence level (0-100) for this rule, stored with matched records and displayed in the MDM Web App.
Confidence values do not affect the matching algorithm or rule priority. They are mainly used as a label in the web application, allowing you to filter matching proposals. -
When: Optional condition that must be
truefor this rule to apply. Use this to restrict the rule to records meeting specific criteria. -
Expression: Boolean expression that must evaluate to
truefor records to be matched. Both this expression and all tests must pass for records to match.You can leave the expression empty as well, in which case it is assumed to be
true.When evaluating matching rules, two records are compared at a time: one labeled as
xand the other asy. Reference their columns usingxandysyntax.These terms have no special semantics and the expression should be commutative, that is, the result should be the same regardless of which record has which position.
-
Tests: Define specific comparison criteria between record attributes.
-
Column: The column containing values to compare.
-
Allow Empty Value:
-
If selected: Null values are included in the test.
-
If not selected: The test fails when either record has a null value.
-
-
Function: The comparison algorithm to use when evaluating distance between records. Choose from predefined functions like
equalityor custom functions defined in Match Functions. -
Limit: Maximum value a function can return for the test to pass. If any test exceeds its limit, the entire matching rule fails.
This is meaningful only for functions that return distance (such as
hamming). Other functions return0when satisfied (for example,equality).While optional, we recommend setting this parameter for every rule as it ensures comparability with other test types. -
Relative: If selected, it divides the function result by the length of the longer compared value (for normalized scoring).
-
Configure proposal rules
Proposal rules identify potential matches that require manual review. Such records are sent to the proposals output of the Matching step for data steward evaluation.
Proposal rules are configured using the same settings as matching rules. For detailed instructions, see Configure matching rules.
Configure constraint rules
Constraint rules provide additional restrictions on which records can be grouped together, ensuring all records in a matching group share the same values for specified attributes. Unlike matching rules that evaluate record pairs, constraint rules are evaluated against the entire matching group to maintain group consistency.
To configure constraint rules, define the following:
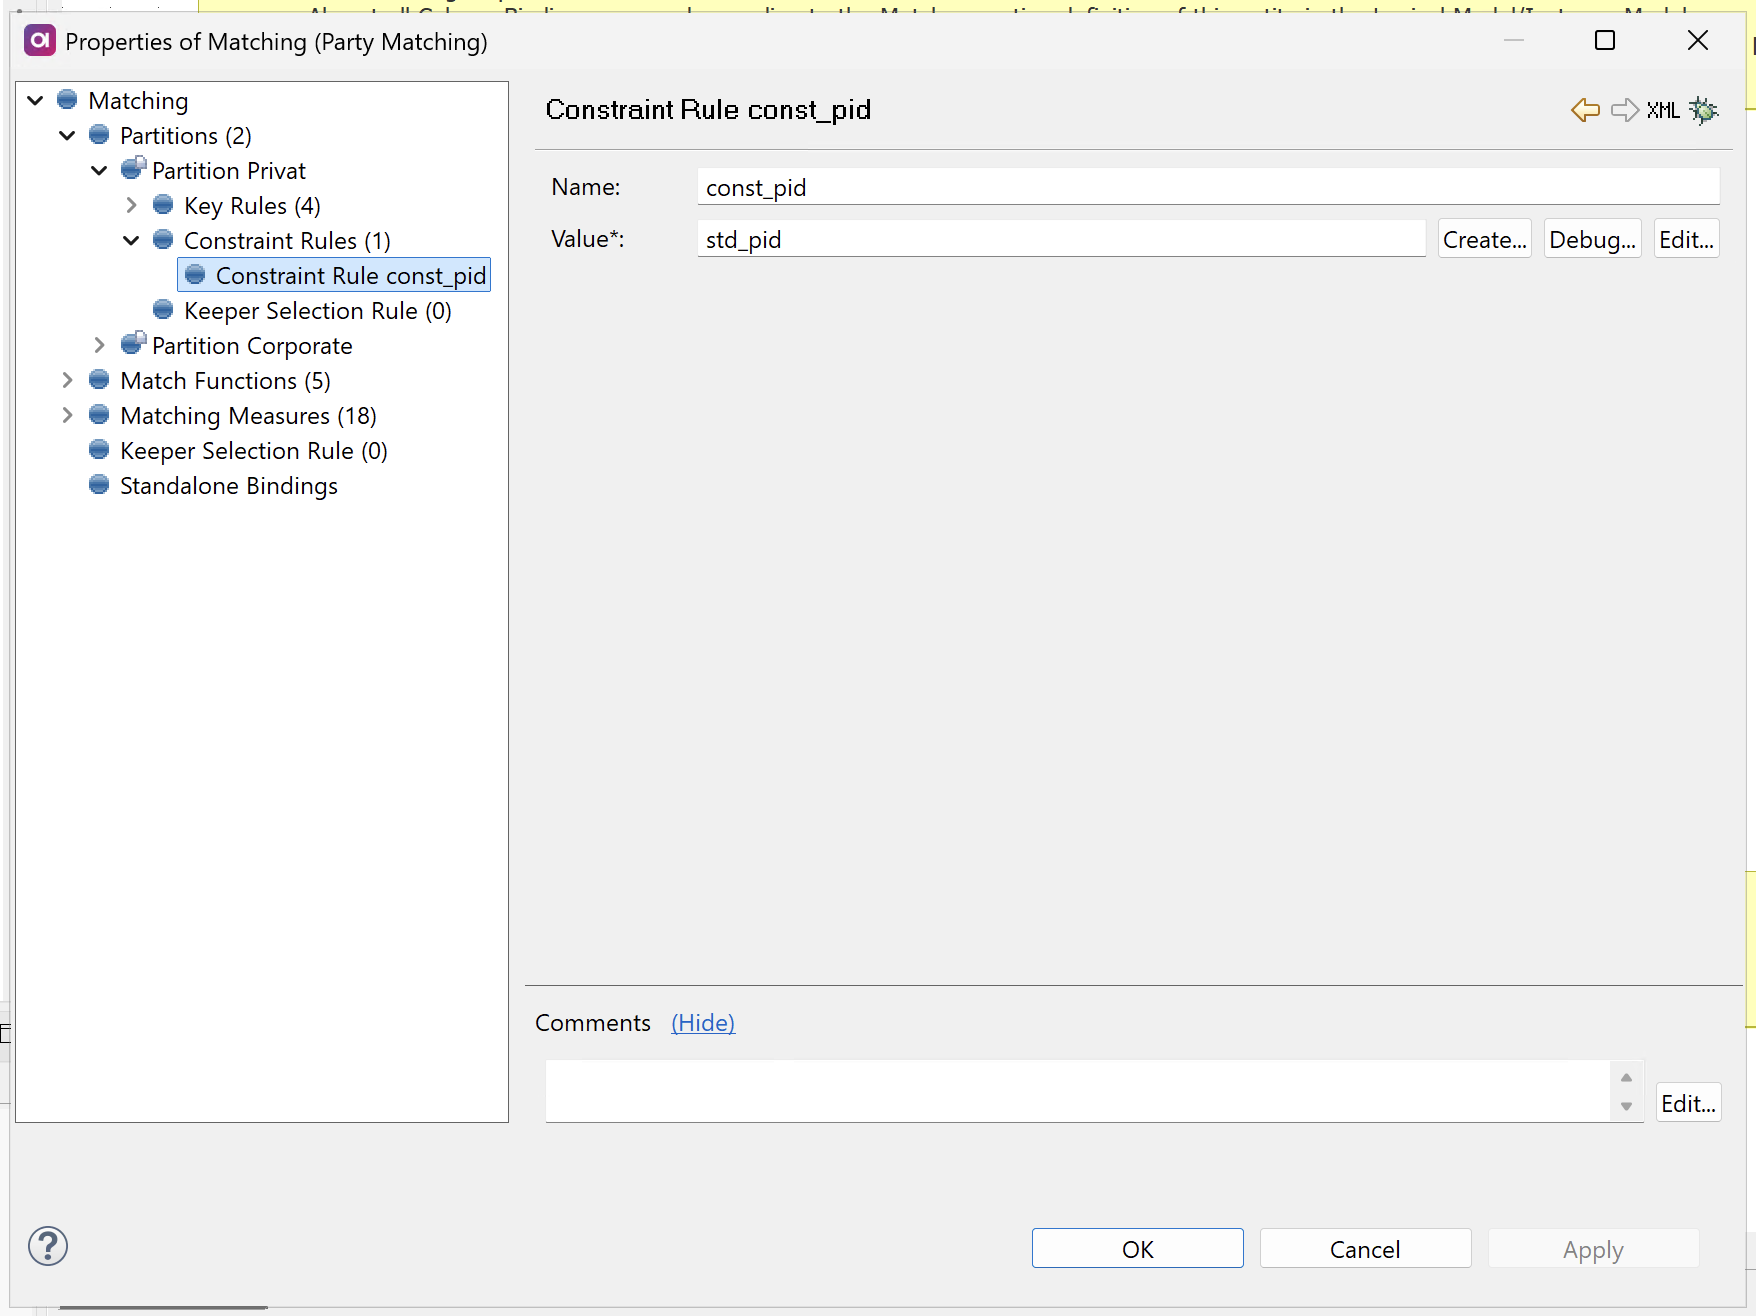
-
Name: The name of the constraint rule.
-
Expression: Expression that must evaluate to the same value (or null) for all records in the matching group.
If a newly added record has a different non-null value than existing group members, it is separated into a new matching group regardless of key rules and matching rules.
Consider the following examples of constraint rules:
- Unique source system
-
Ensures that records from a designated trusted source system are never auto-matched with records from other systems.
-
Name:
Unique <SOURCE_NAME> -
Expression:
iif(eng_source_system = '<SOURCE_NAME>', source_id, null)
-
- Unique person identifier
-
Ensures that records with different government-provided identifiers (such as Social Security Numbers) are never auto-matched.
-
Name:
Unique PID -
Expression:
mat_pid
-
Configure standalone bindings
| Standalone bindings are only necessary when the Matching step is used outside of the MDM Engine context (for example, for testing). If that is not your use case, skip this step entirely. |
Click here to expand
In the left-hand menu of the Matching Step configuration, navigate to Standalone Bindings.
If you are matching outside of a complete MDM project, you need to map at least the Master Id column.
Otherwise, a java.lang.IllegalStateException: Persistence is not set error occurs, which means the standalone mode cannot be configured.

| Parameter | Description |
|---|---|
Id Column |
Stores the unique ID for all records. |
Master Id Column |
Stores the ID for matching groups. |
Match Rule Name Column |
Name of the first successful matching rule. |
Match Quality Column |
The strength of the match, which is a number between |
Match Related Id Column |
ID of the record to which a record was matched to. |
Rematch |
Which rematch configuration is used. Possible values:
|
Isolate flag |
The Boolean value for isolate.
Records with isolate flag set to |
Master Id From |
The minimal master ID assigned to new groups (the default value is |
Next steps
After configuring your matching plan:
-
Test your configuration - Run the matching plan with sample data to verify your rules work as expected.
-
Configure Advanced Matching - Configure matching for advanced matching scenarios.
-
Matching Step Performance Tuning - Finetune the performance of the Matching step.
-
Matching Performance Best Practices - Optimize your matching results and performance.
-
Impact of Matching Configuration Changes - Plan for matching maintenance and updates.
Was this page useful?