
Creating a Master Data Layer Model
A Master Data Layer model defines how data is mastered and provided to consuming systems and connected applications. The interface of data providing services is derived from the master data model.
For general information on approaches to modeling and importing models, see Creating a Logical Model.
To create a master data model from scratch, you need to:
-
Add and configure entities (master and possibly instance).
-
Add and configure relationships between entities.
Add a master data layer
-
Double-click Logical Model > Master Data Layers in the Model Explorer.
-
Click Add or start filling the fields in the dialog:
-
Name of the master data layer.
-
GUI Label: The name of the master layer that will be shown in MDM Web App.
-
Description.
-
Select OK.
A new master data layer will appear under Master Data Layers.
-
Add a master entity
-
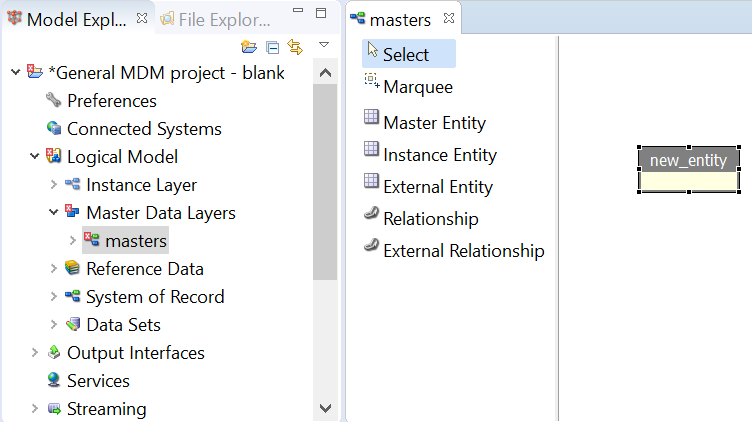
Double-click your newly added layer (masters in our case) under the Master Data Layers node to start modeling on the canvas.
-
Click Master Entity in the upper-left corner and then click on the canvas to create a blank master entity.
-
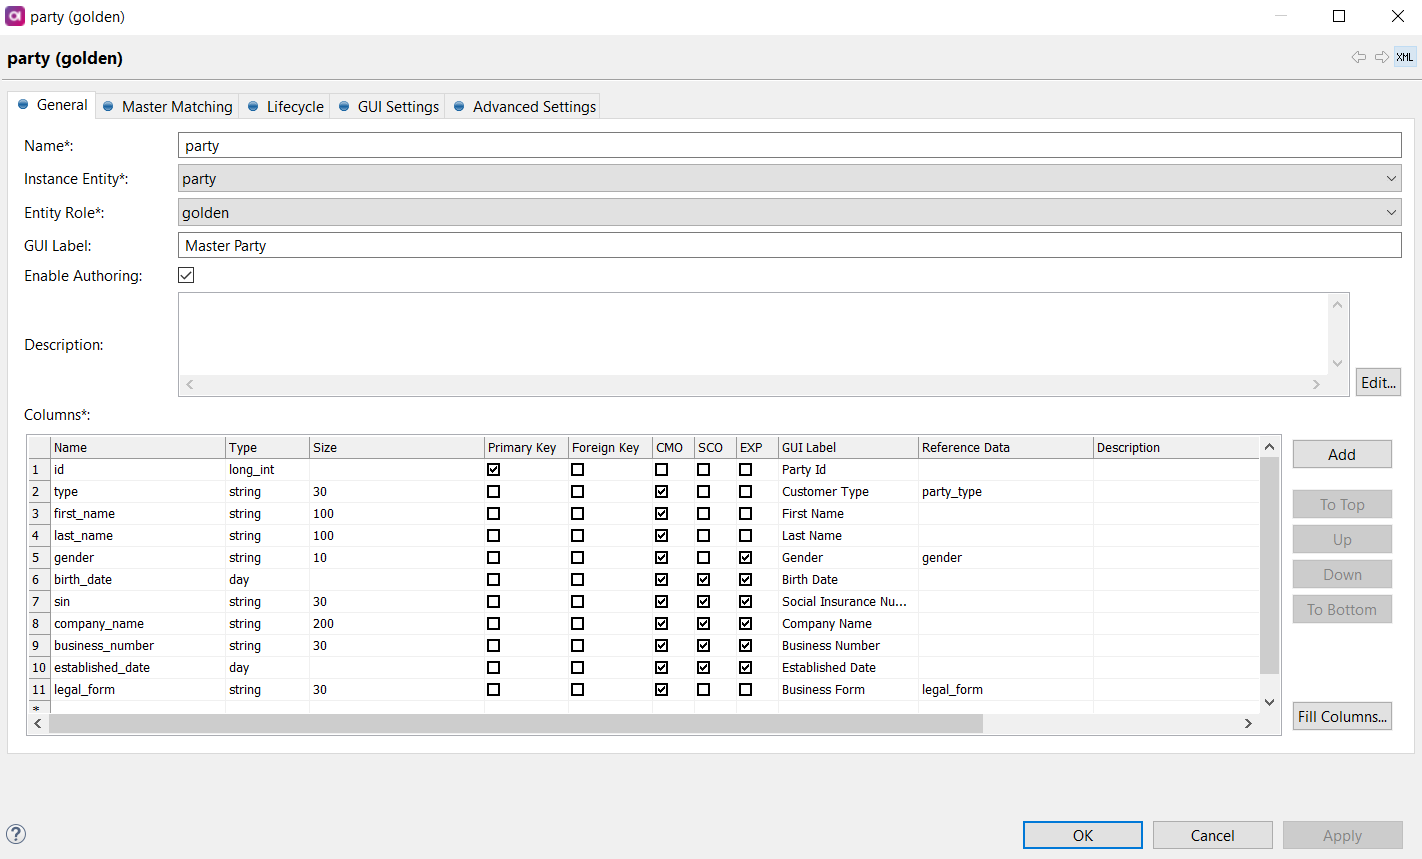
Open the entity and start editing the fields on the General tab (hover over the fields to view tooltips).
The primary key column must be defined as follows:
-
Name: id.
-
Type: long_int.
Use only lowercase for column and entity Name.
Enable Authoring (default) allows the authoring of records on the master layer. For more information, see Creating and Deleting Records. -
-
On the Master Matching tab, define the columns to be used in the Matching step and other relevant settings as described in Configure Master Layer Matching. See also Add relationships.
-
On the Lifecycle tab, define the lifecycle behavior for Authored records and Overrides. See Configuring Record and Override Lifecycles.
-
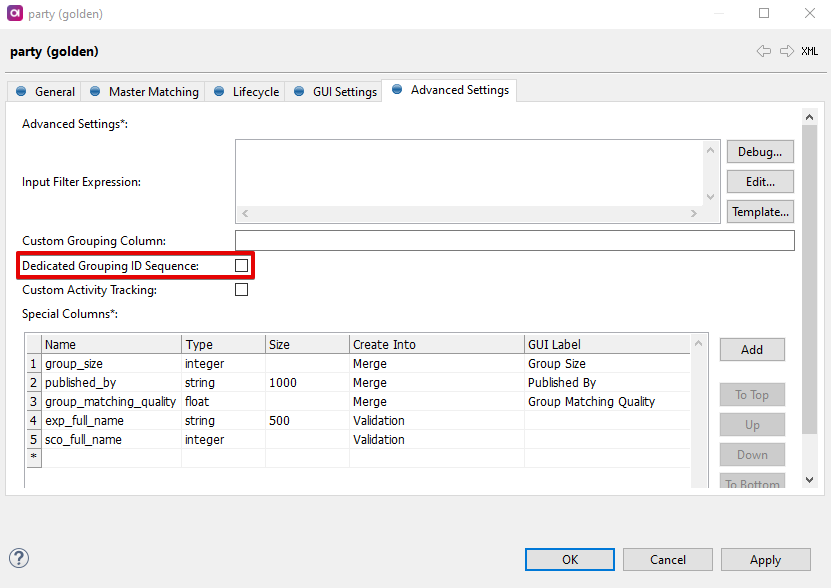
On the Advanced Settings tab, you can configure the dedicated ID sequence, turning off overrides, custom filtering and Special Columns definition.
For additional assistance with configuration, hover over the fields to view tooltips.
-
Edit the settings on the GUI Settings tab as needed. Here you can configure the record detail layout, validations, custom sampling settings, or a custom action for this entity.
Add an authored master entity
-
In the Model Explorer, select your MDM project and go to Logical Model > Master Data Layers.
-
Select the master layer you would like to add a new entity to.
-
Double-click the layer node (masters in our case) to open the plan.
-
Click Master Entity in the upper-left corner and then click on the canvas to create a blank master entity.
-
Open the entity and start editing the fields on the General tab (hover over the fields to view tooltips).
Use only lowercase for column and entity Name. 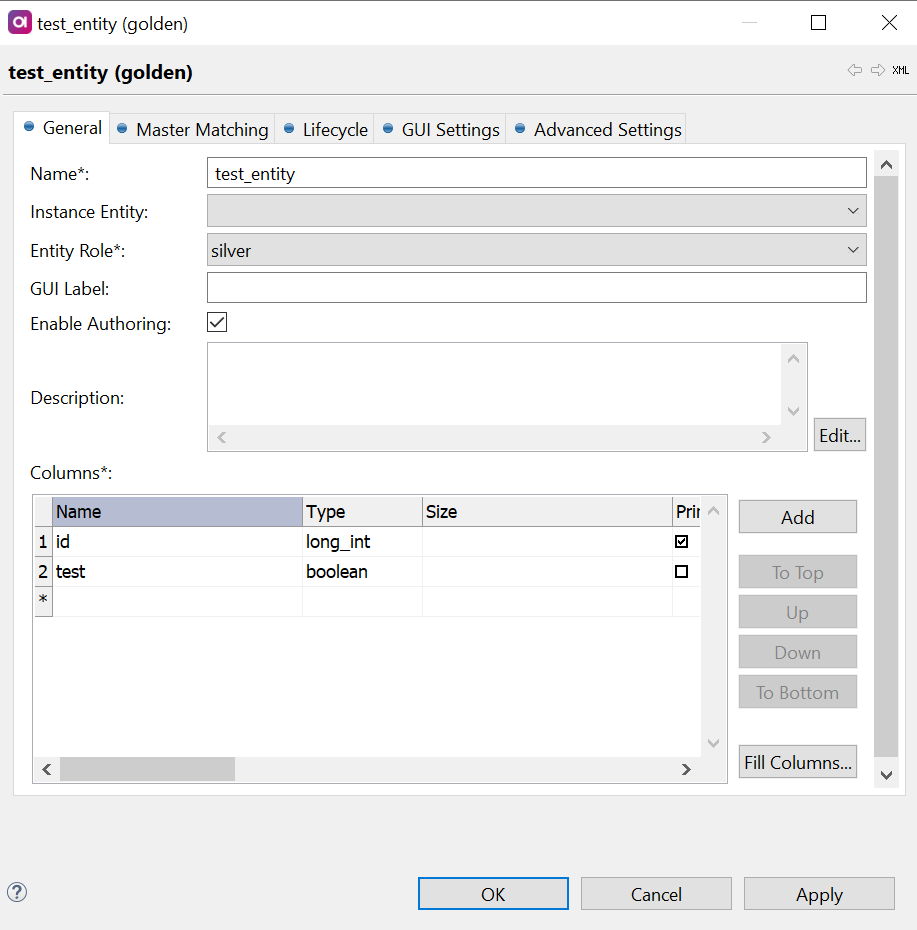
-
Leave the Instance Entity field blank.
-
Select Entity Role: golden or silver.
-
Define the GUI label (the name which will be displayed in MDM Web App).
-
Select Enable Authoring.
-
Add entity columns as desired.
The primary key column must be defined as follows:
-
Name: id.
-
Type: long_int.
-
-
On the Advanced Settings tab, you can configure the dedicated ID sequence, turning off overrides, custom filtering and Special Columns definition.
For additional assistance with configuration, hover over the fields to view tooltips.
-
Edit the settings on the GUI Settings tab as needed. For more details, see MDM Web Application Configuration.
When adding an authored master entity, do not edit any configuration on the Master Matching or Lifecycle tabs. As these tabs are ignored when no instance is filled, the configurations defined here will not be generated.
Dedicated ID sequence
The Dedicated Grouping ID Sequence on the Advanced Settings tab for authored and consolidated master entities helps to avoid issues caused by using one common sequence for all IDs in MDM.
The dedicated ID sequence behaves as follows based on the master entity type:
-
Authored only: ID of master record generated during insert (batch/Soap/REST/…) is taken from the dedicated sequence.
-
Consolidation only:
masterIdColumnof the corresponding instance matching is filled by the ID taken from the dedicated sequence in all cases (matching new records, rematch, manual split). -
Mixed: For both cases (a) + (b) IDs are taken from the same dedicated sequence.
|
Keep in mind that this does not guarantee that there are no gaps in the sequence - it only reduces them and lowers the ID numbers for the following reasons:
* The sequence is cached in Java (for performance reasons), so an engine restart sets the |
| If you enable the dedicated ID sequence on existing data, you also have to alter the DB sequence to provide the subsequent IDs in higher numbers than already used. |
Turn off overrides
Overrides for individual entities can be turned on or off on the Advanced Settings tab:
-
Enable Data Overrides: Clear to hide the Edit button on the entity detail screen in MDM Web App.
-
Enable Activity Overrides: Clear to hide the Activate/Deactivate override action on the record detail screen.
-
Overrides on Columns: Select individual columns for which overrides are turned off.
Add virtual instance entities
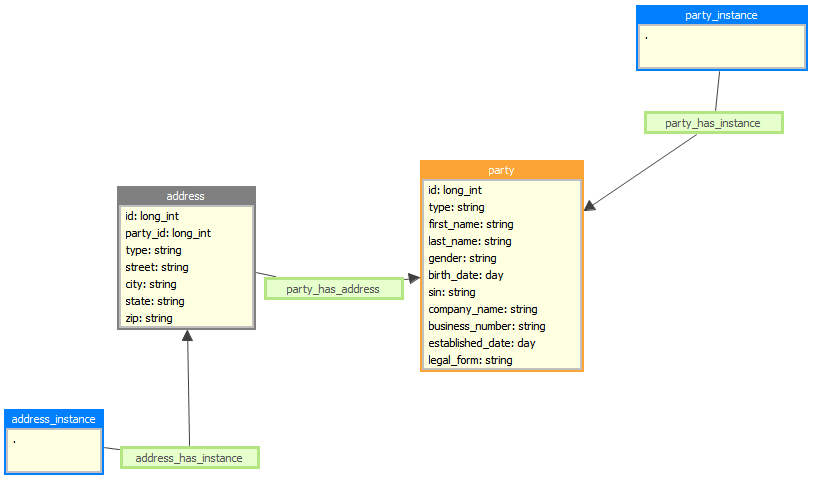
The so-called virtual entities enable viewing the source, cleansed, and matched data for the given entity in MDM Web App or online web services. The following diagram shows an example of two virtual instance entities (blue) added to the Master Layer Model.
To add a virtual instance entity:
-
Select Instance Entity in the upper-left corner of the modeling canvas.
-
Double-click the entity to configure it. This opens the General tab, which is similar to that of a master entity (see Add a master entity for more detailed information).
-
Switch to the GUI Settings tab to configure MDM Web App display options. The configuration is also similar to that of a master entity.
DQIs are not configurable for virtual instance entities. Instead, the configuration is taken from the regular entity.
Add relationships
Adding a relationship between master entities follows a similar procedure and principles as when defining those on the Instance Layer Model (see Creating an Instance Layer Model).
To add a relationship between master entities:
-
Select Relationship in the navigation panel. Then click one entity and drag the relationship to another entity (for example, contact to party).
-
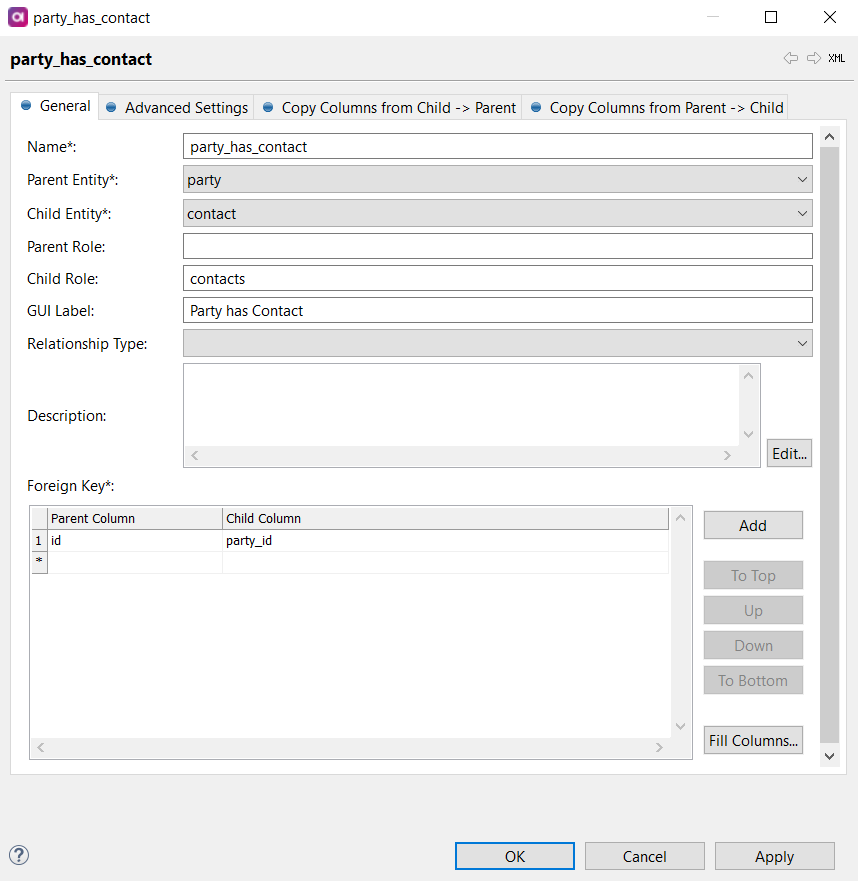
Fill in the relationship Name and check the other parameters:
-
Parent Role and Child Role are used as aliases in web services for model traversing (instead of using the relationship name and its reverse name).
-
Parent Table indicates the independent entity in the relationship; the relationship arrow points from the dependent entity (Child Table) towards the independent.
-
Same System Relationship Type is defined within the same Connected System: Use this option to separate the same records (same source_id) from different systems. This typically covers most use cases.
For relationships with virtual instances, use unique names for each Child Role and Parent Role within one specific Child Entity.
-
-
Define Foreign Keys for the relationship (content assist is available).
-
Define attributes you wish to copy from one entity to another (for example, for matching or mastering reasons).
Open the Copy Columns from Parent → Child and Copy Columns from Child → Parent tabs to set up columns (view tooltips as needed by hovering over attributes). Always consider filtering out records that match a given condition in order to reduce the copied data volume.
On the Advanced Settings tab, you can define special settings like Extended Same System relationship behavior or Compound Foreign Keys.
For master matching to work on related entities, it is necessary to define Copy Columns using expressions. 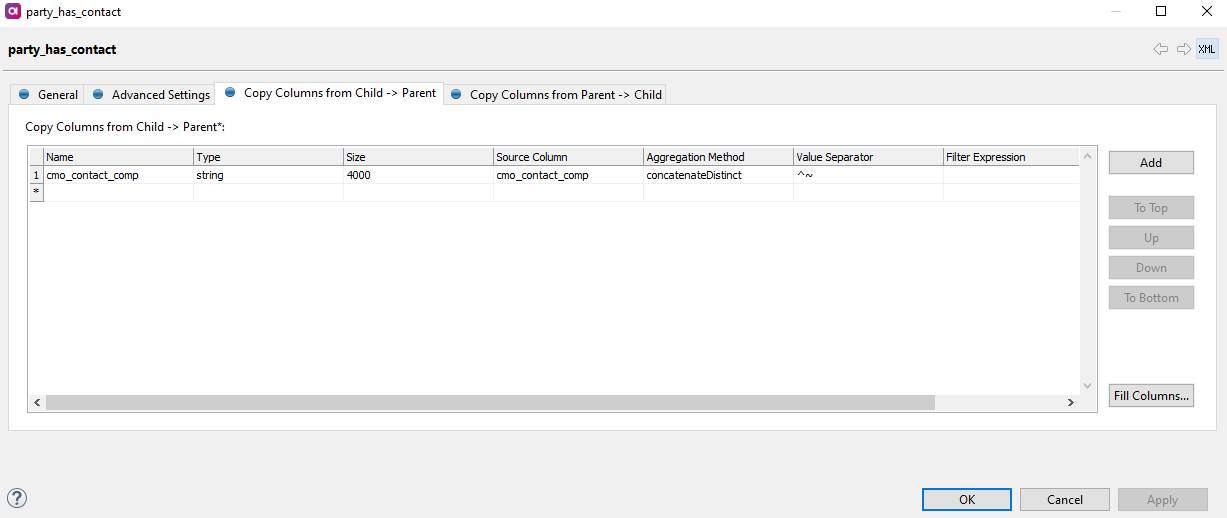
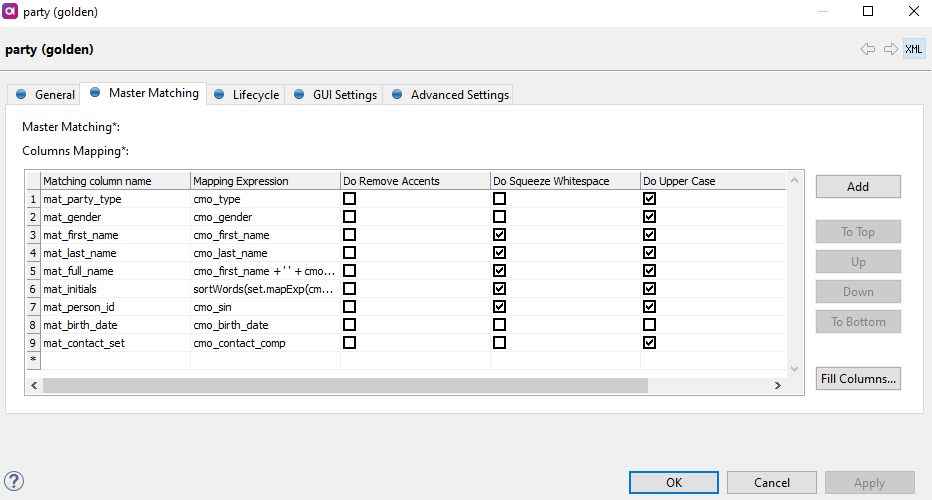
Map master columns back to the columns that are consumed by the Matching step (not the matching plan interface) to be able to match instance and master records. The same transformations as for the instance columns in Match operation have to be applied.
Relationships between golden and silver records
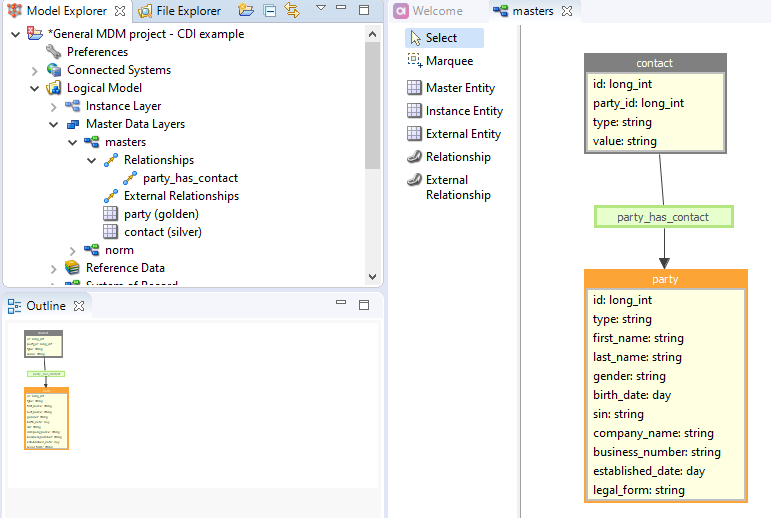
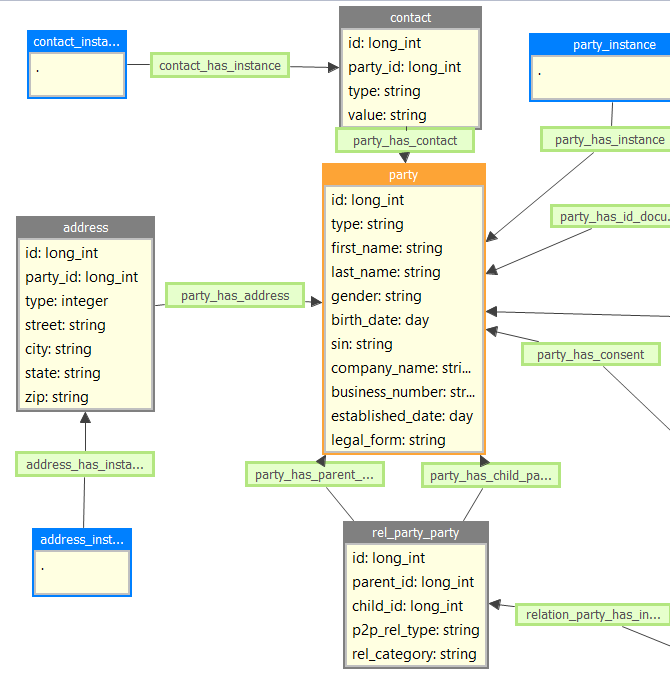
If entities share a 1:N relationship, the relationship should be set as golden > silver (one golden record can have numerous silver related records, but a silver entity can only have one golden record).
In the following example, the golden Party entity has many contacts.
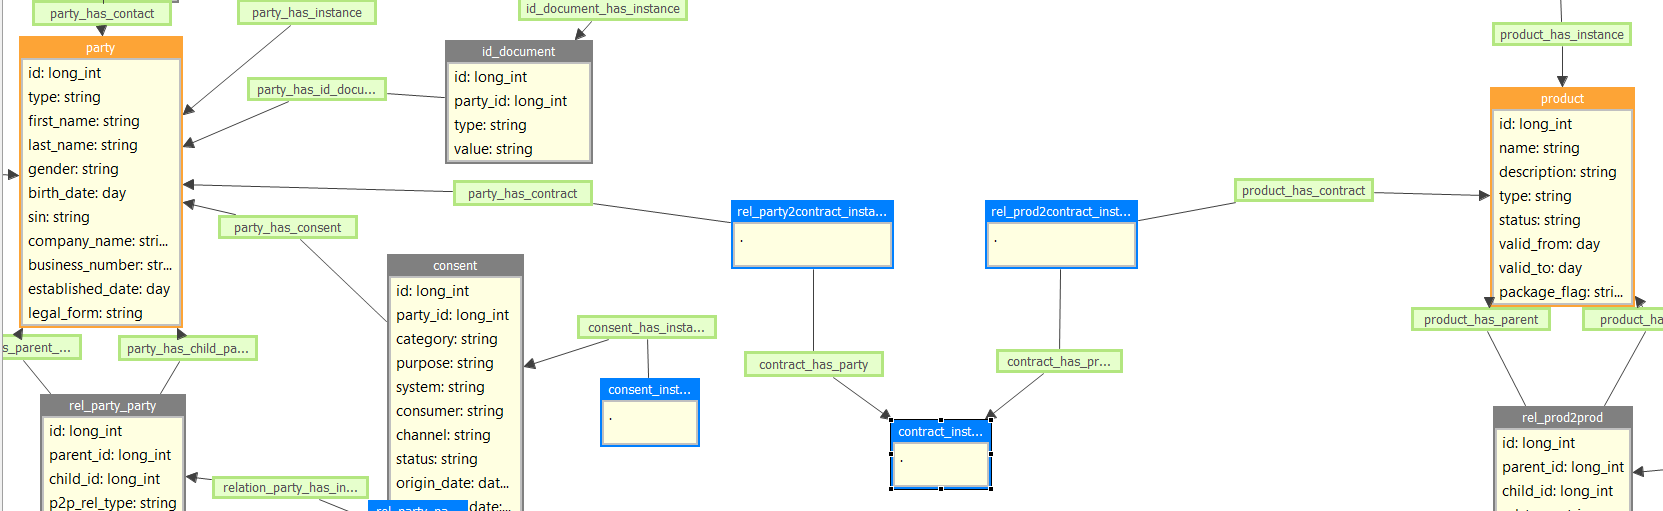
If entities share an M:N relationship, they should both be golden entities and utilize a mapping entity in between, which is recommended to be silver but does not necessarily need to be. The mapping entity stores the relationships between the golden entities and should be designated as silver because the records within it should be de-duplicated to avoid the multiplication of relationships.
In the following example, the Contract mapping entity links the Party and Product golden entities.
| It is recommended that M:N relationships are set up between two golden records while relationships between a golden and silver entity should be 1:N. |
Was this page useful?