
Configuring Permissions
Before configuring permissions, configure workflows and tasks. For more information, see Configuring Workflows, Tasks, and Permissions.
To configure permissions:
-
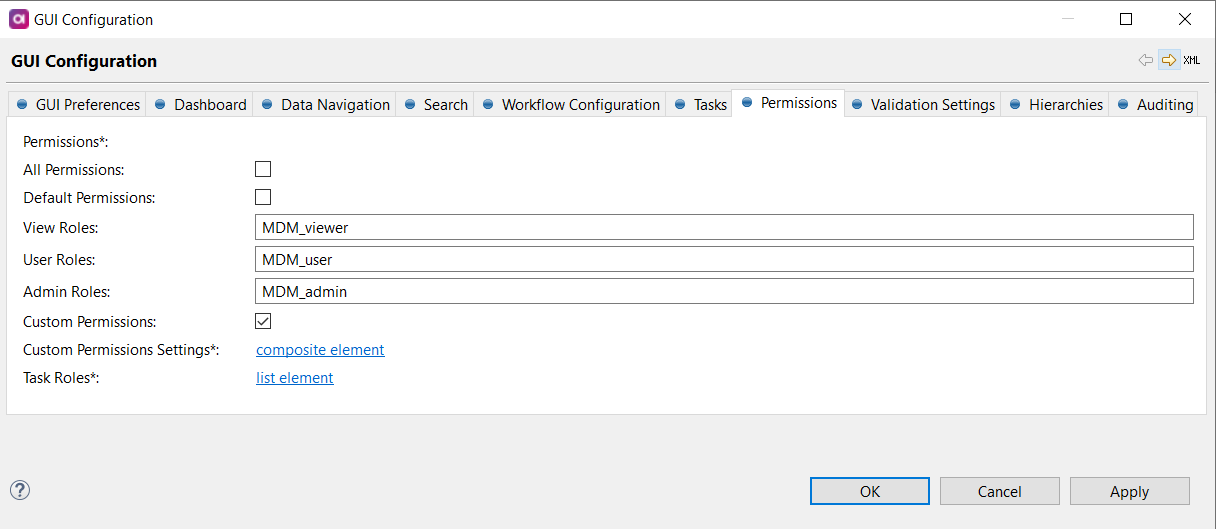
Double-click GUI Configuration and navigate to the Permissions tab. The following screen appears:
-
Specify the following:
-
All Permissions: Grants permissions for all entities and columns, including all actions.
Use for development mode only. -
Default Permissions:
-
View Roles: Users with this role can see entities, workflows, and create tasks.
-
User Roles: Users with this role have all the View role permissions, plus the ability to edit records, create, discard, and delete tasks, and export data.
-
Admin Roles: Users with this role have all the User roles permissions plus the ability to publish tasks.
-
-
Custom Permissions: Use if you need to configure custom permissions. See Configuring a custom permission scheme.
-
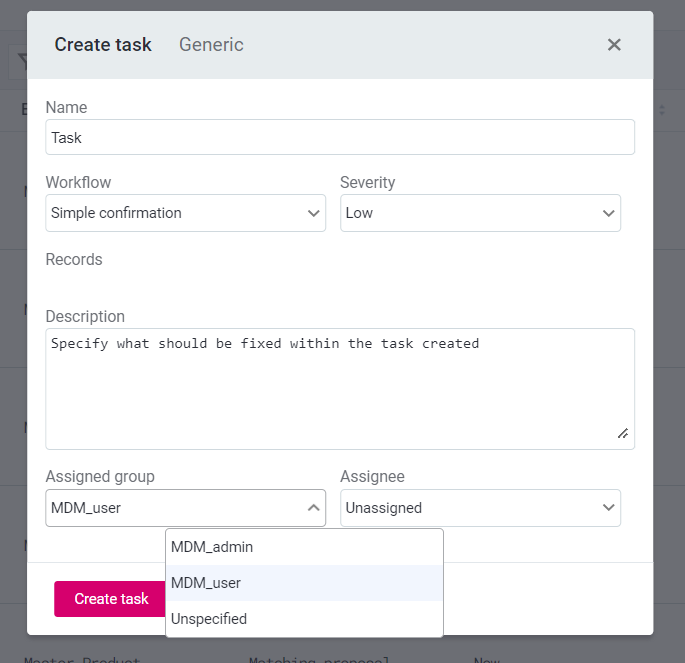
Task Roles: Roles listed here are users to whom tasks can be assigned, as shown in the following example:
-
Configuring a custom permission scheme
It is not possible to use default permissions with a custom workflow.
This can be done in one of the following ways:
-
(preferred) In the custom permissions section, define new roles that mirror the default roles. Make sure to use the same names as default roles. In this case, the roles will be applied automatically without adding them manually across all relevant sections.
The definition of custom roles is included in the MDM example project.
-
In the custom permissions section, create and define new roles. Manually add the new roles across all relevant sections where roles are applied, including the Tasks tab, Data Navigation tab, Workflow Configuration tab, and Permissions tab.
To configure a custom permission scheme:
-
Open the project in ONE Desktop.
-
Double-click GUI Configuration and navigate to the Permissions tab. First, clear the Default Permissions option.
It is possible to use both default and custom permissions, but if a role defined in the following steps in Custom Permissions has the same name as a Default Permissions role, it will be automatically overridden. -
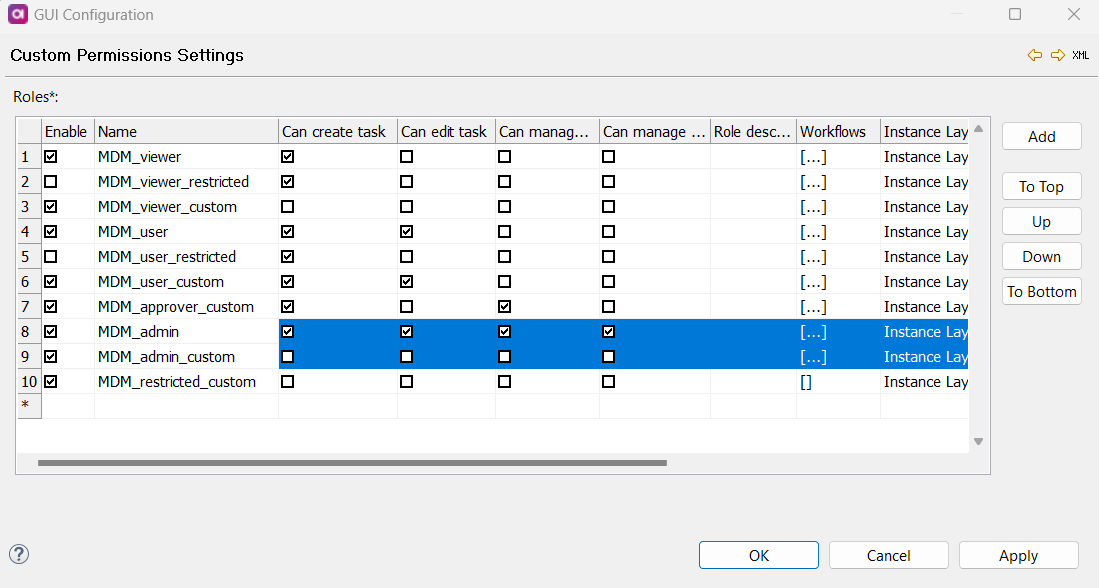
Select Custom Permissions and open Custom Permissions Settings by selecting the composite element link.
-
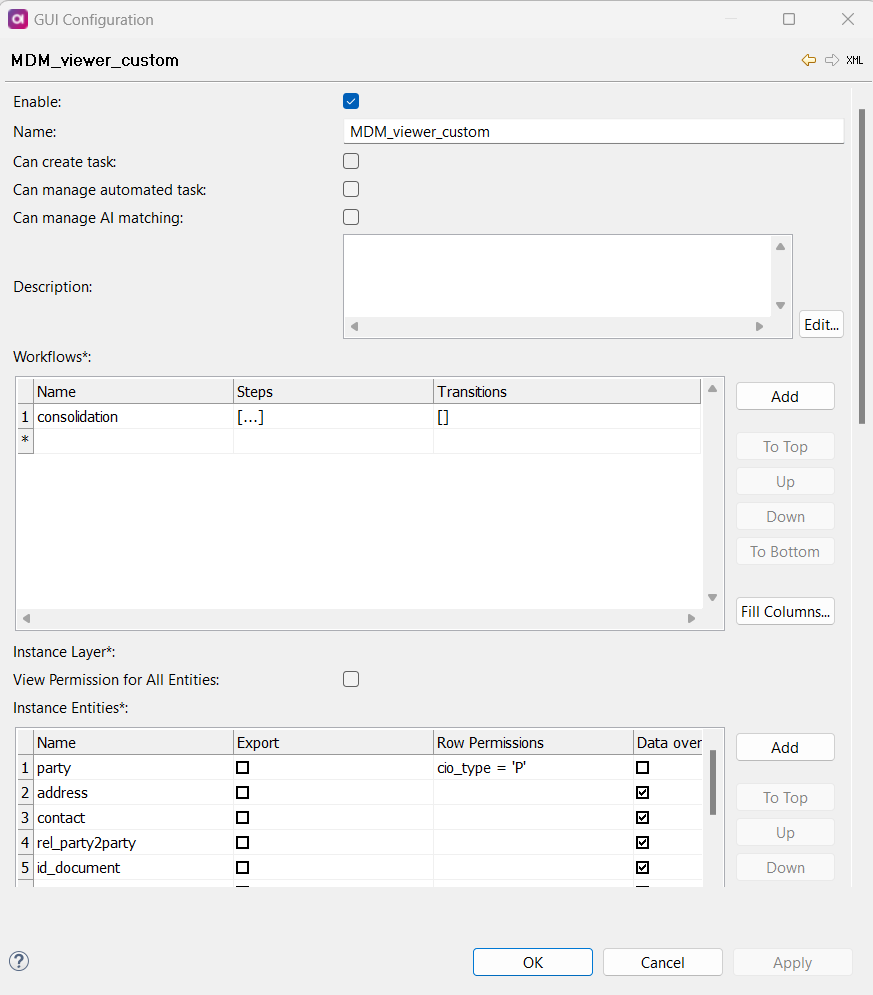
On the Role screen, define the following:
-
Name: Name of the role.
-
Description (optional): Description of the role.
-
Can create task: Specifies if the role can create tasks.
Users with any form of modification permissions (edit, create, update, delete) can implicitly create tasks to perform necessary data changes. There are no visibility restrictions on tasks based on Assignee or Assignee group settings. All roles can view tasks even if they do not have edit permissions or are not assigned to the task.
Currently, tasks are visible to users even if they do not have view permissions for the entity that the task is related to.
Task deletion permissions are configured in the Workflow section, see Workflows.
-
Can see only tasks for visible entities: Specifies if the role can view tasks only for entities they have permission to view. Row permissions are not applied.
-
Can manage automated task (only for admin role): Specifies if the role can manage automatic tasks.
Users with automated task creation permissions must also have view permissions for all entities and columns that are used in the automatic tasks they created. Otherwise, these users cannot view the task detail. -
Can manage AI matching: Specifies if the role can manage AI matching.
Users that train AI or review training must have full view permissions on the training entity both for columns and rows. The absence of column permissions can result in inadequate matching decisions, and the absence of row permissions can result in an error. Workflows: Workflow permissions. Includes permissions for Steps and Transitions. Instance layer: Instance layer permissions by entity. Includes Row permissions, Columns, and Steps. Master layer: Master layer permissions by entity. Includes Row permissions, Columns, and Steps. Datasets: Dataset permissions by entity. Includes Row permissions, Columns, and Steps. ** Matching proposal layer: Matching proposal permissions by entity. Includes view and reject permissions. + NOTE: Select Enabled to enable every permission possible for the corresponding role.
+ TIP: Use Fill Columns to quickly populate the Columns section with all available names.
-
-
Once you have filled all the necessary details, generate the project to save them. Right-click on GUI Configuration and select Generate.
-
Finally, in Keycloak, assign the newly created roles to Users as required.
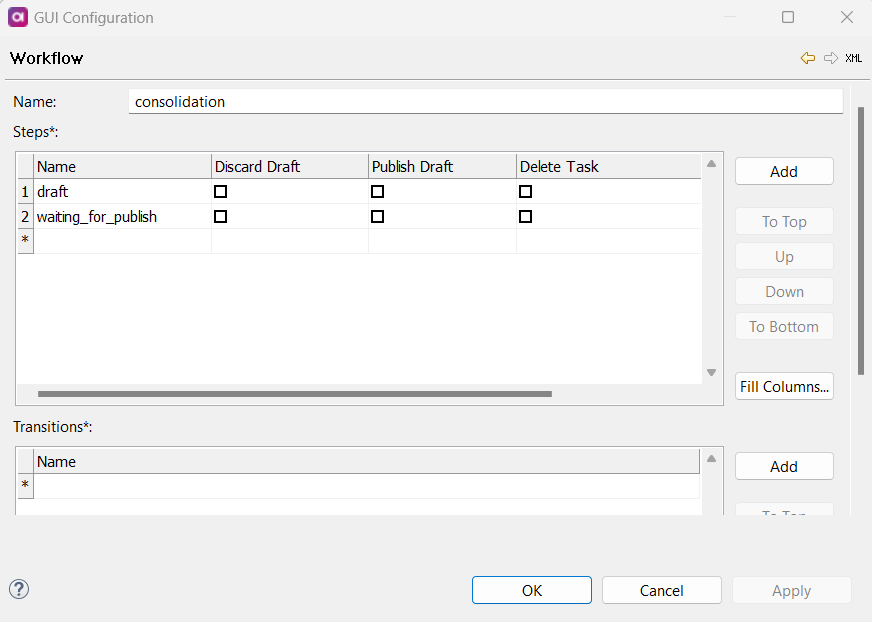
Workflows
-
Name: Name of the workflow.
-
Steps: If a role contains a workflow step, the role can view tasks in this state. If the option is selected for that workflow step, the role can perform these actions on tasks in this step.
For example, if Publish Draft is selected for that workflow step, the role can publish drafts in this state.
-
Discard Draft: If enabled, the role can discard the entire draft, including all changes made within it. This action cannot be reverted. -
Publish Draft: If enabled, the role can publish the entire draft, including all changes made within it, making the proposed changes visible to other users and consuming systems. -
Delete Task: If enabled, the role can delete a task within a specified workflow step.For more information about workflows, publishing, discarding, and deleting tasks, see Publishing Workflow and Resolving Tasks.
Currently, the role with only View and Publish Draft or Discard Draft permissions cannot see the Preview and Preview changes options in the Draft detail.
-
-
Transitions: If a role contains a workflow transition, the role can execute this transition (move tasks to another state).
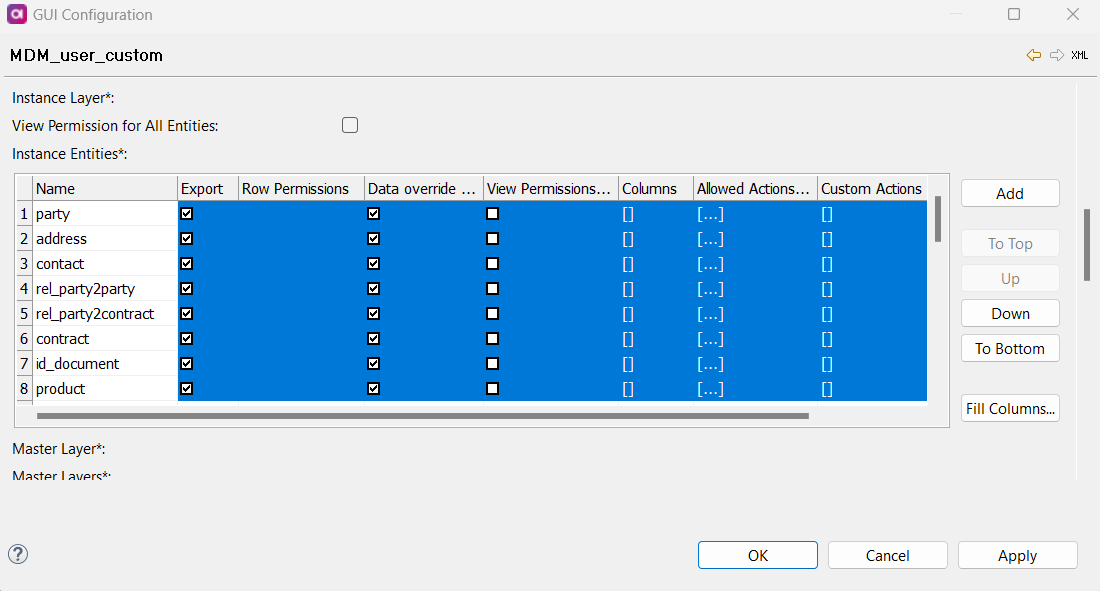
Instance layer
Select View Permissions for All Entities to allow this role to view all entities on the instance layer (no other actions are allowed).
To define permissions for specific entities, Add an entity, and double-click the number next to the added entity.
The following screen appears:

Define the following:
-
Name: Name of the instance layer entity.
-
Export (Boolean): If enabled, the role can export items in the instance layer entity.
-
View Row Permissions: View row permissions are defined using SQL
WHEREconditions (supported operators and syntax depend on the database).If an entity has a defined row permission, the role can only view the rows specified by that permission. If no row permission is set for the entity, the role has access to all rows by default.
To prevent access to all rows, set the condition to
FALSE.If a view-only role is defined, set Edit Row Permission to FALSEto prevent unintended edit access. See Row permission access level and Evaluating multiple row permissions. -
Edit Row Permissions: The Edit row permission works similarly to the View row permission, but it restricts the ability to edit rows.
A role can only edit the rows that they are also allowed to view and only if their Edit permission allows it. If the Edit row permission is more restrictive than the View permission, the user cannot edit all the rows they can see.
If an edit role is intended to apply only to a data subset (as defined in View Row Permission), make sure to apply the same condition to Edit Row Permission to maintain consistent access control. See Row permission access level and Evaluating multiple row permissions. -
Data Override Permissions All Columns (Boolean): If enabled, data override permissions are applied to all columns in that instance layer entity for this role.
-
View Permissions for All Columns (Boolean): If enabled, view-only permissions are applied to all columns in that instance layer entity for this role.
-
Columns: Define data override permissions on a column by column basis, for the specified instance layer entity for the specified role.
-
Name: The name of the column. -
Data Override: If enabled, the role can override data on this column on this instance layer entity.
-
Master layer
To define permissions for specific master layers, Add a master layer, and double-click the number next to the added layer.
The following screen appears:
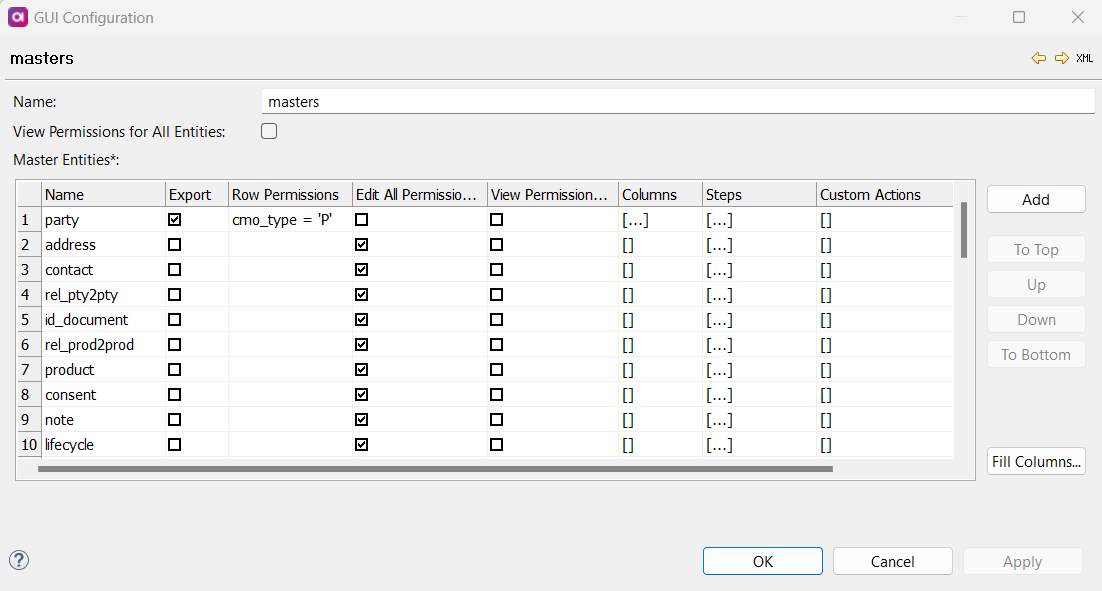
Define the following:
-
Name: Name of the master layer.
-
View Permissions for All Entities: If enabled, the role can view all entities on the master layer (no other actions are allowed).
-
Master Entities: To add permissions on an entity by entity basis, select Add and double-click the number next to the added entity. The following screen appears:
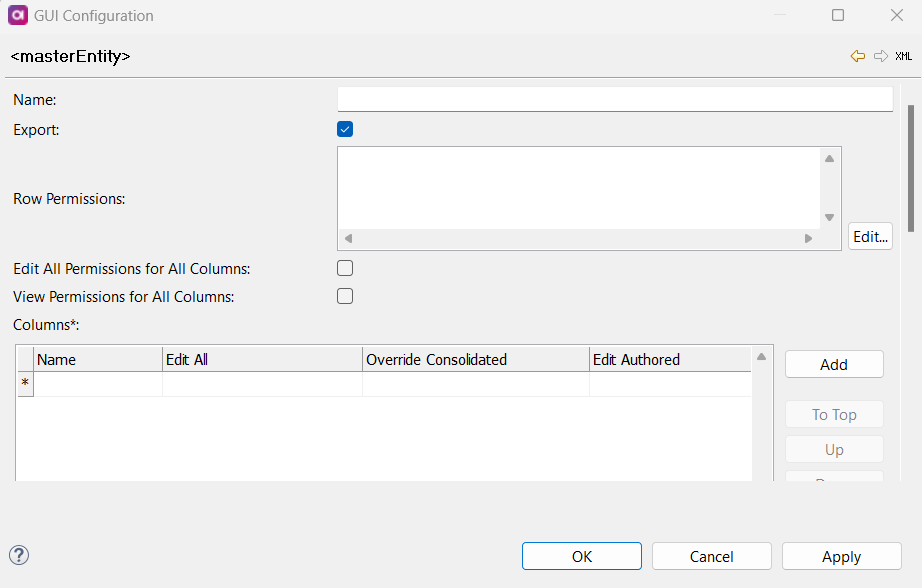
Define the following:
-
Name: Name of the master layer entity.
-
Export (Boolean): If enabled, the role can export items on this layer.
-
View Row Permissions: View row permissions are defined using SQL
WHEREconditions (supported operators and syntax depend on the database).If an entity has a defined row permission, the role can only view the rows specified by that permission. If no row permission is set for the entity, the role has access to all rows by default.
To prevent access to all rows, set the condition to
FALSE.If a view-only role is defined, set Edit Row Permission to FALSEto prevent unintended edit access. See Row permission access level and Evaluating multiple row permissions. -
Edit Row Permissions: The Edit row permission works similarly to the View row permission, but it restricts the ability to edit rows.
A role can only edit the rows that they are also allowed to view and only if their Edit permission allows it. If the Edit row permission is more restrictive than the View permission, the user cannot edit all the rows they can see.
If an edit role is intended to apply only to a data subset (as defined in View Row Permission), make sure to apply the same condition to Edit Row Permission to maintain consistent access control. See Row permission access level and Evaluating multiple row permissions. -
Edit All Permissions for All Columns: If enabled, the role has Edit All permissions for all columns of the specified entity.
-
View Permissions for All Columns: If enabled, the role can view all columns of the specified entity (no other actions are allowed).
-
Columns: If a column is listed, the role has view permissions by default. Other options grant editing permissions on the specified column. The role must have permissions for a specific action (Edit All, Override Consolidated, Edit Authored); otherwise, the column cannot be edited.
-
Edit All: If enabled, the role can override consolidation records and edit authored records in Mixed style. Individual Override Consolidation and Edit Authored settings are not required. -
Override Consolidated: If enabled, the role can override consolidated records in the specified column. -
Edit Authored: If enabled, the role can edit authored records in Mixed style in the specified column.Make sure that all related entities have the appropriate foreign key columns defined. If an entity does not have the foreign key column linking it to the parent entity, the related entity will not be displayed in the parent entity record details.
For example, if you define both party and address entities in a permission role, but the address entity does not have a foreign key column that references the party entity, the address entity will not be visible in the party record details.
-
-
Steps: Define permissions on a step by step basis, for that master layer entity for that role. Different actions are available depending on whether records are authored or consolidated.
-
For consolidated records,
Override,Activity Override, andManual Match (Override)are available.-
Override: If enabled, the role can perform data override actions (see Editing Values) in the specified workflow step. -
Activity Override: If enabled, the role can override the activity status of the record: set as active or inactive and remove activity overrides (see Activating and Deactivating Records) in the specified workflow step. -
Manual Match (Override): If enabled, the role can perform manual match (merge/split) actions (see editing-master-data:merging-and-splitting-records.adoc[]) in the specified workflow step. .
-
-
For authored records,
Edit Authored,Create Authored, andDelete Authoredare available. If enabled, the role can execute these actions on items in this step master layer (see Editing Values) for items in this step on this master layer entity.-
Edit Authored: If enabled, the role can edit authored records on a master layer in the specified workflow step. Within this action, the role can edit only columns where Edit Authored or Edit All are allowed. -
Create Authored: If enabled, the role can create authored records on a master layer in the specified workflow step. Within this action, the role can populate only columns where Edit Authored or Edit All are allowed. -
Delete Authored: If enabled, the role can delete authored records on a master layer in the specified workflow step.
-
-
| If you add Create Authored permissions on the entity, make sure to add Edit Authored or Edit All permissions to all foreign columns on this entity. Missing edit permissions on foreign columns can result in exceptions in case you wish to create this entity from the parent entity in MDM Web App. |
| Permissions set in the Columns field must match those defined in the Steps field for that role, otherwise an error is thrown. |
Datasets
Select View Permissions for All Datasets to allow this role to view all datasets (no other actions are allowed).
To define permissions for specific datasets, Add a dataset and double-click the number next to the added dataset.
The following screen appears:
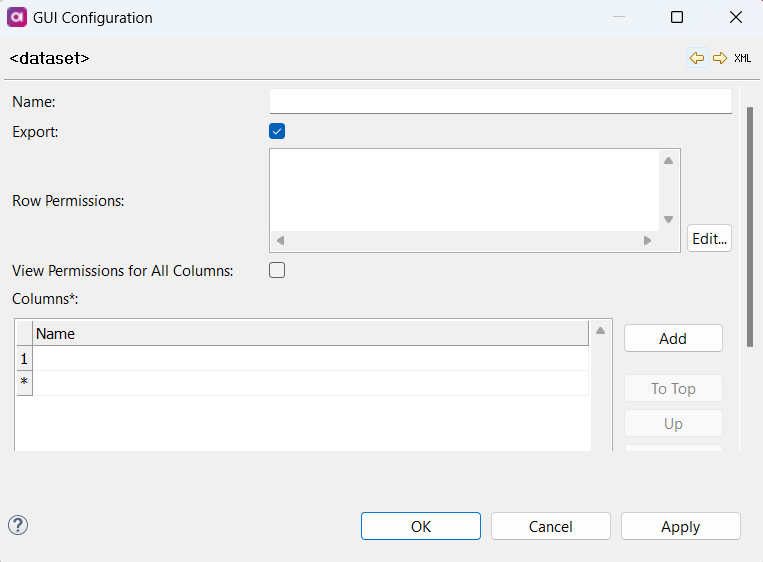
Define the following:
-
Name: Name of the dataset.
-
Export (Boolean): If enabled, the role can export items in this dataset.
-
View Row Permissions: View row permissions are defined using SQL
WHEREconditions (supported operators and syntax depend on the database).If an entity has a defined row permission, the role can only view the rows specified by that permission. If no row permission is set for the entity, the role has access to all rows by default.
To prevent access to all rows, set the condition to
FALSE.If a view-only role is defined, set Edit Row Permission to FALSEto prevent unintended edit access. See Row permission access level and Evaluating multiple row permissions. -
Edit Row Permissions: The Edit row permission works similarly to the View row permission, but it restricts the ability to edit rows.
A role can only edit the rows that they are also allowed to view and only if their Edit permission allows it. If the Edit row permission is more restrictive than the View permission, the user cannot edit all the rows they can see.
If an edit role is intended to apply only to a data subset (as defined in View Row Permission), make sure to apply the same condition to Edit Row Permission to maintain consistent access control. See Row permission access level and Evaluating multiple row permissions. -
View Permissions for All Columns: If enabled, the role can view all columns of the specified dataset (no other actions are allowed).
-
Columns: If a column is listed, the role has view permissions by default.
Permissions set in the Columns field must match those defined in the Steps field for that role, otherwise an error is thrown.
Matching proposal layer
On this level, you can define view and reject permissions for matching proposals for the role.
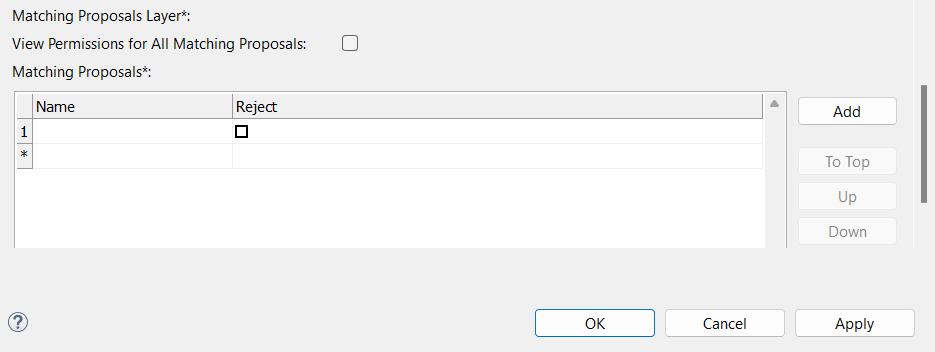
Select View Permissions for All Matching Proposals to allow this role to view all matching proposals (no other actions are allowed).
-
Matching proposals: To add entities, select Add and provide the following:
-
Name: Name of the matching proposal entity that the role can view.
-
Reject: If enabled, the role can reject matching proposals on the specified entity.
-
Alternatively, you can specify the entity name and reject rights by double-clicking the number of the row and filling in the table that opens.
Bulk setting permissions for multiple entities
If you need to set the same permissions for multiple entities across all columns, follow these steps:
-
Create a permission template for the first entity:
-
Define column-level permissions (view and modify).
-
Specify which operations are allowed in each workflow step.
-
-
Add other entities: list the entities that should have the same permissions as the first entity.
-
Highlight the list:
-
Select the first entity settings.
-
Highlight the entities that should receive the same settings.

-
-
Use Ctrl+D to copy the permissions to the selected entities.
-
(Optional) Add entity-specific settings if needed, for example, row permissions or custom actions.
-
Make sure to configure permissions for task operations, workflow steps, transitions, and allowed operations.
Use the same procedure to copy settings among different roles efficiently.
Row permission access level
There are three access levels available for both View and Edit row permissions:
-
No access: Applies when the user has no row permissions, either by removing the entity or setting the condition to
FALSE. -
Restricted access: Applies when specific WHERE conditions are defined, limiting access to only the rows that match those conditions.
-
Allow all: Applies when the condition is left empty, granting access to all rows.
Evaluating multiple row permissions
When a user is assigned multiple roles, and each role has different row-level permissions, the access rights are evaluated using a union strategy. This means that the most permissive access granted by any of the assigned roles will apply.
For example, if a user holds both the viewer role (with Restricted access) and the data_steward role (with Allow all access), the resulting permission will be Allow all. This approach ensures that users receive the full extent of access authorized by any of their roles, rather than the most restrictive.
Using Keycloak custom attribute as row permission parameters
From 16.2.0, you can use Keycloak custom attributes as dynamic parameters in row-level permission conditions. This removes the need to manually set values and enables changes to permission values without restarting the MDM server.
Define a custom attribute in Keycloak
To create and use a custom attribute for row permissions:
-
Log in to the Keycloak Admin Console and select the realm you are using for MDM (typically,
Ataccamaone). -
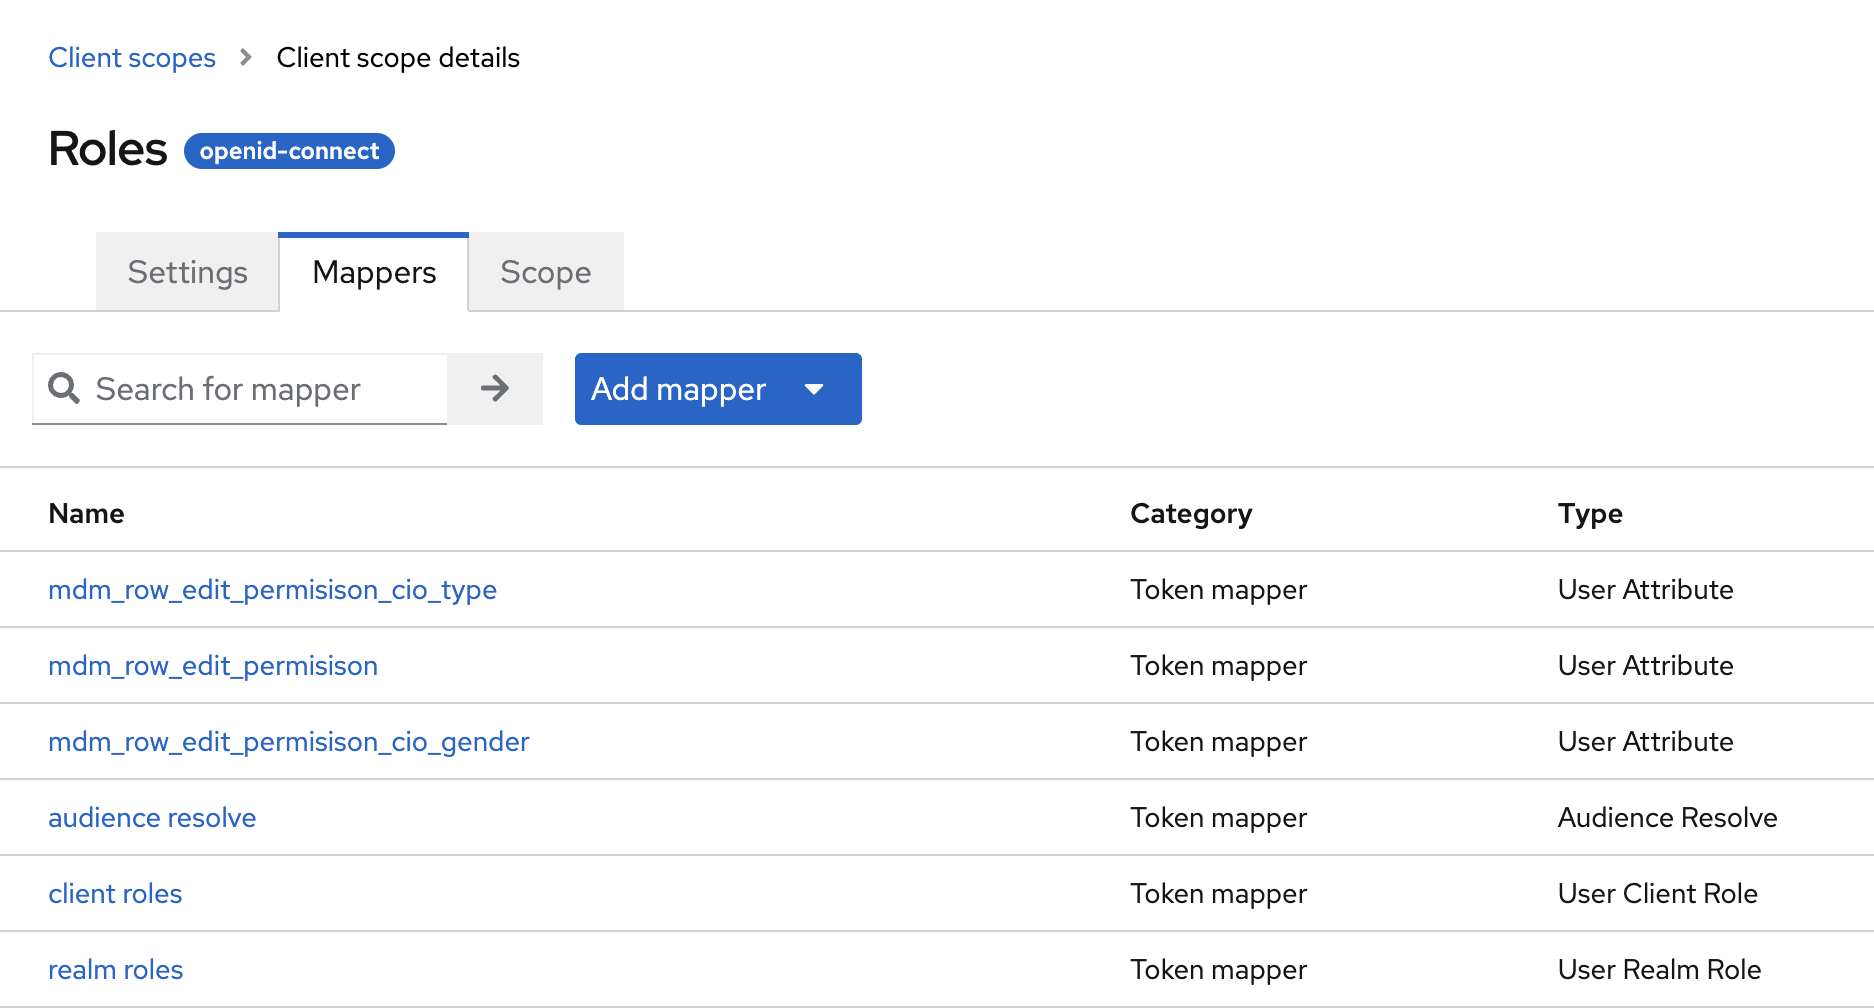
In the left-hand navigation menu, select Client Scopes.
-
Open the roles client scope.
-
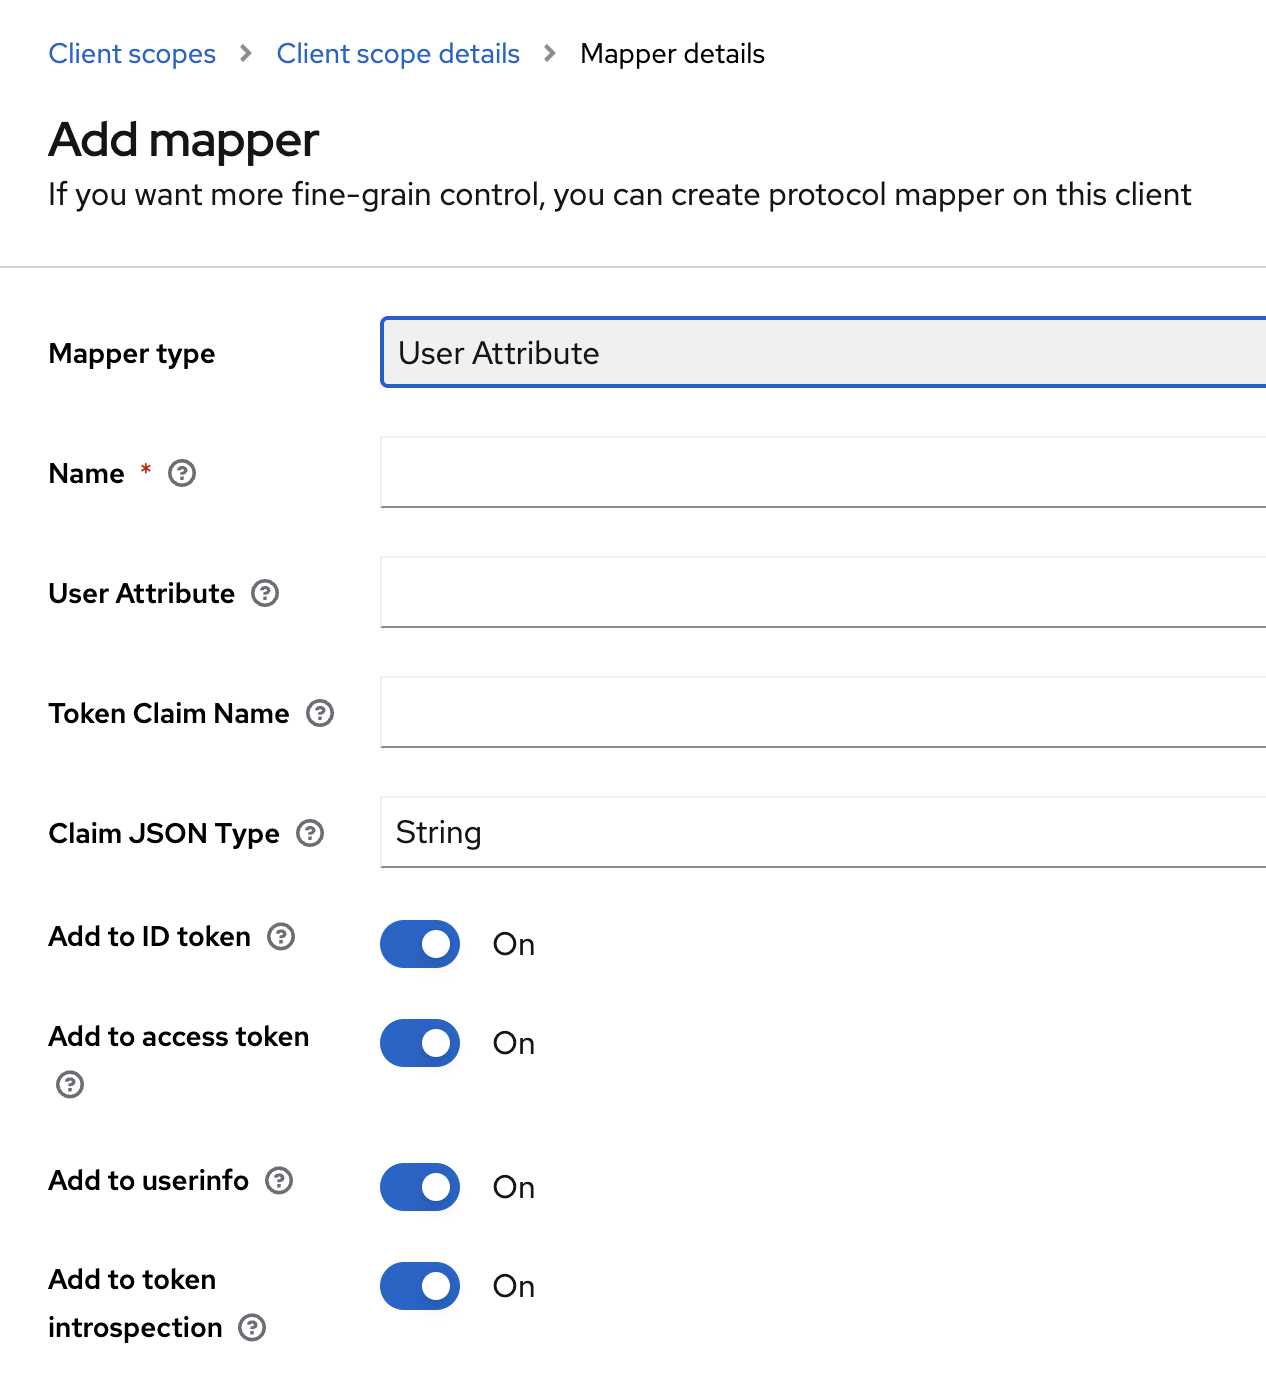
On the Mappers tab, check whether the desired user attribute already exists. If not, select Add Mapper to define a new one.
-
Fill in the mapper details. See the Keycloak official documentation for reference.
-
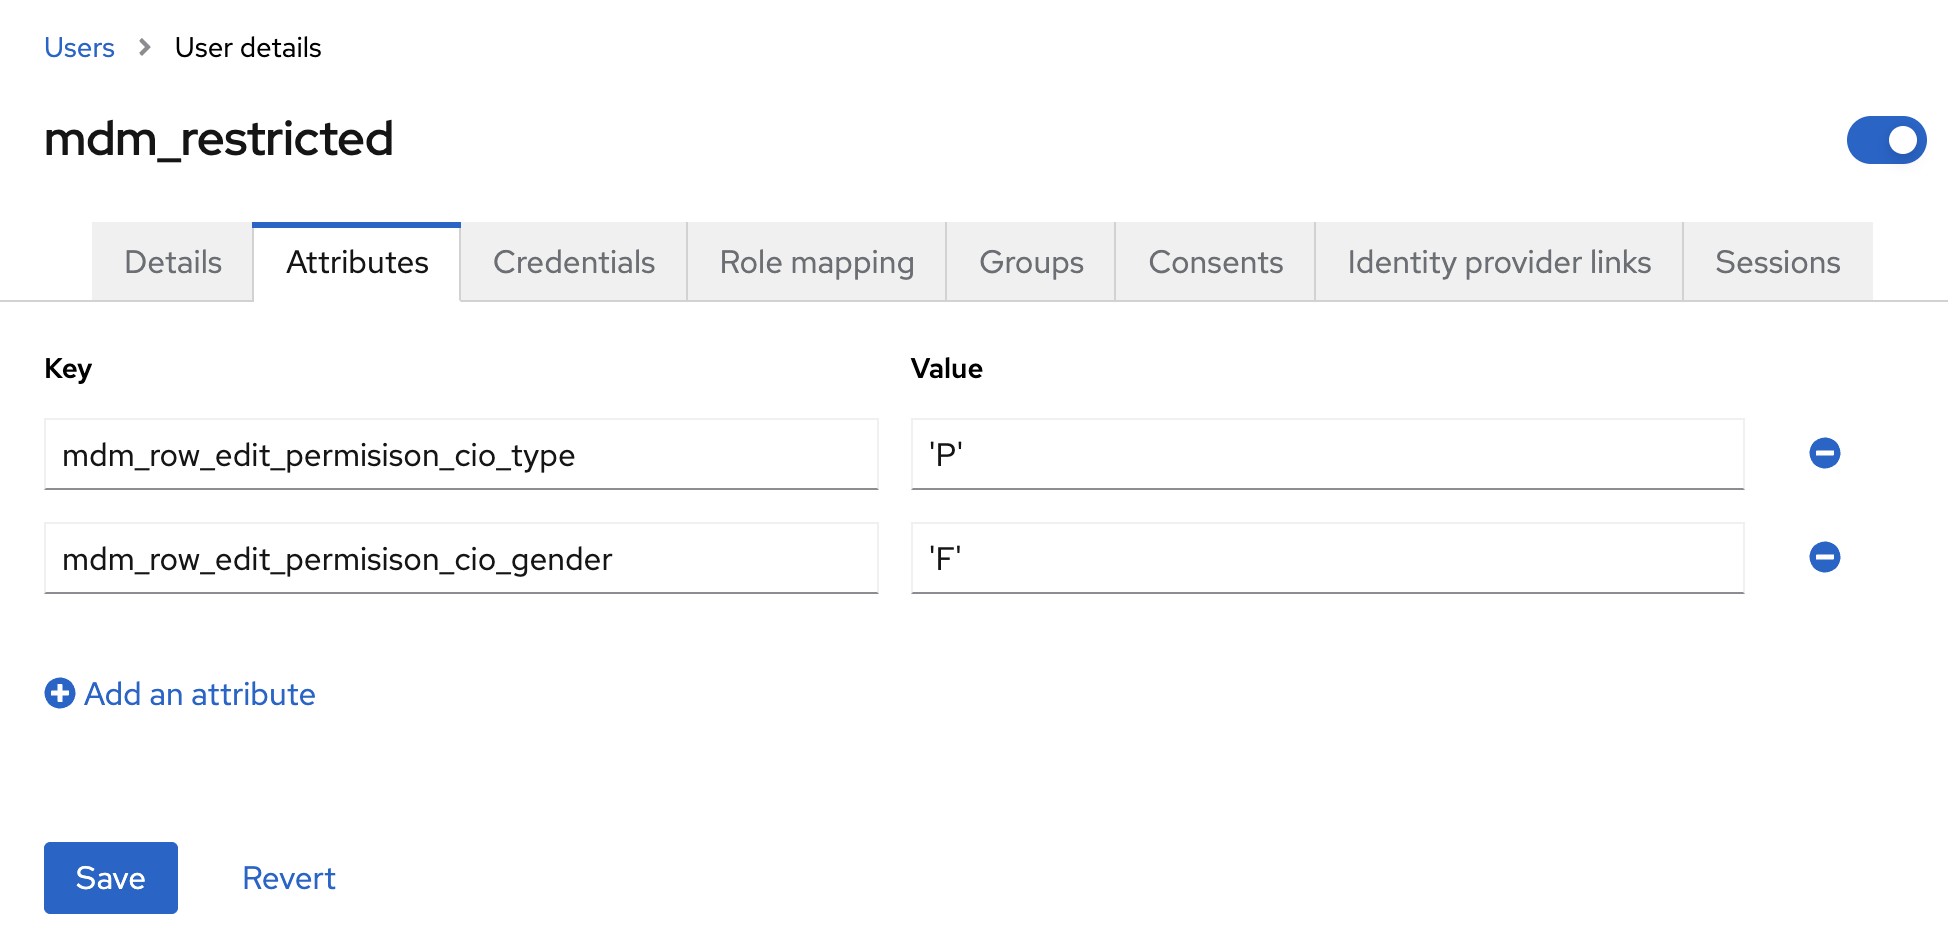
Next, go to Users and select the user you want to assign the attribute to.
-
On the Attributes tab, add the newly created custom attribute and save your changes.
Using custom attributes in ONE Desktop
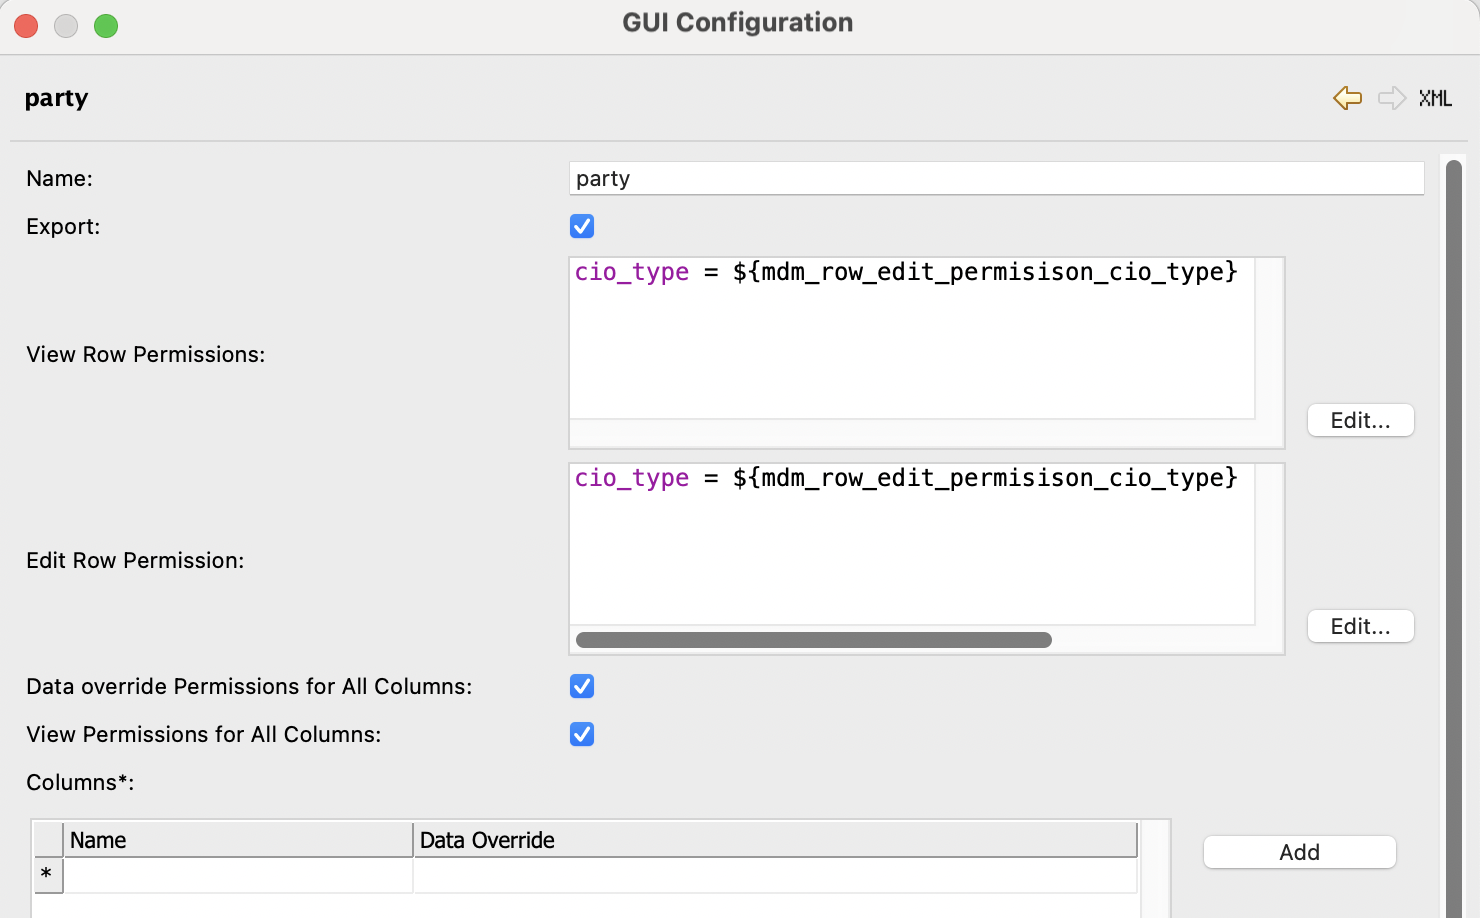
Once a custom attribute is set up in Keycloak, you can reference it in View or Edit row permissions in ONE Desktop as shown in the following example. This setup allows dynamic and user-specific data access control, aligned with identity attributes managed centrally in Keycloak.
Was this page useful?