
Matching Proposals
What are matching proposals?
Matching proposals are potential duplicates in your data that are captured as part of automated matching in the Matching step. While generated automatically based on predefined rules, they require manual resolution to confirm, reject, or adjust the suggested matches.
Typically, manual intervention is needed when:
-
There are specific proposal rules defined.
-
There are some constraints applied.
-
A record matches several groups but cannot be automatically merged to more than one record.
-
A configured column changes on a record, and the change is set to generate a proposal rather than a rematch.
| To better understand how different approaches to matching complement each other, see Matching approaches. For an in-depth look into how matching proposals are generated, see Proposal rules. |
In addition, matching proposals are produced by AI Matching, which generates a set of matching proposals based on previous user decisions and AI model training.
In MDM Web App, you can see all matching proposals available for your data, resolve them yourself, or assign a task to other team members.
Get started with matching proposals
Working with matching proposals follows one of these scenarios:
-
You go through matching proposals and assign a related task to a coworker.
-
You go through matching proposals and resolve them on your own.
-
You are assigned a task related to matching proposals.
To quickly get started with matching proposals, follow these steps:
-
Open a matching proposal to view details. This is your main workspace regardless of your specific use case.
-
Add related proposals to make sure you’re viewing all relevant records. Your list of records in the compare view is now complete.
-
Start by hiding records that are irrelevant.
-
Use Remove selected if you do not want to see the proposal at the moment but might use it later. You can get back to this proposal on the Matching proposals listing at any point.
-
Use Reject proposal if the proposal is definitely wrong. This dismisses the proposal and deletes it from the listing entirely.
-
-
Compare remaining records to decide if they can be merged.
-
Merge the master records or merge or split the instances based on the comparison. For details, see Resolve matching proposals.
-
Once you are done, move the task to the next step in the publishing workflow to propagate the changes.
Where to find matching proposals
The matching proposals listing contains matching proposals available for your data (aggregated from the MDM Matching step and AI Matching).
You can access it in one of two ways:
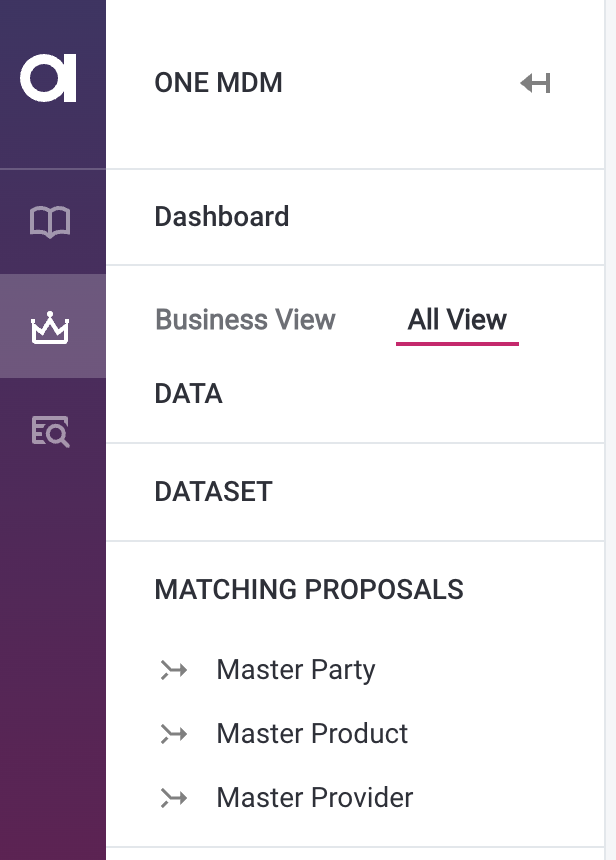
- From left navigation panel
-
In the left navigation panel, switch from Business to All View and select Matching Proposals.
- From Business View
-
If configured, matching proposals are also shown in the Business View. To learn how to add a link to matching proposals, see Customizing the Left Navigation Panel.
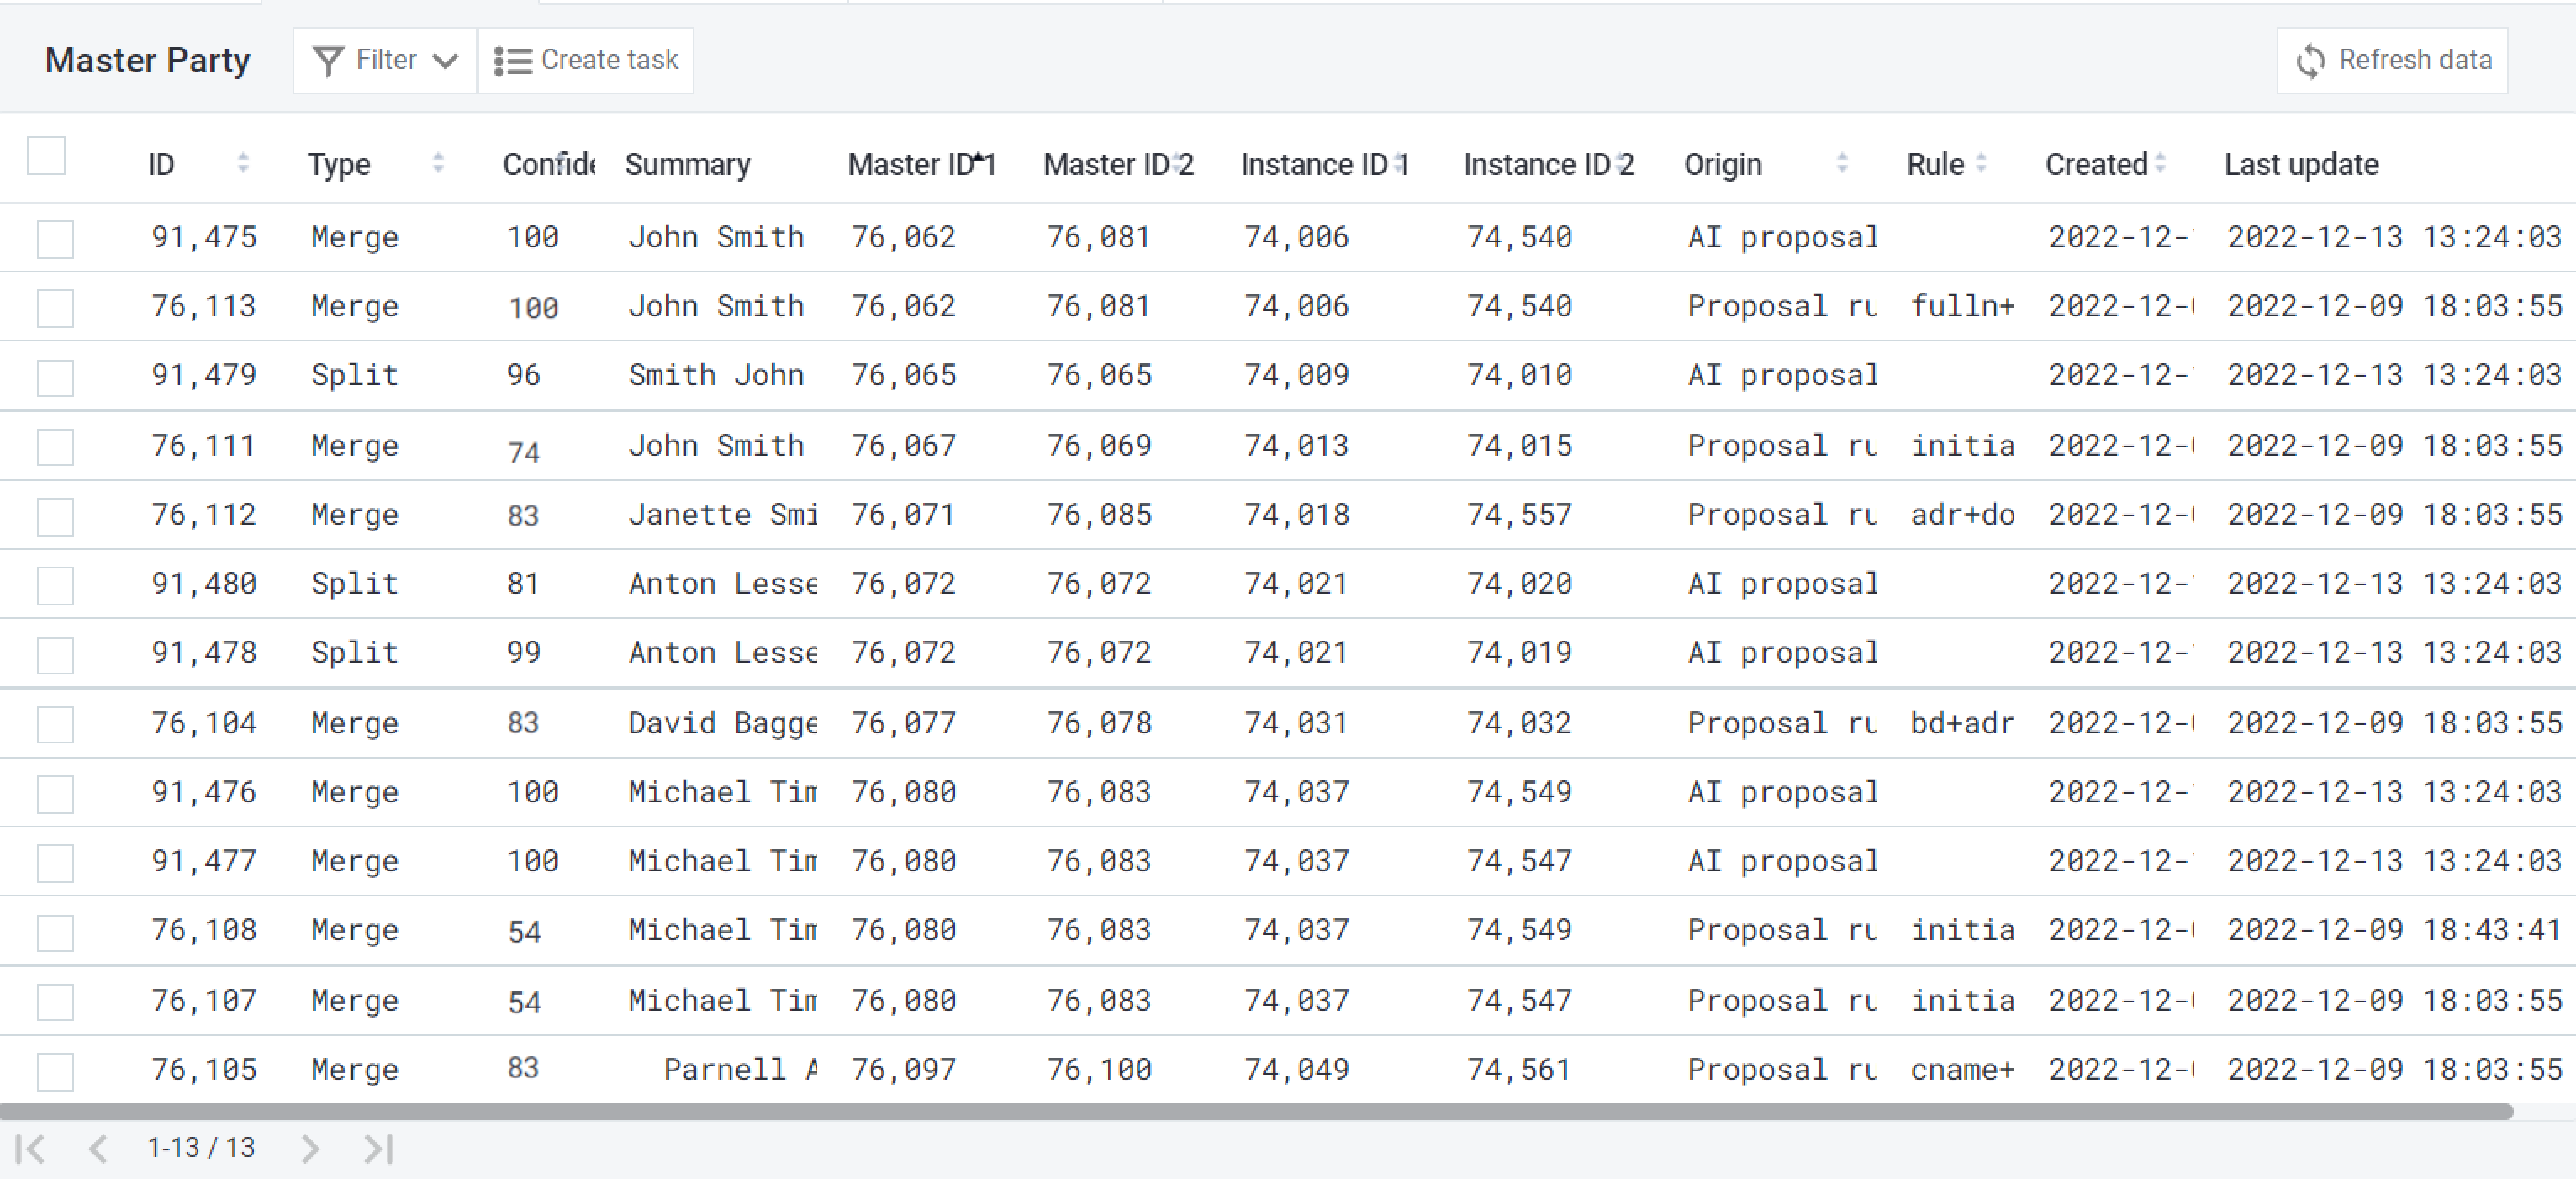
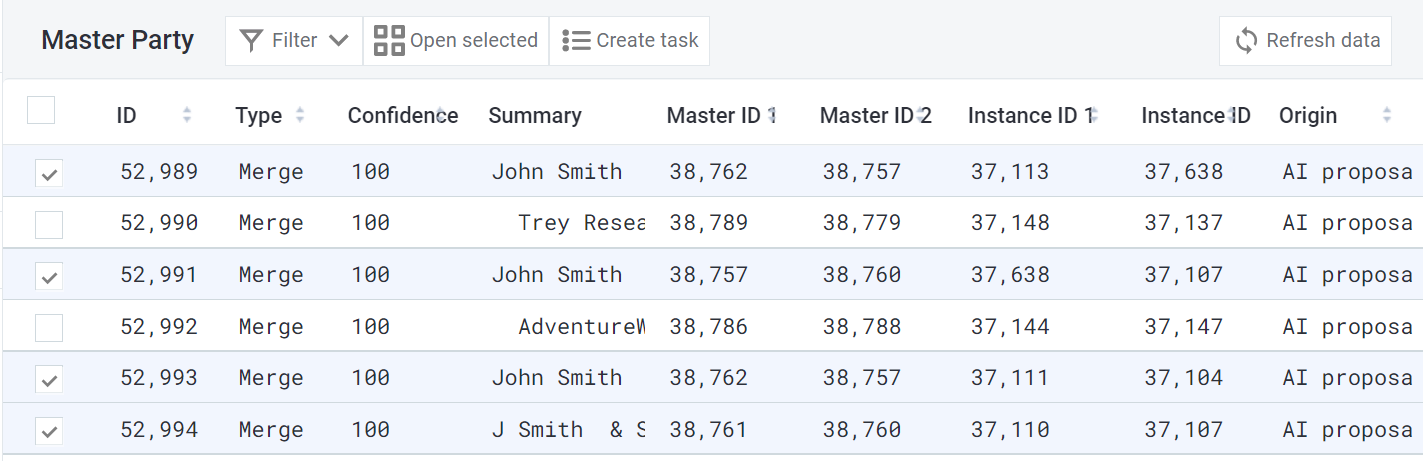
Matching proposals listing overview
On the matching proposals listing, you can view the following information for each proposal:
-
ID: The matching proposal identifier.
-
Type: The matching proposal type: Merge or Split. Proposals generated from Create Proposal If Changed configuration are always Merge.
-
Confidence: The match likelihood, expressed as a percentage.
For matching proposals coming from the Matching step, this is manually configured for each matching rule applied. For AI Matching proposals, this is calculated automatically during AI matching.
-
Summary: A short description of the matching proposal. Typically contains the names of relevant master records.
What you see here depends on how record labels are configured. See Constructing the record label.
-
Master ID 1, Master ID 2: Identifiers of the two master records that are part of the merge or split proposal.
-
Instance ID 1, Instance ID 2: Identifiers of the instances of the first and the second master records that are part of the matching proposal.
-
Origin: Describes how the matching proposal was generated.
For matching proposals coming from the MDM Matching step, the following values are used:
-
Proposal rule
-
Matching rule
-
Constraint issue
-
Proposal only (for proposals generated using Create Proposal If Changed configuration)
For matching proposals generated through AI Matching, the origin is labeled as AI proposal.
To learn more about rule types in the MDM Matching step, see How the Matching Step Works.
-
-
Rule: An expression representing the rules based on which the proposals were created.
-
Created: Date and time when the matching proposal was generated.
-
Last updated: Date and time when the matching proposal was last updated.
From this screen, you can:
-
Filter proposals: Narrow down which matching proposals are displayed. See Filter matching proposals.
-
Create task: Create a matching proposal task for other team members. See Manual Task Creation.
Filter matching proposals
To quickly find specific matching proposals, you can filter proposals the same way you filter data.
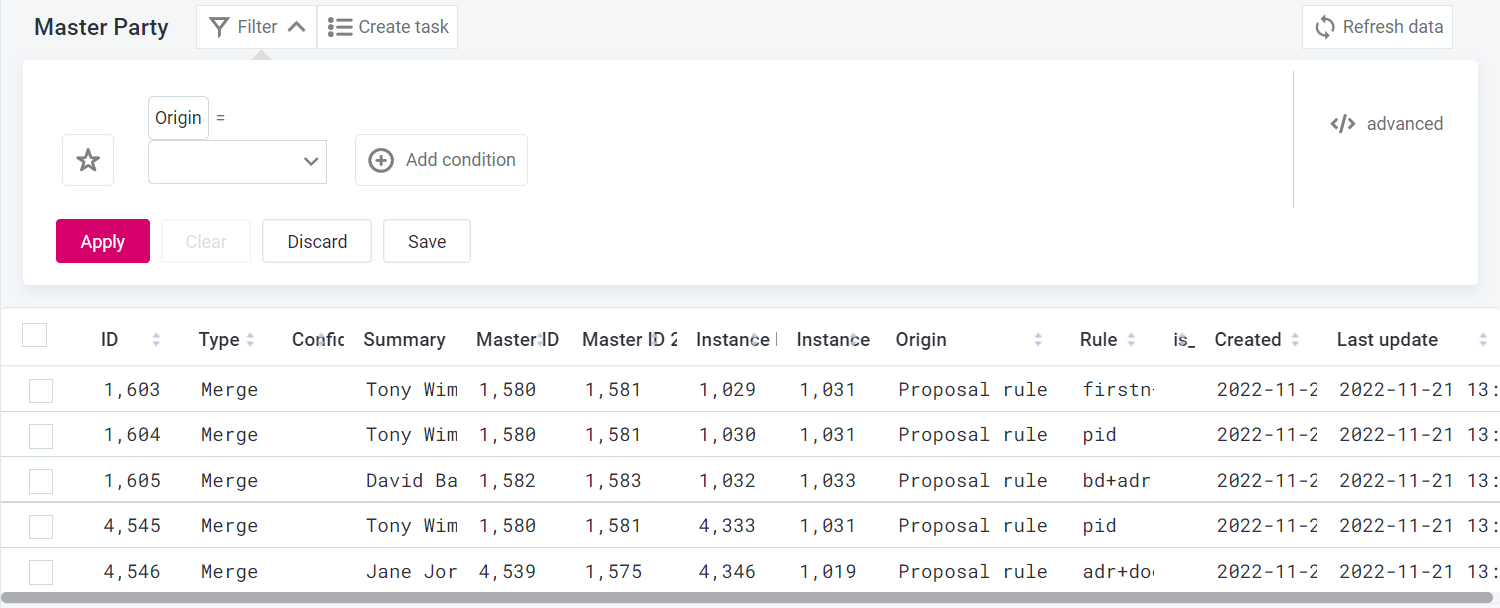
To filter matching proposals:
-
On the Matching proposals listing screen, select Filter.
-
To define a filtering condition:
-
Select Add condition and choose a parameter from the list (for example,
CreatedorLast update). -
Next to the parameter, select the appropriate search operator. For example, to filter all proposals created after a certain date, use
Created > 2025-01-01. -
Change case sensitivity if needed.
-
-
To search by more than one attribute, repeat step 2.
If you define more than one condition, change the AND/OR operator between conditions as needed.
-
When you’re finished, select Apply. The listing now shows only proposals matching your filter conditions.
For more complex filtering, use the Advanced filter.
View matching proposal details
The matching proposals detail screen is the main workspace for managing data changes. To better suit your workflow, you can access this screen from several locations in the web application.
- From task detail
-
If you’re assigned a matching proposal task, you can access your task from My tasks or Tasks screens.
Look for tasks of Matching proposal type and open the task. In the Matching proposals section, select Resolve to view details.
To visualize what records would look like after publishing, use the Preview option instead, available in the Drafts section. For details, see Preview matching proposal changes. 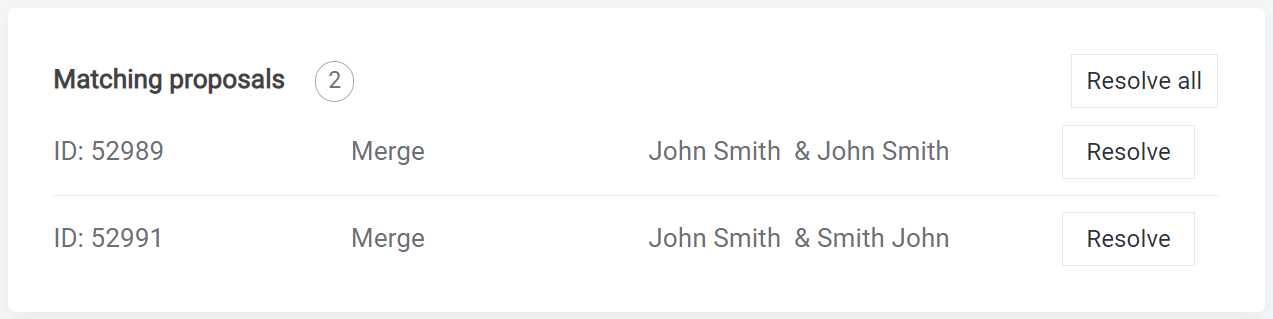
- From matching proposals listing
-
If you want to check all matching proposals, go to the matching proposals listing.
To view details, click anywhere on the matching proposal row. To open multiple proposals at once, choose which proposals you want to view and in the toolbar select Open selected.
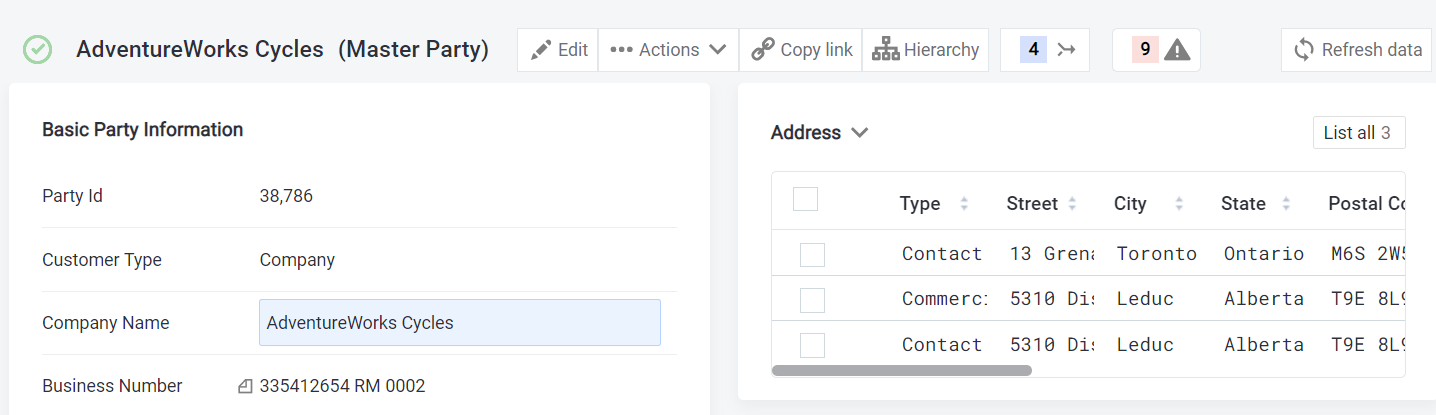
- From record detail
-
When viewing a record, if there are matching proposals available, a merged arrow icon is displayed together with the total number of proposals.
To view the proposals, select the icon. In the preview that opens, select the matching proposal you want to access.
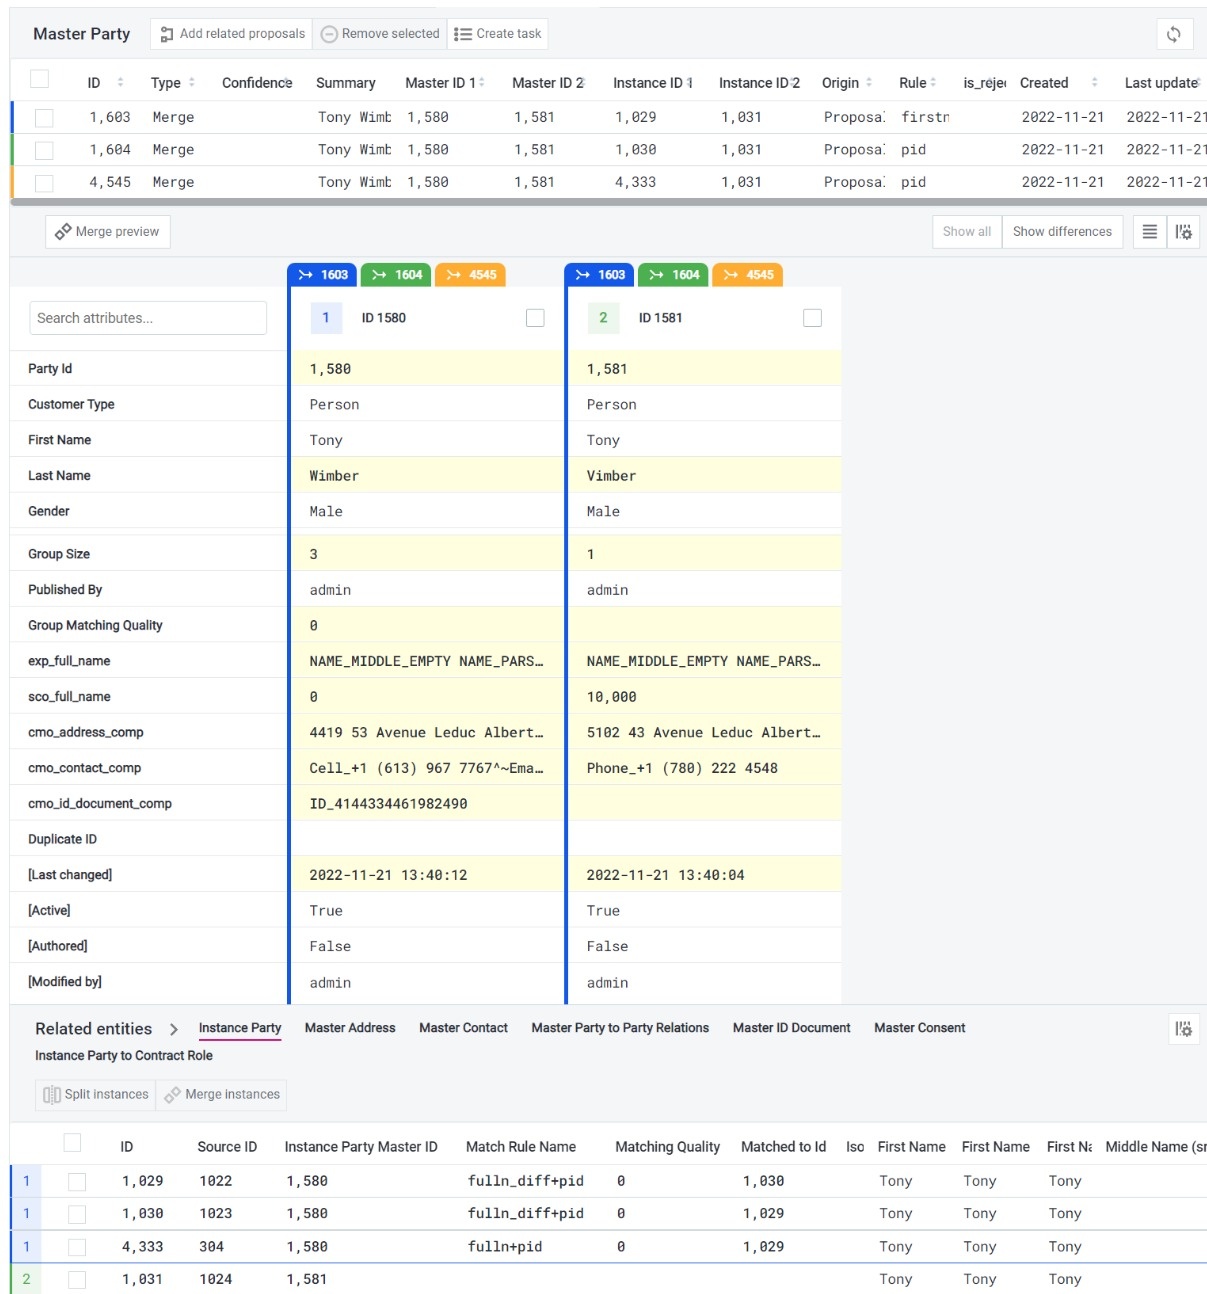
Matching proposals detail overview
The matching proposal detail view provides information about records relevant to the selected matching proposals and several actions for managing data. For each proposal, the same metadata is shown as on the Matching proposals listing screen.
To help you easily identify which record belongs to which matching proposal, records are color-coded (one color for one matching proposal).
The following image shows the default vertical compare layout where:
-
Records are displayed side by side.
For table format, switch to the horizontal layout. See Compare records. -
Values that differ between records are highlighted.
Select Show differences to filter only these attributes.
From the top toolbar, you can:
-
Create a matching proposal task for other team members.
View related entities
The Related entities section shows details of records from related entities. Use it to verify whether records match.
Related records are color-coded and numbered, with different colored lines separating groups of related records. This helps you quickly see the relationships between records.
| To display related child entity records (including direct instance records), select one of the entities. |
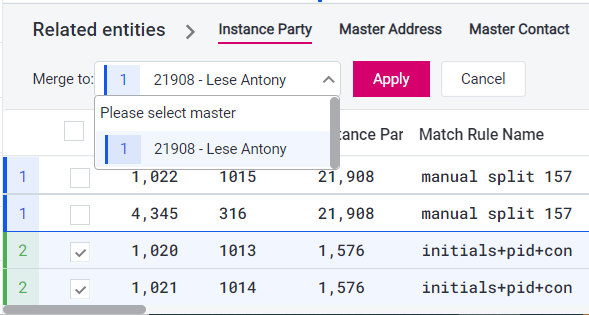
To merge and split specific instances directly from this section, use the Instance party tab. Here you can see instance records related to master records from the matching proposal.
Other tabs in Related entities are view-only.

Add related proposals
There might be additional proposals that include the same records you’ve selected.
To automatically find and add such proposals:
-
On the Matching proposals detail, select Add related proposals.
-
In the dialog that opens, confirm that you want to add the related proposals.
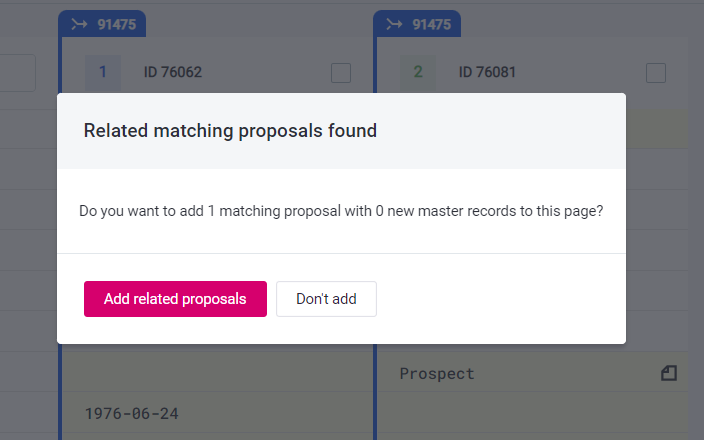
Related proposals are now added to the list and shown together with your initial selection of records in the compare view.
To ensure all related proposals are added, repeat this action multiple times. Once there are no related proposals left, a message will confirm this when you run the action again.
Remove matching proposals
To hide proposals you don’t want to work with at the moment, you can remove selected matching proposals from the compare view. This also removes related records unless they are included in other proposals on the list.
| Removed proposals do not disappear from the listing and can be resolved later. Do not confuse this with rejecting proposals. |
-
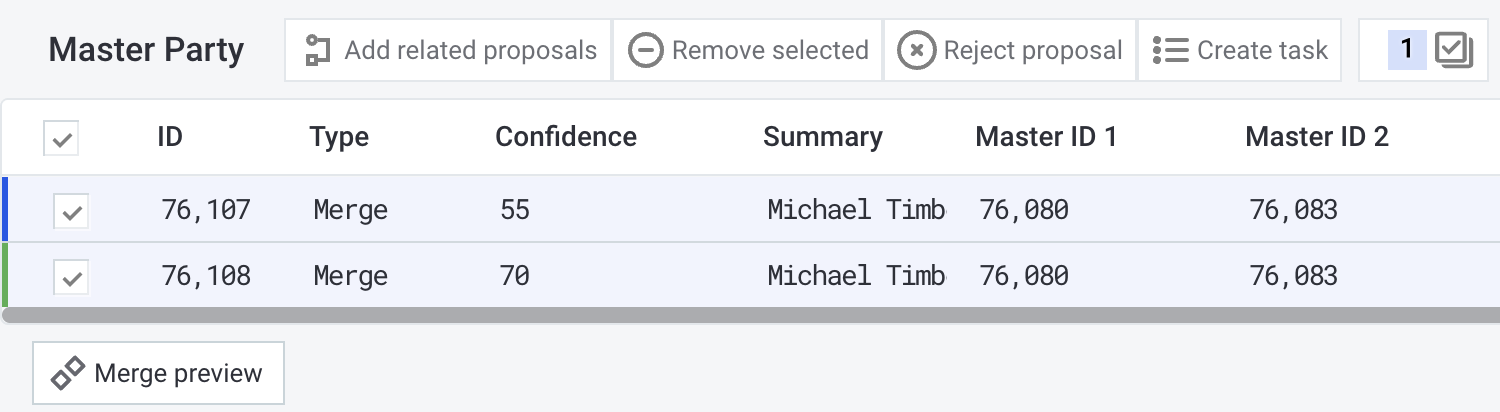
On the Matching proposals detail, select one or more proposals.
-
In the toolbar, select Remove selected. The selected proposals are now removed from the list, and any related records are removed from the compare view.
To add removed proposals back to this view, see Add related proposals. If the proposal is definitely wrong, reject the proposal instead to remove it from the Matching proposals listing too.
Reject matching proposals
Reject matching proposals that are completely irrelevant. This removes them from the Matching proposals listing and helps you keep your workspace tidy.
When you reject a proposal, the AI algorithm learns from your decision.
| Rejecting matching proposals cannot be reversed. To hide proposals from the compare view, use Remove selected instead. |
To reject proposals:
-
On the Matching proposals detail, choose one or more proposals from the list and select Reject proposal.
-
In the window that opens, choose whether to Exclude this decision from AI matching learning. If selected, the rejection will not influence future AI Matching suggestions.
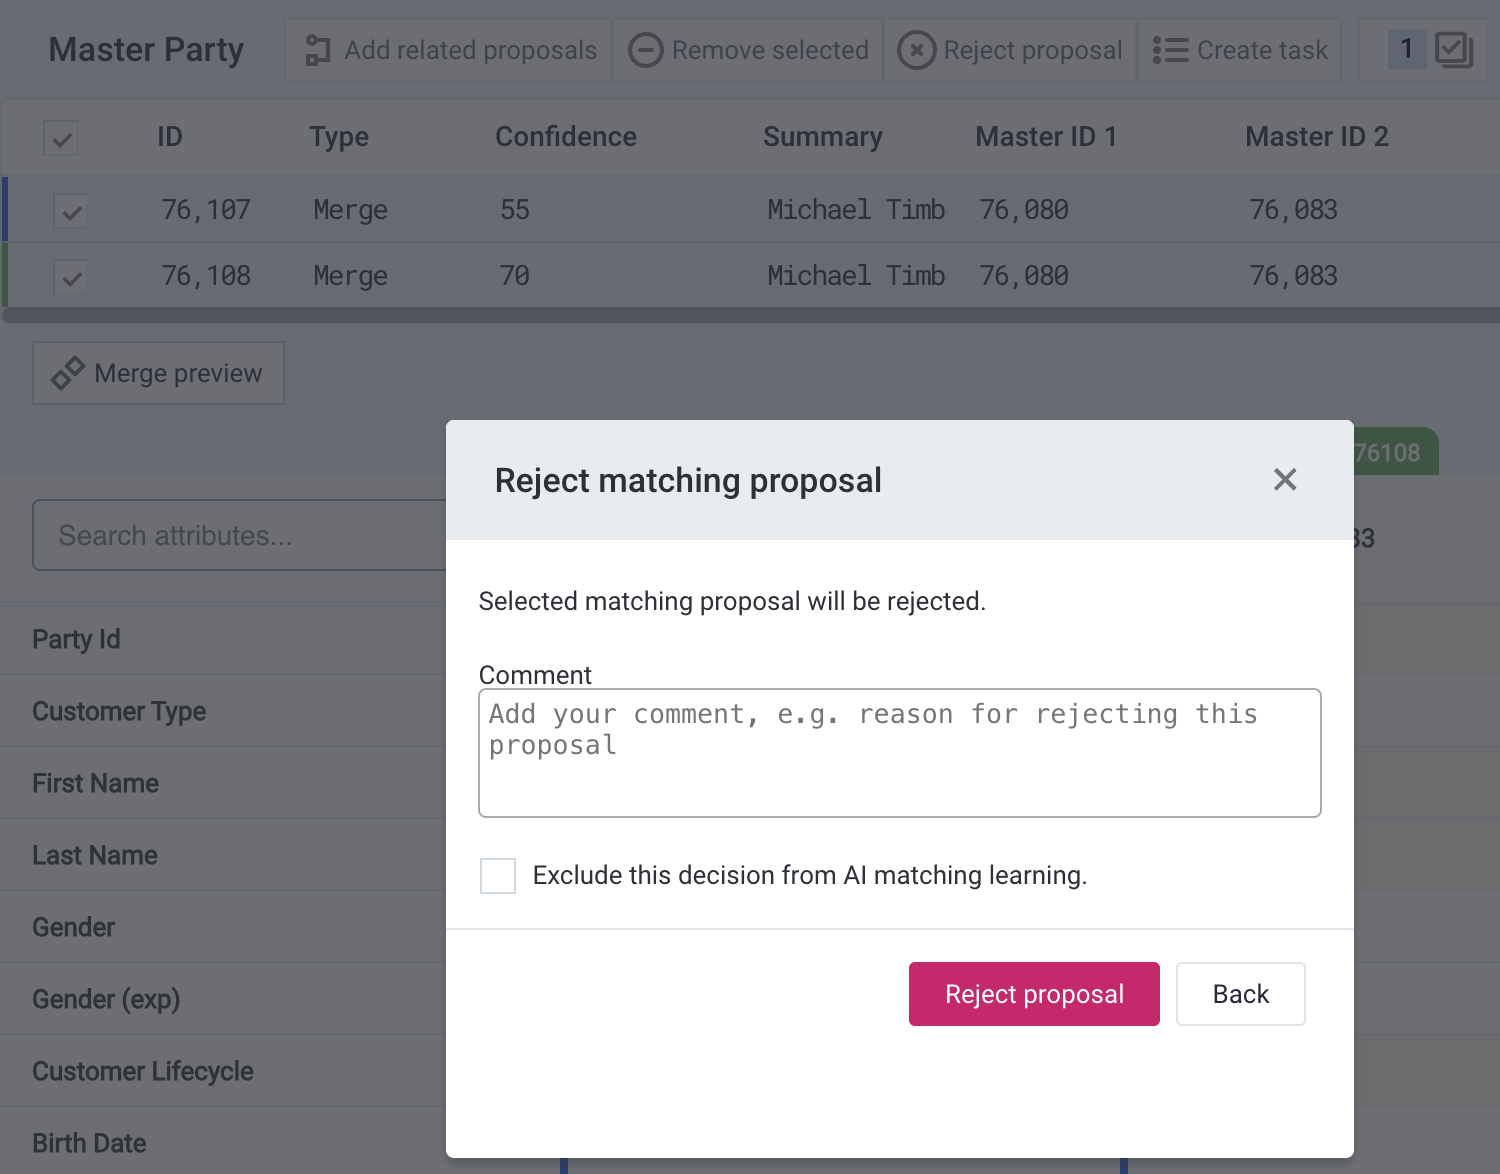
-
Leave a comment documenting your decision and select Reject proposal.
The selected proposals are now removed from the Matching proposals listing.
Compare records
The Compare view helps you decide whether records from the matching proposal should be merged.
There are two layouts available:
-
Vertical layout: Records are displayed as cards side by side, with differing attributes highlighted. Opens by default when comparing 2-8 records.
For an illustration, see Matching proposals detail overview.
-
Horizontal layout: Records are displayed in a table format, with differing attributes shown in bold. Opens by default when:
-
Comparing only one master record (in case of a split proposal).
-
Comparing more than eight records.

-
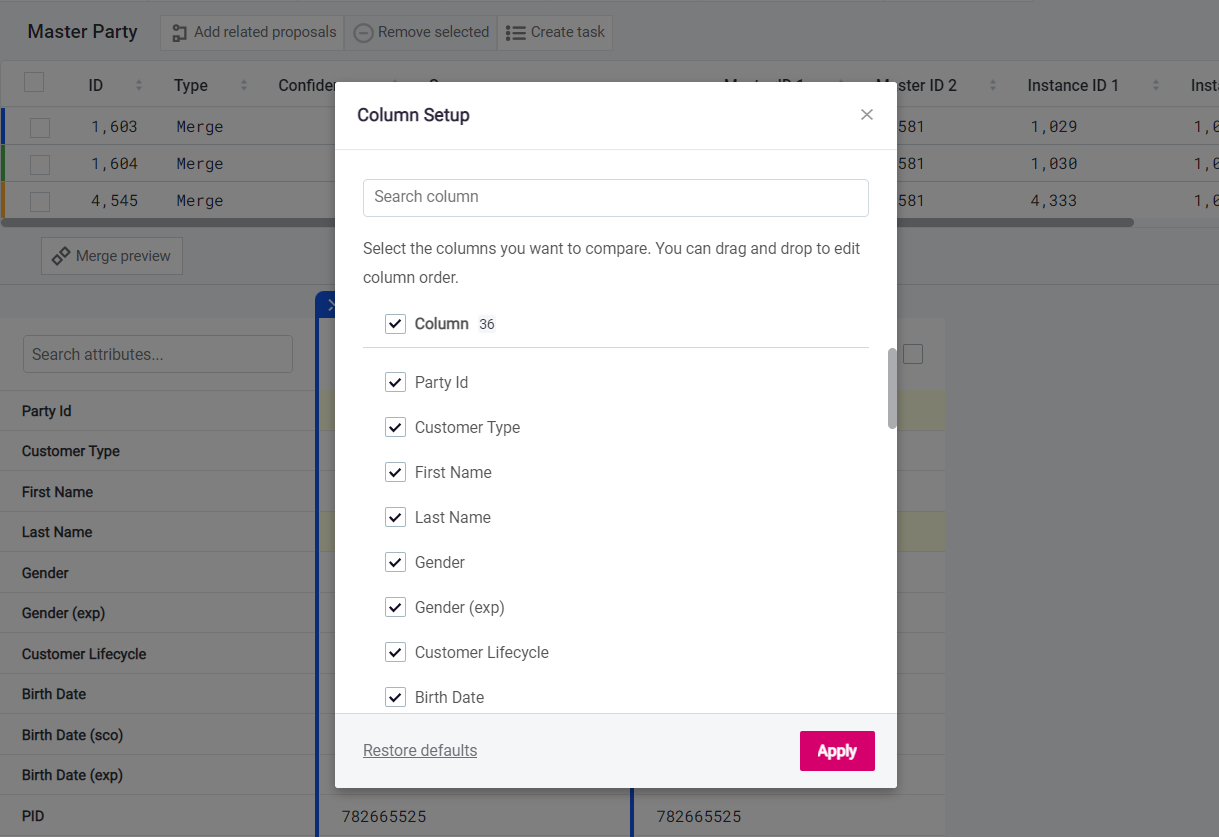
When you add or remove records from the compare view, the layout does not change automatically. To switch between layouts, use the four-line icon next to the Column Setup.
To customize the compare view for your use case, you can choose which columns are shown and their order:
| A dedicated Column Setup is available for Related entities. |
-
Open the Column Setup (vertical lines with a gear).
-
In the window that opens, choose the columns that you would like to see. Use search if needed.
If you need to reorder columns, clear the search bar first. Drag and drop only works when the search bar is empty. -
Drag and drop to reorder columns.
-
Once you are finished, select Apply.
Resolve matching proposals
To resolve a matching proposal, merge or split records included in the proposal.
In the vertical layout, all visible records are included in the merge. In the horizontal layout, you select which records to merge.
| The horizontal layout requires publishing changes in two stages: first for any record edits, then for the merge itself. |
You cannot switch the compare layout once you already start the merge. If another layout suits you better, cancel the merge and change the layout before restarting the process.
| Before publishing your changes, preview how they will affect your data. For details, see Preview matching proposal changes. |
Merging from vertical layout
When merging from the vertical layout, you do not need to select records. All records displayed in the current vertical compare view will be involved in the merge.
-
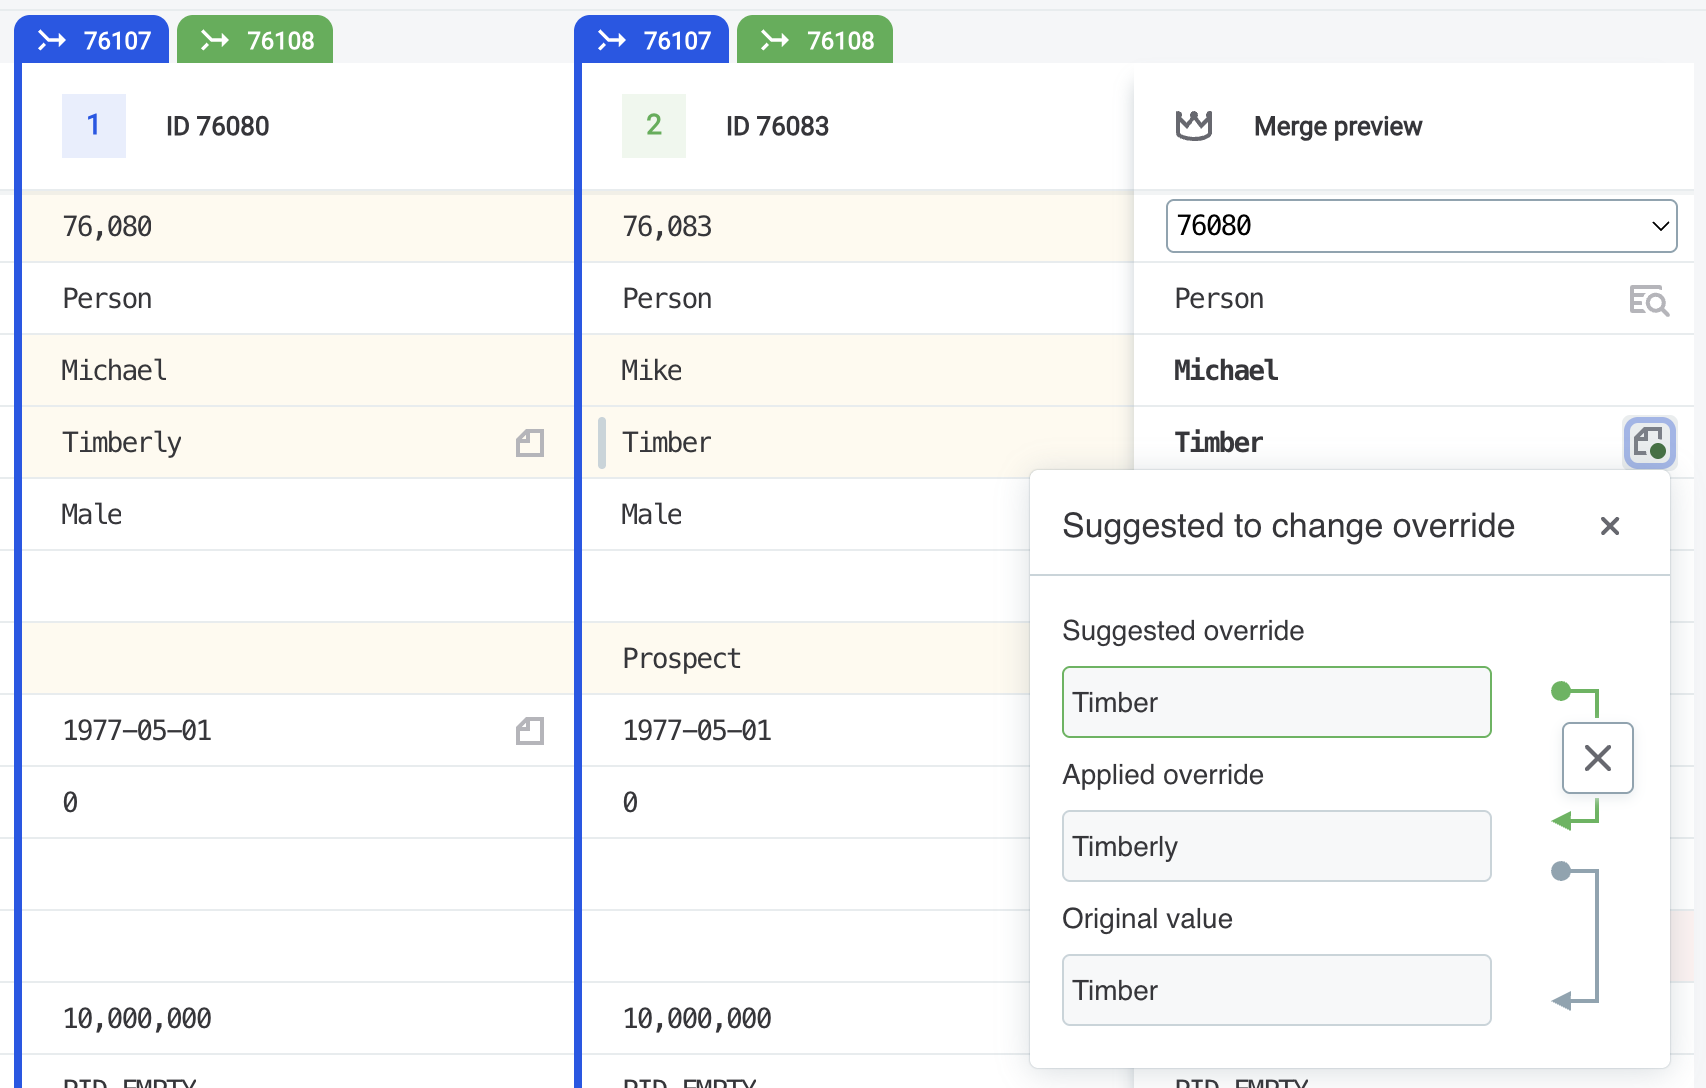
On the Matching proposals detail, select Merge preview.
-
In the Merge preview column that appears, select the survivor identifier from the dropdown to see the values that will be applied to all records shown. Look for the page icon to see which values are used as overrides.
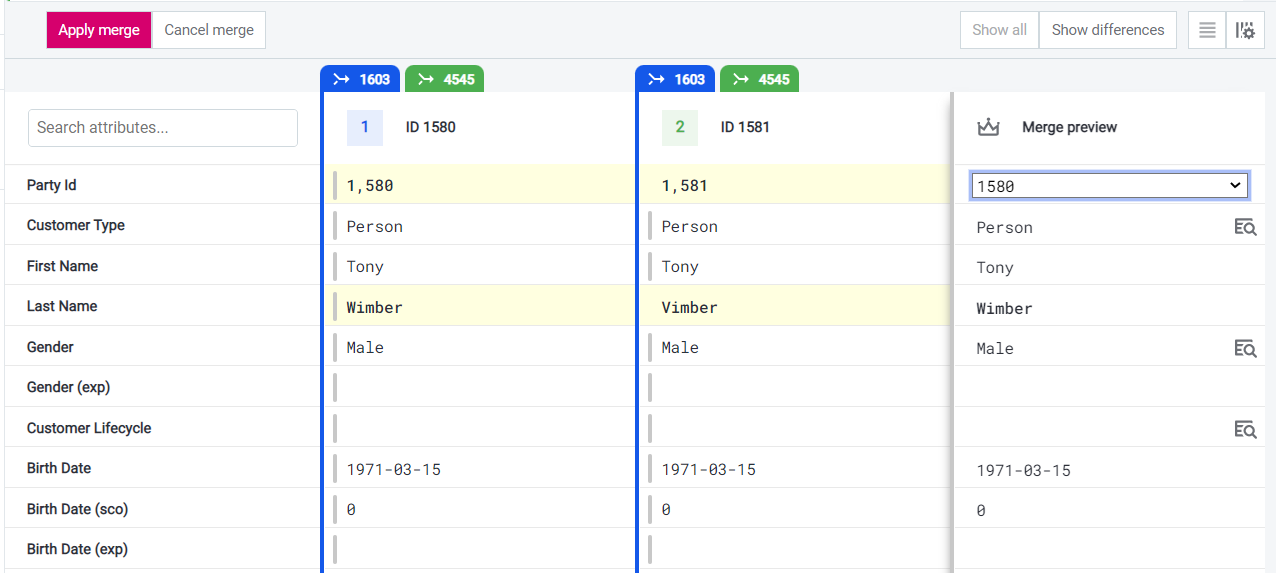
-
To suggest changes to the merge preview:
-
Select specific values from the non-survivor record that you want to propagate to the survivor.
-
Alternatively, edit the attributes directly in the Merge preview column.
Manually edited fields are labeled with an override icon (page with a green dot) and validated in real time.
Select the icon to compare the original and new values. To discard the suggested override, select X.
-
-
Once you are finished, select Apply merge.
-
The changes are now saved into a task. To propagate the changes to the MDM Server, publish them by selecting Resolve and publish from the taskbar. See Resolving Tasks.
The resolved proposals are now removed from the current view and your decisions can be used for AI training.
Merging from horizontal layout
-
On the Matching proposals detail, switch to the horizontal layout.
-
Choose two or more records and select Merge masters.
-
In the Select survivor field that appears, select the ID of the master record that will be the survivor.

-
(Optional) To edit any records before merging:
-
Click anywhere on the record row.
-
On the record detail screen that opens, select Edit to make changes.
Edited records are labeled with a page icon with a yellow dot. Select the icon to compare the original and new values, or discard the suggested override (X).
If you edit records in the horizontal layout, you must publish those edits before applying the merge. This creates two separate tasks: one for your edits and one for the merge. To save edits without publishing immediately, select Stop editing. You can return to publish the edits later before proceeding with the merge.
-
-
Select Apply.
-
The merge is now saved into a task. To propagate the changes to the MDM Server, publish them by selecting Resolve and publish from the taskbar. See Resolving Tasks.
Merge and split instances
To merge or split instance records, use the Instance tab in the Related entities section. This is useful for merge matching proposals when you’re uncertain whether all instances should be merged together. For an overview, see View related entities.
You can remove specific instance records from master records or attach them to another master record.
To split an instance record:
-
Select one or several instance records from the list.
-
From the toolbar, select Split instances.
-
The changes are now saved into a task. To propagate the changes to the MDM Server, publish them by selecting Resolve and publish from the taskbar. See Resolving Tasks.
To merge instances to a different master record:
-
Select one or several instance records from the list.
-
From the toolbar, select Merge instances.
-
In the dropdown that appears, select the ID of the master group to which the selected instances will be merged. You can choose from the master group identifiers present in the compare view.
-
Confirm your choice by selecting Apply.
-
The changes are now saved into a task. To propagate the changes to the MDM Server, publish them by selecting Resolve and publish from the taskbar. See Resolving Tasks.
Was this page useful?