
Configuring Workflows
Workflows in MDM Web App are a means to move changes made to records between logical steps to ensure proper approval mechanisms.
Changes to records are stored inside tasks. A task can contain changes to multiple records, which can then be published all at once.
When working with workflows in the MDM Web App, you have several strategies to choose from:
-
Use the default workflow and the default permission scheme.
-
Configure one or several custom workflows and a custom permission scheme. Customize both the workflows and the permissions according to your specific needs.
-
Use default workflow and a custom permissions scheme. The workflow remains unchanged, but you can customize the permissions as needed.
| When using custom workflows, a custom permission scheme must be configured. The default permission scheme cannot be used with a custom workflow. |
Before starting the configuration process, determine which combination of workflows and permissions will be used.
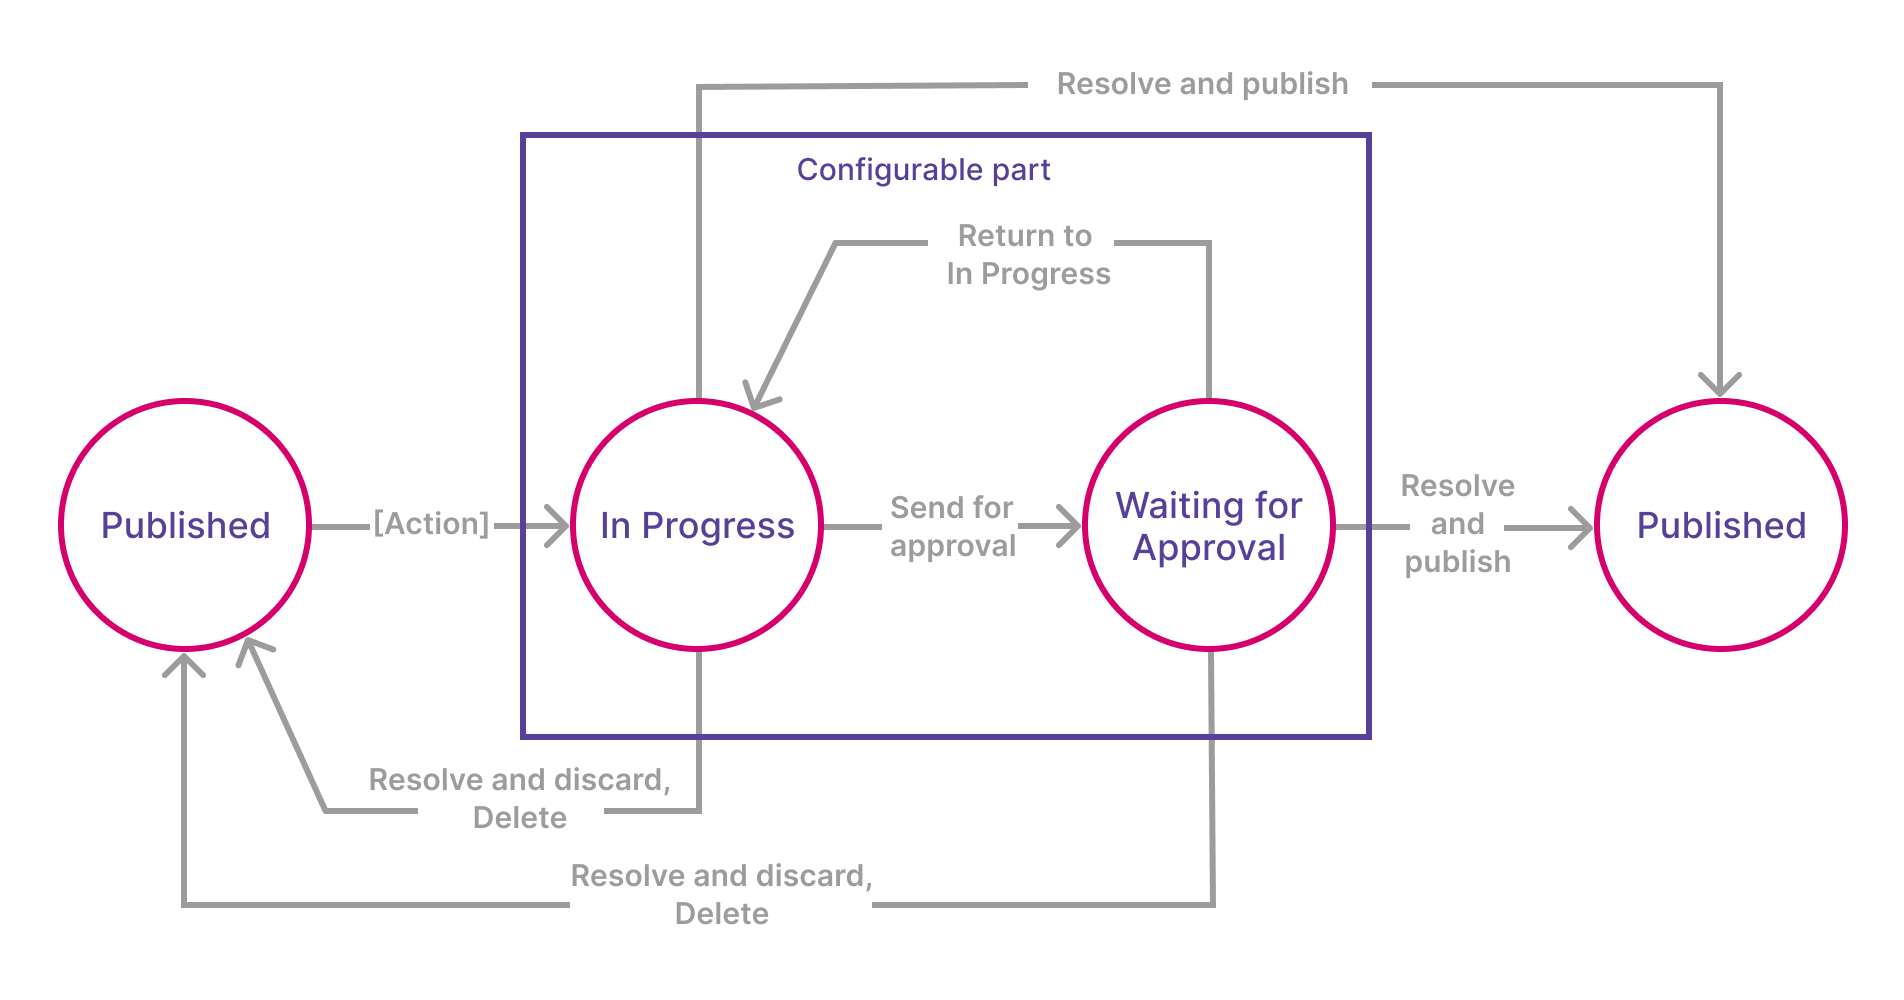
Default master data workflow
The following diagram represents the default workflow for editing data in MDM. The circles represent steps between which users move tasks in MDM Web App while the arrows represent transitions (the ability to move tasks between specific steps).
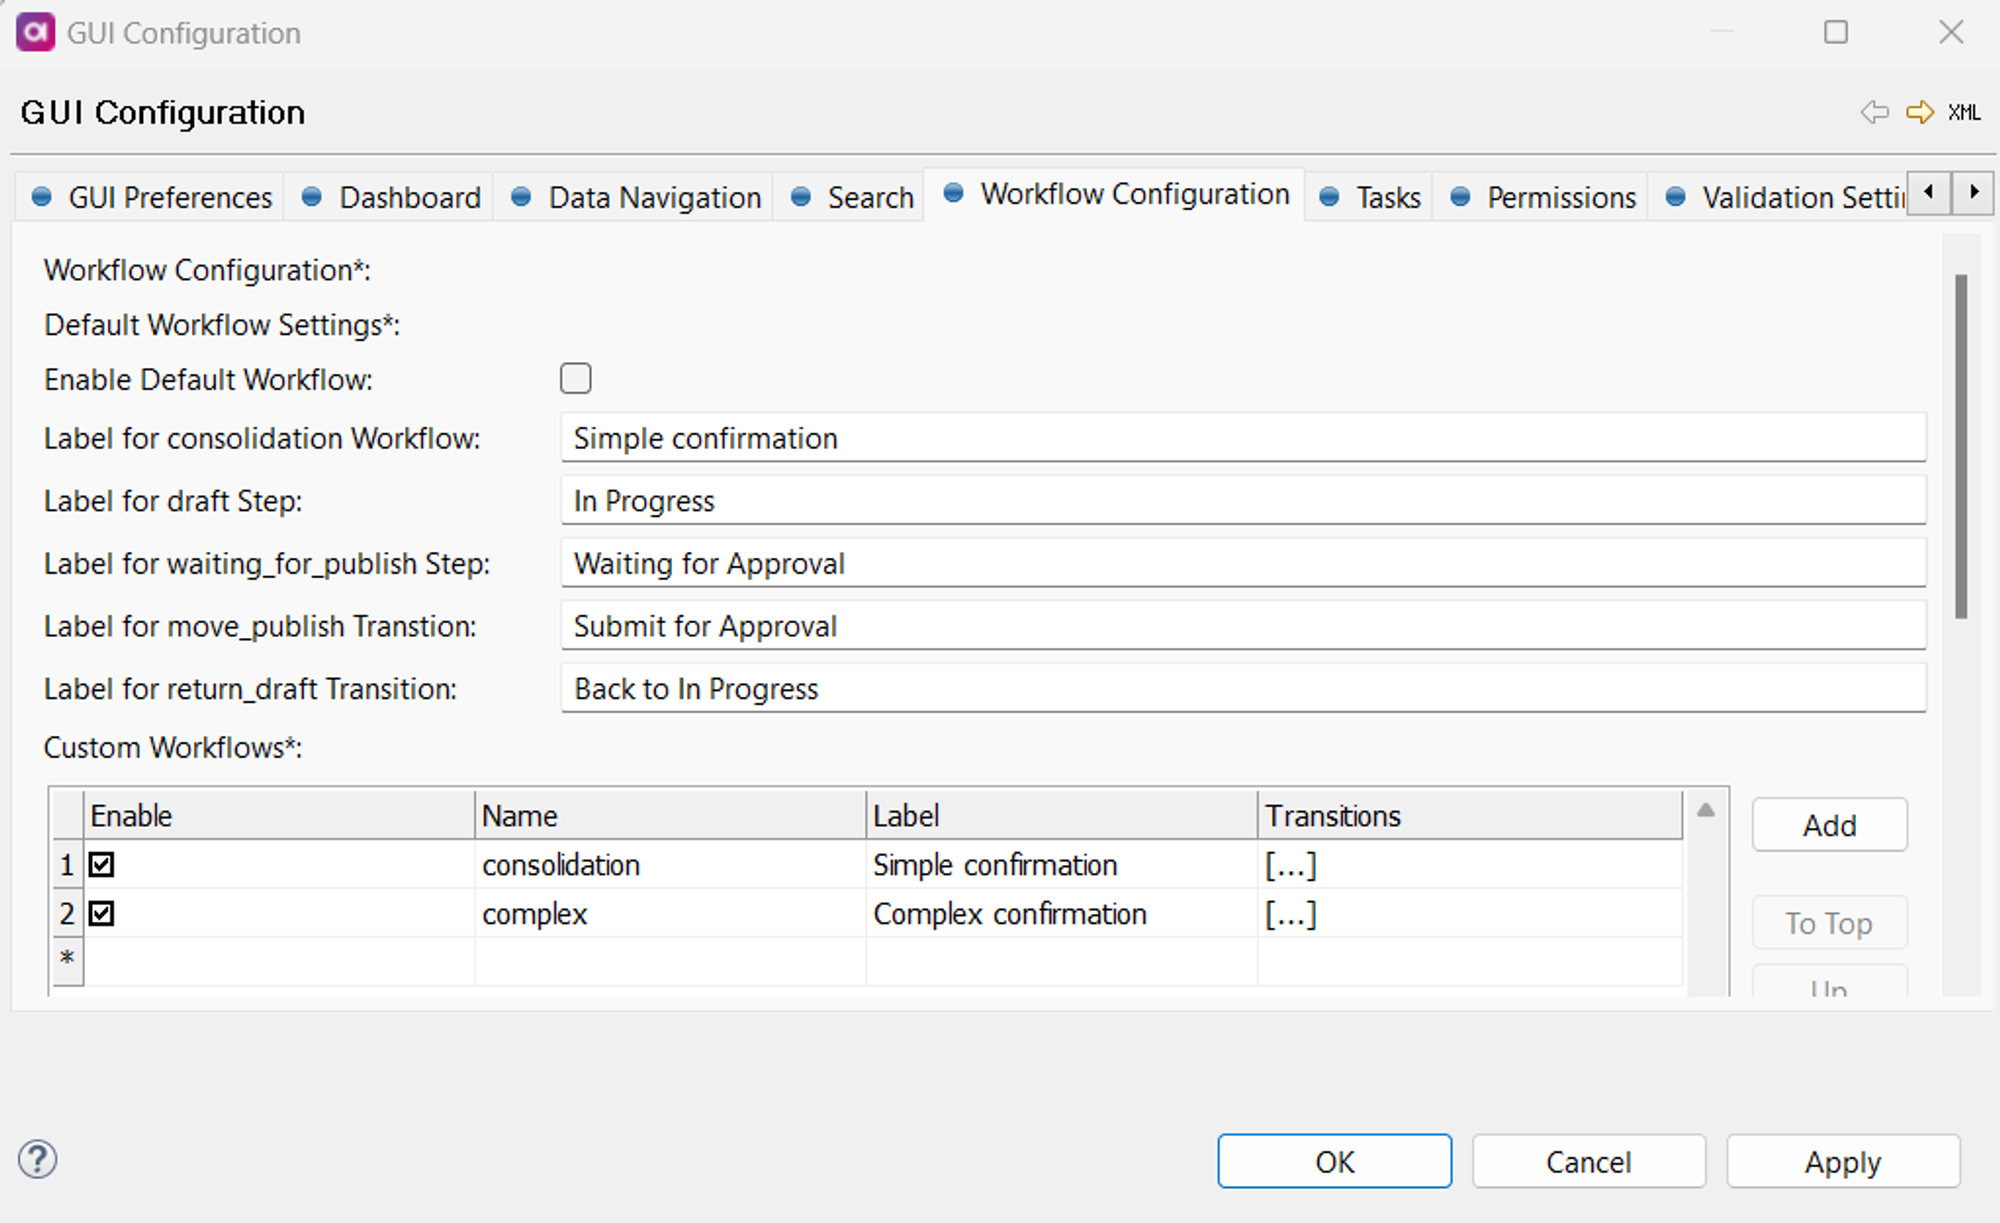
Enabling the default workflow
To enable the default workflow and, if necessary, customize the labels of steps and transitions:
-
Open the MDM Engine project in ONE Desktop.
-
Double-click the GUI Configuration project node. Select Workflow Configuration tab. All the settings pertaining to the default workflow are under Default Workflow Settings.
-
Select Enable Default Workflow.
-
Customize the labels for the steps and transitions as needed.
-
Right-click GUI Configuration and select Generate. Now the
nme-task.gen.xmlfile has been updated with the new configuration, and you can deploy it to the application server running the MDM Engine.
Custom workflows
Configuring a custom workflow
Configuring workflows consists of defining steps and transitions between them.
When defining several workflows, it is possible to reuse steps. However, one step is always shared - the step that starts the workflow.
Defining several workflows means that users will be able to choose the workflow when performing an action in MDM Web App.
To define a workflow:
-
Open the project in ONE Desktop.
-
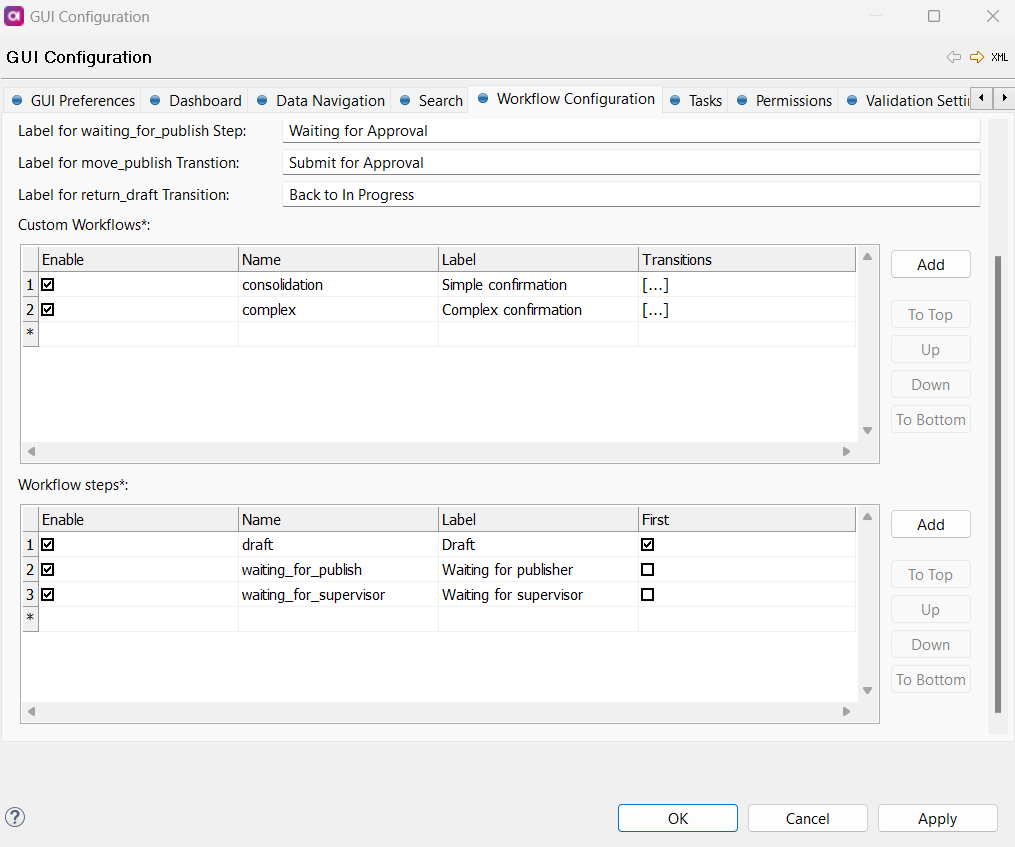
Double-click the GUI Configuration project node. Select Workflow Configuration tab.
-
Under Workflow Steps:
-
Define the steps that the workflow will contain.
-
Make sure to select Enable for all of them.
-
Mark one of the steps as First. This is the step with which the workflow starts.
-
-
Under Custom Workflows, define the following:
-
Enable: Select to ensure that the workflow appears in MDM Web App.
-
Name: Name of the workflow.
-
Label: Workflow name visible in MDM Web App.
-
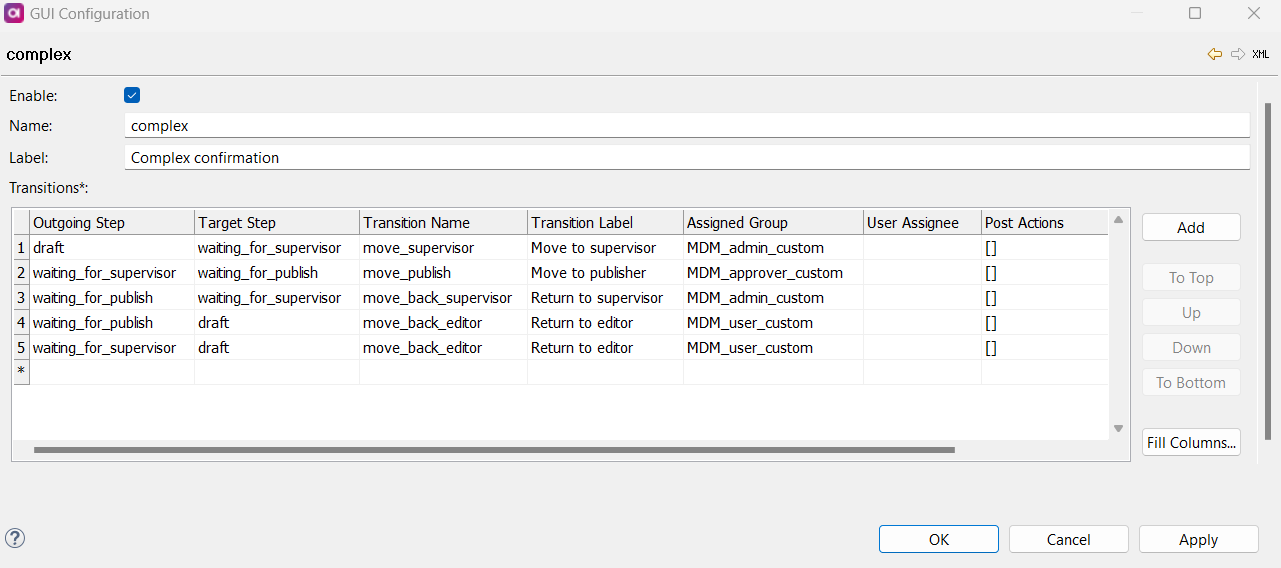
Transitions: Open the row detail and define all necessary transitions between steps.
-
Outgoing Step: The step from which the specified transition starts.
-
Target Step: The step to which the specified transition leads.
-
Transition Name: Unique name of the transition.
-
Transition Label: Name of the transition visible in MDM Web App.
-
Assigned Group (optional): Group of people to which the task is automatically assigned for the specified transition.
-
User Assignee (optional): One person to which the task is automatically assigned for the specified transition.
-
Post Actions (optional): Define one or more actions that will be automatically executed after the specified transition.
When a task transitions in a custom workflow, its details are updated and sent to a plan located in the
\Files\engine\post_actionsdirectory (plan names follow the conventionworkflowName_transitionName_actionName.comp). This plan executes predefined post actions and contains all task columns in an Integration Input step.After execution, a history entry containing the actions and their outcomes is created, and the task details in MDM Web App are updated.
The execution is synchronous. If any action fails, it does not affect the transition success; the failure is simply recorded in the history.
For optimal performance, post actions need to be designed to execute quickly. If longer actions are necessary, we recommend decoupling the action plan from the main execution process to avoid delays.
-
-
-
Right-click GUI Configuration and select Generate. Now the
nme-task.gen.xmlfile has been updated with the new configuration.
Modifying a workflow
|
Prior to deploying a workflow change, we recommend processing all existing tasks (that is, either publishing or deleting all pending tasks). Otherwise, the workflow change might prevent MDM from starting after deployment. |
Modifying a custom workflow
Adding steps and transitions
You can add steps and transitions to your custom workflow as needed. Make sure to modify the permissions accordingly.
Renaming workflows, steps, and transitions
Transitions can be renamed without any issues. Make sure to modify the permissions accordingly.
If you need to rename a workflow or workflow steps, we recommend changing the label rather than workflow and step names.
|
Changing names involves assigning a new name and removing the old one, which will affect how tasks that use removed workflow and steps are displayed in MDM Web App. If a workflow is renamed, tasks associated with the removed workflow will not appear in the MDM Web App in either Open or Closed section even if they were previously resolved. |
Before renaming a step, ensure it is not used in active tasks:
-
Go to Tasks.
-
Filter Open tasks that are currently using the step you wish to rename.
-
Move these tasks to a different step. Before renaming a workflow, publish or discard all tasks using the workflow.
Modifying the default workflow
You can modify the default consolidation workflow. If you have a large number of active tasks using the default workflow or need to add post actions, you have the following options:
-
Add a new custom workflow and use it as the default. In the meantime, resolve all existing tasks using the consolidation workflow.
-
Modify the default consolidation workflow. Follow these steps:
-
Disable the default workflow.
-
Add a custom workflow called 'consolidation' containing these necessary elements:
-
Steps:
draft,waiting_for_publish. -
Transitions:
move_publish,return_draft.
-
-
Test the workflow by starting the server.
-
Adjust the workflow as needed. Make sure to use custom permissions.
-
The custom consolidation workflow is part of the MDM example project.
Removing a workflow
To remove a workflow:
-
Publish or discard all tasks using the workflow.
-
Disable the workflow.
|
Tasks using the removed workflow will not be visible on the Closed tab. To view these tasks, after publishing or discarding them, remove the workflow from the task defaults and permissions. However, do not remove the workflow from the configuration. |
Was this page useful?