
Configuring Validations
This section explains how to configure global validation settings in MDM Web App, as well as attribute validations for the instance and master layers.
Overview
Validations in MDM Web App are a way to detect and visualize any kinds of problems with displayed or entered data, that is, data not complying with defined data quality rules.
The anatomy of MDM Web App validations
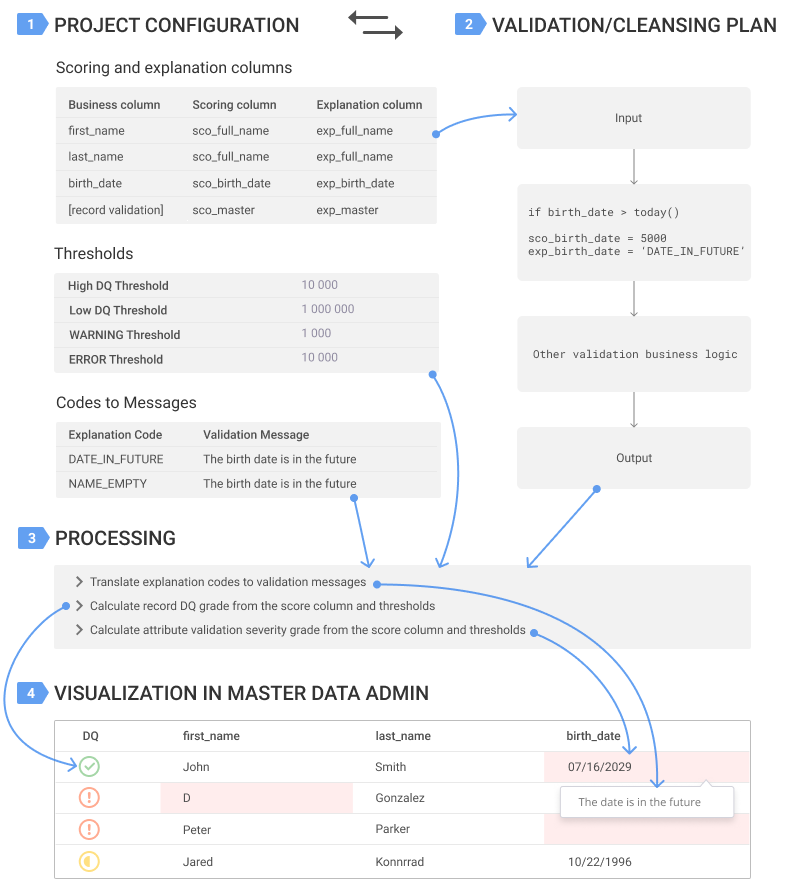
The following diagram illustrates how validations are configured, calculated, and visualized in MDM Web App.
1 |
As part of the MDM Project configuration:
|
2 |
Validation or cleansing plan: Implement the validation logic in a ONE plan (the cleansing plan for instance layer validations and the validation plan for master layer validations) to populate the score and explanation columns with scores and explanation codes respectively. In addition to calculating validations and persisting the results, the plan also defines the interface for on-the-fly validations on user input in MDM Web App. |
3 |
Processing: The engine processes the scores and explanations from the plan together with the thresholds and translations and sends the result to MDM Web App. |
4 |
Visualization in MDM Web App:
|
| As part of the project development and testing, steps 1 and 2 might go through several iterations. For example, after testing the plans and getting score outputs, it might be necessary to review the thresholds or update the list of code-to-message mappings. |
| You can override scoring results and assign a particular validation result to an explanation code, for example, the NAME_EMPTY code attribute (corresponding to a name attribute) always means Low DQ for the whole record. |
Understanding validation score thresholds
Thresholds put scores into buckets and interpret them as validation severity grades (in case of attribute validation) or DQ grades (in case of record DQ calculation).
The two diagrams illustrate how setting thresholds produces the final result of validating data as well as how validation results are displayed in MDM Web App.
Attribute validations
| Validation severity grade | Calculation |
|---|---|
INFO |
Score < WARNING threshold |
WARNING |
WARNING threshold ≤ Score < ERROR threshold |
ERROR |
Score ≥ ERROR threshold |

Record validations
| Record DQ grade | Calculation |
|---|---|
High DQ |
Score < High DQ threshold |
Medium DQ |
High DQ threshold ≤ Score < Low DQ threshold |
Low DQ |
Score ≥ Low DQ threshold |
-
ERROR. The highest severity. Should correspond to the highest score.
-
WARNING. Medium severity.
-
INFO. Low severity. Used to indicate that the attribute has passed the validation with minor or no corrections.

Configuring validations
While attribute validations are configured separately for the instance layer and the master layers, the configuration is identical and is performed at Logical Model > Instance Layer > [entity] and Logical Model > Master Data Layers > [masters] > [entity] respectively.
In the entity settings, select Enable Validations for every attribute you wish to enable validations for. Global settings are configured under GUI Configuration.
Define scoring and explanation columns
-
Open an entity whose attributes you need to validate.
-
Select SCO and/or EXP options for each attribute that needs a separate score and explanation in the plan.
For example, for an attribute called
first_name,sco_first_nameandexp_first_nameare generated into the plan.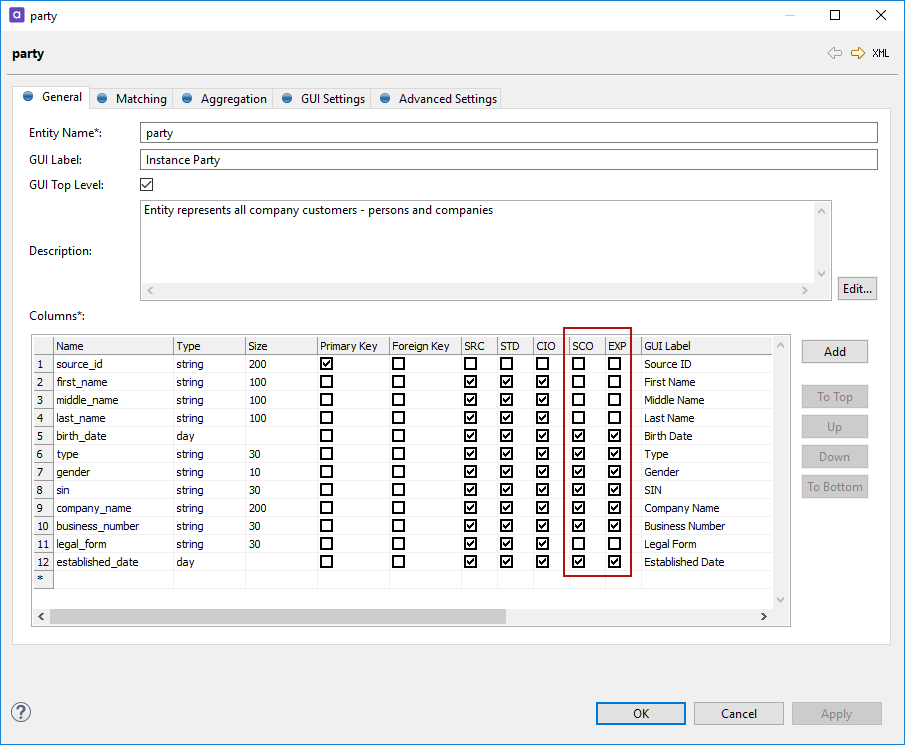
-
For attributes that are evaluated together and share scores and explanation codes with other attributes, define separate explanation and scoring columns under Advanced Settings > Special Columns.
In Create Into, select Validation (unless this column must be also available in the merge plan, in which case select Merge).
For example,
first_nameandlast_nameare evaluated together and share scores and explanations insco_full_nameandexp_full_namecolumns, so these two columns need to be defined as special columns.The scoring columns have to use the integerorlongdata type, and the explanation columns have to use thestringdata type.
Repeat the procedure for the explanation and scoring columns used for the record validations.

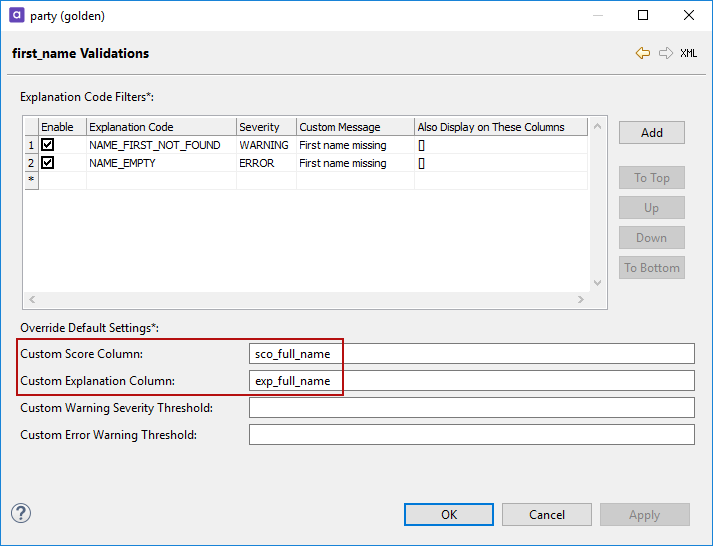
Map scoring and explanation columns to business columns
This step is only necessary if you defined explanation or score columns under Special Columns.
In this case, open the business column detail, open the Validations composite element, and set Custom Score Column and/or Custom Explanation Column.
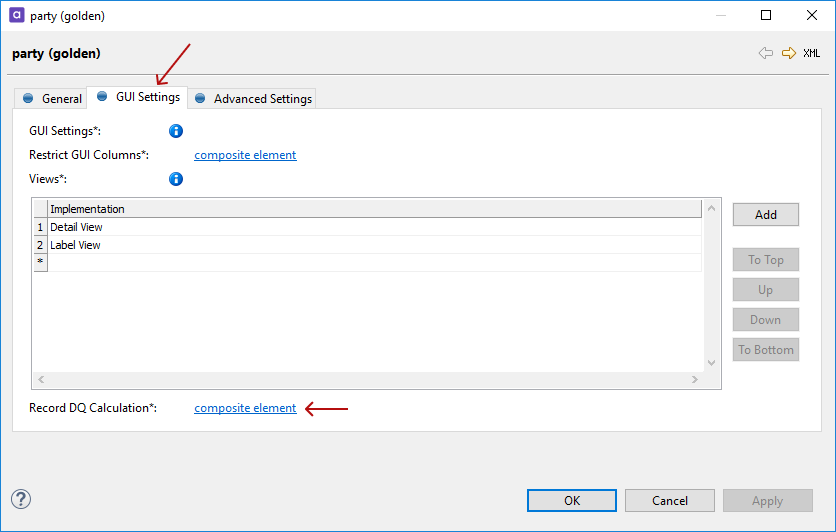
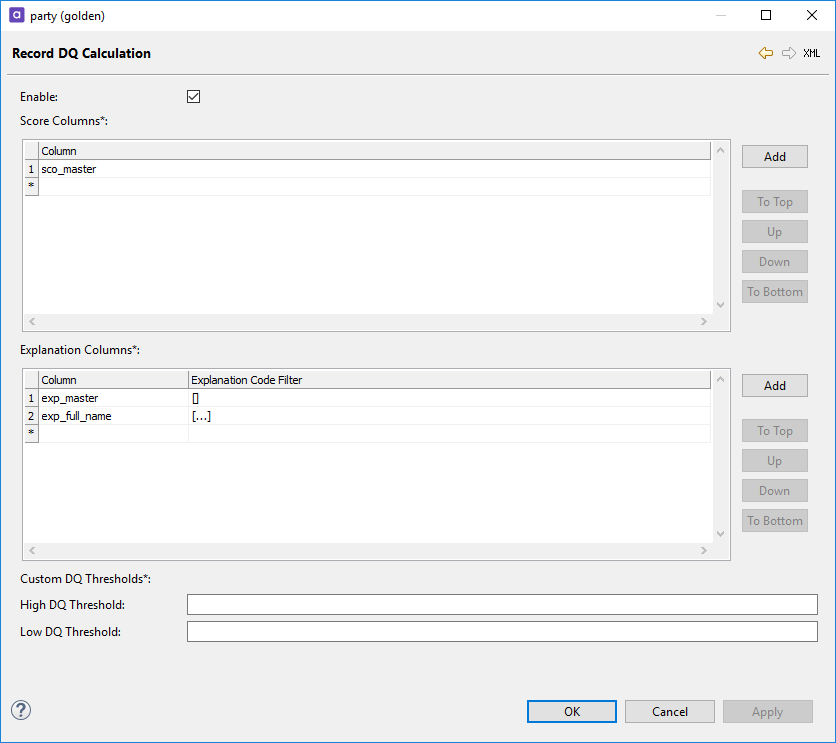
Select scoring and explanation columns for record DQ calculation
For record DQ calculation, switch to the GUI Settings tab and go to the details of Record DQ Calculation composite element.
| DQIs are not configurable for virtual instance entities. Instead, the configuration is taken from the regular entity. |
-
Select Enable.
-
Under Score Columns, list the score columns that are used for record DQ calculation. If multiple columns are used, the scores are summed up.
-
Under Explanation Columns, list the explanation columns that are used to display explanation codes. To filter out the explanation messages, enter the column detail and list the codes.
You can also specify a custom message here and override the DQ calculation by assigning a DQ grade to a particular column.
-
(Optional) Under Custom DQ Thresholds, specify custom thresholds as needed.
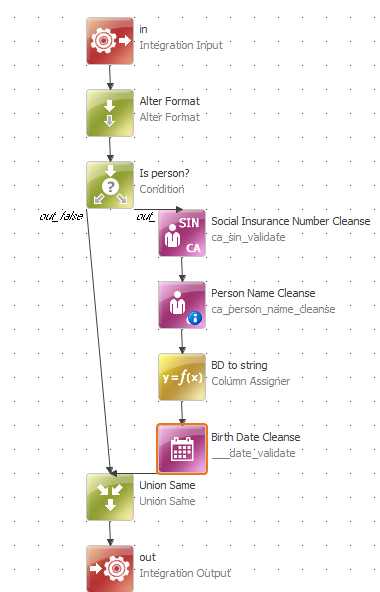
Configure the plan
After you define the scoring and explanation columns, you need to generate and configure the plan for each entity where validations are necessary.
To generate the plan, right-click the project name and click Generate. The generated plans are available under Transformations > [entity] > [entity]_clean (for the instance entity) and [entity]_validate (for the master entity).
| If the cleansing has been generated and configured before, the Generate action will update its input and output interface with the defined scoring and explanation columns. |
The plan is generated with the Integration Input and Integration Output steps containing all defined score and explanation columns.
Implement the validation business logic between these steps that populates the score and explanation columns.
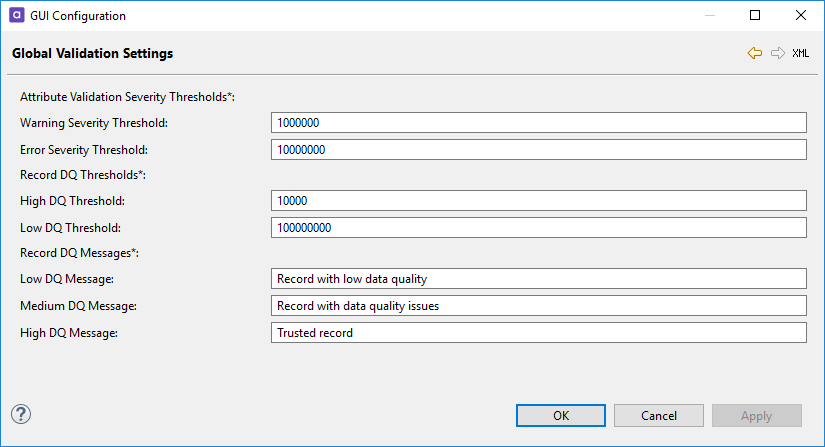
Define thresholds
Define global attribute and record validation thresholds under GUI Configuration > Validation Settings > Global Validation Settings.
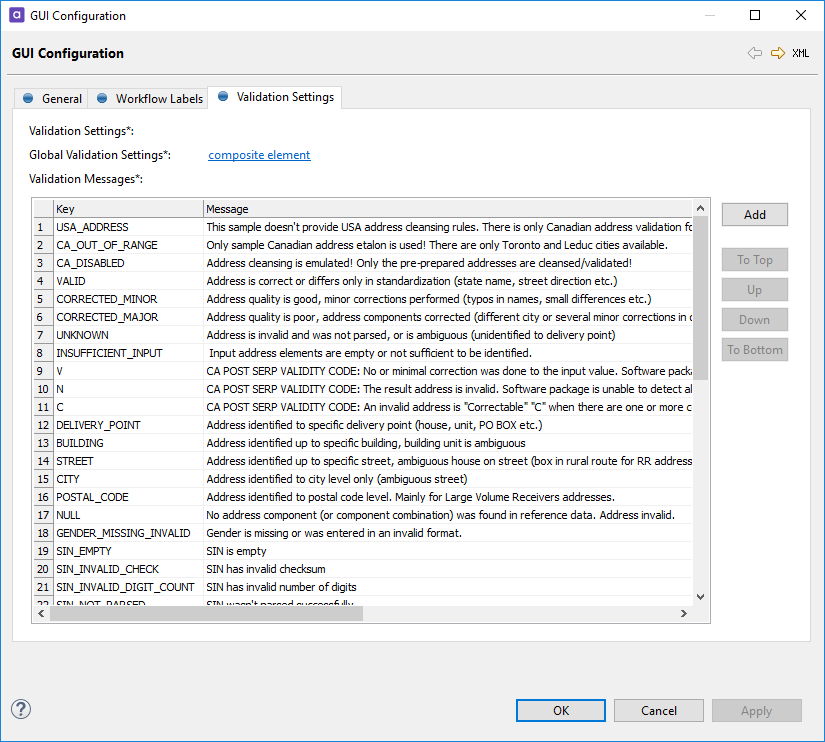
Translate explanation codes to validation messages
For MDM Web App to display validation messages instead of technical explanation codes, open GUI Configuration > Validation Settings, copy explanation codes from the plan under Validation Messages, and provide corresponding validation messages.
Localize validation messages
It is possible to display validation messages in a chosen language in MDM Web App.
To add validation messages translation:
-
Open your MDM Project. In Files > etc, find the
mda-validation_messages.propertiesfile. -
Copy the file and translate validation messages corresponding to explanation codes to a chosen language.
-
In the
mda-config.xmlfile, under<validationMessageFiles>, specify the language that the file is translated to.Use ISO 639-1 codes (
en,fr,ge,cs,ru,it,es).
<validationMessageFiles>
    <messageFile language="en" fileName="mda-validation_messages.properties"/>
    <messageFile language="fr" fileName="validations-fr.properties"/>
</validationMessageFiles>
If the mda-validation_messages.properties file exists for the language that is currently active in MDM Web App, the translation of the validation messages is used automatically.
Otherwise, the default language is used.
Filtering out explanation codes and related settings
Filter out explanation codes
As the result of cleansing, explanation columns might contain various explanation codes, including "positive" codes, implying that parsing or standardization was successful. Therefore, we recommend defining which codes are important to display in MDM Web App along with the record validation severity grade.
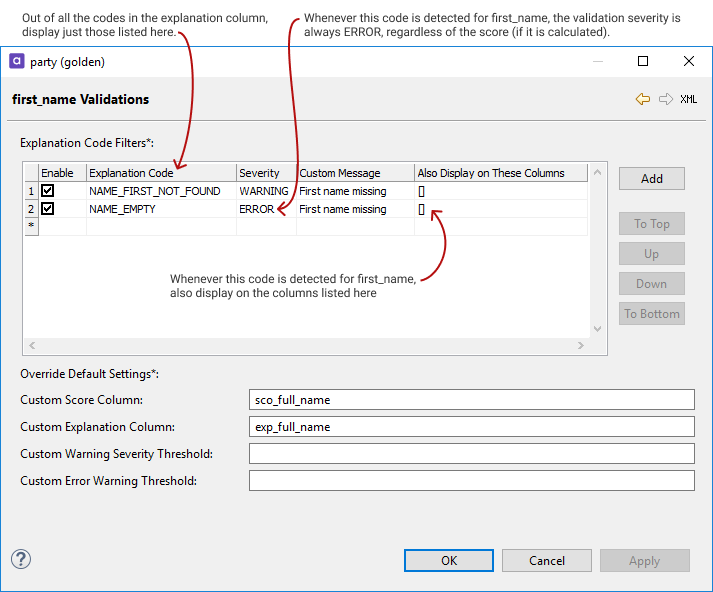
To filter out explanation codes, open the business column detail, open the Validations composite element, and under Explanation Code Filters list the codes that MDM Web App should display.
You can also specify a custom message here and override the DQ calculation by assigning a DQ grade to a particular column.
Override the results of scoring with explanation codes
Sometimes it is necessary to assign a specific severity grade (for attribute validations) or DQ grade (for record validations) to a particular explanation code and disregard the score. For example, this might be useful for attribute validations where the score is not as important or calculated.
To assign a specific severity grade (attribute validation) to an explanation code:
-
Open a business column detail.
-
Open the Validations composite element.
-
Under Explanation Code Filters, enter an explanation code (if it is not there yet).
-
In the Severity column, choose the severity grade that should be associated with the explanation code.
In case several codes are assigned to a severity and detected in the explanation column, the attribute gets the lowest of the detected severity grades.
To assign a specific DQ grade (record validation) to an explanation code:
-
Switch to the GUI Settings tab and go to the detail of Record DQ Calculation composite element.
-
Under Explanation Columns, enter an explanation column detail, and under Explanation Code Filters enter an explanation code (if it is not there yet).
-
In the DQ column, select the DQ grade that is assigned to the record if this code is detected in the explanation column.
In case several codes are assigned to a DQ grade and detected in the explanation column, the record gets the lowest of the detected DQ grades.
Show explanation codes defined for one column on another column
In cases where several attributes are validated together but have separate explanation columns, it might be necessary to display explanation codes of Attribute A for Attribute B. For example, assume Company Business Number is cross-validated with Company Name (there is a lookup mapping them to each other), and the explanation codes are written into the explanation column for the Company Name attribute. If there is a mismatch between these two, it might be useful to show a validation message about it on both attributes.
To display explanation codes from Column A on Column B:
-
Open validation settings for Column A.
-
Under Explanation Code Filters, add the code that you want to display on Column B.
-
Under Also Display on These Columns, add Column B.
Was this page useful?