
Constructing Record Detail Templates
Record details in MDM Web App can display data from the selected record, its related records, and its instance records (when opening a master record). Data display settings determine what data is displayed to users in MDM Web App and how it is organized.
This configuration needs to be done for each master entity whose data you want to display in MDM Web App.
It is possible to configure the record detail layout and content directly from the MDM Engine project. It is also possible to construct the record label used in different places throughout the application. These two parts constitute the record template.
It is possible to configure templates on Master and Instance records.
Constructing the record layout
-
Double-click an entity under Logical Model.
-
Switch to the GUI Settings tab.
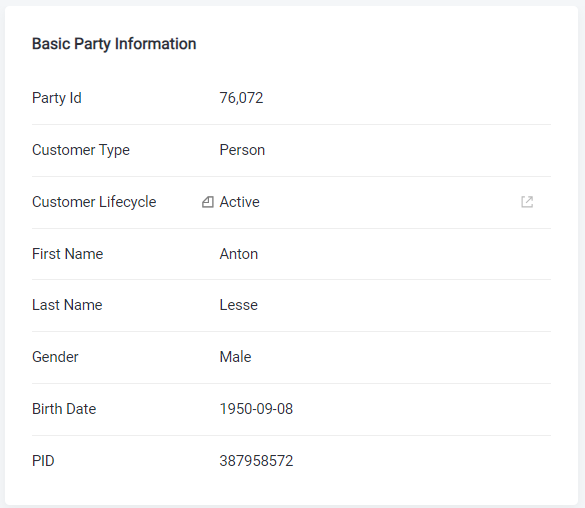
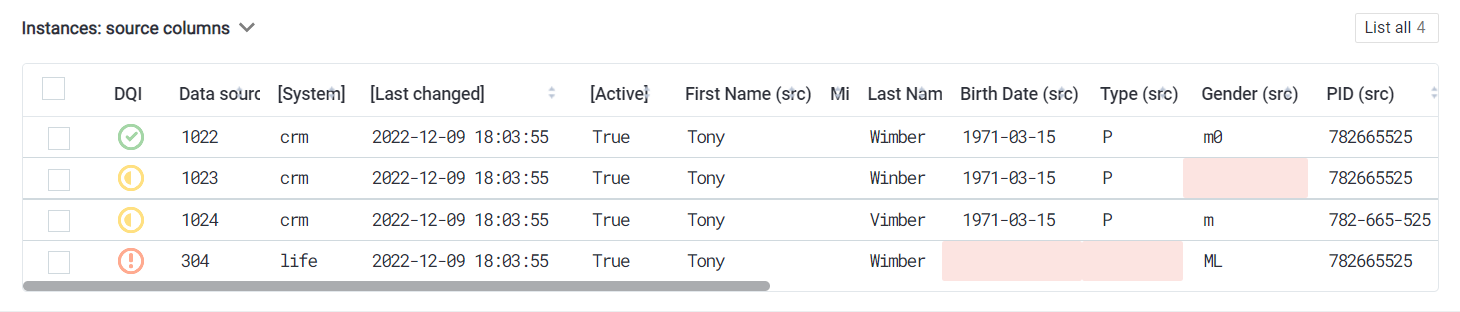
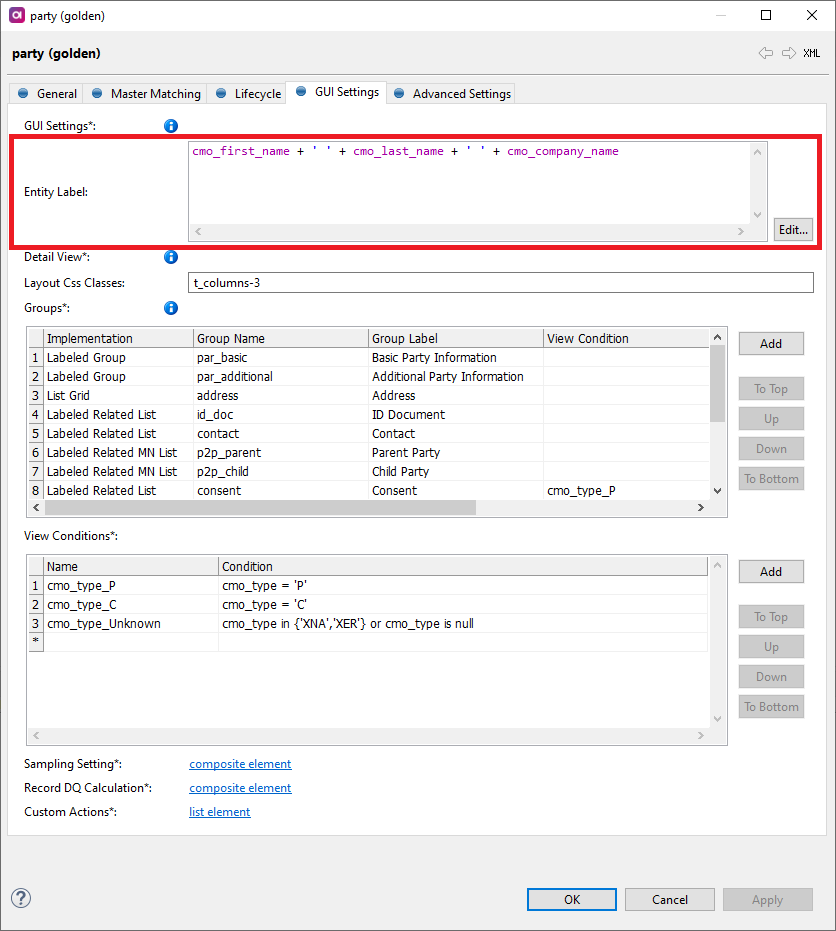
The following example shows a configured Detail View for a master record.
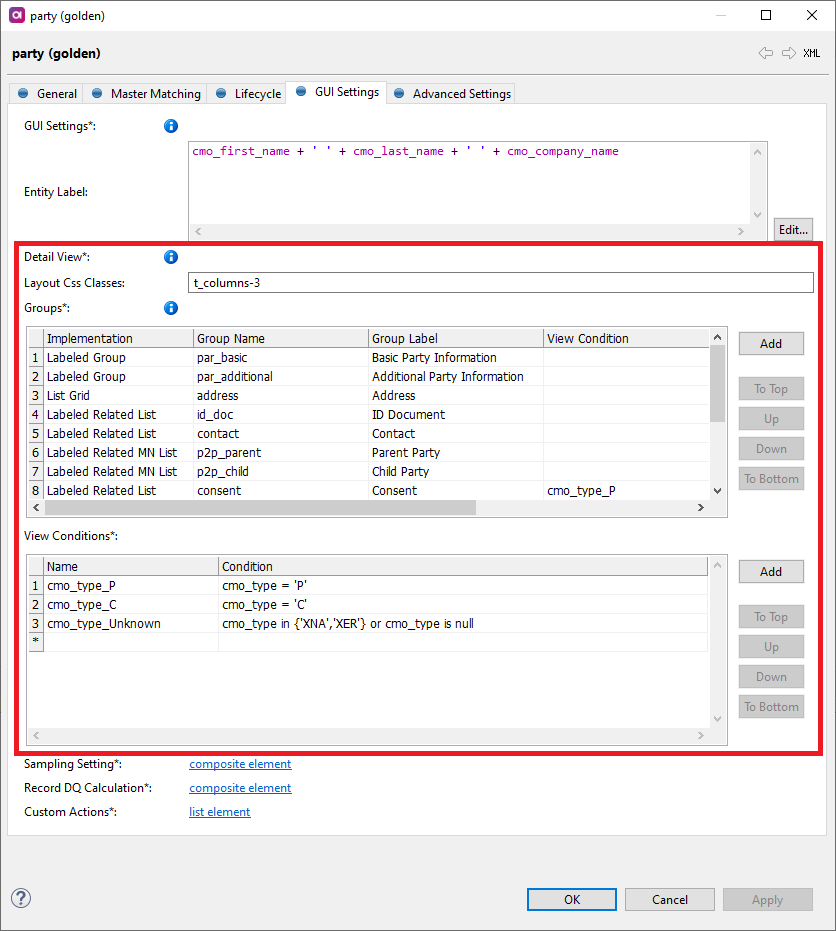
Detail view reference
The detail view defines groups of attributes to be displayed when viewing master or instance entry details, for example, after opening a search result or one of the instances of a master entry.
In Layout Css Classes you can define the detail template layout. There are three predefined layout styles that you can use:
-
t_columns-2 - Sets the maximum width of the template content to contain two columns alongside each other.
-
t_columns-3 - Sets the maximum width of the template content to contain three columns that can fit alongside each other if the screen is wide enough.
-
t_compact - Makes all margins, row heights and fonts smaller so that more content can be displayed on a single screen.
You can also add a custom class.
In that case, you must first define it in the template.css file located in Files > etc > gui_templates.
To provide multiple layout CSS classes in Layout Css Classes, separate the class names with a space.
The detail view has the following possible implementations:
-
Labeled Group - Displays the attributes of records in the current entity.
-
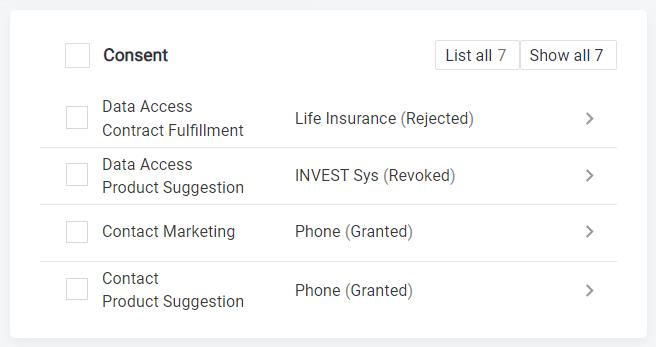
Labeled Related List - Displays the attributes of records in 1:N related entities, mainly related master (silver) entities, but it is usable for virtual instance entities too.
-
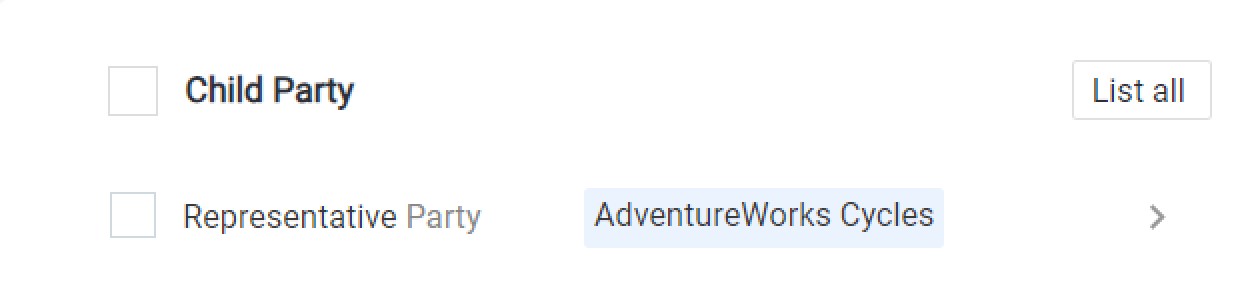
Labeled Related MN List - Displays the attributes of records in M:N related entities (including the associative tables between the entities).

-
Labeled Linked MN List - Displays the attributes of records in M:N related entities (excluding the associative tables between the entities).
-
List Grid - Displays attributes of the selected related entity. It is also possible to configure subviews based on column masks and switch between them from the same pane, for example source attributes, cleansed attributes, match attributes, or all attributes.
This implementation is mainly meant for displaying instance records of the current master entry, with the additional feature of splitting and merging the selected instance records. Therefore, it requires a relationship between the golden entity and a "virtual" instance entity. For more information on modeling master data layers in MDM, see Creating a Master Data Layer Model. -
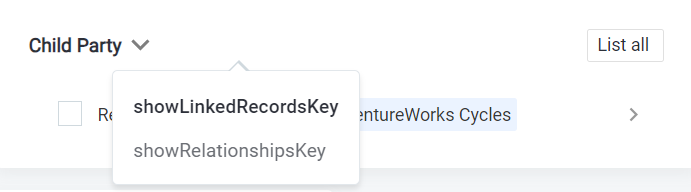
Switch Layout - Allows the user to use a dropdown menu to select the data view options for that entity. You can choose if you want to display linked records or relationships.
-
Tab Layout - Shows available data in tab format.

How are MDM Web App attribute labels determined?
The attributes displayed in MDM Web App views use labels (if they are configured) instead of technical attribute names used in the MDM model. Attribute labels are defined in the Logical Model subnodes, in the same dialog as entity attributes, in the GUI Label column.
Since GUI Labels are optional, the attribute name that is shown in MDM Web App is determined in the following order:
-
For master layer attributes (for example,
party.cmo_first_name), the attribute label is taken from the GUI Label attribute defined on the master entity party (for example, First Name). Otherwise, the column name from the MDM model (from the master layer) is used (for example,cmo_first_name). -
For instance entity attributes on master layers (for example,
party_instance.first_name), the attribute label is taken from the virtual instance entity (serves as an override). If it is not defined, the label is taken from the instance entity party, GUI Label column, and a cleansing prefix is automatically added (for example, "First Name (src)").In case the GUI Label is not provided, the column name is used and a cleansing prefix is added automatically (for example, "first_name (src)").
Configuring a labeled group
-
In the detail view, select Add.
-
Select Labeled Group.
-
Double-click the row number of the newly created implementation to open the settings.
-
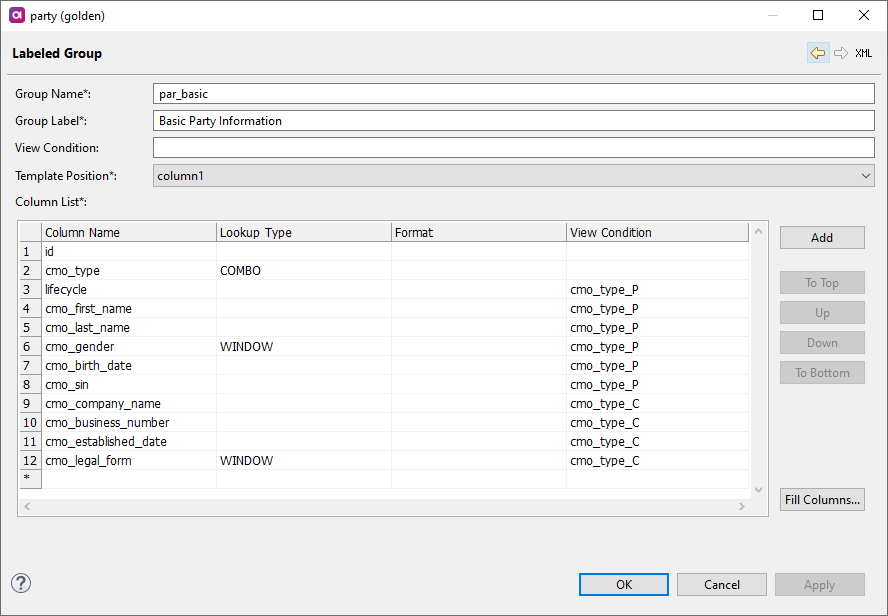
Provide the following information:
-
Group name - The technical name for the group. Can only consist of letters, digits, and underscores.
-
Group label - The group label that will be displayed in the application.
-
View condition - See the following image.
-
Column list - Press Ctrl+Space to get a list of entity columns in Column Name. These are entity columns you wish to display.
In Lookup Type, press Ctrl+Space to see the options available. Here you can specify how you want to browse the lookup data - the pop-up window is more suitable for larger sets of values.
You can also override data type formatting from the GUI Configuration (see Defining view conditions) and set the view condition of each field in View Condition by pressing Ctrl+Space to get a list of available view conditions.
-
Configuring a labeled related list
-
In the detail view, click Add.
-
Select Labeled Related List.
-
Double-click the row number of the newly created implementation to open the settings.
-
Provide the following information:
-
Group name - The technical name for the group. Can only consist of letters, digits, and underscores.
-
Group label - The group label that will be displayed in the application.
-
View condition - See Defining view conditions.
-
Preview limit - You can override the preview limit set in GUI Configuration for this particular entity. It defines how many roles are loaded when you open the record detail template.
-
View limit - You can override the view limit as well. It defines the maximum number of rows displayed in the record detail template. A button in the application allows you to list them on a new tab if the count is too large.
-
Linked record parameters (Label and Value) - Defines how the related data is presented. Only literals (simple text) and column references (prefixed with a dollar sign (
$) and enclosed between curly brackets ({}), for example${cmo_category}), are allowed. ONE expressions are not allowed.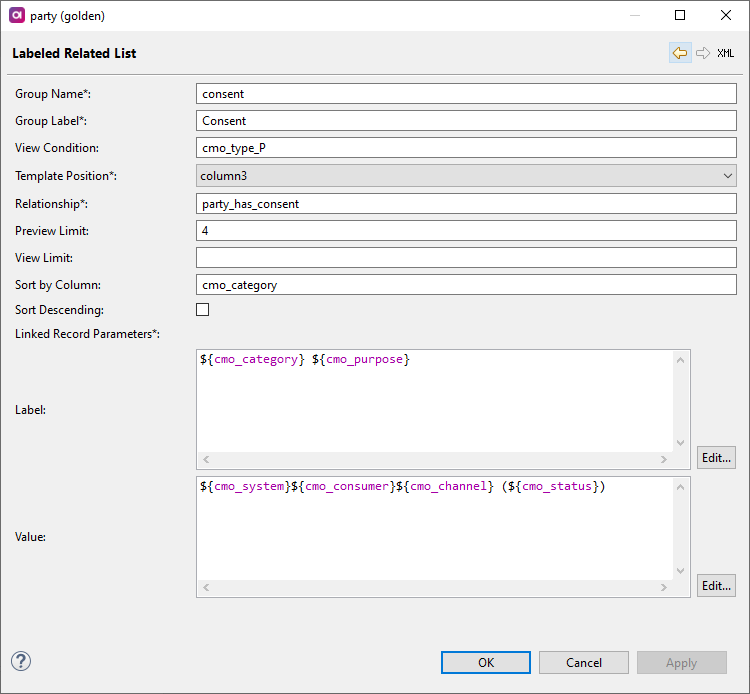
-
Configuring a related MN list
-
In the detail view, click Add.
-
Select Related MN List.
-
Double-click the row number of the newly created implementation to open the settings.
-
Provide the following information:
-
Group name - The technical name for the group. Can only consist of letters, digits, and underscores.
-
Group label - The group label that will be displayed in the application.
-
View condition - See Defining view conditions.
-
Layout - Choose between switch and tab.
-
Relationship to associative entity - Press kdb:[Ctrl+Space] to get a list of relationships to create a link to an MN entity.
-
Destination entity - Press kdb:[Ctrl+Space] to get a list of the entities to which the relationship points.
-
Relationship destination - Press kdb:[Ctrl+Space] to get a list of the relationships used to create a link to the related entity.
-
Preview limit - You can override the preview limit set in GUI Configuration for this particular entity. It defines how many rows are loaded when you open the record detail template.
-
View limit - You can override the view limit as well. It defines the maximum number of rows displayed in the record detail template. A button in the application allows you to list them on a new tab if the count is too large.
-
MN relationship parameters - Here you can define the information to be displayed in the application from the associative table when the M:N relation is shown as a relationship.
-
Linked record parameters (Label and Value) - Defines how the related data is presented. Only literals (simple text) and column references (prefixed with a dollar sign (
$) and enclosed between curly brackets ({}), for example${cmo_category}) are allowed. ONE expressions are not allowed.It is possible to use bridge columns in the target record label or value (for example,
${cmo_p2p_rel_type}).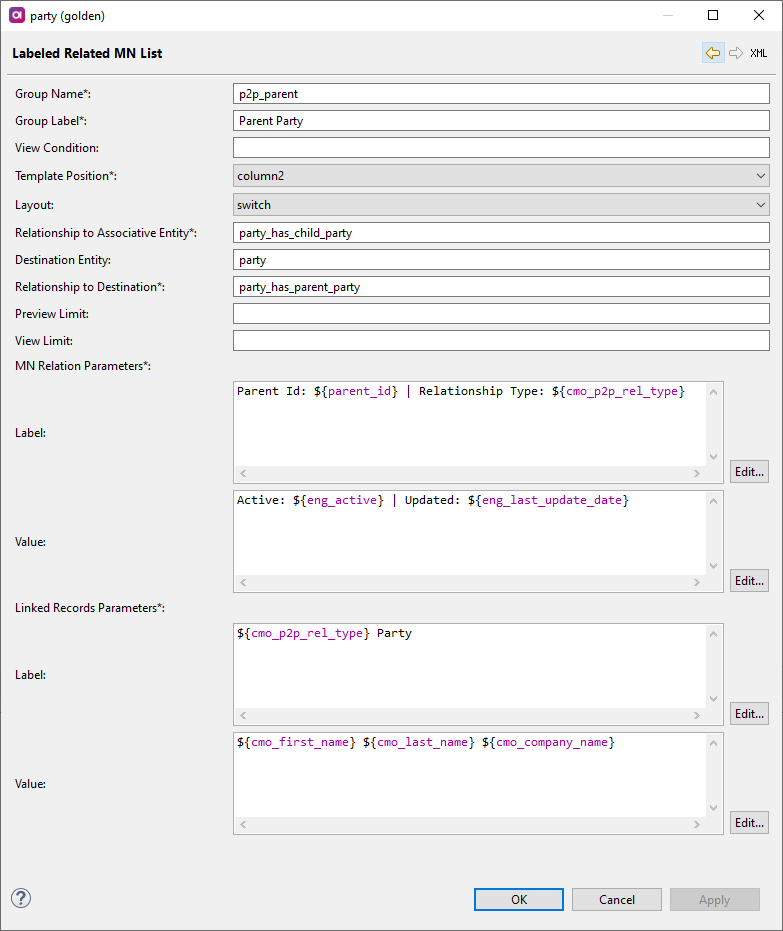
-
Configuring a linked MN list
-
In the detail view, click Add.
-
Select Linked MN List.
-
Double-click the row number of the newly created implementation to open the settings.
-
Provide the following information:
-
Group name - The technical name for the group.
-
Group label - The group label that will be displayed in the application.
-
View condition - See Defining view conditions.
-
Layout - Choose between switch and tab.
-
Relationship to associative entity - Press kdb:[Ctrl+Space] to get a list of relationships to create a link to an MN entity.
-
Destination entity - Press kdb:[Ctrl+Space] to get a list of the entities to which the relationship points.
-
Relationship destination - Press kdb:[Ctrl+Space] to get a list of the relationships used to create a link to the related entity.
-
Linked record parameters (Label and Value) - Defines how the related data is presented. Only literals (simple text) and column references (prefixed with a dollar sign (
$) and enclosed between curly brackets ({}), for example${cmo_category}) are allowed. ONE expressions are not allowed.It is possible to use bridge columns in the target record label or value (for example,
${cmo_p2p_rel_type}).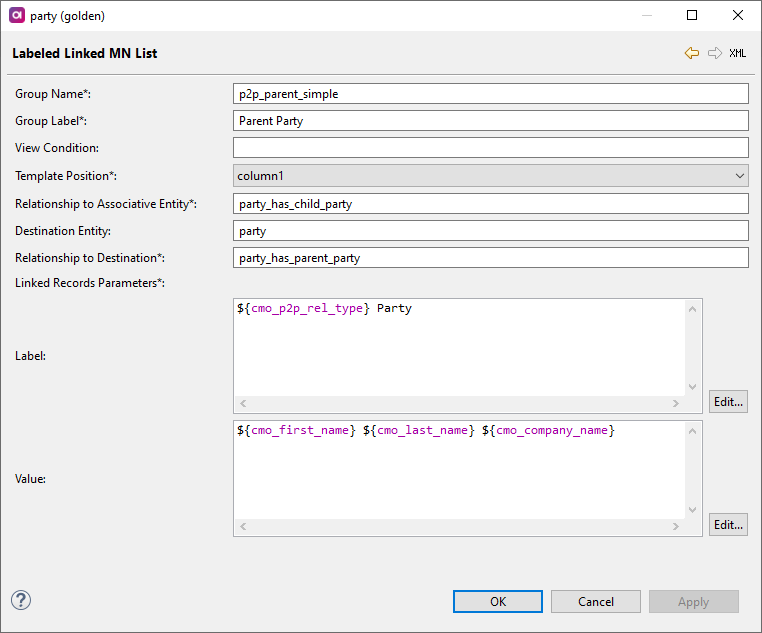
-
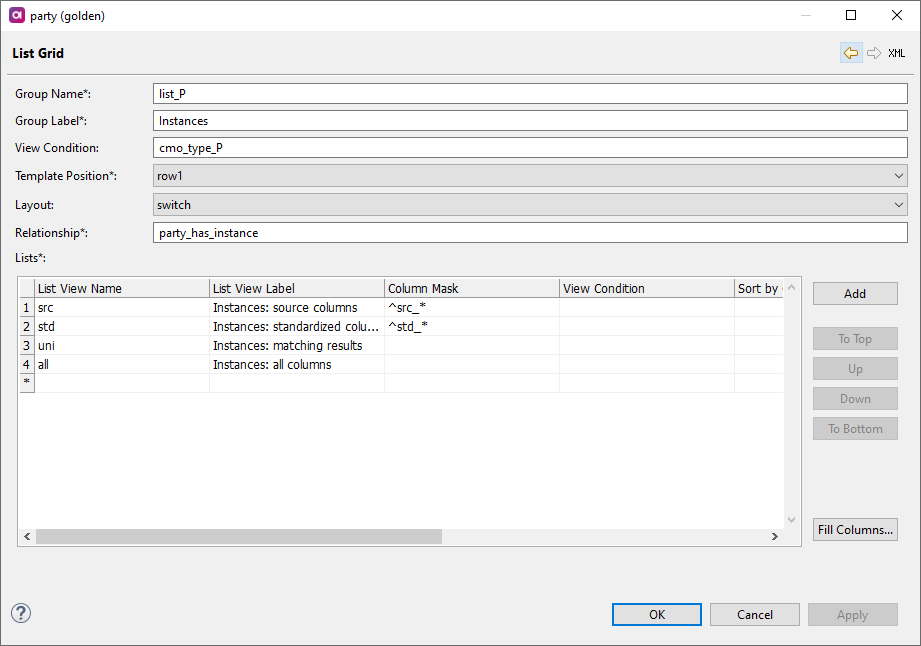
Configuring a list grid
-
In the detail view, click Add.
-
Select List Grid.
-
Double-click the row number of the newly created implementation to open the settings.
-
Provide the following information:
-
Group name - The technical name for the group. Can only consist of letters, digits, and underscores.
-
Group label - The group label that will be displayed in the application.
-
View condition - See Defining view conditions.
-
Layout - Choose between switch and tab.
-
Relationship - Press kdb:[Ctrl+Space] to get a list of relationships to create a link to a related entity.
-
Instance Lists - Defines the different views of instance records.
-
List view name - Defines a particular list view.
-
List view label - Allows you to define the label that will be used for the list view.
-
Column mask - Allows you to define a mask for the column selection; it is defined using regular syntax.
If a combination of a listed column and mask is used, listed columns are shown first and columns by mask are added at the end.
-
View conditions - See Defining view conditions.
-
-
Defining view conditions
View condiitons let you define when a particular implementation of the Detail View is shown. This feature is useful when it is necessary to adjust the view for a particular subtype of a business object, for example, you can show different sets of columns for persons and legal entities.
View conditions are defined in the form of a ONE expression.
In the following example, two view conditions are defined based on the lookup field: cmo_type = 'P' shows the pane with attributes for persons, and cmo_type = 'C' shows the pane with attributes for legal entities.
After you define a view condition, you can apply it on any level: on the whole group or inside the group on a column level.
Configuring related entity preview limit
You can configure the number of related records you preview in the record detail. To do so:
-
Double-click GUI Configuration.
-
Open the GUI Preferences tab.
-
In Related Entity Preview Limit, enter the number of records that you wish to display. The default is 5.
For other settings, see Configuring Display Settings and Data Type Formats.
Constructing the record label
The record label defines the entry label that is shown in the tab header and breadcrumb navigation. It also defines how the entry is referenced in the application, for example, from issues or dashboard view history.
The configuration consists of specifying columns that will be shown or literals (string constants or plain text enclosed in single quotes). ONE expressions can also be used.
The labels are generated into mda-label.gen.properties under ROW_LABEL and require a server restart to be refreshed.
|
Was this page useful?