
Configuring Tasks for Importing Data from Text Files
The following steps explain how to configure a task for importing data to RDM tables from text files. Additionally, files can be downloaded from a remote server, one by one in separate tasks, or as an archive in one task.
The configuration produces a set of plan files and one workflow .ewf file executing all relevant plans and performing additional tasks like downloading from a remote server, unpacking, and deleting files after importing.
Step 1 Understand import task anatomy
A text file import task has the following hierarchical structure:
-
Task = One workflow file.
-
Table = One plan file.
-
Several tables can be updated in one task.
Step 2 Determine your use case
The import functionality in RDM supports a few optional features, like support for extracting archives and transferring files from a remote server. Combinations of the available options result in the following use cases:
-
Manually place CSV or TXT files to the local server (containing the RDM Runtime and ONE Runtime Server) and import data to RDM (one or multiple tables per task), plus optionally delete the file after the import is finished.

-
Download one text file from a remote server to the local server and import data to one RDM table in one task, plus optionally delete the file after the import is finished.
-
Download an archive containing one or several text files from a remote server to the local server, unpack it, and import data to one or several RDM tables in one task, plus optionally delete the file after the import is finished.

The output of any configuration is a workflow file consisting of several tasks like downloading an archive, extracting it, and running ONE plans (one plan per table), and deleting all files after the import is finished.
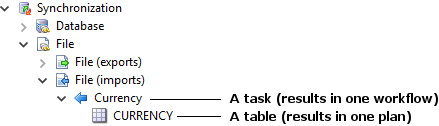
Step 3 Define a synchronization task in the RDM project
-
Expand Synchronization > File > File (imports).
-
Right-click File (imports) and select New synchronization task.
-
Fill in Synchronization task attributes.
-
Select OK to save changes and close the window.
A new synchronization task is created under Synchronization > File > File (imports), listing the affected tables and the Synchronization task (generated) node.
-
Save changes to your project and reload metadata.
-
Right-click the newly created task and select Generate workflow and plans.
A workflow file is generated to Files > workflows and all dependent plans are generated to Files > plans > synchronization > FTs > imports.
The naming conventions are as follows:
-
Workflow file:
[task_name]_import.ewf, for example,newtask_import.ewf. -
Plans:
[task_name]_[table_name]_import.plan, for example,newtask_PRODUCTS_import.plan.
You can also generate plans separately for each selected table: right-click the node with the table under the task and select Generate plan. -
-
The first part of the configuration is done. Now configure the generated plans.
Synchronization task attributes
| Field | Required for use cases | Description | ||
|---|---|---|---|---|
Name |
All |
Task name. |
||
Server name |
2, 3 |
Name of a previously defined server connection.
|
||
Local Server Downloads Directory |
2, 3 + 1* |
Directory on the local server (containing the RDM Runtime and ONE Runtime Server) where the file with data is downloaded to from the remote server (use cases 2 and 3). * Directory which is cleaned up after a successful import if Delete file after import is selected (use case 1).
|
||
Remove Server Source Directory |
2, 3 |
Directory on the remote server containing the file to download to the local server. |
||
File Name |
2, 3 |
File (text or archive) to download from the remote server. |
||
Compression |
3 |
Specifies the compression type (if any). |
||
Delete file after import |
N/A |
If selected, the text files and archive are deleted after a successful import. |
||
Authentication Strategy |
All |
Determines the authentication configuration for the RDM Importer step in the generated import plan. See App Variables for information about authentication strategies. |
||
Tables |
All |
The list of tables that are updated with the task. |
Step 4 Configure plans for importing data
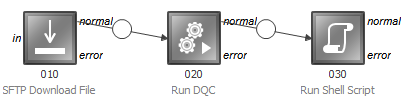
When a plan for importing data from a text file is generated for the first time, it contains two steps:
-
RDM Importer - Imports data to the RDM repository.
-
Text File Writer - Writes errors sent by RDM Importer to a text file.
The plan must be further configured:
-
Right-click a node with a table under an import task and select Open Plan.
-
Connect RDM Importer with Text File Writer steps.
-
Add an input step containing data to be imported (Text File Reader, JDBC Reader, or similar) and connect it to the in endpoint of RDM Importer.
-
(Optional: if you are passing credentials manually): Add an input step containing parameters for the RDM Importer step and connect it to the parameters endpoint of RDM Importer. The data source should have one row of data containing a valid username and password.
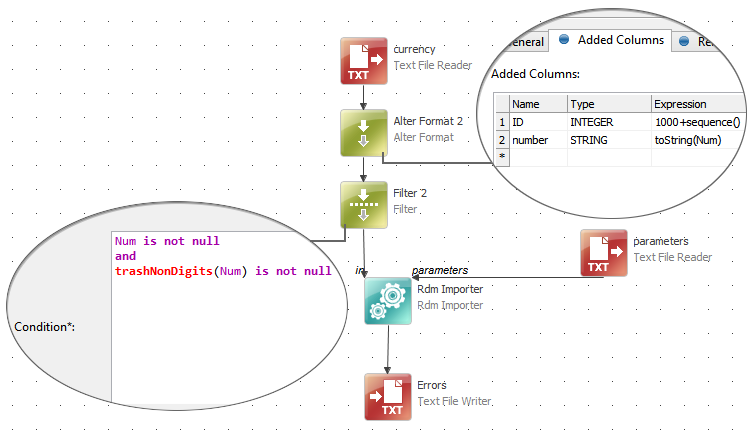
Example parameters fileusername;password betty;5ecurePasswordYou can add additional steps before RDM Importer to filter or transform data. See the image showing a configured plan. -
Double-click the RDM Importer step to configure it.
On the General tab:
-
In the Move to Edit Action field, select the state in which the records are published.
-
Select Incremental (recommended) to turn on the incremental mode: new records are imported, existing records not present in the input file are untouched, matched records are updated.
-
Select Import Table for the data to be imported to the corresponding table in the Import mode. This allows checking the imported data before moving it to the Edit mode.
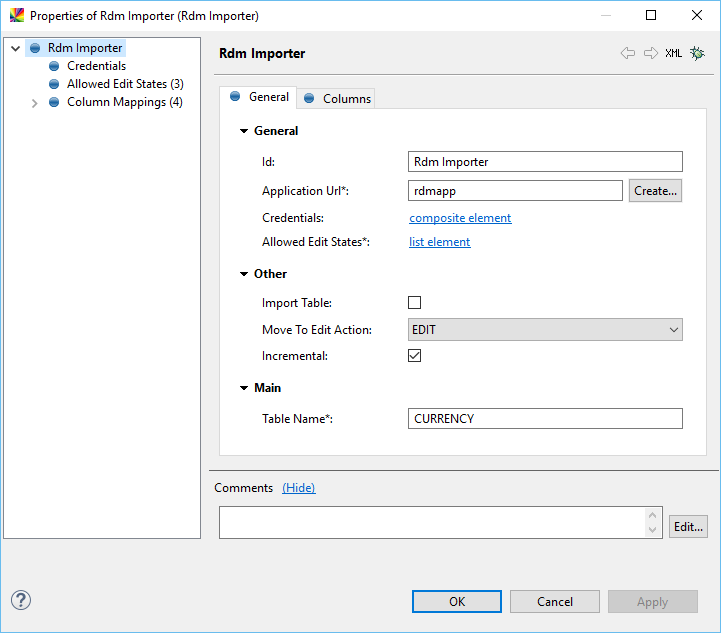 Figure 1. RDM Importer General tab
-
-
Switch to the Columns tab, map columns from the data source (In column) to the columns in the Name column (attribute names as modeled for the table). Select the appropriate Column Type for each column:
-
NORMAL - A regular RDM column containing reference data (columns of this type are modeled under the RDM Logical Model > Tables node).
-
INPUT - A column from the counterpart external database table (see Adding Databases Synchronized with RDM).
-
CHANGE_TYPE - The edited state of the record (new, edited, deleted).
-
FROM - Date and time when the record was published.
-
TO - Date and time when the record was moved to the History table (a change was made to the record and published on this date).
-
PRIMARY_KEY - The RDM-generated identifier of the record.
-
GROUP_PRIMARY_KEY - The RDM-generated group identifier of the record (used to group the same records with different business dates, see Tables, section Business date columns).
-
HCN - History change number; the ordinal number of the publishing action during which the record was published.
-
USERNAME - The user that has made the change to the record.
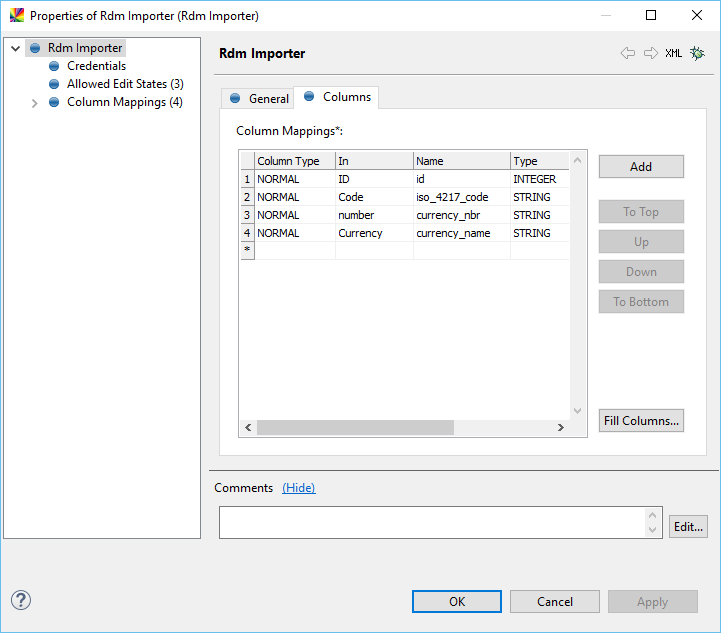 Figure 2. RDM Importer Columns tab
-
-
(Optional: if you are passing credentials manually) From the step navigation tree, select Credentials and configure the credentials:
-
In the User field, enter the name of the attribute containing the username.
-
In the Password field, enter the attribute containing user password.
-
-
Select OK to save changes and close the window.
The plan is ready to be tested and deployed.
The following plan adds two columns in the Alter Format step and filters the Num column before sending data to the RDM Importer step, which sends data to the RDM repository.
Step 5 Schedule the import task
The workflow generated into Files > workflows can be scheduled for regular runs by the scheduler. See Scheduling Tasks.
Was this page useful?