
Building the RDM Solution from Scratch
This article is intended to guide you through the creation and development of your first RDM project from start to finish, including the deployment of files generated based on your configuration to the RDM web application and runtime.
Create a new project
-
Launch ONE Desktop:
[RDM]/rdm.exe. -
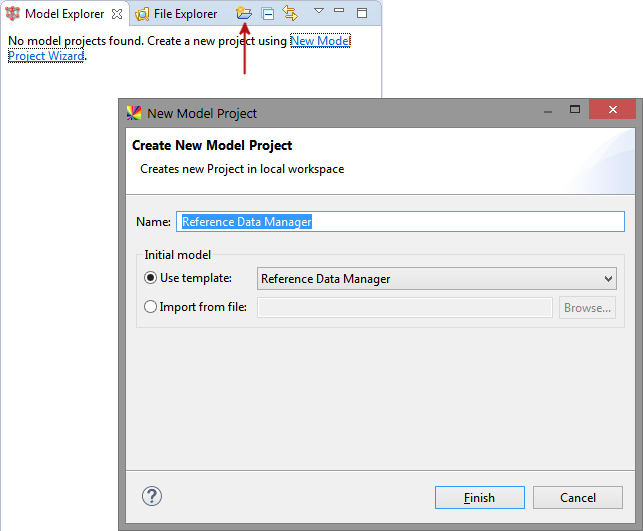
Switch to the Model Explorer view and select the New Model Project icon. Give the project a name, keep the Use template option at Reference Data Manager and select Finish.
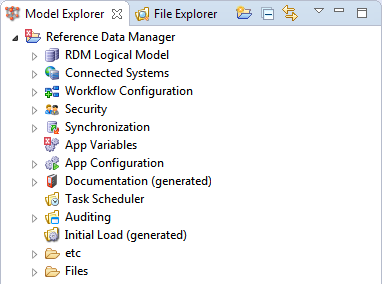
A new RDM project is created:
Configure your RDM project
After you have created your RDM project, it is almost blank. Now you can go ahead and building your RDM solution.
The following steps set forth a suggested course of building the RDM solution designed so that you have to complete all prerequisites for each subsequent step. You could, however, go about the task in a different order since most tasks after step 3 are independent of each other but require steps 1, 2, or 3 to be completed.
- 1 Configure required application settings
-
Required: Yes
Some of the application settings, like the RDM repository database type and web application URL are required to make the application work. Open the App Variables node and fill in all the fields marked as required.
- 2 Define RDM user repositories and roles
-
Required: Yes
It is necessary to let RDM know how it should authorize users: against users and roles found in a user directory (LDAP) or added manually.
- 3 Create the RDM data model
-
Required: Yes
This is the core step of the solution: you define what reference data dictionaries you want to have, their attributes, and relationships between these dictionaries.
- 4 Create additional reference data views
-
Required: No
After creating the data model, you can configure alternative views on your reference data: hierarchical parent-child structure, tables grouped by custom categories, and so on.
- 5 Set up synchronization with external systems
-
Required: No
To propagate data to other systems in your organization, you can set up one or several synchronization tasks: database synchronization, text file imports and exports, and online services for reading and writing data.
- 6 Set up change approval workflows
-
Required: No
If you want to take control of data editing and publishing in RDM, set up change approval workflows for any selected table: design steps, configure step conditions, select participants and columns available for modification in each step, and set up email notifications for completion of steps.
- 7 Set up email notifications
-
Required: No
If you want to notify selected users about activity in the RDM application, set up email notifications for events like publishing, rejecting, and sending a record for publishing.
- 8 Configure initial loads to RDM tables
-
Required: No
Populating your RDM tables with ONE plans is a great option if you need to modify, enrich, filter, or transform your input data before importing it to RDM.
- 9 Set up RDM auditing
-
Required: No
RDM supports auditing of user actions inside the web application. You can configure what should be logged.
Deploy web application configuration
After setting up everything needed for you RDM solution, you need to generate XML configuration files (packed into a ZIP archove) and deploy them to the RDM web application. See How to Deploy an RDM Web App Configuration.
| You need to perform this step every time you make changes to your project. |
Deploy RDM server
This step varies depending on your deployment type. For more information, see RDM Deployment Guide.
Was this page useful?