
Configuring Synchronization with External Databases
RDM can synchronize reference data in its repository with any other external databases. This article explains how to configure a workflow to do that. After you configure the synchronization and deploy the configuration, you can monitor synchronization tasks in the web application: see Monitoring Synchronization.
Prerequisites
-
At least one connected system defined under Connected Systems > Databases. See Adding Databases Synchronized with RDM.
Step 1 Define a synchronization task
-
Expand Synchronization > Database.
-
Right-click Database and select New synchronization task.
-
Fill in Synchronization task attributes.
-
Select OK to save changes.
Synchronization task attributes
| Name | Required | Description | ||
|---|---|---|---|---|
Name |
Y |
Name of the synchronization task. |
||
Use Reverse Synchronization |
N/A |
If selected, synchronization with an external system is set up and a plan with the system_input suffix is used in the synchronization workflow. See Step 2 Generate plans and workflows.
|
||
Authentication Strategy |
Y |
Determines the authentication configuration for the RDM steps in the generated synchronization plans. See App Variables for information about authentication strategies. |
||
Tables |
Y |
Definition of tables that are synchronized in this task:
|
Step 2 Generate plans and workflows
Each synchronization task consists of three or four ONE plans and one .ewf (workflow) file, which links the plans:
-
[task_name]_input.plan- Imports data from RDM and writes them to TXT files (one per synchronized table). -
[task_name]_synchronization.plan- Extracts data from the TXT files with imported data and writes it to consuming systems. -
[task_name]_system_input.plan- Imports data from consuming systems to RDM.This plan is included into the workflow only if Use Inputs option is selected in the App Variables node. See App Variables. -
[task_name]_output.plan- Reports to RDM about the outcome of the synchronization. -
[task_name].ewf- A workflow file that puts the mentioned plan files in execution order. See the sample file contents in the following step.
To generate files, right-click a synchronization task and select Generate workflow and plans. A workflow file is generated to Files > workflows and all dependent plans are generated to Files > plans > synchronization > databases.
| You can easily open all plans and the workflow by right-clicking a synchronization task and selecting Open workflow or a particular plan. |
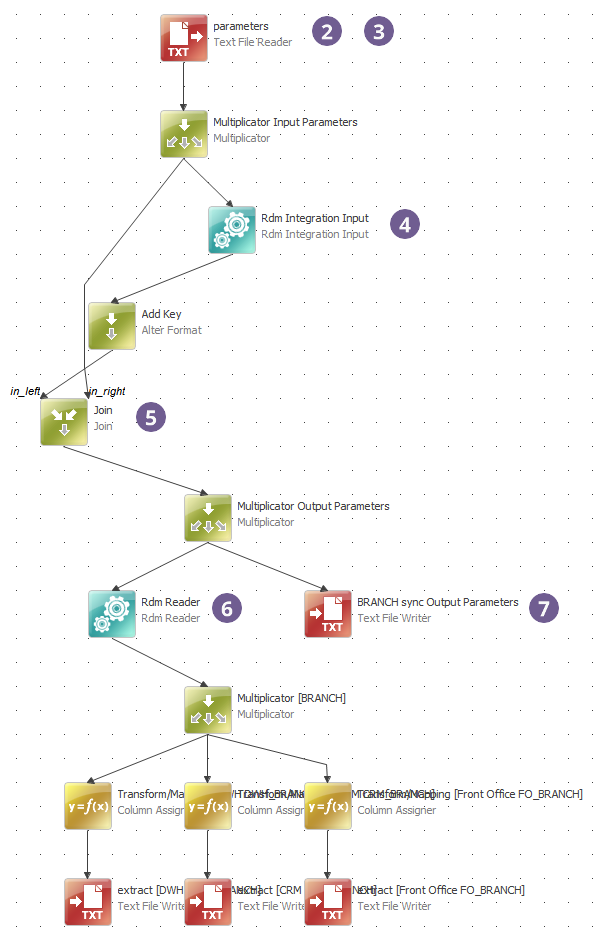
Step 3 Configure the input plan
After generating [task_name]_input.plan for the first time, you need to configure certain steps in it.
Other plans do not need any configuration unless you chose to pass credentials manually when configuring the task (or unless it is configured in App Variables).
-
Right-click a synchronization task and select Open input plan.
-
Add an input step (for example, JDBC Reader or Text File Reader) with a data source containing one row of data with the following attributes (attribute names are up to you).
We will refer to this data source as parameters in the following steps: .. Username (Optional: if you are passing credentials manually) - A valid RDM user with read permissions to the table. .. Password (Optional: if you are passing credentials manually) - User password. .. Type - Type of synchronization to perform: … FULL - Exports all published data as available on the date specified in the timestamp. … INCREMENT - Exports only the changes since the last synchronization until the date specified in the timestamp. .. Timestamp - Data is downloaded in the published state as of this date.
+ .Example parameters file
username;password;type;timestamp betty;5ecurePassword;INCREMENT;2016-01-01 00:00:00 -
Configure the added input step.
-
Switch to the Shadow Columns tab and add one column with the following properties:
-
Name -
key. -
Type -
INTEGER. -
Default Expression -
1.
-
-
-
Configure the RDM Integration Input step:
-
Map attributes from parameters to the Timestamp, Process Mode attributes in the step.
-
(Optional: if you are passing credentials manually) From the step navigation tree, select Credentials and configure the credentials:
-
In the User field, enter the name of the attribute containing the username.
-
In the Password field, enter the attribute containing user password.
-
-
-
Configure the Join step:
-
On the General tab, map the key column added in step 2 into the Right Key field.
-
-
Configure the RDM Reader step:
-
Map the user attribute from parameters to the User and Password parameters.
-
-
Configure the [task_name] Output Parameters Text File Writer step:
-
Open the step and switch to the Columns tab.
-
Correct columns to those that you use in the parameters step.
-
Step 4 Configure authentication (optional)
If the Global Authentication Strategy in App Variables or local Authentication Strategy for the synchronization task is set to Pass Credentials Manually, you need to make sure that all RDM steps are connected to a data source (for example, a text file containing attributes with the username and password used to authenticate into the RDM web application), similarly to the configuration of the Input Plan as described previously.
Step 5 Schedule the Synchronization Task
The workflow task generated in Step 2 Generate plans and workflows can be scheduled for regular runs by the Task Scheduler. See Scheduling Tasks.
Was this page useful?