Connect to a Server
From ONE Desktop, you can create server connections to enable the usage of certain steps and workflow tasks (SOAP Call, SOAP Multi Call, Jms Writer, Issue Reader/Writer, SCP/SFTP Download/Upload).
The Amazon S3 server connection enables encryption of the data sent to or stored on the server.
| To learn more about how to connect to Ataccama ONE Platform, see Connect to Ataccama ONE Platform. |
Register a new server
To create a new server connection:
-
In the File Explorer, right-click Servers and select New Server.
-
Select the Environment. For more information, see Environments.
-
Specify the server Name and select Implementation.
-
Configure the server connection based on your server implementation and select Finish.
Once the new server is registered, it shows up in the File Explorer tree.
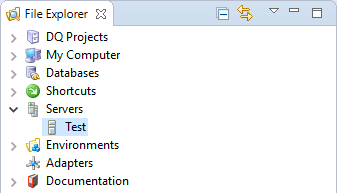
| While in development, right-clicking the server connection and selecting Connect should not be considered a valid connectivity test, and doing so is not necessary to enable step communication. |
Implementations
Generic
Use to connect to:
-
The server running RDM or DQIT web application (see Importing and Exporting Issues, RDM Synchronization).
-
Generic URL resources, for example, to specify a remote host in the SFTP/SCP Download/Upload File workflow tasks.
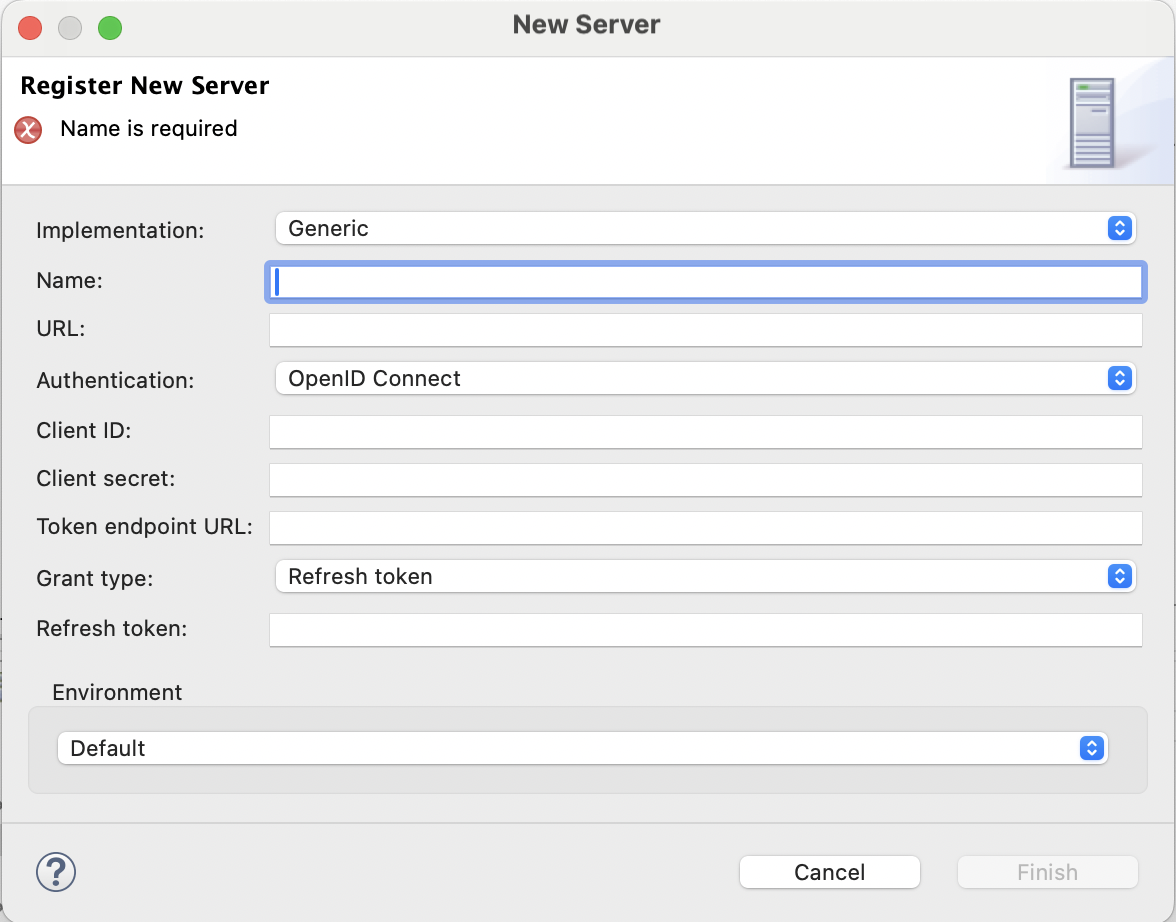
| Property | Description |
|---|---|
URL |
Specifies the server URL in the |
Authentication |
Select according to the server security settings. The following options are available:
|
Azure Data Lake Storage Gen2
Connect to the Azure Data Lake Storage Gen2 server to upload or download files stored there. Once the server connection is registered, you can use it as follows:
-
In workflows to operate on files.
-
In plans as an input or output in the Reader and Writer steps.
In plans and workflows, the server connection can be called using the resource://<resourceName>/<path>/<inputFile> syntax.
The steps supporting resources are Text File Reader and Writer, Excel File Reader and Writer, Xml, Json, Avro, Parquet Reader and Writer steps, Complex Xml Writer, Dbf File Reader, and Generic Data Reader.
|
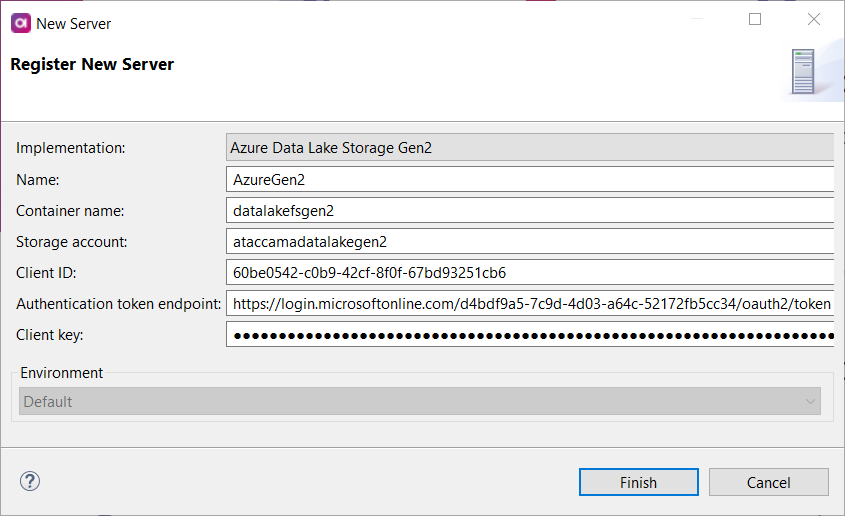
| Property | Description |
|---|---|
Container name |
Name of the file system. |
Storage account |
Azure Data Lake Storage Gen2 account. |
Client ID |
Uniquely identifies the client application. |
Authentication token endpoint |
The URL from which the HTTP client obtains the access token. Contact your admin for details. |
Client key |
Key from the Azure AD application to authenticate with Data Lake Storage Gen2. |
Google Cloud Storage
Connect to the Google Cloud Storage server to upload or download files stored there. Once the server connection is registered, you can use it as follows:
-
In workflows to operate on files.
-
In plans as an input or output in the Reader and Writer steps.
In plans and workflows, the server connection can be called using the resource://<resourceName>/<path>/<inputFile> syntax.
The steps supporting resources are Text File Reader and Writer, Excel File Reader and Writer, Xml, Json, Avro, Parquet Reader and Writer steps, Complex Xml Writer, Dbf File Reader, and Generic Data Reader.
|
| The drag and drop functionality is supported for files and objects on Amazon S3 and Google Cloud Storage servers. |
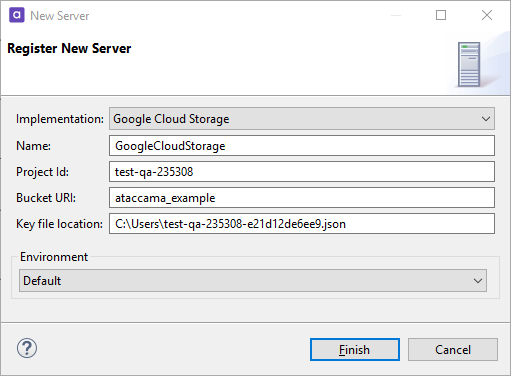
| Property | Description |
|---|---|
Project Id |
Project Id associated with your project within Google Cloud Platform. |
Bucket URI |
Bucket URI associated with your project within Google Cloud Platform. |
Key file location |
UNC path to the location where your key file ( |
JMS
Connect to JMS server to send processed records as JMS messages using the Jms Writer step and to feed JMS messages to MDM (see Configuring Stream Consumers).
| Property | Description |
|---|---|
Connection factory |
Connection factory class name. |
User |
User login credentials. |
Password |
Password for the specified user. |
Properties |
Optional array of Java properties passed to the connection. |
Kafka
Connect to servers running Kafka to consume or publish Kafka messages via Kafka Reader and Writer steps and Kafka online service.
Optionally, this can be done with a specified Avro schema registry input and output format, which means you can consume and publish the Avro schema model directly to and from the schema registry.
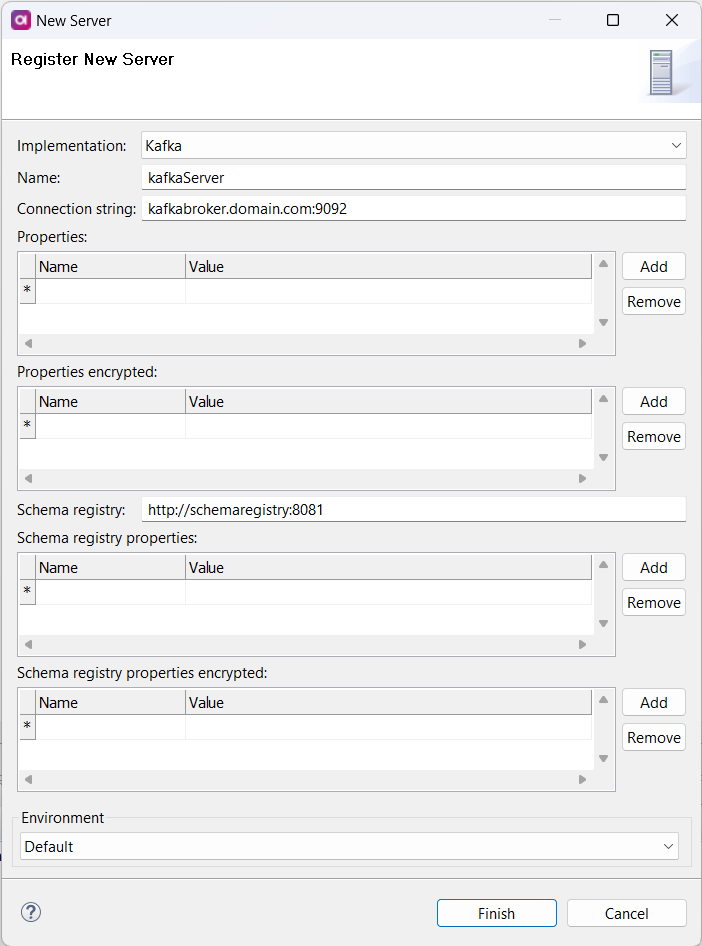
| Property | Description |
|---|---|
Connection string |
Comma-separated list of Kafka broker servers in the |
Properties |
(Optional) List of Kafka properties shared by all Kafka steps using the Kafka server connection. For a list of all properties, see the official Kafka documentation. A property with the same name defined in a Kafka step overrides the property defined in the Kafka server connection. |
Properties encrypted |
(Optional) List of encrypted Kafka properties (for example, A property with the same name defined in a Kafka step overrides the property defined in the Kafka server connection. |
Schema registry |
(Optional) Schema registry endpoint. ONE Desktop supports Confluent Schema Registry for the Avro schema format. For more information about the Confluent Platform, see the official Confluent documentation. |
Schema registry properties |
(Optional) List of schema registry properties shared by all Kafka steps using the Kafka server and a schema registry connection. A property with the same name defined in a Kafka step overrides the property defined in the schema registry connection. |
Schema registry properties encrypted |
(Optional) List of encrypted schema registry properties shared by all Kafka steps using the Kafka server and a schema registry connection. A property with the same name defined in a Kafka step overrides the property defined in the schema registry connection. |
Amazon S3
Connect to the Amazon S3 server to upload or download files stored there. Once the server connection is registered, you can use it as follows:
-
In workflows to operate on files.
-
In plans as an input or output in the Reader and Writer steps.
In plans and workflows, the server connection can be called using the resource://<resourceName>/<path>/<inputFile> syntax.
The steps supporting resources are Text File Reader and Writer, Excel File Reader and Writer, Xml, Json, Avro, Parquet Reader and Writer steps, Complex Xml Writer, Dbf File Reader, and Generic Data Reader.
|
| The drag and drop functionality is supported for files and objects on Amazon S3 and Google Cloud Storage servers. |
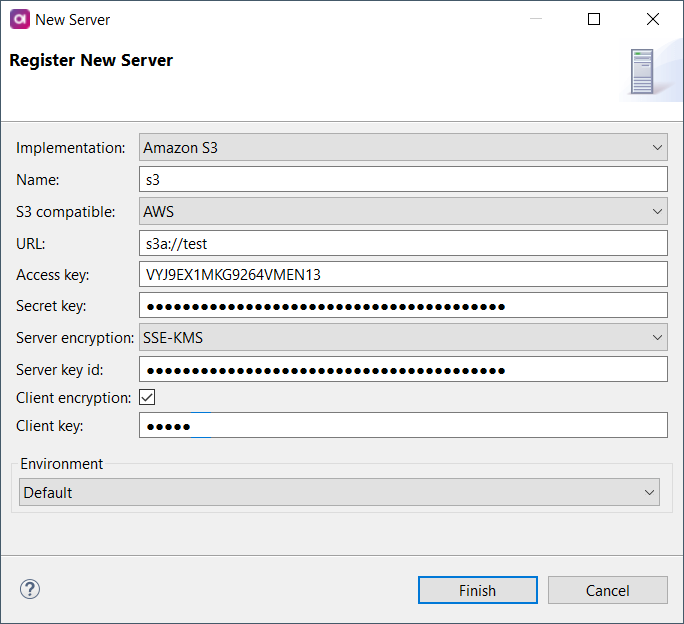
|
Amazon S3 does not operate with a folder structure the way other systems do; it operates only with files.
It is allowed to have a file with backslash ( When you create a folder on Amazon S3, you create a file with a backslash in its filename. The resulting file and filename cause issues with operations such as Delete or Move in the Operate On File workflow task when removing the last file from the folder. Therefore, we strongly recommend using the operation Mkdir in all of your workflow tasks whenever it is necessary. When using the Mkdir operation, your folder will be still available even after its last file is deleted. |
| Property | Description | ||
|---|---|---|---|
S3 compatible |
Select the AWS option. |
||
URL |
Specifies the server URL in the
|
||
Access key |
Access key associated with the S3 account. |
||
Secret key |
Secret access key associated with the S3 account. |
||
Server encryption |
Specifies how the server encrypts data. The following options are available:
|
||
Server key id |
Select the encryption key from the keys generated by the server. If you leave this field empty, a default service key (generated by the server on a customer by service by region level) is used. The field is available only with SSE-KMS server encryption. |
||
Client encryption |
Enables client-side data encryption. |
||
Client key |
Fill in a key to encrypt the data on the client side. The field is available when client encryption is selected.
|
MinIO Server
MinIO is a high performance object storage released under Apache License v2.0 and API-compatible with Amazon S3 cloud storage service.
Connect to the MinIO server to upload or download files stored there. Once the server connection is registered, you can use it as follows:
-
In workflows to operate on files.
-
In plans as an input or output in the Reader and Writer steps.
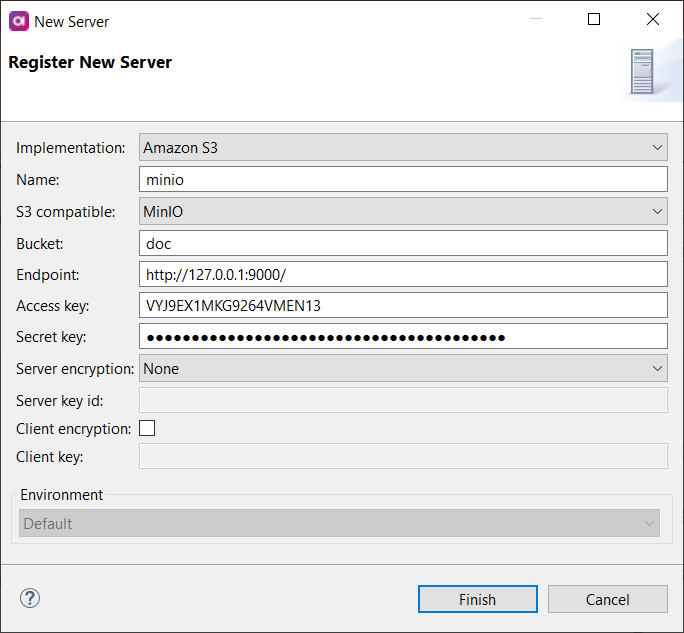
| Property | Description | ||
|---|---|---|---|
S3 compatible |
Select the MinIO option. |
||
Bucket |
Name of the bucket that you want to connect to. |
||
Endpoint |
Specifies the MinIO server URL.
Must include the URL protocol prefix (such as Example: |
||
Access key |
Access key associated with the MinIO account. |
||
Secret key |
Secret access key associated with the MinIO account. |
||
Server encryption |
Specifies how the server encrypts data. The following options are available:
|
||
Server key id |
Select the encryption key from the keys generated by the server. If you leave this field empty, a default service key (generated by the server on a customer by service by region level) is used. The field is available only with SSE-KMS server encryption. |
||
Client encryption |
Enables client-side data encryption. |
||
Client key |
Fill in a key to encrypt the data on the client side. The field is available when client encryption is selected.
|
SMTP
Connect to an SMTP server to send automatic email notifications when executing a plan (Sendmail step) or workflow (Send Mail workflow task).
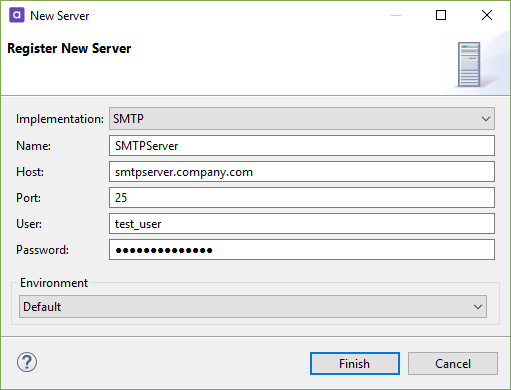
| Property | Description |
|---|---|
Host |
Specifies the SMTP server host. |
Port |
Specifies the connection port used by the server. |
User |
User name. |
Password |
Password for the specified user. |
Salesforce
Connect to a Salesforce server to consume and work with data from your Salesforce system. The server connection can be used in dedicated Salesforce Reader and Salesforce Writer steps.
| If you need to connect to Salesforce through a proxy, configure the proxy settings in Java system properties and restart ONE Desktop. For details, see Salesforce > Configure HTTP proxy server. |
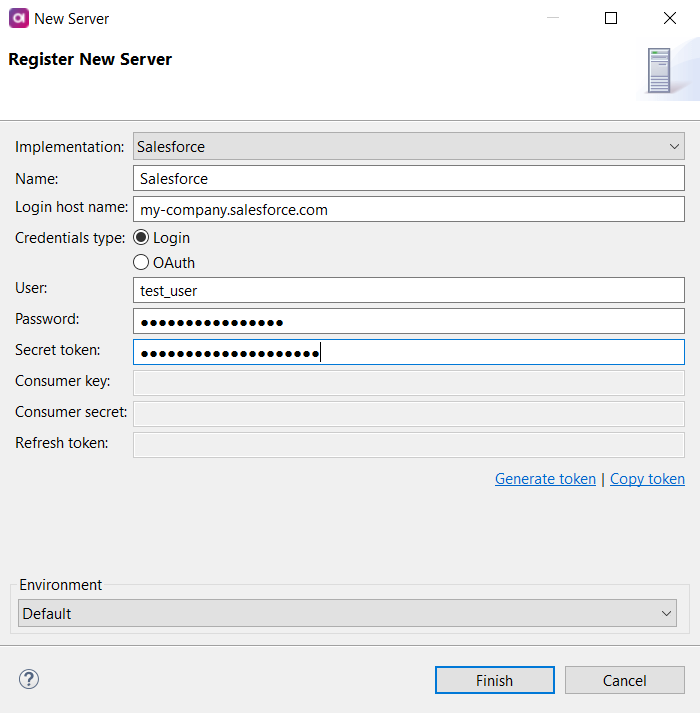
| Property | Description |
|---|---|
Login host name |
If your organization uses a custom domain for hosting Salesforce, enter it here. If your organization does not use a custom domain, leave this field empty. |
Credentials type |
Select the authorization type, Login or OAuth. Depending on the chosen type, you need to provide the corresponding login credentials. If you are using OAuth, see also OAuth authorization. |
User |
Username associated with the Salesforce account. |
Password |
Password for the Salesforce account. |
Secret token |
Security token allowing access to Salesforce from an IP address outside the user’s trusted IP range. |
Consumer key |
OAuth 2.0 consumer key ( |
Consumer secret |
Consumer secret ( |
Refresh token |
OAuth 2.0 refresh token. If provided, the application can authenticate after the access token has expired without having to prompt the user for credentials. The token can be generated through ONE Desktop. |
OAuth authorization
To be able to connect to Salesforce using OAuth, turn on Device Flow in API Settings for Ataccama-connected apps in your Salesforce settings.
To connect using OAuth, you need the following information:
-
Consumer KeyandConsumer Secret: You can find these in the connected app detail in Salesforce. See the following steps for more details. -
Refresh Token: Generate it in ONE Desktop before first use.
To copy the Consumer Key and Consumer Secret:
-
In Salesforce, go to Setup.
-
In Quick Find, enter
Apps. -
Find your connected app, open the more options menu (blue arrow) and select View.
-
Copy the
Consumer KeyandConsumer Secret.
To connect to Salesforce using OAuth:
-
Open ONE Desktop.
-
In the File Explorer, right-click Servers and select New Server.
-
From the Implementation list, select Salesforce.
-
Enter the Name of your connection.
-
In Credential Type, select the OAuth option.
-
Paste the
Consumer KeyandConsumer Secret. -
In Refresh Token, select Generate Token. This generates a user code in the User Code field.
-
Copy the user code, and then select Authenticate. The Salesforce login page opens in your browser.
-
Paste the user code in the Code Field, and then select Connect.
-
To confirm the access, select Allow.
-
On the confirmation screen, select Continue. This logs you in to Salesforce and automatically fills in the Refresh Token field in you Salesforce server connection in ONE.
-
In ONE Desktop, select Finish to create the new server connection.
You should now be able to log in using OAuth and refer back to this connection for information about the
Consumer Key,Consumer Secret, and theRefresh Token.
SAP RFC
Connect to a SAP RFC server to consume SAP data and work with preconfigured SAP functions. The server connection can be used in dedicated SAP RFC Reader and SAP RFC Execute steps.
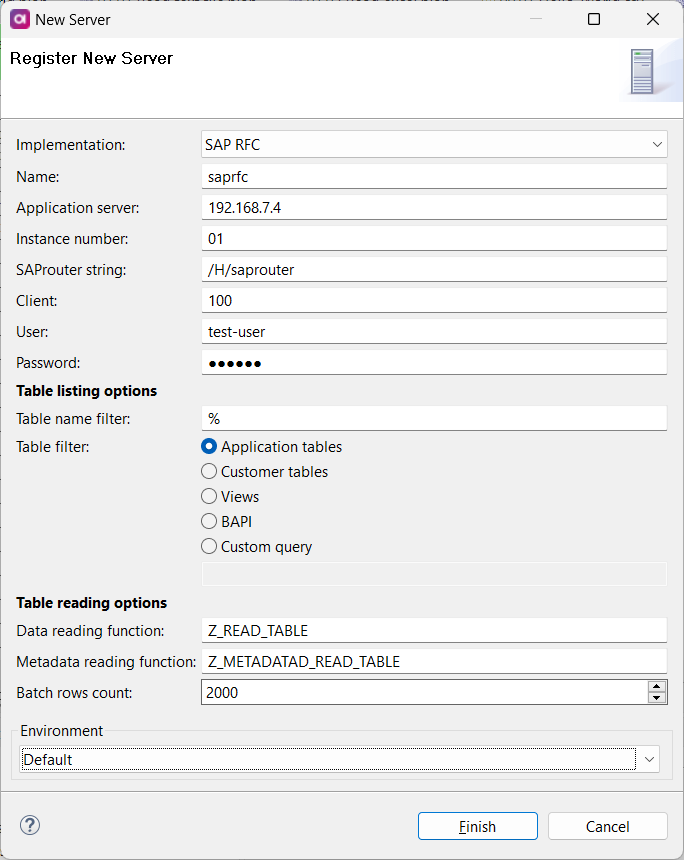
| Property | Description |
|---|---|
Application Server |
Domain name or IP address of the SAP server. |
Instance Number |
Application instance number of the SAP system. This is a two-digit number used for connecting to the server. |
SAProuter String |
Points to the SAProuter used to connect to the server. The following format is used: |
Client |
SAP client number that RFC uses for logging into the SAP server. |
User |
Username associated with the SAP account. |
Password |
Password for the SAP account. |
Table Name Filter |
(Optional) Lets you filter tables by name.
The default value is |
Table Filter |
Specifies which tables are queried. The following options are available: Application Tables, Customer Tables, Views, BAPI, Custom Query. If you select Custom Query, you also need to provide the query that will be applied. |
Data Reading Function |
(Optional) Name of the SAP function for querying data.
By default, the standard |
Batch Rows Count |
(Optional) Number of records that are read in a single batch.
Default value: |
Metadata Read Function |
(Optional) Name of the SAP function for reading metadata. This property allows you to specify a custom function if necessary, as the Data Reading Function might not support all table types. Use this to read from table types that the Data Reading Function cannot handle. |
Make the server connection available in the command line and online mode
When executing plans and workflows in the command line (runcif utility) or online mode (from the ONE Runtime Server Admin), it is necessary to make the server connection available to the runtime from the Runtime Configuration file.
To learn how to export runtime configuration, see Export and Import Runtime Configuration.
When exported to the runtime configuration file, the server definition part looks as follows:
<?xml version='1.0' encoding='utf-8'?>
<runtimeconfig>
...
 <contributedConfigs>
  <config className=.ataccama.dqc.processor.support.>
   <urls>
    <url
        name="SomeConfiguredServer"
        user="myusername"
        password="crypted:DESede:p63913D4fMa175vrXECs1nOHdV1SG5sUto5HhuV6Izg="
        url="localhost:22"
        />
   </urls>
  </config>
  ...
 </contributedConfigs>
 ...
</runtimeconfig>
Was this page useful?
