
Snowflake and Ataccama Unstructured Data Integrations
This document guides data engineers and analysts through integrating Snowflake’s document processing capabilities with the Ataccama platform. The integration enables structured management of data extracted from unstructured documents. This guide assumes basic familiarity with Snowflake and Ataccama platforms.
Summary
Snowflake offers two tools for extracting and processing data from documents: PARSE_DOCUMENT and Document AI.
PARSE_DOCUMENT is a Snowflake Cortex SQL function that extracts text and layout elements from documents stored in Snowflake stages.
It supports various formats, including PDF, DOCX, PPTX, and image files like TIFF, JPEG, and PNG.
Once the data is extracted it can then be parsed into a table that can be cataloged and evaluated in the Ataccama platform.
Document AI is a more advanced AI feature that uses Snowflake’s Arctic-TILT (Text Image Layout Transformer) model to extract data from documents. It can interpret both textual and graphical content by using zero-shot extraction or fine-tuning to particular document layouts. It is more focused on the creation of automated pipelines for continuous document processing where extracted data can be loaded directly into Snowflake tables which can then once again be cataloged and evaluated within the Ataccama platform.
Prerequisites
-
Access to a Snowflake account with appropriate permissions
-
Existing Ataccama environment
-
Documents for processing (for example, PDF, DOCX, or images)
-
Basic SQL knowledge
PARSE_DOCUMENT to Ataccama
Step 1: Prepare the documents
Ensure all PDF documents are collected and organized on your local system. For this demo we are using test data contracts from the Contract Understanding Atticus Dataset (CUAD) as an example dataset. You can use any PDF documents for your own implementation.
Step 2: Create an internal stage
Use Snowflake’s internal or external stages to store these documents. In this example, we use an internal stage.
-
Via SQL:
CREATE OR REPLACE STAGE contract_stage DIRECTORY = ( ENABLE = TRUE ) ENCRYPTION = ( TYPE = 'SNOWFLAKE_SSE' ); -
Via UI:
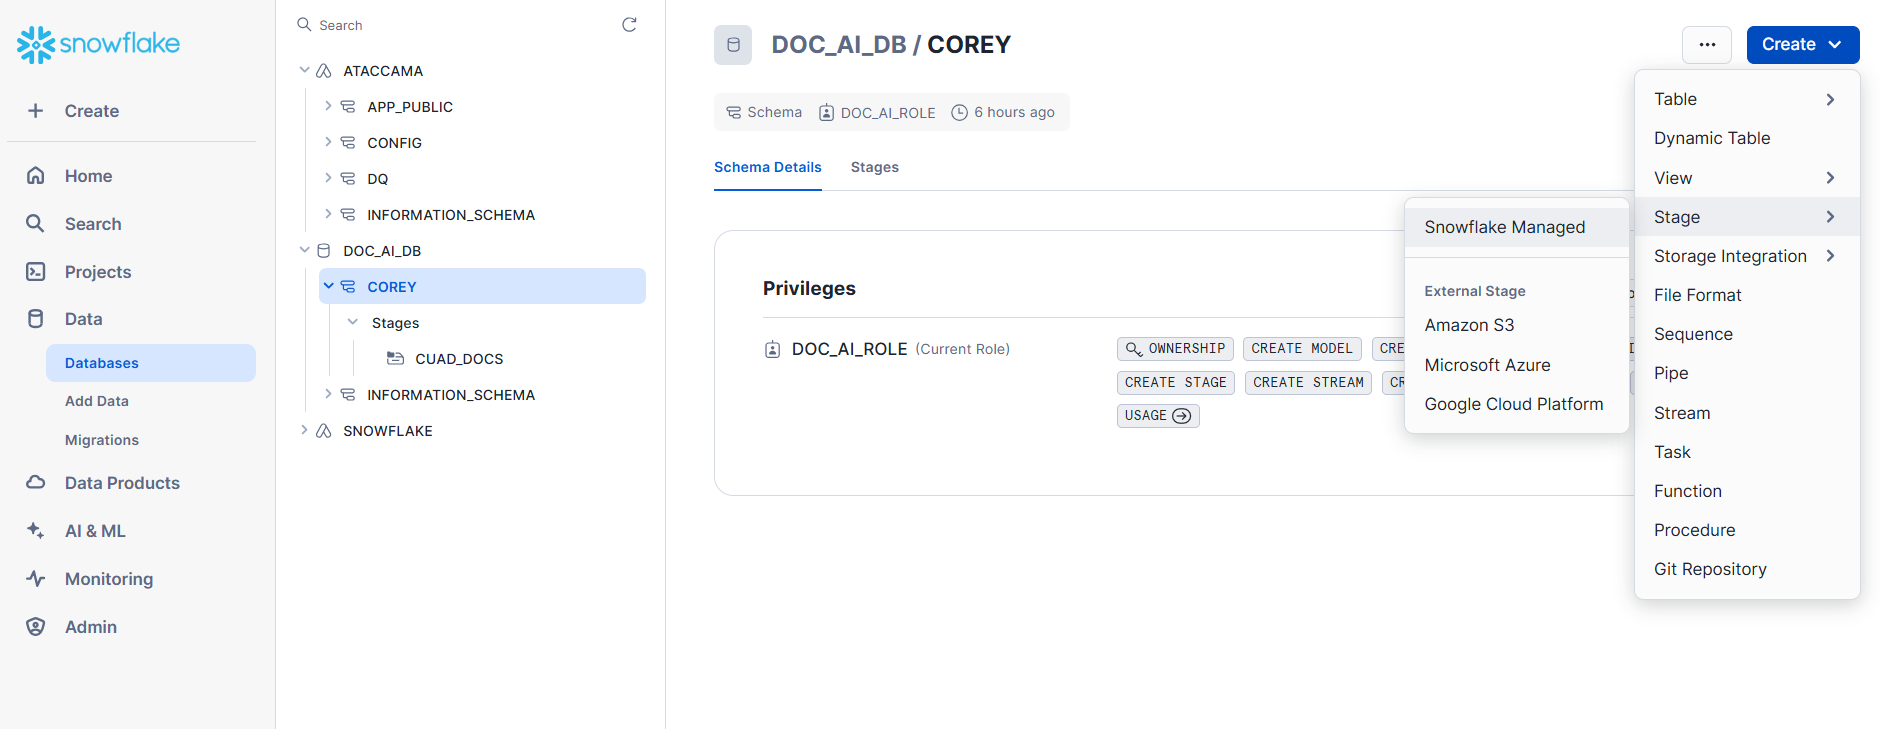
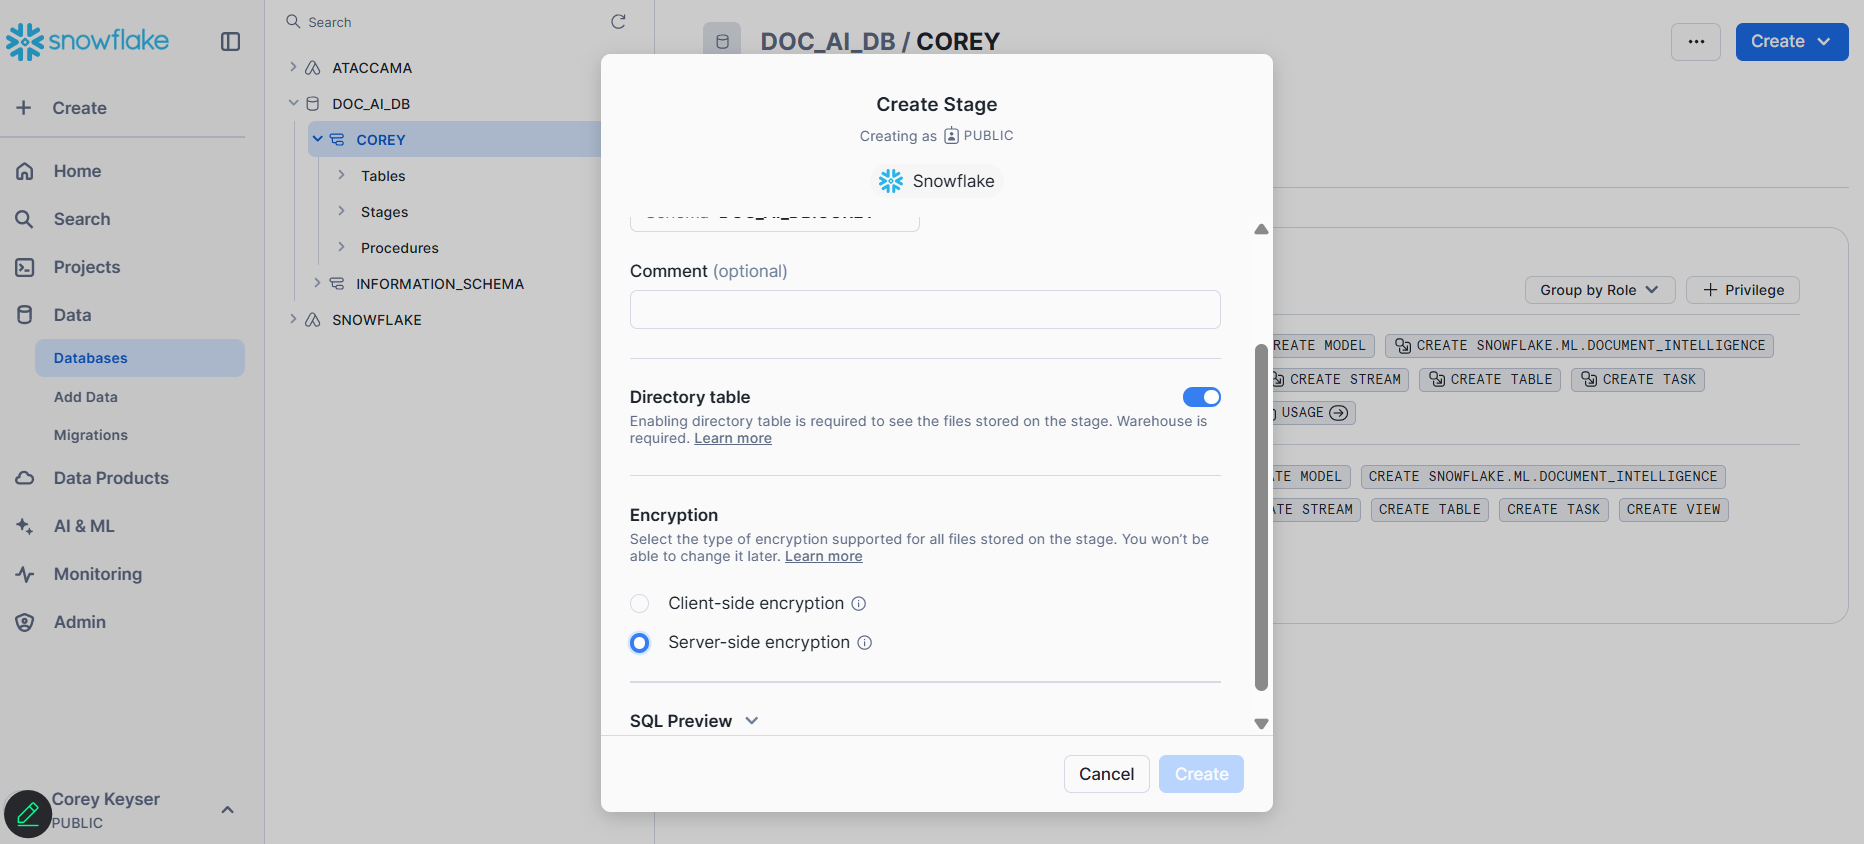
Make sure to use Server-side encryption when setting up your stage if you do not use the SQL above.
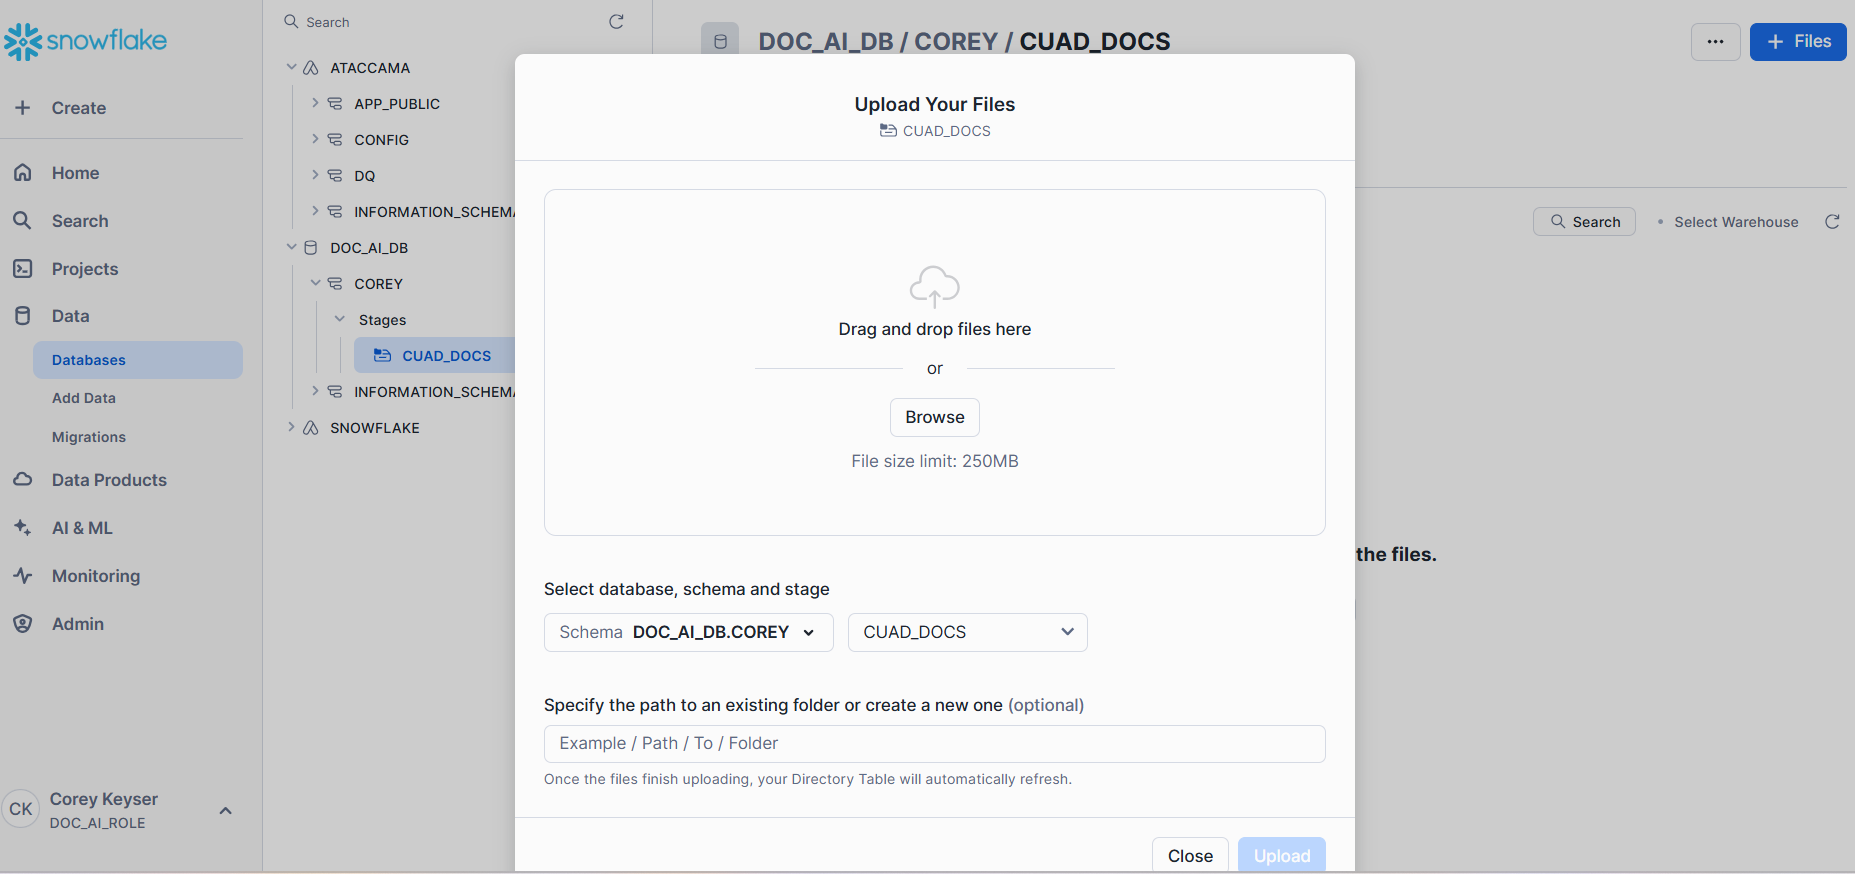
Step 3: Upload files to the stage
Select + Files in the top-right corner and manually upload files from local computer or point to an existing file store.
Step 4: Parse documents using SQL
Create target table
Create a target table called EXTRACTED_DOCS to store the extracted text.
This table will include columns for the file name and the extracted content:
-- Create table to store extracted document text
CREATE OR REPLACE TABLE EXTRACTED_DOCS (
    FILE_NAME STRING,
    EXTRACTED_TEXT STRING
);
Extract text using PARSE_DOCUMENT
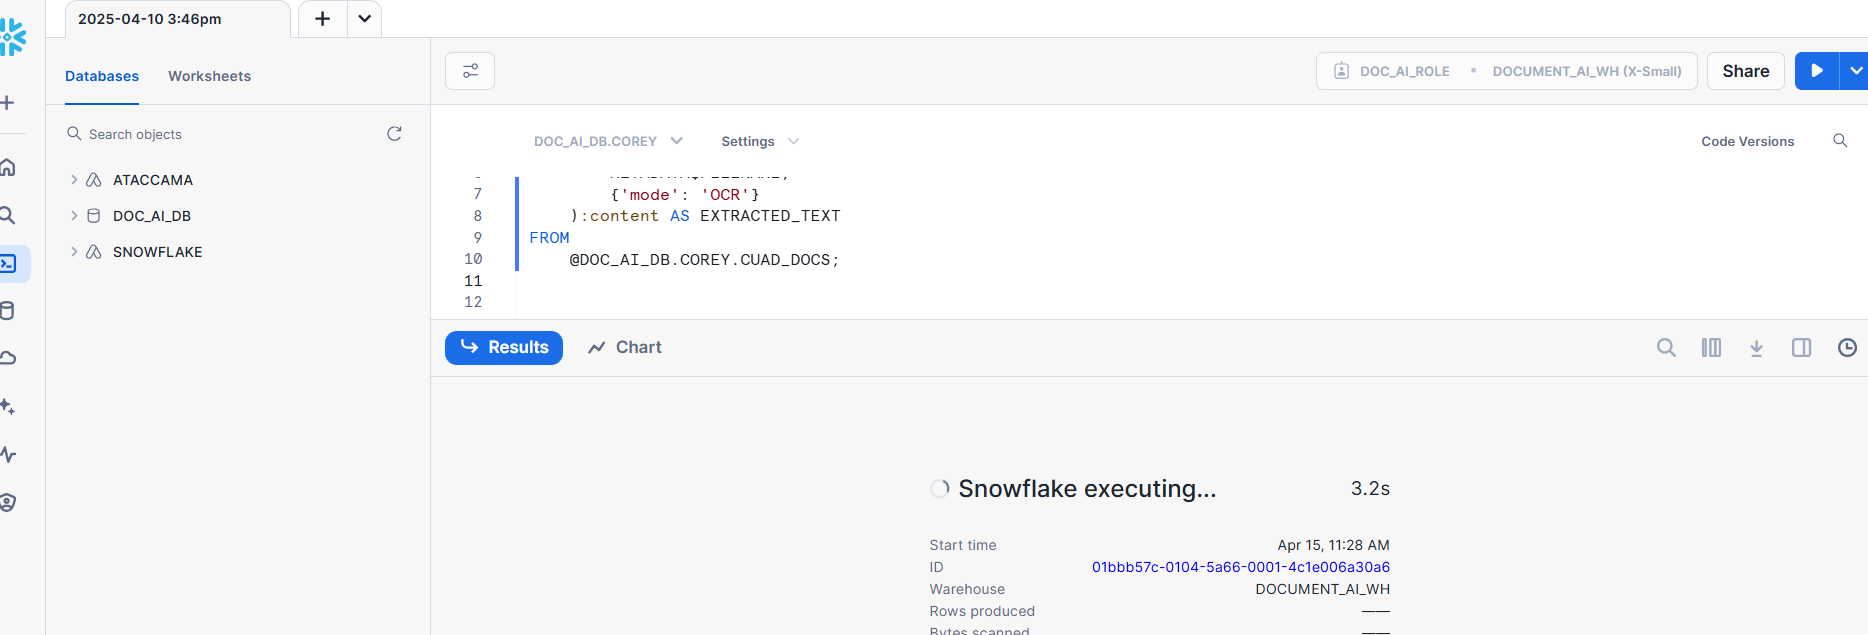
Use the PARSE_DOCUMENT function to extract text.
| This step might take a while depending on the size and number of files. |
-- Extract text from all documents in the stage
INSERT INTO EXTRACTED_DOCS (FILE_NAME, EXTRACTED_TEXT)
SELECT
    METADATA$FILENAME AS FILE_NAME,
    SNOWFLAKE.CORTEX.PARSE_DOCUMENT(
        '@<DATABASE>.<SCHEMA>.CONTRACT_STAGE',
        METADATA$FILENAME,
        {'mode': 'OCR'}
    ):content::STRING AS EXTRACTED_TEXT
FROM
@<DATABASE>.<SCHEMA>.CONTRACT_STAGE;|
Alternatively if you want to extract just one document at a time use the below: |
Step 5: Verify the extracted data
Query the table and review to ensure accuracy:
-- Verify the extracted data
SELECT *
FROM EXTRACTED_DOCS;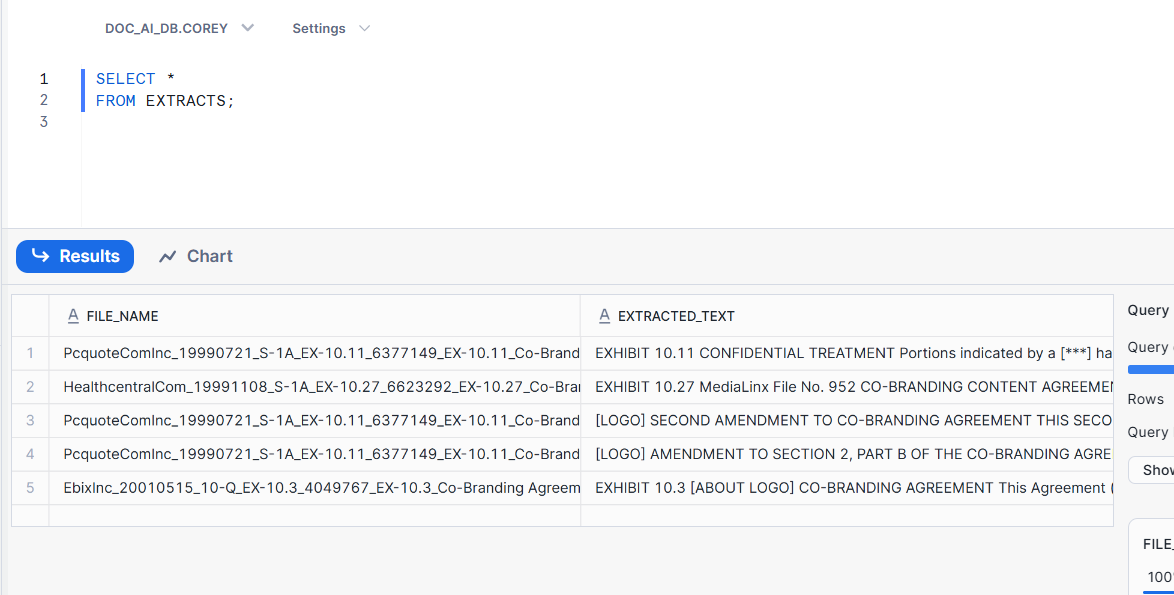
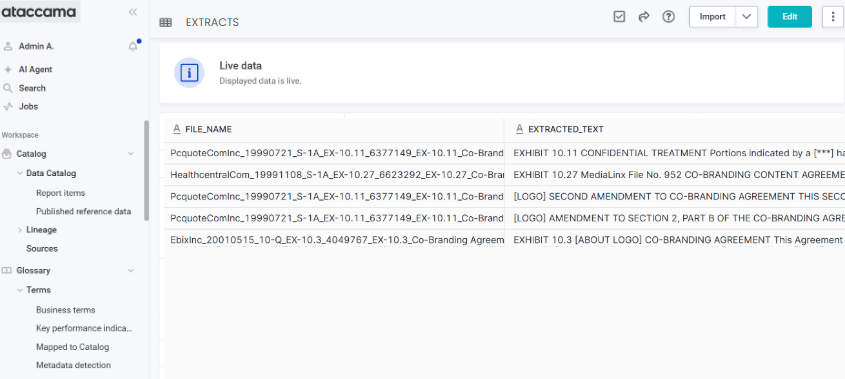
Step 7: Connect and catalog data in Ataccama
-
Create connection to Snowflake database following the instructions found in Snowflake Connection.
-
Import data into the Data Catalog. For more information, see Import Metadata.
Document AI to Ataccama
Document AI is a more advanced tool compared to PARSE_DOCUMENT as it can more intelligently extract key information from documents into the schema of complex tables.
To process documents using Snowflake’s Document AI and store the extracted information into a Snowflake table for cataloging in the Ataccama platform, follow these steps:
Step 1: Create and populate Snowflake stage
Create an internal stage
Upload files to a stage within an existing Warehouse and Schema.
-
Via SQL:
-- Create stage for Document AI CREATE OR REPLACE STAGE doc_ai_stage DIRECTORY = ( ENABLE = TRUE ) ENCRYPTION = ( TYPE = 'SNOWFLAKE_SSE' ); -
Via UI:
Make sure to use Server-side encryption when setting up your stage if you do not use the SQL above.
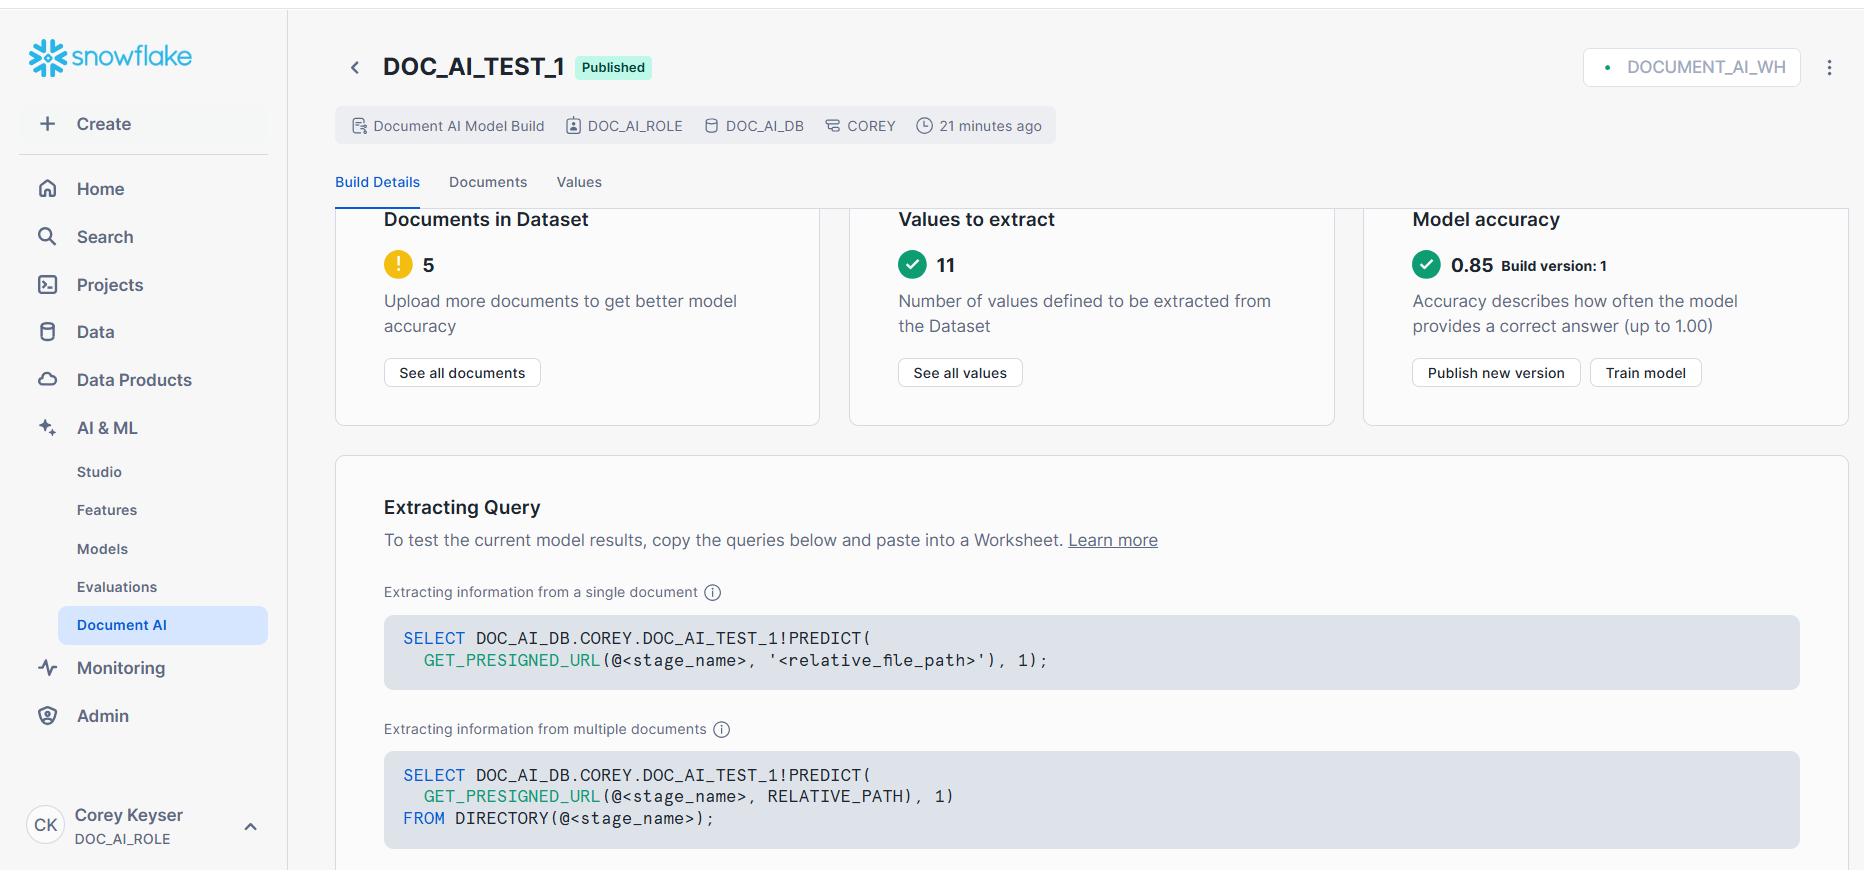
Step 2: Create a Document AI model build
Configure the model build
-
Build name: Provide a descriptive name for your model build.
-
Choose database and schema: Select the database and schema you created earlier.
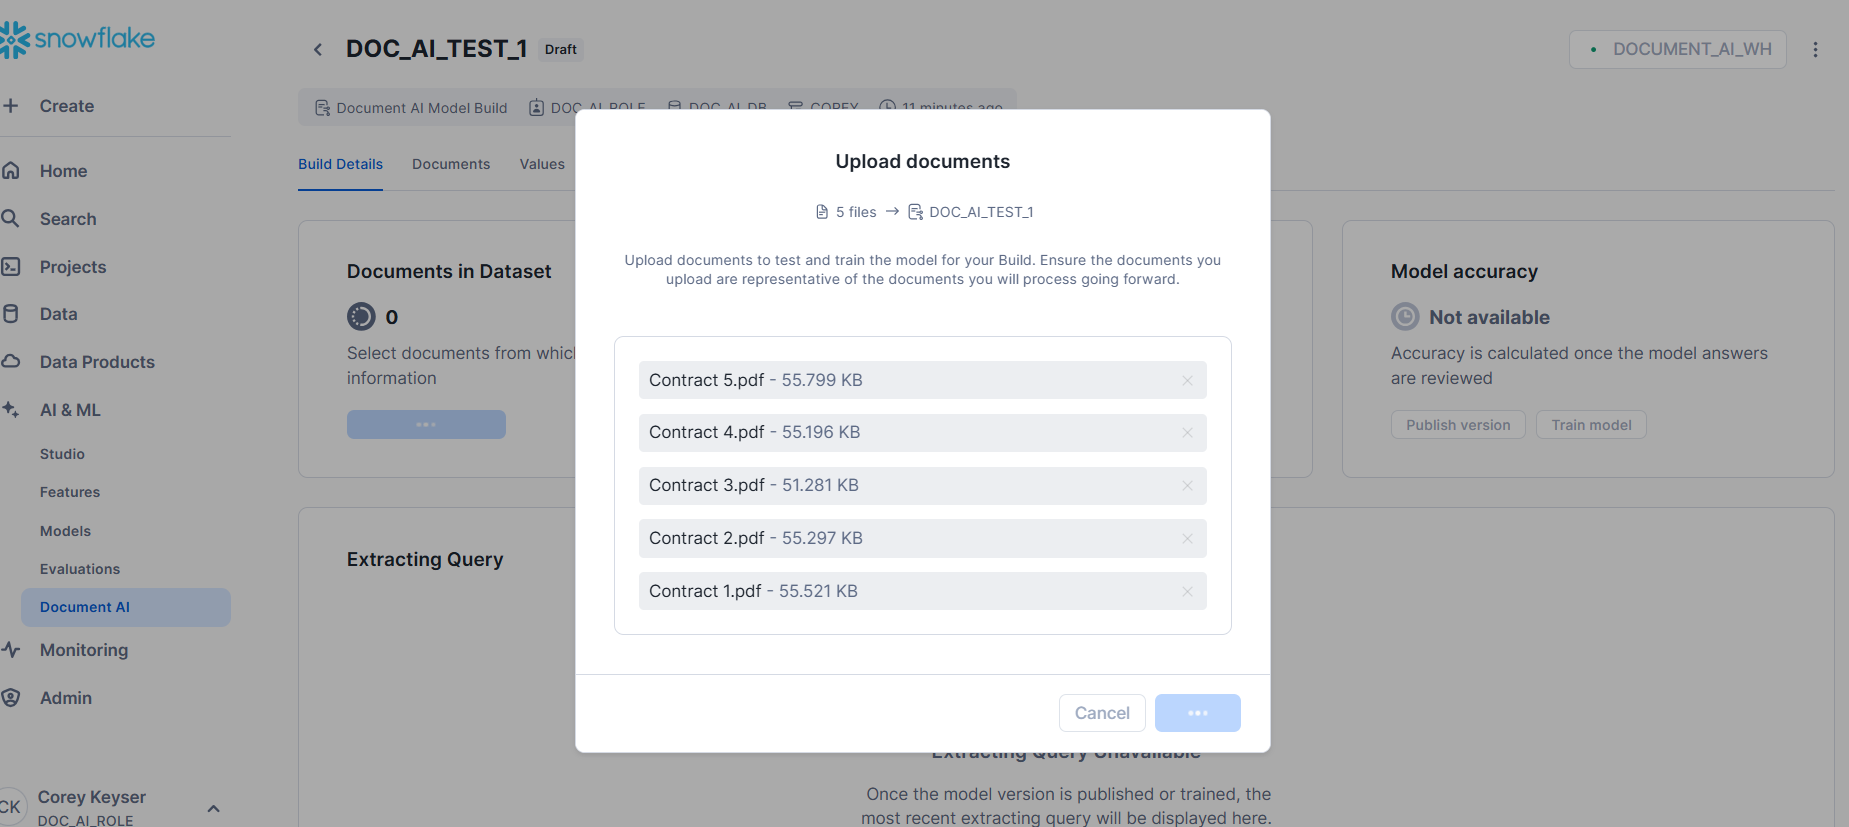
Upload sample documents
Add sample documents from your stage to train and test the model. These can be the same CUAD example documents or your own document samples.
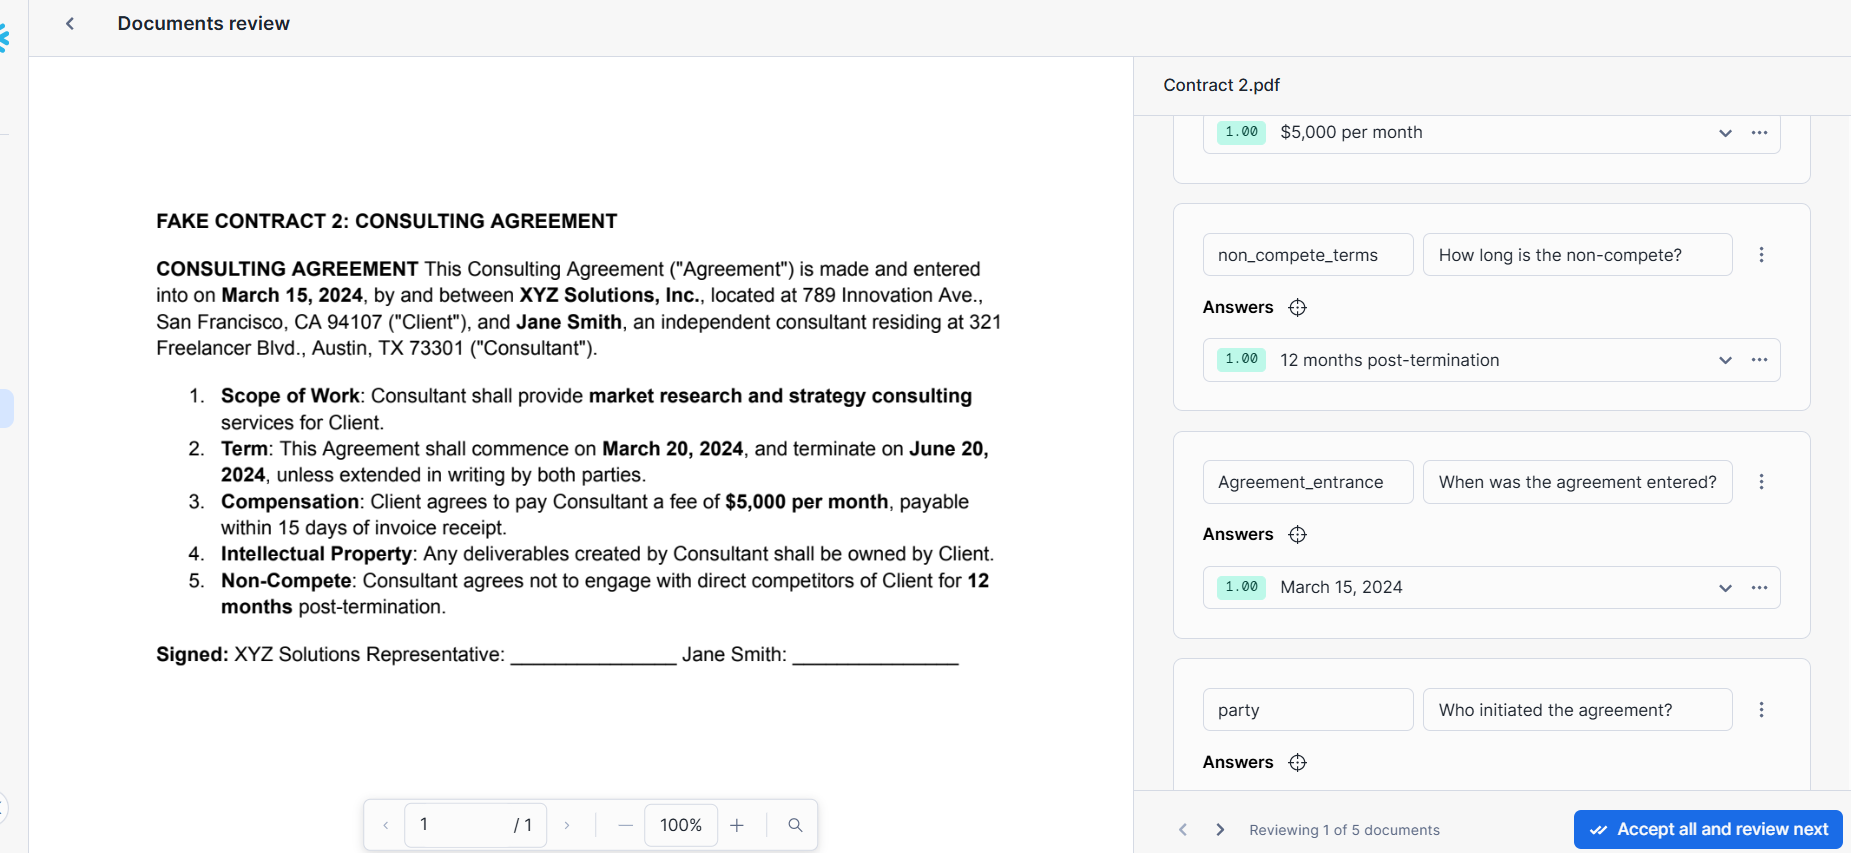
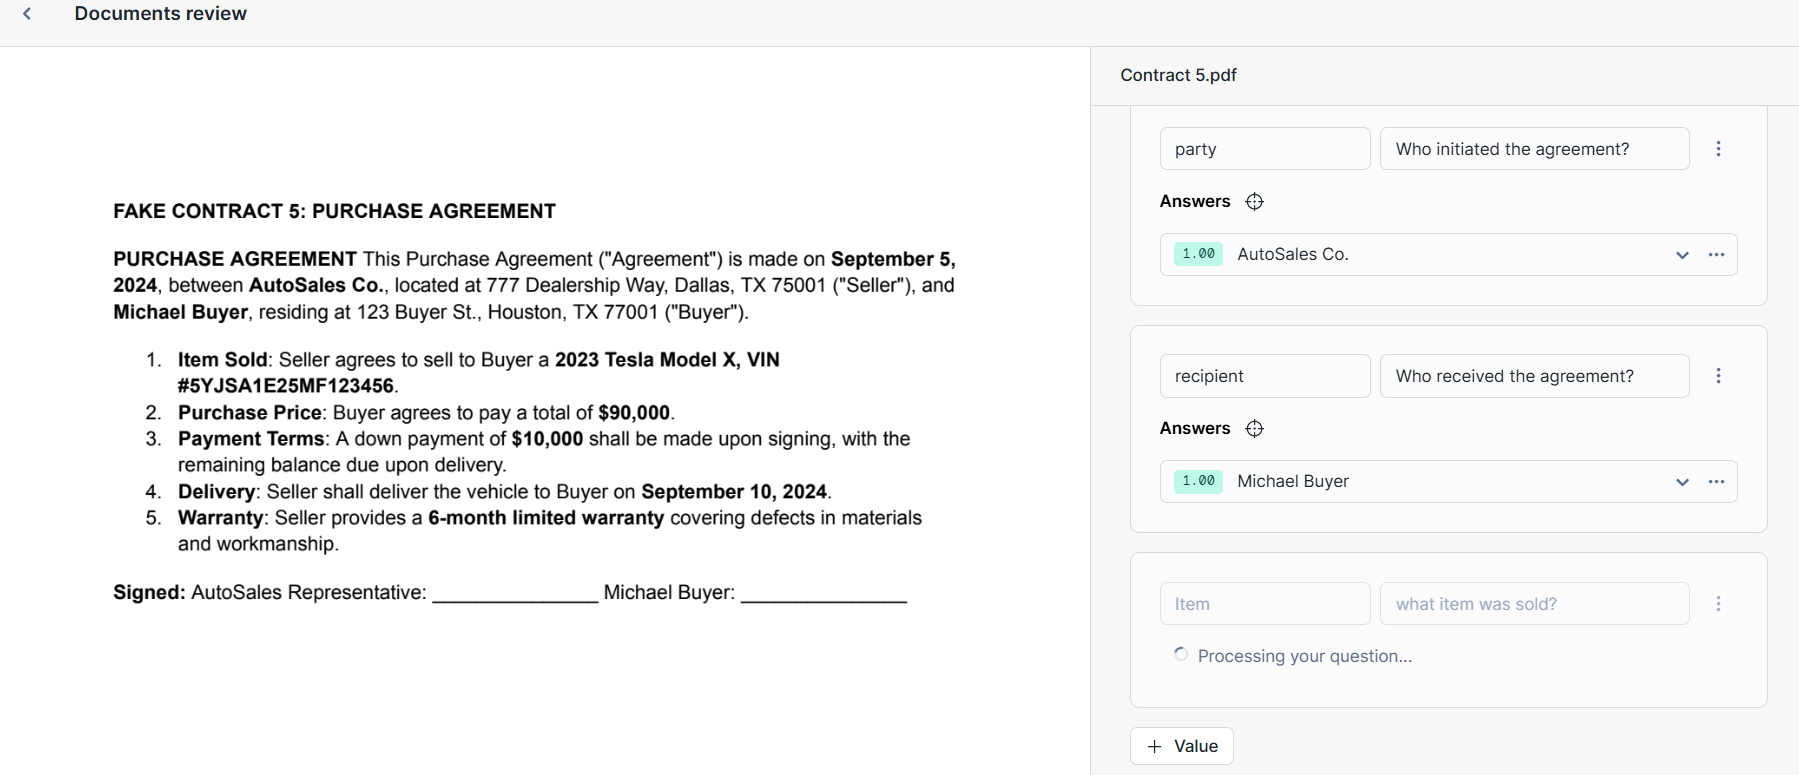
Define data extraction points
Specify the data points you wish to extract by formulating questions in natural language. For example, to extract contract dates, you might ask, "What is the effective date of the contract?"
Step 3: Prepare for data extraction
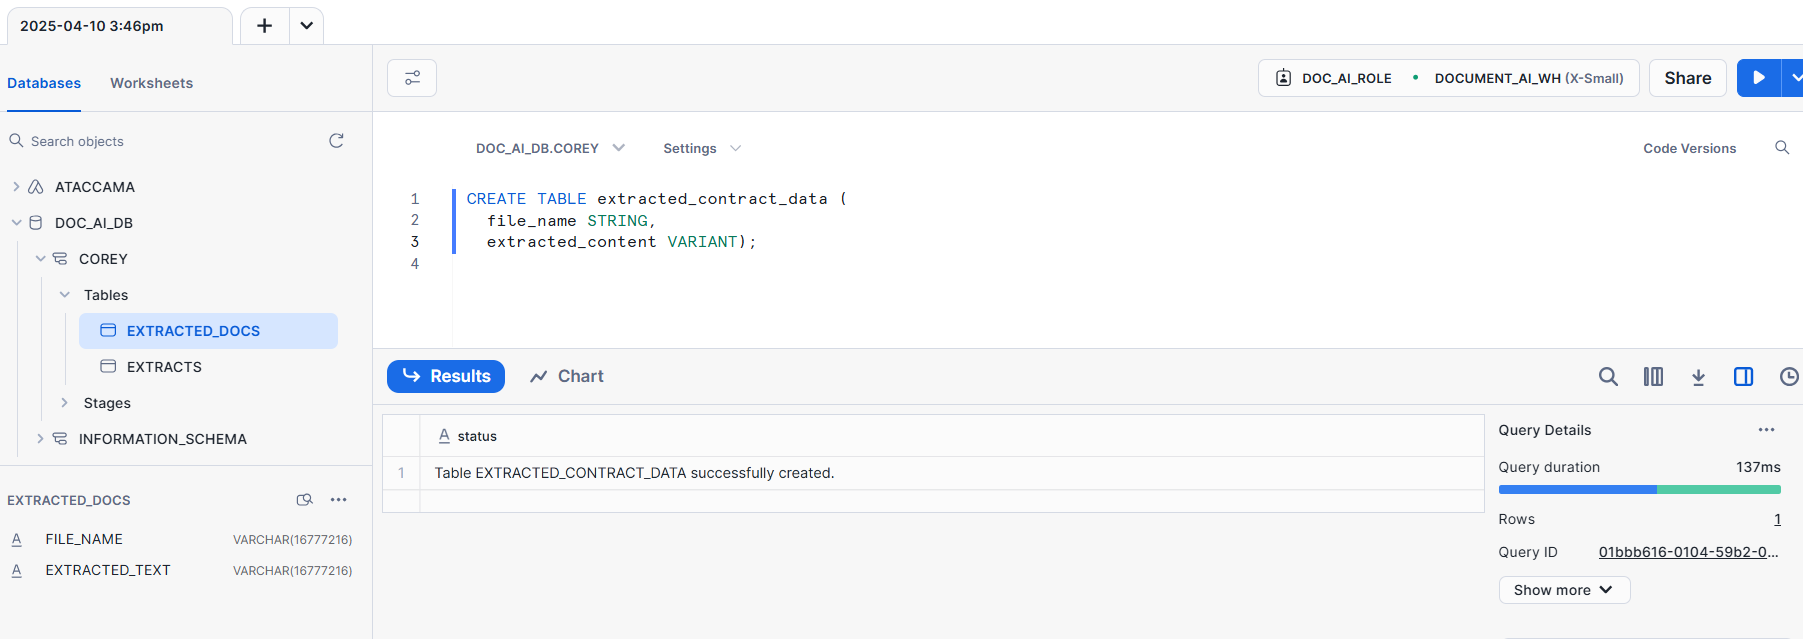
Create a table to hold the extracted information:
-- Create table to store Document AI extraction results
CREATE TABLE extracted_contract_data (
    file_name STRING,
    extracted_content VARIANT
);
Step 4: Prepare the extraction query
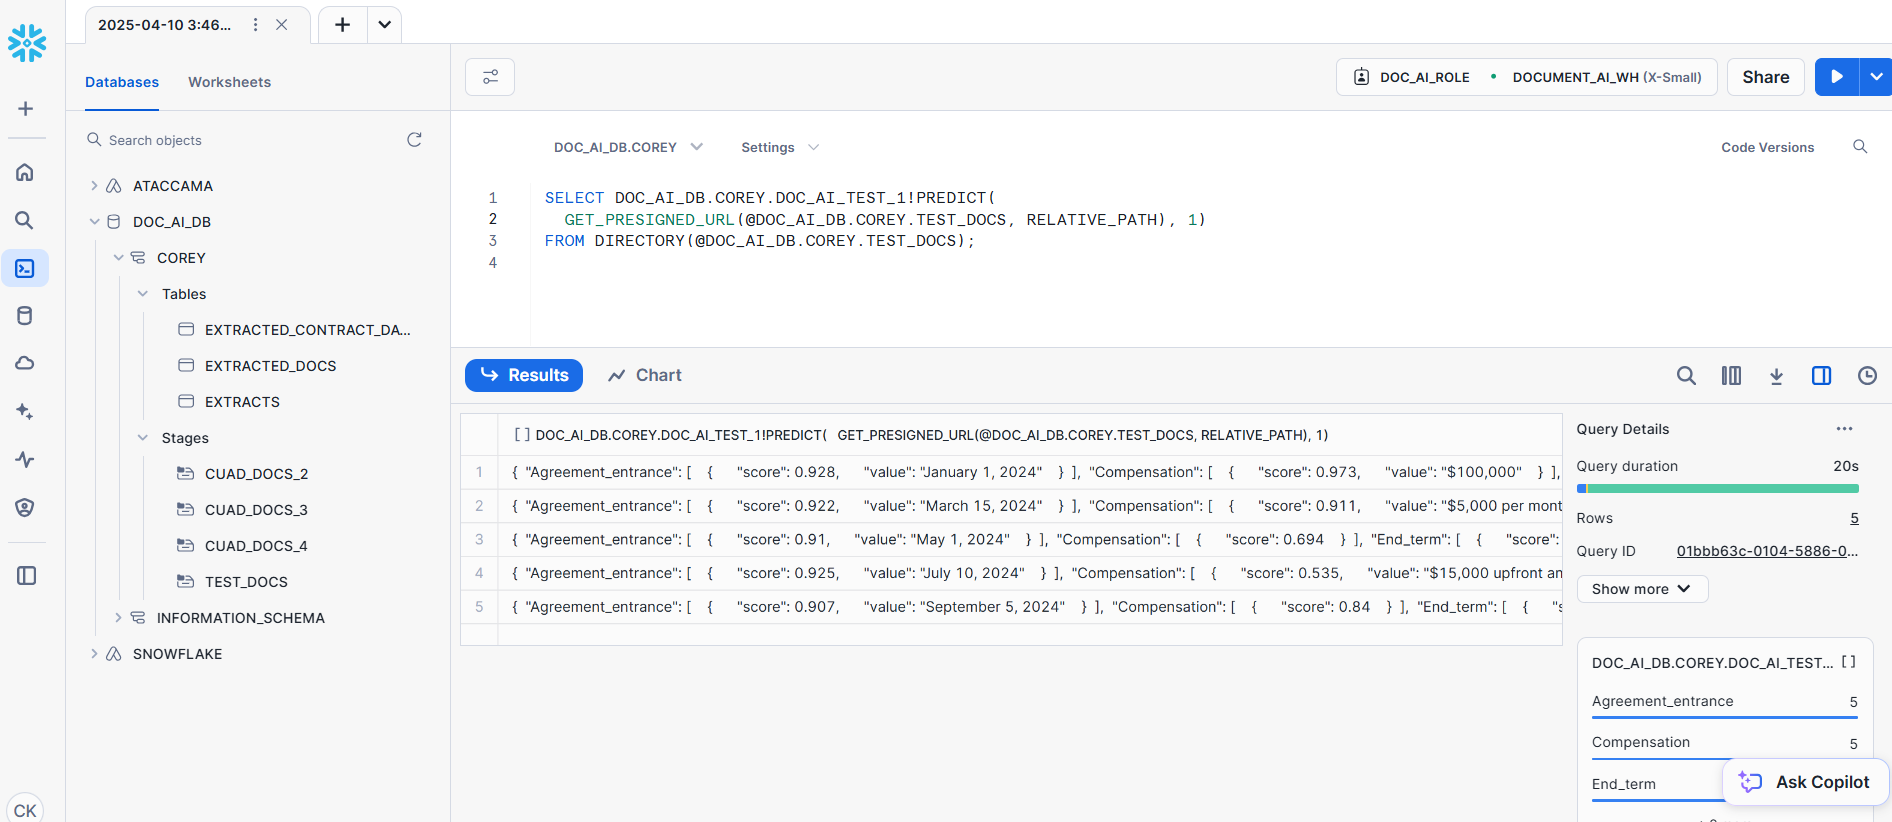
Use the PREDICT function associated with your published model to extract data from documents stored in the stage.
This is provided to you in the homepage for the Document AI model build.
For example:
-- Example extraction query
SELECT <MODEL_NAME>!PREDICT(@<DATABASE>.<SCHEMA>.DOC_AI_STAGE, 'document_1.pdf') AS extracted_data;
Replace <MODEL_NAME> with the name of your published model and document_1.pdf with the specific document you are processing.
|
Step 5: Insert extracted data into table
There are two options for extracting the information.
Option 1: Store complete JSON output
This is the easiest method and can be done with the SQL below:
-- Insert complete JSON output
INSERT INTO extracted_contract_data (file_name, extracted_content)
SELECT
    'document_1.pdf',
    <MODEL_NAME>!PREDICT(@<DATABASE>.<SCHEMA>.DOC_AI_STAGE, 'document_1.pdf');
Option 2: Flatten JSON into columns
This can be done in a number of ways but the most comprehensible is to manually determine the columns you want based on the JSON, change the table according to the new columns, then write the extracted content to the columns.
Example JSON output structure
{
    "Agreement_entrance": [
        {
            "score": 0.928,
            "value": "January 1, 2024"
        }
    ],
    "Compensation": [
        {
            "score": 0.973,
            "value": "$100,000"
        }
    ],
    "End_term": [
        {
            "score": 0.916
        }
    ],
    "Item": [
        {
            "score": 0.938
        }
    ],
    "Scope_of_work": [
        {
            "score": 0.934,
            "value": "Software Engineer"
        }
    ],
    "Start_Term": [
        {
            "score": 0.841,
            "value": "January 1, 2024"
        }
    ],
    "Title": [
        {
            "score": 0.768,
            "value": "Employment Agreement"
        }
    ],
    "__documentMetadata": {
        "ocrScore": 0.965
    },
    "non_compete_terms": [
        {
            "score": 0.912
        }
    ],
    "party": [
        {
            "score": 0.93,
            "value": "ABC Corporation"
        }
    ],
    "price": [
        {
            "score": 0.957,
            "value": "$100,000"
        }
    ],
    "recipient": [
        {
            "score": 0.902,
            "value": "John Doe"
        }
    ]
}
SQL to create a structured table and extract specific fields
-- Create initial table
CREATE TABLE extracted_contract_data (
    file_name STRING,
    extracted_content VARIANT
);

-- Change table structure to store specific fields
CREATE OR REPLACE TABLE extracted_contract_data (
    file_name STRING,
    agreement_entrance_value STRING,
    agreement_entrance_score FLOAT,
    compensation_value STRING,
    compensation_score FLOAT,
    end_term_value STRING,
    end_term_score FLOAT,
    item_value STRING,
    item_score FLOAT,
    scope_of_work_value STRING,
    scope_of_work_score FLOAT,
    start_term_value STRING,
    start_term_score FLOAT,
    title_value STRING,
    title_score FLOAT,
    non_compete_terms_value STRING,
    non_compete_terms_score FLOAT,
    party_value STRING,
    party_score FLOAT,
    price_value STRING,
    price_score FLOAT,
    recipient_value STRING,
    recipient_score FLOAT,
    ocr_score FLOAT
);

-- Extract and write to table
INSERT INTO extracted_contract_data
(
    file_name,
    agreement_entrance_value,
    agreement_entrance_score,
    compensation_value,
    compensation_score,
    end_term_value,
    end_term_score,
    item_value,
    item_score,
    scope_of_work_value,
    scope_of_work_score,
    start_term_value,
    start_term_score,
    title_value,
    title_score,
    non_compete_terms_value,
    non_compete_terms_score,
    party_value,
    party_score,
    price_value,
    price_score,
    recipient_value,
    recipient_score,
    ocr_score
)
SELECT
    RELATIVE_PATH AS file_name,
    PREDICTED_JSON:Agreement_entrance[0].value::STRING AS agreement_entrance_value,
    PREDICTED_JSON:Agreement_entrance[0].score::FLOAT AS agreement_entrance_score,
    PREDICTED_JSON:Compensation[0].value::STRING AS compensation_value,
    PREDICTED_JSON:Compensation[0].score::FLOAT AS compensation_score,
    PREDICTED_JSON:End_term[0].value::STRING AS end_term_value,
    PREDICTED_JSON:End_term[0].score::FLOAT AS end_term_score,
    PREDICTED_JSON:Item[0].value::STRING AS item_value,
    PREDICTED_JSON:Item[0].score::FLOAT AS item_score,
    PREDICTED_JSON:Scope_of_work[0].value::STRING AS scope_of_work_value,
    PREDICTED_JSON:Scope_of_work[0].score::FLOAT AS scope_of_work_score,
    PREDICTED_JSON:Start_Term[0].value::STRING AS start_term_value,
    PREDICTED_JSON:Start_Term[0].score::FLOAT AS start_term_score,
    PREDICTED_JSON:Title[0].value::STRING AS title_value,
    PREDICTED_JSON:Title[0].score::FLOAT AS title_score,
    PREDICTED_JSON:non_compete_terms[0].value::STRING AS non_compete_terms_value,
    PREDICTED_JSON:non_compete_terms[0].score::FLOAT AS non_compete_terms_score,
    PREDICTED_JSON:party[0].value::STRING AS party_value,
    PREDICTED_JSON:party[0].score::FLOAT AS party_score,
    PREDICTED_JSON:price[0].value::STRING AS price_value,
    PREDICTED_JSON:price[0].score::FLOAT AS price_score,
    PREDICTED_JSON:recipient[0].value::STRING AS recipient_value,
    PREDICTED_JSON:recipient[0].score::FLOAT AS recipient_score,
    PREDICTED_JSON:"__documentMetadata".ocrScore::FLOAT AS ocr_score
FROM
(
    SELECT
        RELATIVE_PATH,
        <MODEL_NAME>!PREDICT(
            GET_PRESIGNED_URL(@<DATABASE>.<SCHEMA>.DOC_AI_STAGE, RELATIVE_PATH), 1) AS PREDICTED_JSON
    FROM DIRECTORY(@<DATABASE>.<SCHEMA>.DOC_AI_STAGE)
);
Step 6: Verify and utilize extracted data
Query the extracted data to retrieve and review the information to ensure accuracy:
-- Verify the extracted contract data
SELECT *
FROM extracted_contract_data;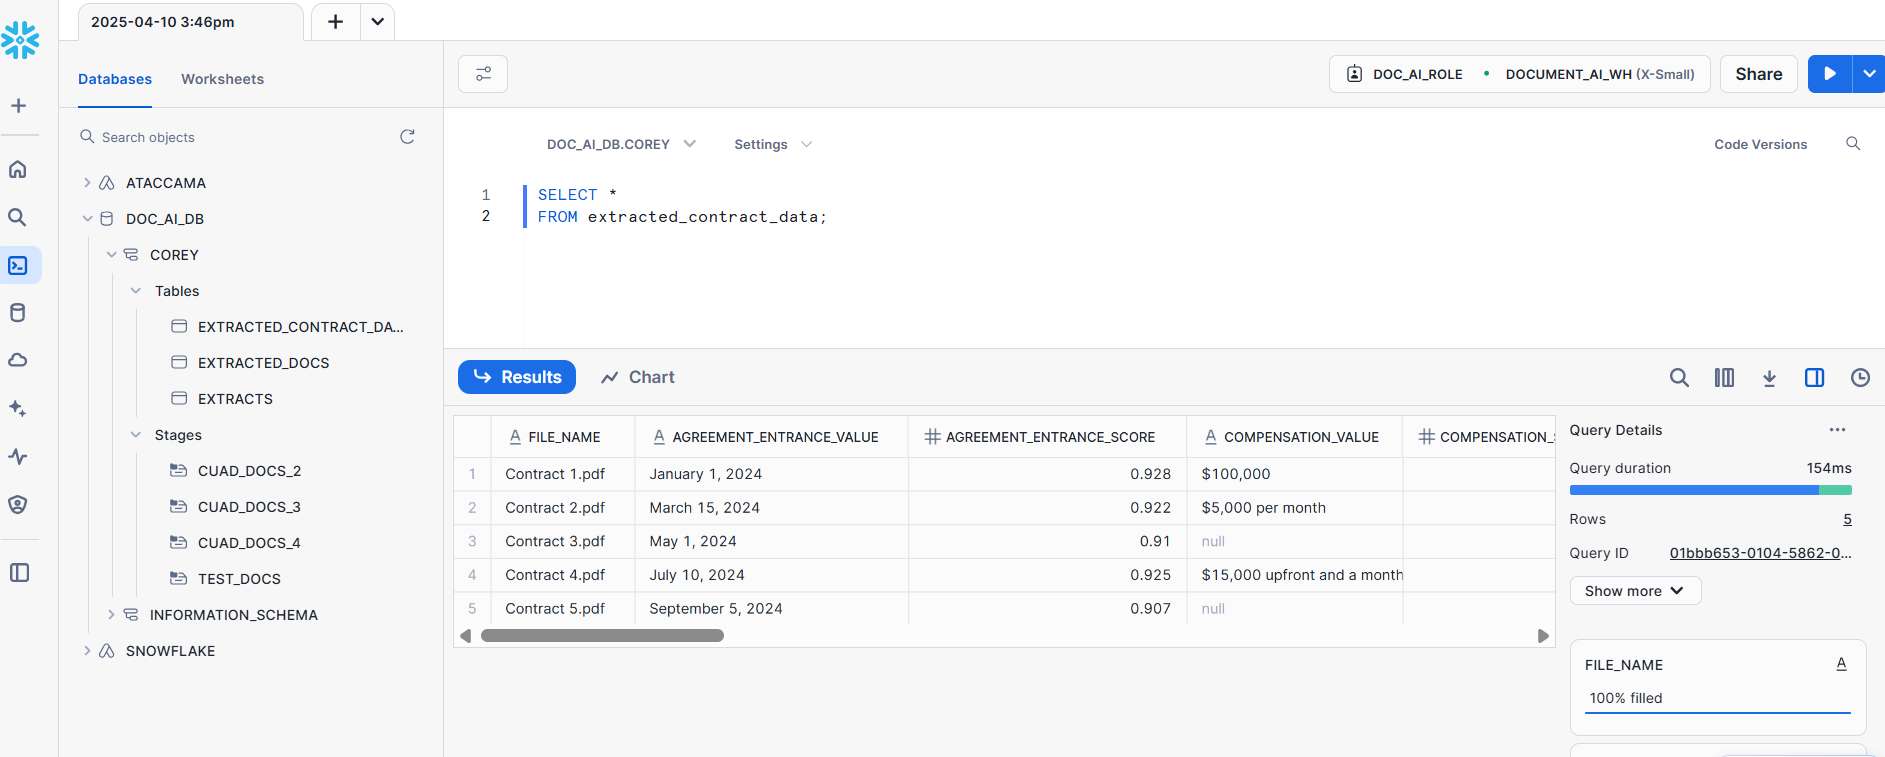
Step 7: Connect and catalog data in Ataccama
-
Create connection to Snowflake database. For more information, see Snowflake Connection.
-
Import data into catalog. For more information, see Import Metadata.
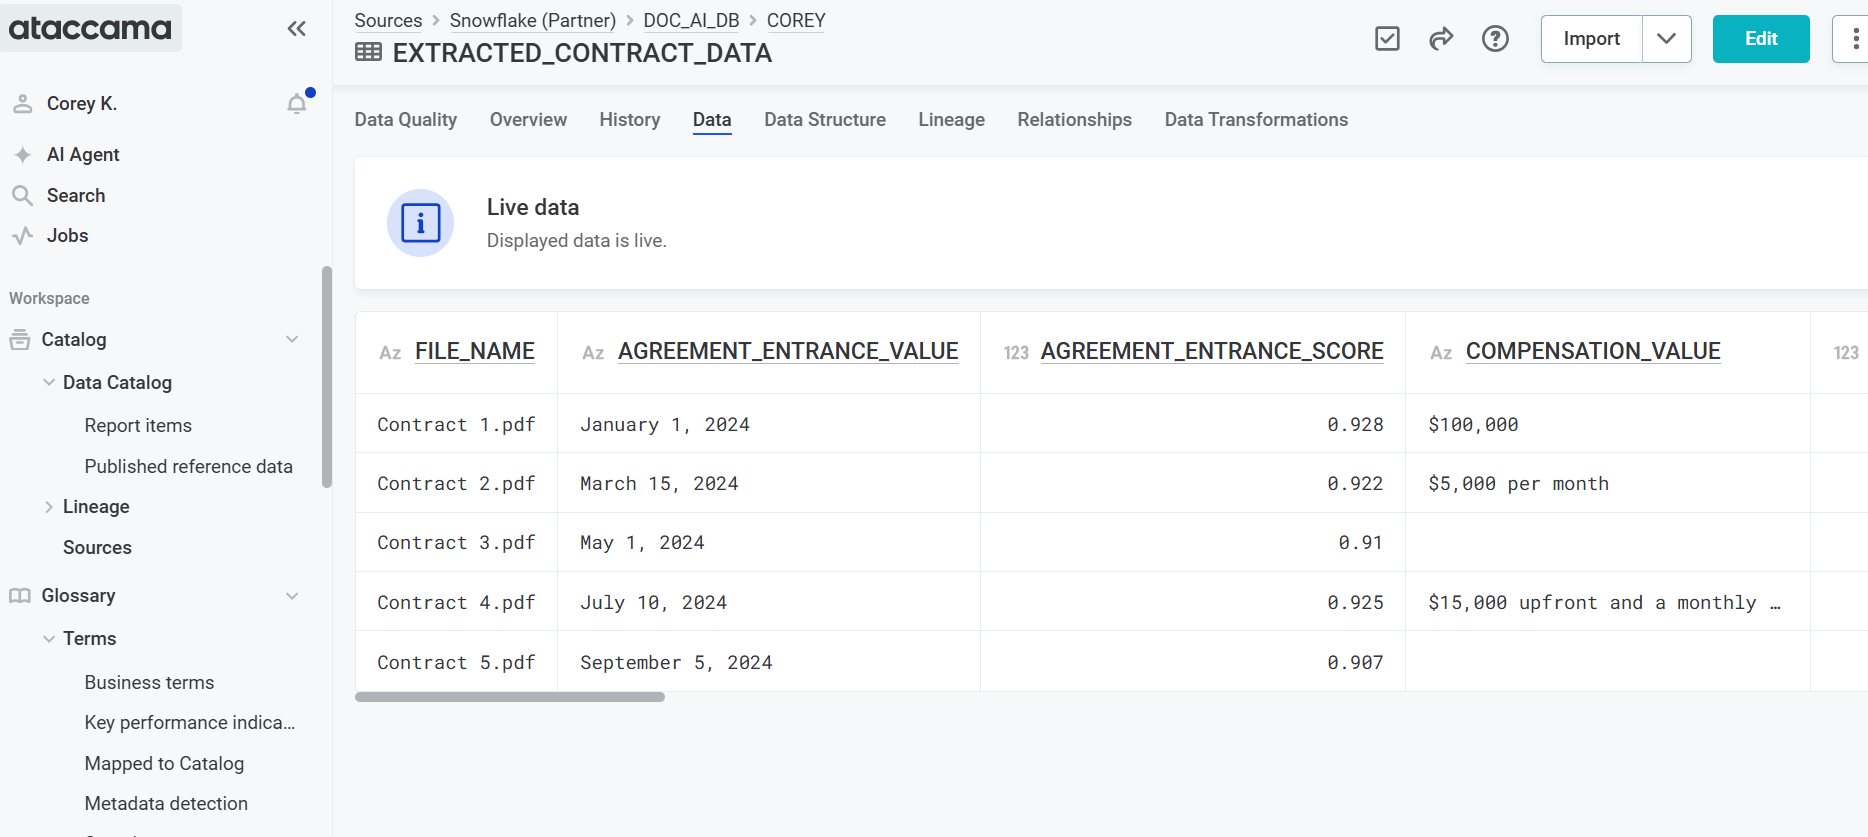
-
Run DQ rules on the extracted information in the same way you would with a normal structured table. For more information, see Run DQ Evaluation.
By following these steps, you can utilize Snowflake’s document processing capabilities to extract valuable information from your documents and store it in a structured format within Snowflake tables, facilitating enhanced data analysis and operational efficiency in the Ataccama platform.
Was this page useful?