
Orchestration Server in Ataccama Cloud
Every Ataccama Cloud environment is deployed with a default configuration of the Orchestration Server (also called ONE Runtime Server). If you don’t require any modifications to the default configuration, no action is needed.
However, the Orchestration Server lets you extend the functionality and define additional data source connections that would otherwise not be available.
The following article describes how to work with the Orchestration Server in Ataccama Cloud environments.
Limitations
When using the Orchestration Server in cloud environments, the following workflow tasks are not available:
-
Run Shell Script, Run Windows Command: Cannot be used due to security reasons.
-
Run DQC on Cluster: Use Run DPM Job instead.
-
Run DQC Process: Use Run DQC instead.
-
HTTP Get: Temporarily disabled.
Prerequisites
To make changes to the Orchestration Server configuration in an Ataccama Cloud environment, the following requirements must be in place:
-
You have an up and running environment in Ataccama Cloud.
-
You have a Git repository ready to store and deploy your server configuration from.
Add the orchestration template to your Git repository
The orchestration server template contains all files and the folder structure necessary to start developing additional configuration.
You can download the current configuration template from the following link: Orchestration Server configuration template.
Add the contents of the template to your Git repository. The folder structure of your repository should be as follows:
-
<your-repository>-
orch-
Files-
notificationHandlers -
schedulers -
workflows
-
-
runtime
-
-
Clone your repository to ONE Desktop
To establish a connection to your Git repository and create a project that is also suitable for local testing, we recommend you clone your repository to ONE Desktop.
You can download the necessary version of ONE Desktop from the Support Service Desk.
To learn more about how to work with ONE Desktop, see Welcome to ONE Desktop.
To clone your repository:
-
Launch ONE Desktop.
-
Switch the perspective to Git.
-
Select to the Open Perspective icon.
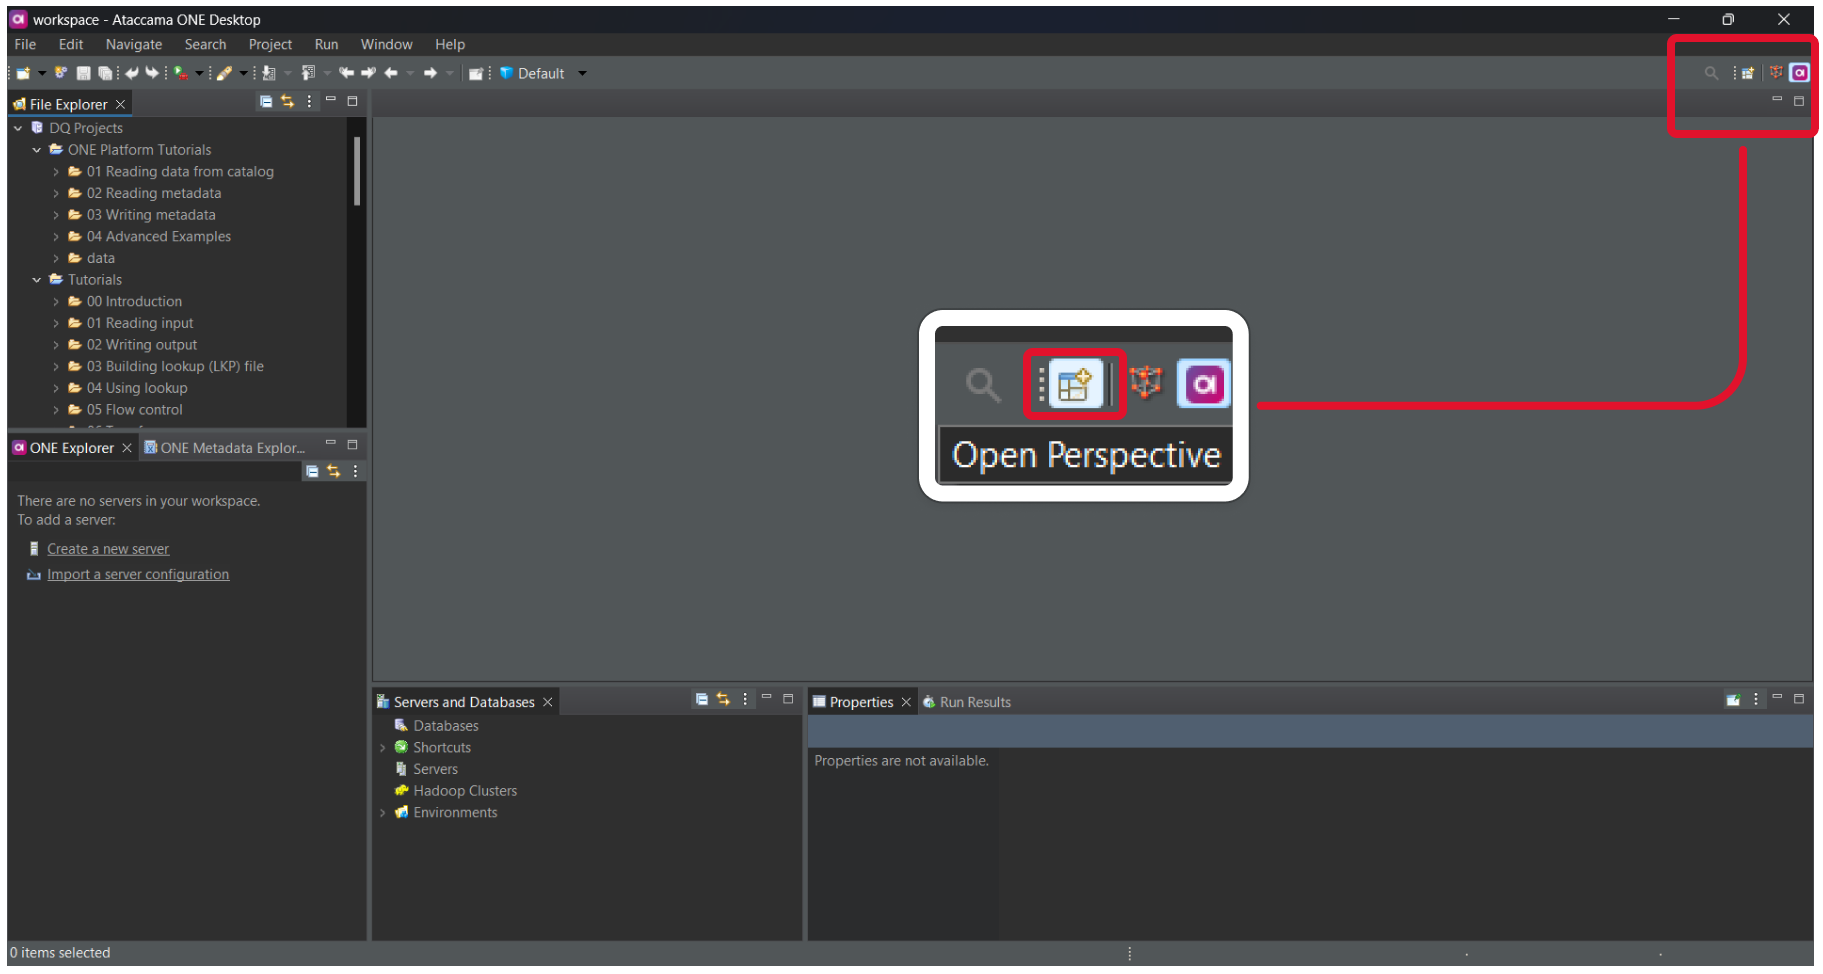
-
Select Git.

-
Select Open. This opens the Git Repositories browser in the sidebar.
-
-
From the Git Repositories browser, select Clone a Git repository.
-
Fill out the necessary information to clone your repository using your preferred connection protocol. The following image is an example of a valid
httpsconnection.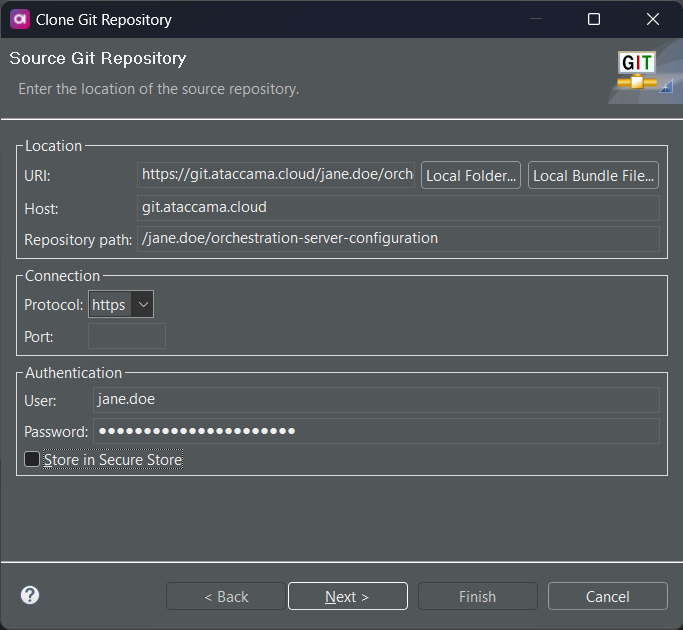
-
Select Next.
-
Choose the branches to clone from your repository and then select Next.
-
Configure the local destination of your repository and then select Finish. This clones your repository to the specified local destination and adds it to the Git Repositories browser.
-
Right-click the repository and then select Import Projects.
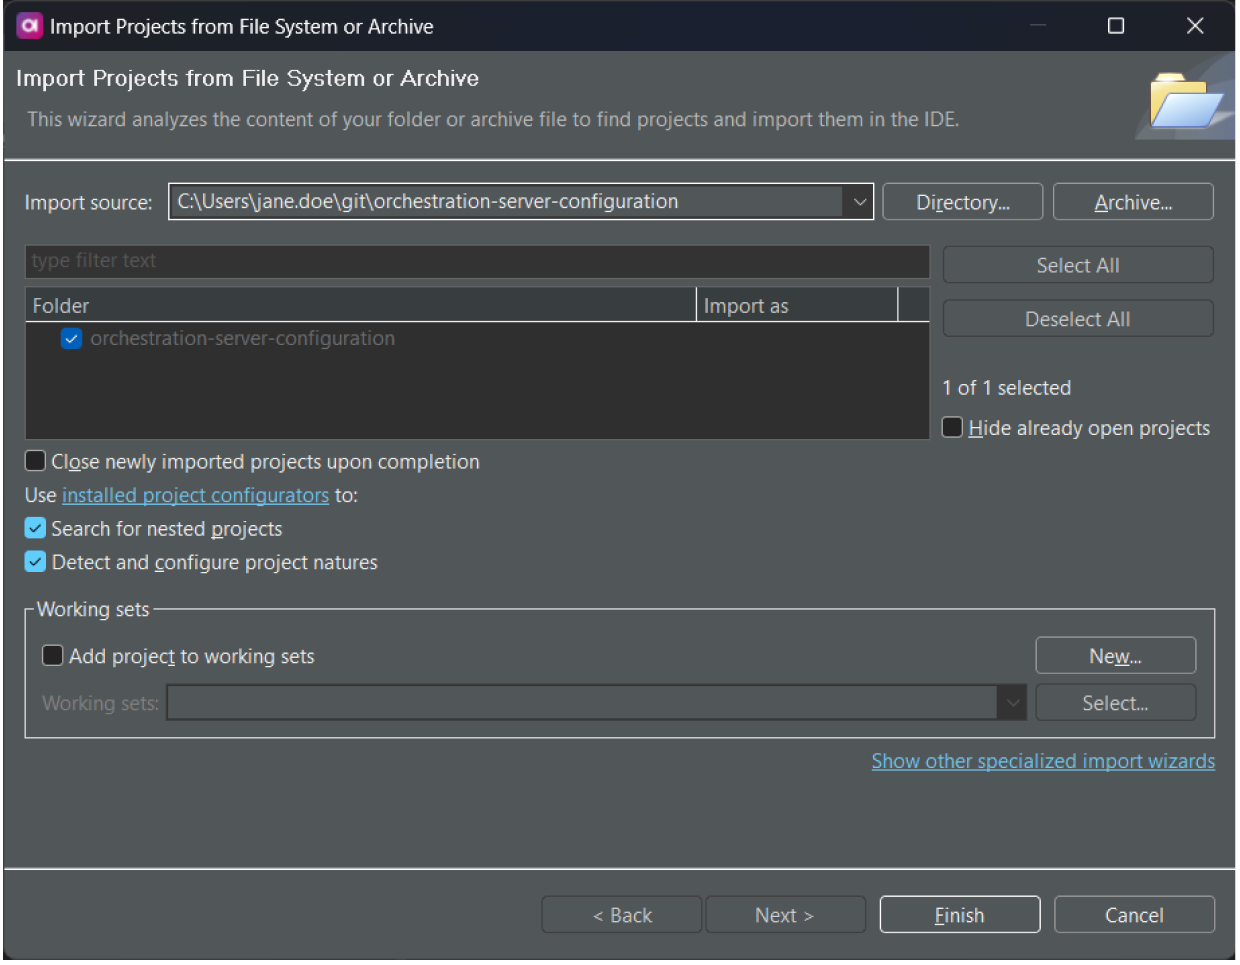
-
Select Finish. This adds the repository to your DQ Projects.
-
To view the project, switch back to the ONE Perspective.
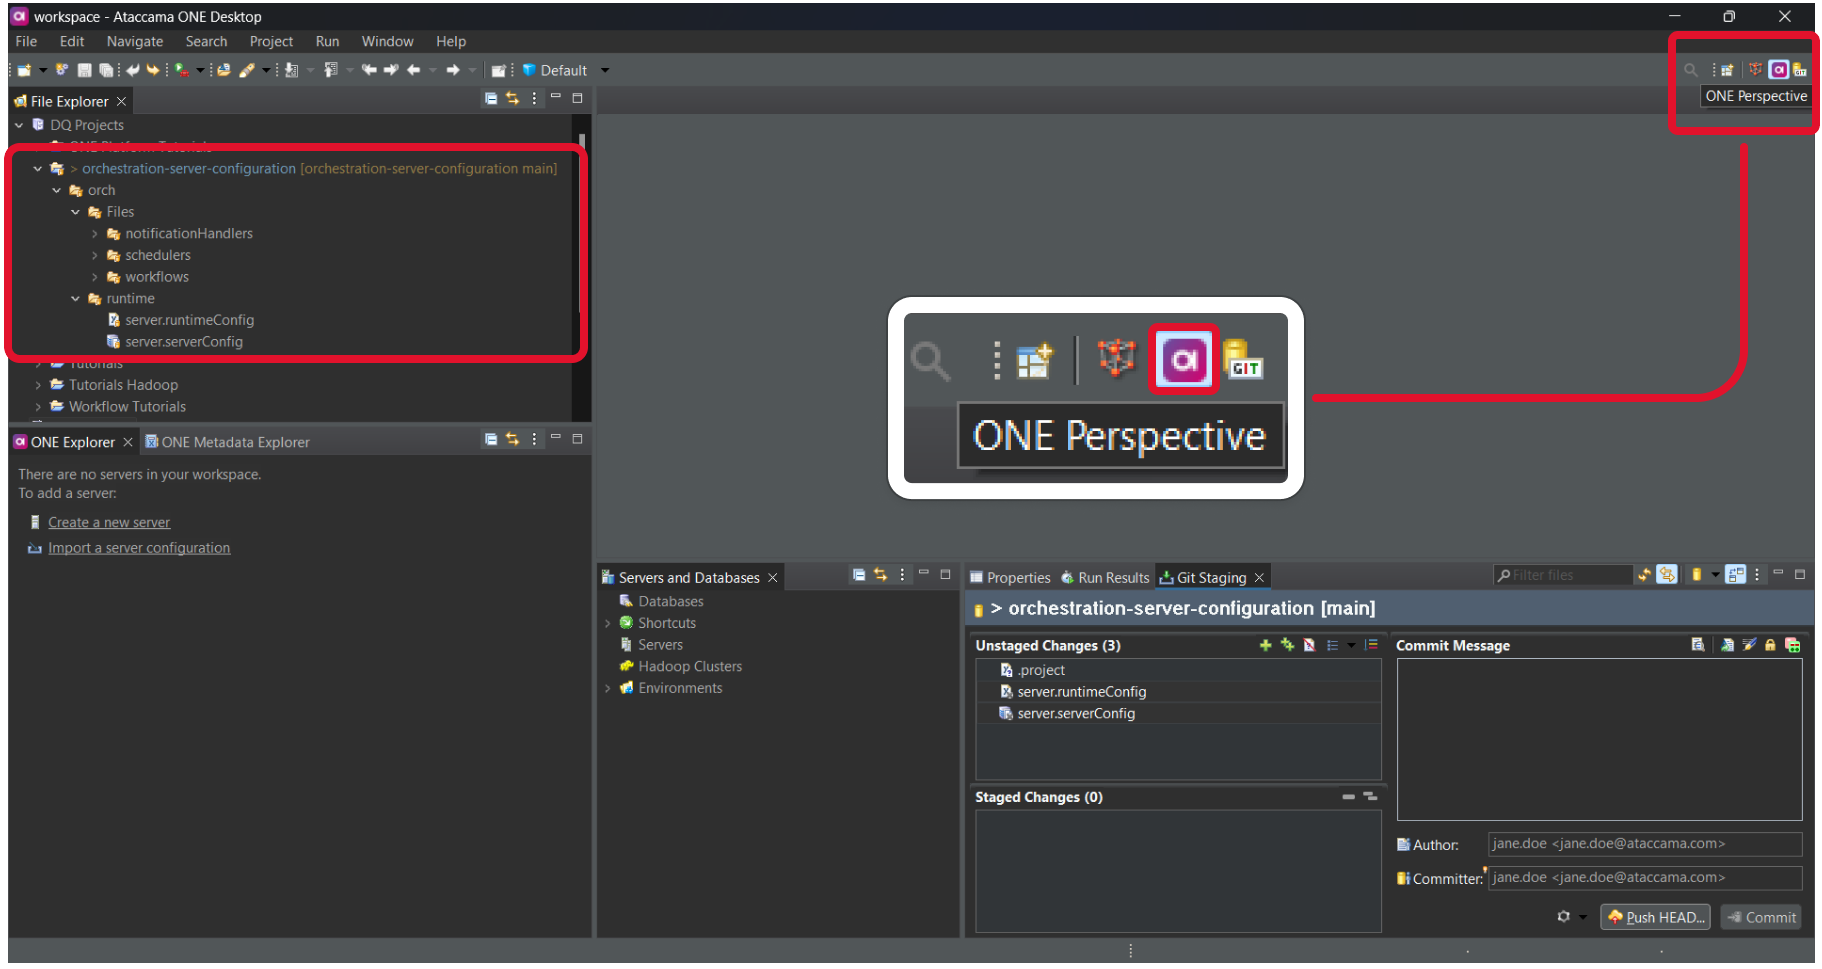
You now have a ONE Desktop project from which you can commit and push changes to your Git repository.
For more information about how to work with Git in ONE Desktop, search through local ONE Desktop documentation and refer to Git.
Test your orchestration server configuration locally
You can run your custom configuration locally to test whether it starts without issues. However, the filepaths necessary to make this work within ONE Desktop are different than those in the Cloud Portal (the configuration inteface of your Ataccama Cloud environment).
To test your configuration locally:
-
Move the
server.runtimeConfigandserver.serverConfigfiles located withing theruntimefolder and place them directly within the top folder of your project, that is on the same level as theorchfolder.We recommend moving rather than copying configuration files. This way, you avoid creating two file versions, which could lead to the wrong version being uploaded to the server.
-
Configure your project and the moved configuration files as needed.
-
Right-click the
server.serverConfigfile and then select Run Server Configuration. -
In the Console window you can see whether your configuration started successfully.
To view additional details, you can access the Admin Center of your configuration of the Orchestration Server at
http://localhost:8888. -
To end the local test, select the Terminate icon in the Console window.
After you test your configuration locally, move the server.runtimeConfig and server.serverConfig files back to the runtime folder and commit them to your Git repository.
Connect your Git repository to your cloud environment
To deploy your Orchestration Server configuration from your Git repository to your cloud environment:
-
Go to Ataccama Cloud Portal, that is, your configuration interface.
-
Select an environment from the list of environments.
-
Go to the Services tab.
-
In the Shared Services section, find the Orchestration server service and select Settings.
-
In Edit connection, provide the following information:
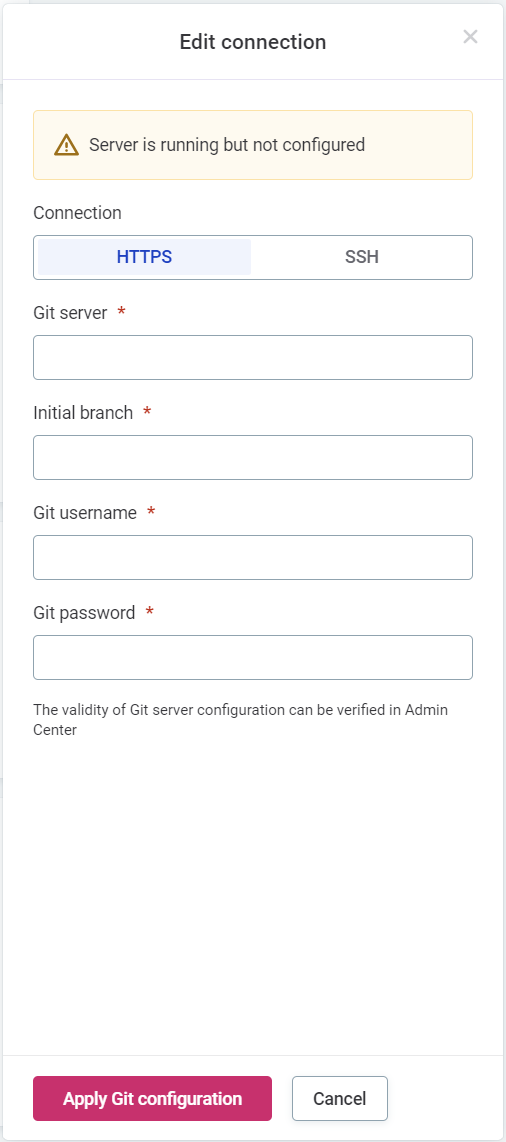
-
Connection: Choose between
HTTPSandSSHconnection type. -
Git server: Provide the Git server URL.
-
Initial branch: Specify the initial branch to be used.
-
Provide authentication credentials depending on the chosen connection type.
-
For
HTTPSconnection provide the following:-
Git username.
-
Git password.
-
-
For
SSHconnection upload a Private SSH key.
-
-
-
Select Restart server on commit if you want new configuration changes to be applied automatically. For details, see How configuration changes are applied.
-
Select Apply Git configuration to complete the setup. This restarts your environment and updates the server configuration.
During the update, the environment status is Updating, which means you can’t use any application.
Once the environment becomes available again, you can start using the Orchestration Server as well as other applications.
You can now make changes to the configuration and push these changes to your cloud environment from ONE Desktop.
The server configuration can later be verified and managed in the Admin Console.
To access the Admin Console, select the Orchestration Server from the Shared Services section on the Services tab of your environment. For more information, see ONE Runtime Server Admin.
|
In case there is an issue, for example, the server configuration can’t be loaded or it contains errors, Admin Center is not available and the server log is displayed instead. Check both the server configuration and the settings in Cloud Portal before repeating the steps provided here. 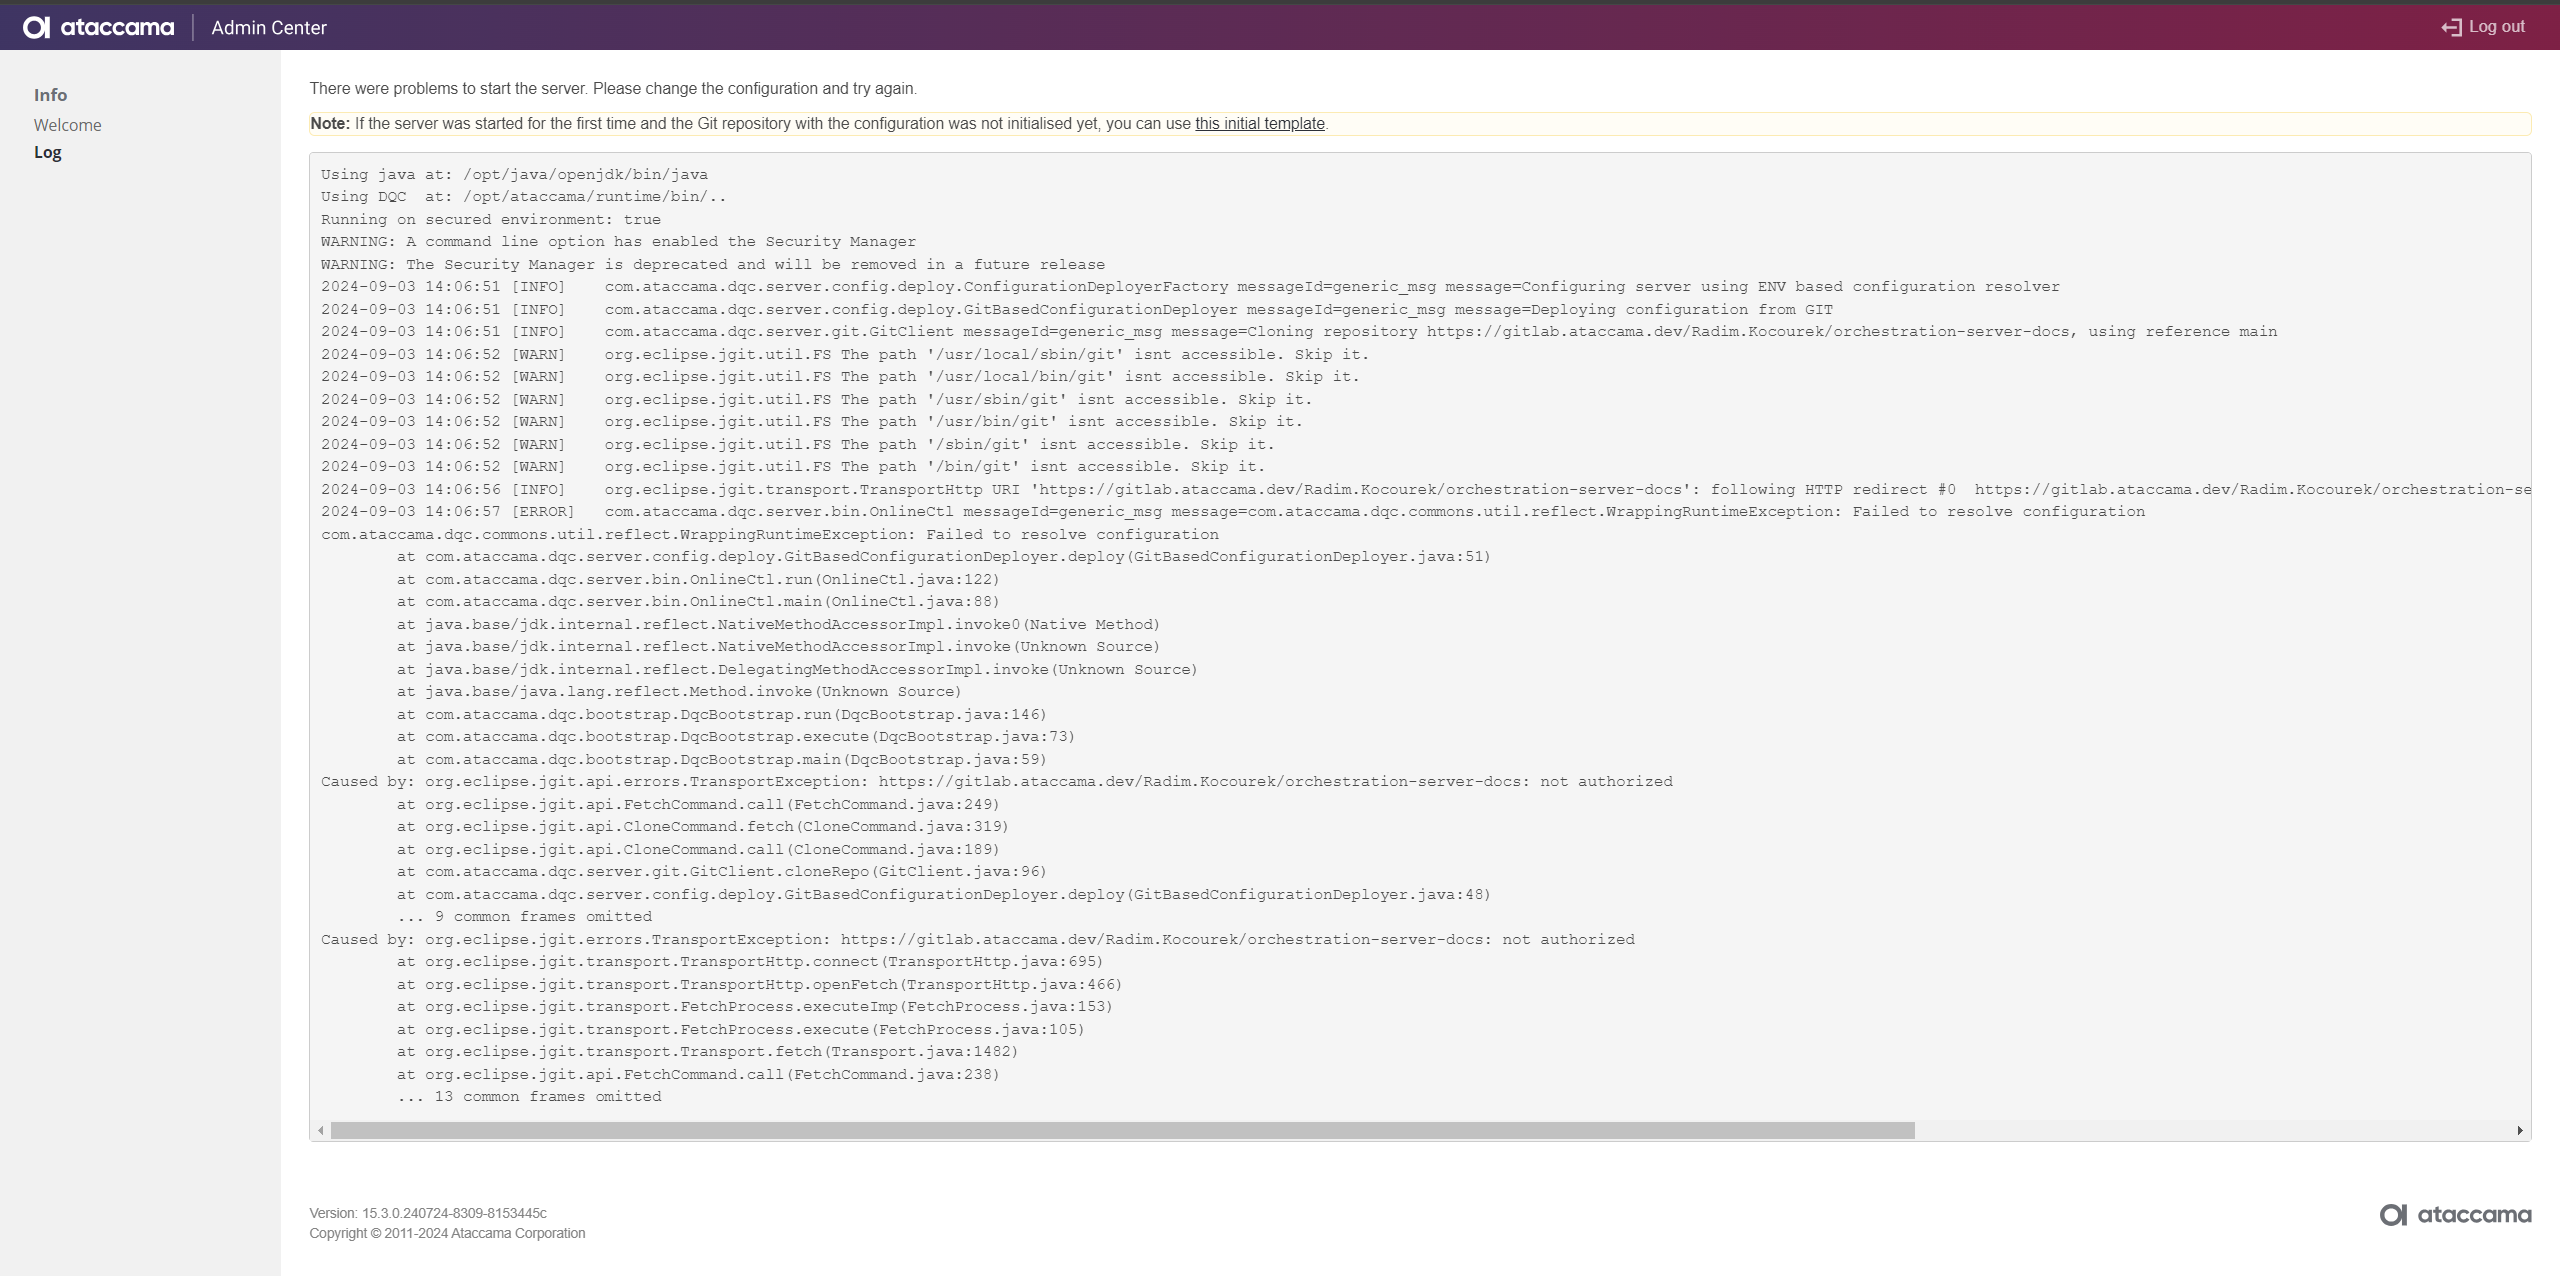
|
How configuration changes are applied
The Git repository holding the server configuration is queried for updates every 60 seconds. How the server responds once a change is detected depends on the Restart server on commit option.
-
Restart server on commit is not selected: All changes must be applied manually. If there is a new commit detected, you are notified in the Admin Center.
To apply the change, in the Admin Center > Server Health Status, select Restart server. If there are any running jobs when this occurs, these jobs are stopped. To prevent this from happening, make sure to restart the server only after all jobs are completed.
-
Restart server on commit is selected: All changes are automatically applied once they are detected.
If a new commit does not affect configuration files but only workflows, schedules, or data files, the services are reloaded instead of restarting the whole server. This does not interfere with any running jobs.
However, if a change concerns configuration files, the server has to be fully restarted. In this case, any jobs in progress are stopped and the server might be unavailable for a brief time.
Activating and deactivating schedulers and notification handlers from the Admin Center takes priority even after a configuration update in the Git repository.
For example, if you enable a scheduler in your configuration repository but deactivate it from the Admin Center, the scheduler will remain deactivated despite any updates in the configuration repository.
To apply the updated configuration to schedulers and notification handlers, you have to manually restart the server (Admin Center > Server Health Status)
Orchestration server configuration
In the context of Ataccama Cloud, the Orchestration Server configuration is structured as follows:
-
runtimefolder contains the following two files:-
server.runtimeConfig: Used to define runtime configuration. -
server.serverConfig: Used to define additional configuration of server components.
-
-
Filesfolder contains files and resources necessary to run certain components, such as workflows, schedulers, and notification handlers.
File access
For security purposes, cloud environments restrict file system access to your Git repository only.
When creating workflows, plans, or other configuration files, ensure all file paths reference files within your repository structure (for example, Files folder).
|
Default connection to Ataccama ONE Platform
Your Orchestration Server comes with a predefined connection to Ataccama ONE Platform, allowing you to access ONE Platform data immediately without defining additional data source connections.
The connection name is OnePlatform.
The connection uses the dedicated orchestration user with the MMM_read-only Keycloak role assigned.
This role provides read-only access to data in your environment.
For write operations, assign an additional role such as MMM_user to the orchestration user.
server.runtimeConfig
The server.runtimeConfig XML file is structured as follows:
<runtimeconfig>
    <dataSources/>
    <databaseDrivers/>
    <parallelismLevel>1</parallelismLevel>
</runtimeconfig>
You can use it to define data source connections. For a list of supported data sources, see the Supported data sources table.
<runtimeconfig>
    <dataSources>
        <dataSource
                password="password"
                name="database-name"
                driverName="postgresql"
                user="user"
                url="jdbc:postgresql://<DB_URL>/postgres">
            <properties>
                <property name="connectTimeout" value="0" />
            </properties>
            <propertiesEncrypted/>
            <propertiesFile/>
            <propertiesFileEncrypted/>
        </dataSource>
    </dataSources>
    <databaseDrivers/>
    <parallelismLevel>1</parallelismLevel>
</runtimeconfig>
Additionally, the databaseDrivers property lets you define data source connection including database drivers.
For more information about database drivers, see Database drivers.
The parallelismLevel property defines the initial number of threads with which a step is started.
The default value is 1.
We recommend not exceeding the number of CPUs in the system when defining this value, see Parallelism level.
server.serverConfig
The server.serverConfig XML file accepts the same definitions that you would use for a locally run Runtime Server.
For information about specific components, see Server Components.
However, some limitations apply:
-
The Online Services component cannot be used with Ataccama Cloud.
-
HTTP Dispatcher component: Ataccama Cloud environments come with a single predefined HTTP listener. If you define additional HTTP listeners in
server.serverConfig, their configuration is merged and applied to the predefined HTTP listener.
Files
The Files folder contains any other configuration plans and associated plans.
The data is organized into folders, as defined in their respective configuration files in server.serverConfig.
For example, Files can hold folders such as:
-
workflows: Workflow files and any associated plans. See Workflow and Scheduler. -
schedulers: Scheduler files and any associated plans. See Workflow and Scheduler. -
notificationHandlers: Notification handler files and any associated plans. See Notifications Handler.
Edit and configure these files as needed, depending on which services and resources you want to set up.
Supported data sources
The following table is a list of JDBC data sources currently supported in Ataccama Cloud environments.
When specifying a new connection, the driver name (driverName) is required and must match the values provided in the following table.
|
You can only use the drivers that you selected when creating your environment in the Cloud Portal (Applications > Data Quality and Governance > Drivers). The following drivers are not available in the current version: Cloudera, Databricks, Derby Network Server, SAP RFC. |
| Data source | Driver name | Enabled by default | Data source | Driver name | Enabled by default |
|---|---|---|---|---|---|
PostgreSQL |
|
Yes |
MySQL |
|
No |
Amazon Aurora PostgreSQL |
|
Yes |
Amazon Aurora MySQL |
|
No |
Oracle |
|
Yes |
Informix |
|
No |
MSSQL |
|
Yes |
SAP HANA |
|
No |
MSSQL (NOLOCK) |
|
Yes |
Salesforce |
|
No |
Azure Synapse Analytics |
|
Yes |
Dremio |
|
No |
MariaDB |
|
Yes |
Redis |
|
No |
Teradata |
|
Yes |
SQLite |
|
No |
MSSQL (jTDS) |
|
Yes |
Airtable |
|
No |
Sybase |
|
Yes |
Cosmos DB |
|
No |
Amazon Redshift |
|
Yes |
Mongo DB |
|
No |
Azure Data Explorer |
|
Yes |
Sybase Native |
|
No |
Fabric Lakehouse SQL Endpoint |
|
Yes |
JSON CData |
|
No |
Big Query |
|
Yes |
Snowflake |
|
Yes |
Derby |
|
Yes |
JDBC driver name casing
The Orchestration Server uses lowercase JDBC driver names (for example, oracle, aurora-postgresql, bq), whereas the Data Processing Engine (DPE) uses the same drivers in uppercase.
To make the Orchestration Server use uppercase driver names too, contact Ataccama Support and request that the following Helm value be set:
runtimeServer.runtimeServerConfig.capitalizeJdbcDriversName: trueWas this page useful?