
Spring Security Configuration
In order to enable Spring Security for the ONE Runtime Server Admin, you need to prepare an XML file containing the authentication parameters and configure ONE Runtime Server to use that configuration.
Define the Spring Security XML configuration file
|
This applies from:
|
-
Create a new XML file in
<ATACCAMA_HOME>/runtime/server/etc. For the purpose of this tutorial, the new file name isnew-spring-security.xml. -
Copy the following contents to the file:
new-spring-security.xml<?xml version="1.0" encoding="UTF-8"?> <beans:beans xmlns="http://www.springframework.org/schema/security" xmlns:beans="http://www.springframework.org/schema/beans" xmlns:xsi="http://www.w3.org/2001/XMLSchema-instance" xmlns:context="http://www.springframework.org/schema/context" xsi:schemaLocation="http://www.springframework.org/schema/beans http://www.springframework.org/schema/beans/spring-beans.xsd http://www.springframework.org/schema/security http://www.springframework.org/schema/security/spring-security.xsd http://www.springframework.org/schema/context http://www.springframework.org/schema/context/spring-context.xsd"> <http authentication-manager-ref="simpleAuthManager" use-expressions="true"> <intercept-url pattern="/console/licenses/" access="hasRole('ROLE_ADMIN')"/> <intercept-url pattern="/**" access="isAuthenticated()"/> <form-login default-target-url="/console/welcome/" always-use-default-target="true"/> <logout logout-url="/**/logout" logout-success-url="/" invalidate-session="true" delete-cookies="JSESSIONID" /> <csrf disabled="true"/> </http> <authentication-manager id="simpleAuthManager"> <authentication-provider> <user-service> <user name="admin" password="${admin.password}" authorities="ROLE_USER, ROLE_ADMIN"/> <user name="test" password="test" authorities="ROLE_USER"/> </user-service> <password-encoder ref="passwordEncoder"/> </authentication-provider> </authentication-manager> <beans:bean class="com.ataccama.dqc.web.spring.support.EncryptablePropertySourcesPlaceholderConfigurer"> <beans:property name="locations" value="./users.properties"/> </beans:bean> <beans:bean id="passwordEncoder" class="org.springframework.security.crypto.password.NoOpPasswordEncoder" factory-method="getInstance"/> <beans:bean id="mvcHandlerMappingIntrospector" class="org.springframework.web.servlet.handler.HandlerMappingIntrospector"/> </beans:beans>Alternatively, you can use the following file as a template:
<ATACCAMA_HOME>/runtime/server/etc/spring-security.xml. In that case, you need to configure thehttpelement as well. -
Edit the
user-serviceelement as needed to add or remove users and change their passwords or permissions. -
Edit the
users.propertiesfile to change the admin user password (the initial value isadmin). By default, the file contains the following:users.propertiesadmin.password=crypted:DES:NsuAku14ipInv4Z7FZAFKRjAVIxjqxmTpX8HwSTGUlE=
Set up the server configuration
| If you choose to edit an existing server configuration instead of creating a new one, carefully review your configuration before proceeding with steps 7-9 in order to avoid removing any necessary settings or components. |
-
Launch ONE Desktop.
-
Navigate to your project.
-
Right-click the project name and select New > Server Configuration.

-
Change the name of the server configuration and select Finish. For the purpose of this tutorial, the server configuration name is
springSecurity.serverConfig.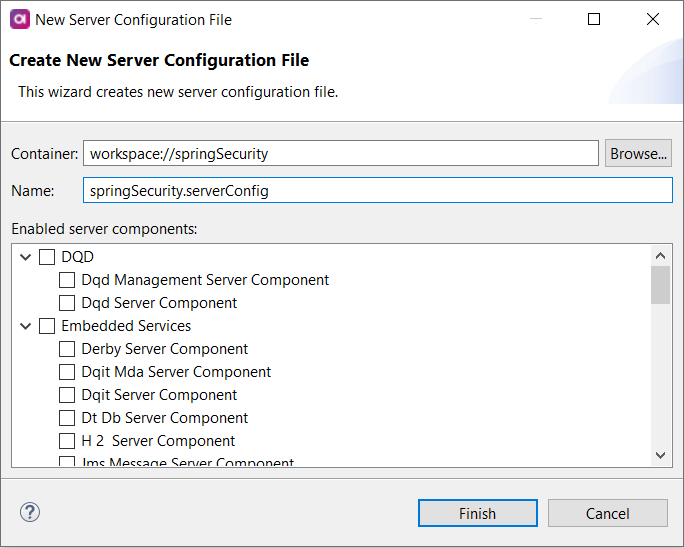
-
In the navigation tree of the server configuration, locate the first Listener Bean and check its port number. It should match the port number of your ONE Runtime Server Admin, typically
8888.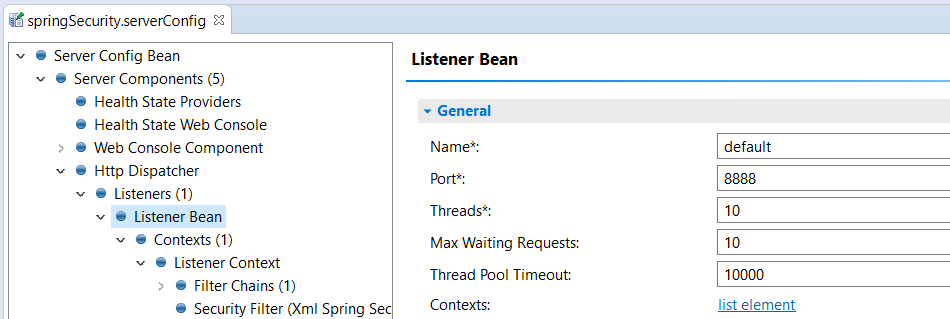
-
In the Listener Bean with the port number
8888, navigate to the Contexts > Listener Context > Security Filter node and configure it:-
In Implementation, select Xml Spring Security.
-
In Config File, select Browse and find the XML file containing Spring Security configuration. If you used the values provided in this tutorial, the file
new-spring-security.xmlis located in<ATACCAMA_HOME>/runtime/server/etc.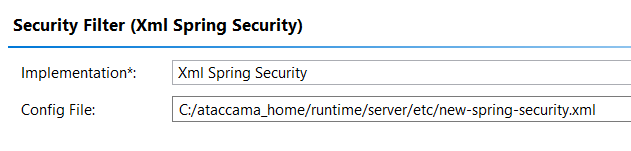
-
-
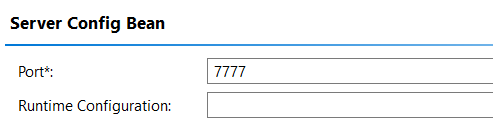
Go to Server Config Bean and clear Runtime Configuration as the field is optional.
-
Remove the following nodes from the Server Config Bean element:
-
The two remaining Listener Beans. A new server configuration has three Listener Beans; you need to keep only the one that you configured in step 6.
-
Workflow Server Component.
To delete these nodes, right-click the name of the node and select Delete.
-
-
Next, from Server Config Bean, navigate to the Server Components > Http Dispatcher > Servlet Filters > Logging Filter node and remove the path from Log File. The new value should be only
request.log.Alternatively, you can change where the file
request.logis stored by selecting another folder or creating the folder../logs.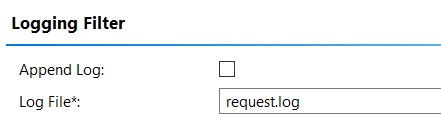
-
To run the server, select Run or press Ctrl+F11. This is the expected outcome in the console:
2020-08-20 14:57:20 [INFO] Starting server on localhost 2020-08-20 14:57:20 [INFO] Using following licenses: 2020-08-20 14:57:20 [INFO] C:\Users\user\emp_user_12.plf 2020-08-20 14:57:21 [WARN] No runtime configuration file is specified 2020-08-20 14:57:21 [INFO] Starting 'HttpDispatcher' 2020-08-20 14:57:21 [INFO] Starting 'HealthStateProviders' 2020-08-20 14:57:21 [INFO] Starting 'WebConsoleComponent' 2020-08-20 14:57:21 [INFO] Starting 'HealthStateWebConsole' 2020-08-20 14:57:21 [INFO] Starting 'ManagementService' 2020-08-20 14:57:21 [INFO] Starting 'OnlineServicesComponent' 2020-08-20 14:57:21 [INFO] [OnlineServicesComponent] serviceLookupFolder '../services' did not exist, new created 2020-08-20 14:57:21 [INFO] / Initializing Spring root WebApplicationContext 2020-08-20 14:57:22 [INFO] [HttpDispatcher][default] Listening for HTTP requests on port 8888 2020-08-20 14:57:22 [INFO] Server startup complete. 2020-08-20 14:57:32 [INFO] [HttpDispatcher][accessLog] [1] 0:0:0:0:0:0:0:1 Request-response time: 00:00.052, status: 401 - / - host:localhost:8888 -
Finally, open a browser and go to
localhost:8888. To sign in, provide your credentials.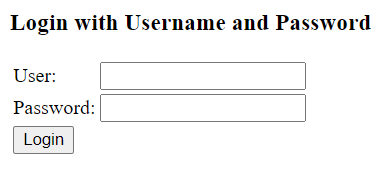
Was this page useful?