
Configuring Workflows and Permissions
Workflows in MDM Web App are a means to move changes made to records between logical states to ensure the four-eye principle or other approval mechanisms.
Changes to records are stored inside tasks. A task can contain changes to multiple records, which can then be published all at once.
There are two strategies you can employ when working with workflows in MDM Web App:
-
Use the default built-in workflow and permission scheme.
-
Configure one or several custom workflows and a custom permission scheme.
| Custom permission schemes must be configured with custom workflows. It is not possible to use a custom permission scheme with the default built-in workflow. |
Default master data workflow and permissions
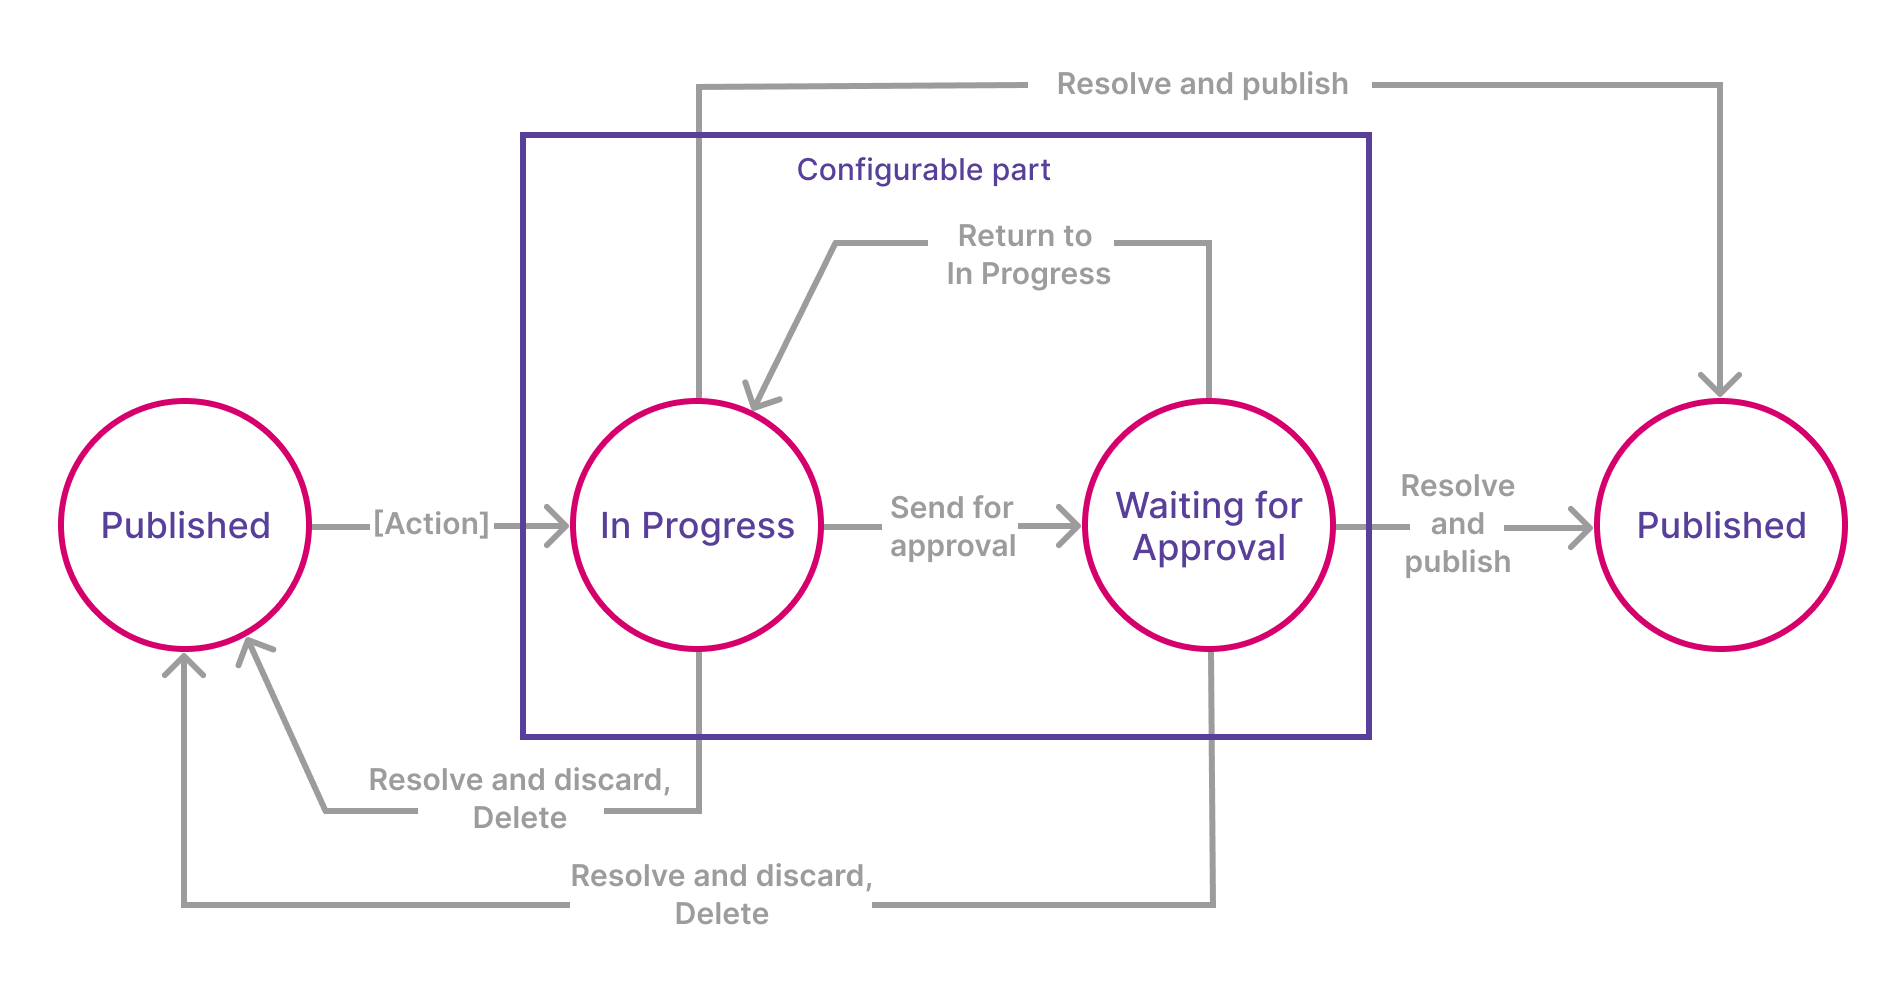
The following diagram represents the default workflow (consolidation workflow) for editing data in the Consolidation hub. The circles represent statuses between which users move drafts in MDM Web App while the arrows represent transitions (the ability to move drafts between specific statuses).
Default master data roles and permissions
The following table summarizes the default permission scheme.
To change the default role-to-permission assignments, see Assigning roles to default permission types.
| Permission type | Consolidation permissions | Role assigned by default |
|---|---|---|
Viewer |
Can browse all entities but cannot perform any actions. |
|
User |
Can perform all actions on records and workflow transitions from the Published and In Progress state. Cannot perform the Publish transition from the In Progress state. |
|
Admin |
Can perform all actions on records and workflow transitions from all states. |
|
Enabling the default workflow
To enable the default workflow and, if necessary, customize the labels of statuses and transitions:
-
Open the MDM Engine project in ONE Desktop.
-
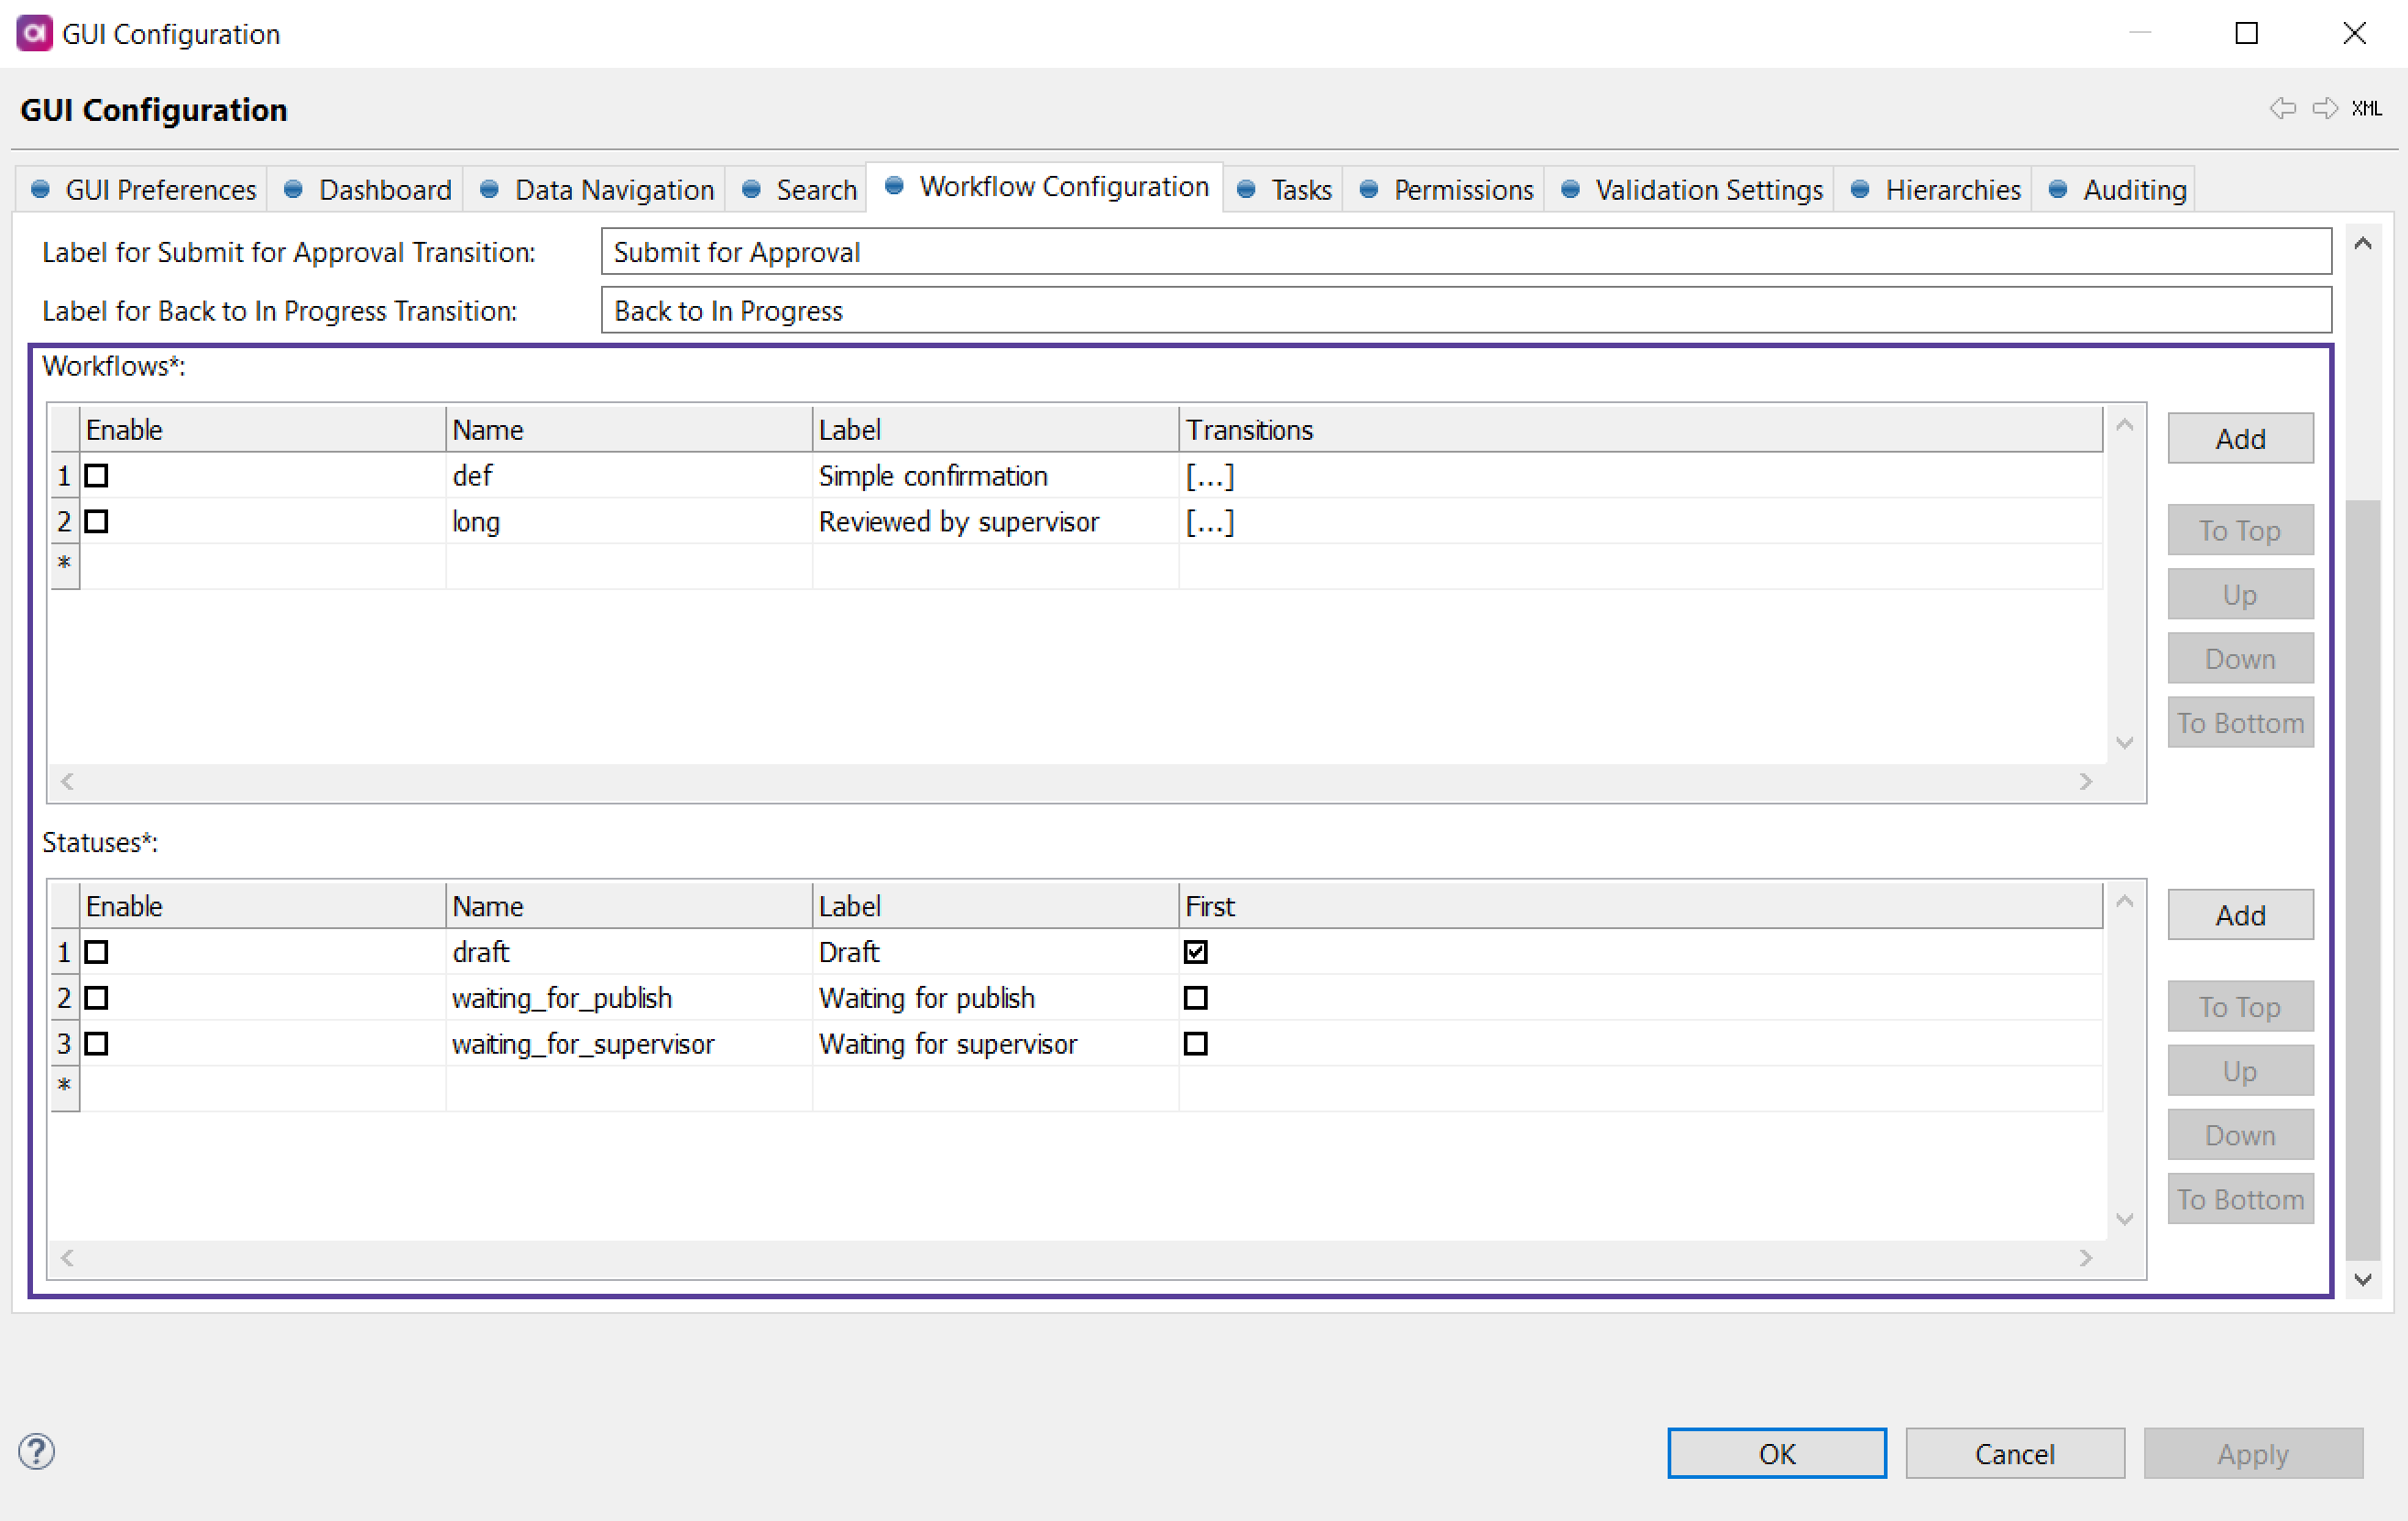
Double-click the GUI Configuration project node. Select Workflow Configuration tab.
All the settings pertaining to the default workflow are under Default Workflow Settings.
-
Check Enable Default Consolidation WF.
-
Customize the labels for the steps and transitions as needed.
-
Right-click GUI Configuration and select Generate. Now the
mda-workflow.gen.xmlfile has been updated with the new configuration, and you can deploy it to the application server running the MDM Engine.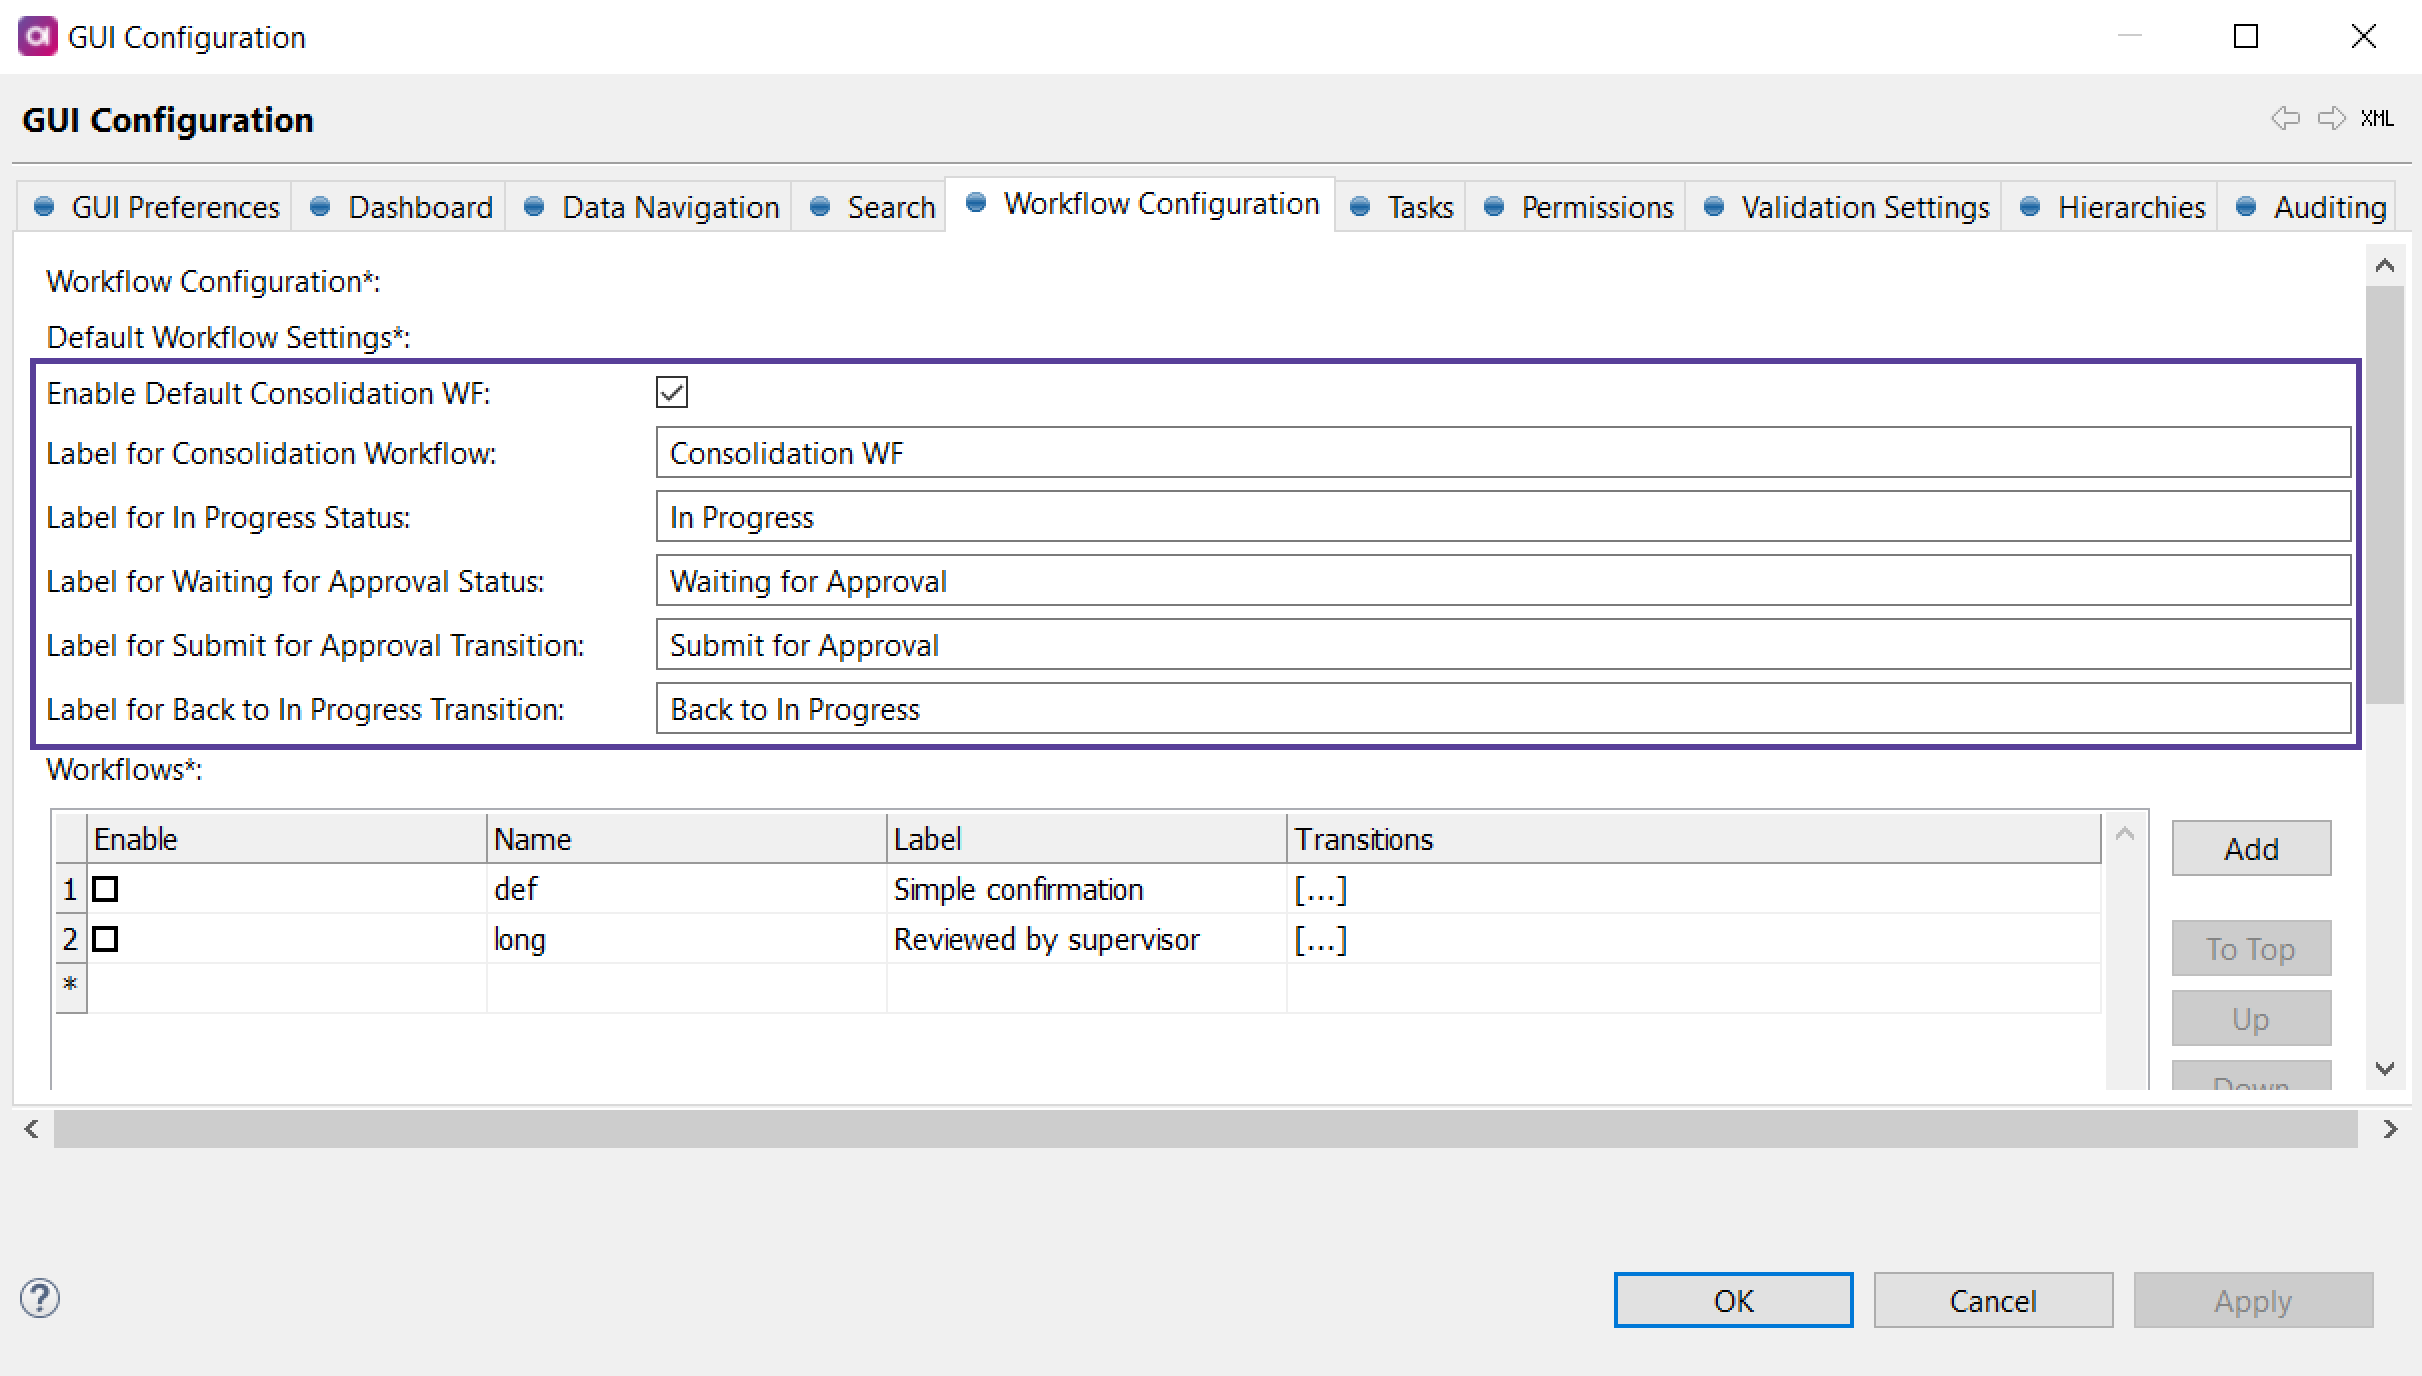
Assigning roles to default permission types
-
Open the MDM Engine project in ONE Desktop.
-
Open Files > etc > mda-permissions.gen.xml.
-
Make sure that only the
MdaDefaultPermissionsProvidersecurity provider is enabled and all others are commented out. -
Under each permission type, list the roles that should have these permissions.
In the following configuration, users with role
MDM_viewerhave Viewer permissions, those with roleMDM_userhave User permissions, and those with roleMDM_adminhave Admin permissions.mda-permissons.gen.xml<permissions> ... <securityProviders> <securityProvider class="com.ataccama.mda.core.config.security.MdaDefaultPermissionsProvider"> <roles> <viewRoles> <role name="MDM_viewer"/> </viewRoles> <userRoles> <role name="MDM_user"/> </userRoles> <adminRoles> <role name="MDM_admin"/> </adminRoles> </roles> </securityProvider> </securityProviders> ... </permissions> -
Deploy the updated file to the application server running the MDM Engine.
Configuring permissions
-
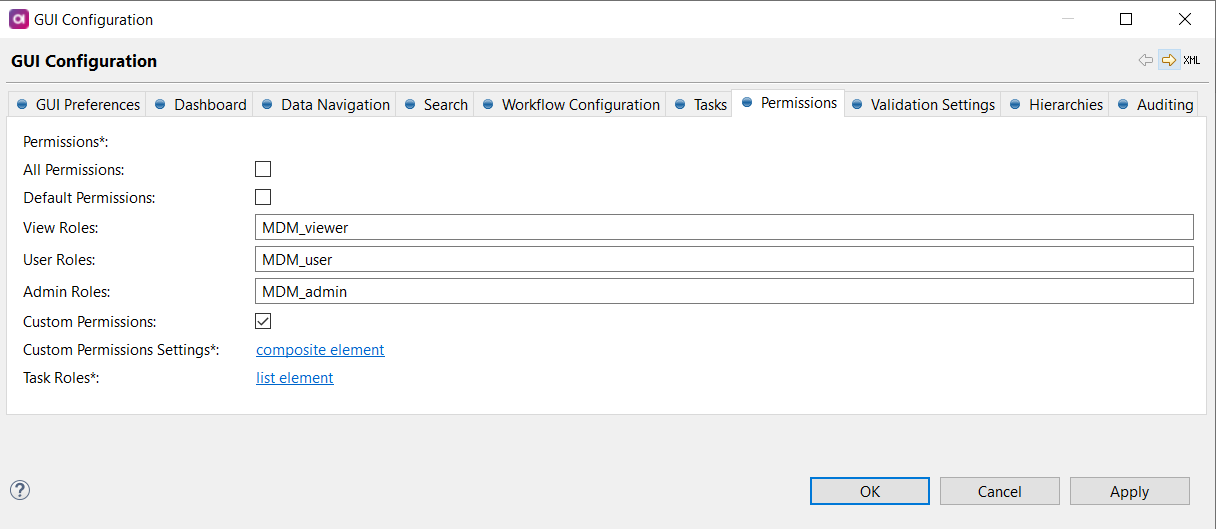
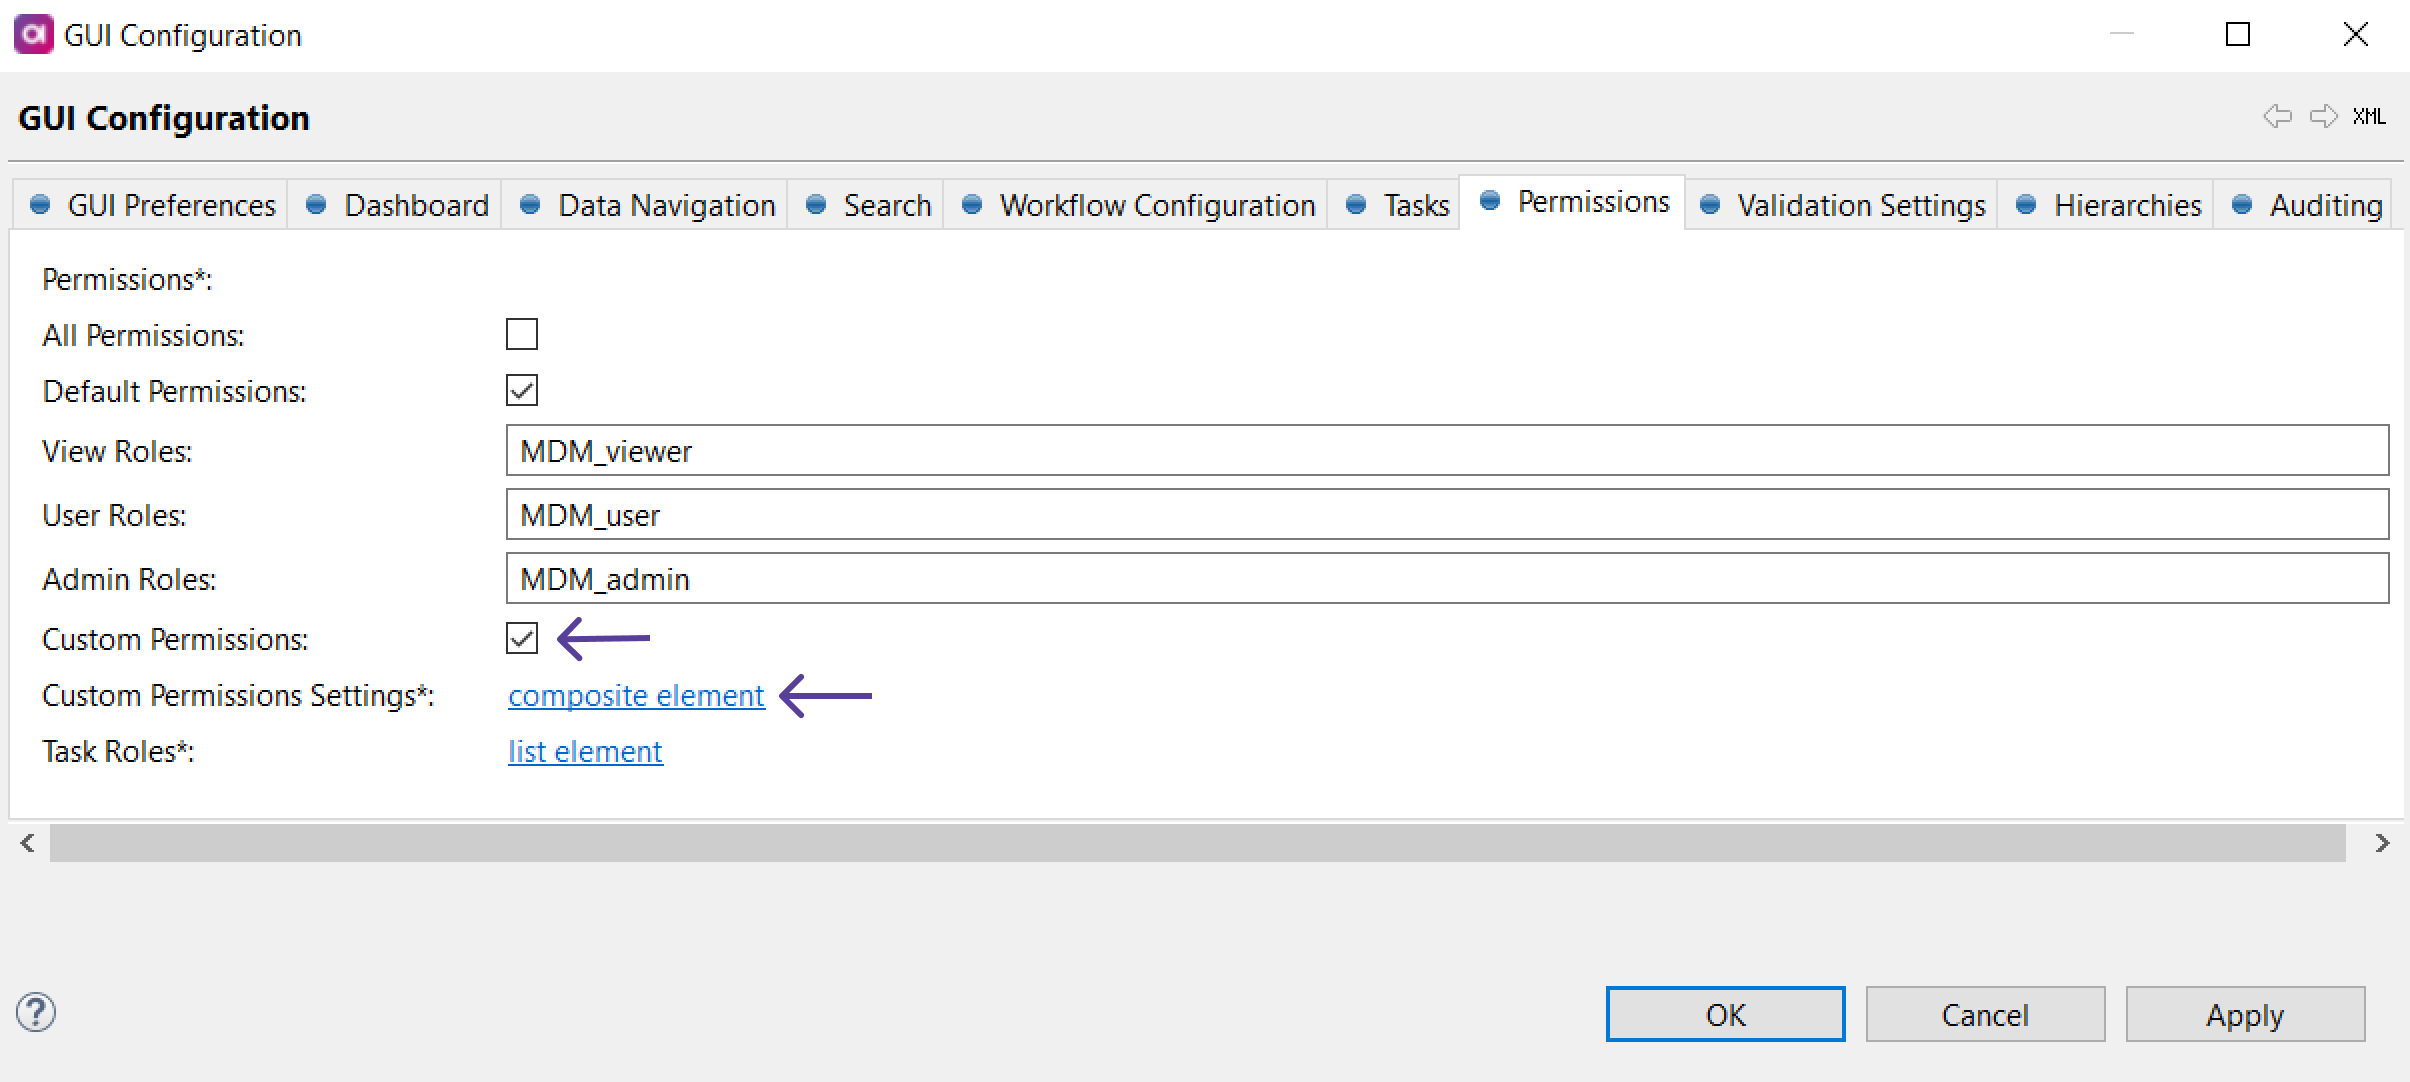
Double-click GUI Configuration and navigate to the Permissions tab. The following screen appears:
-
Specify the following:
-
All Permissions: Grants permission for all entities and columns, including all actions.
Use for development mode only. -
Default Permissions:
-
View Roles: Users with this role can see entities, workflows, and create tasks.
-
User Roles: Users with this role have all the View role permissions, plus the ability to edit records, create, discard, and delete tasks, and export data.
-
Admin Roles: Users with this role have all the User roles permissions plus the ability to publish tasks.
-
-
Custom Permissions: Use if you need to configure custom permissions. See Configuring a custom permission scheme.
-
Task Roles: Roles listed here are users to whom tasks can be assigned, as shown in the following example:
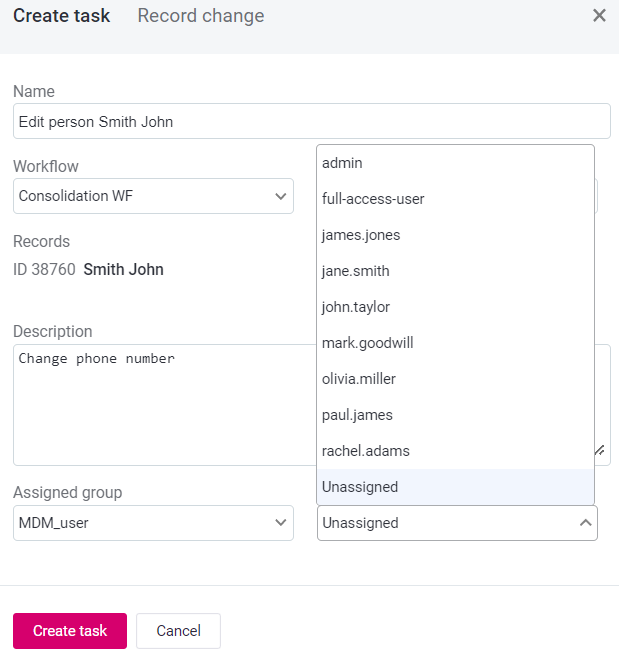
-
Configuring custom workflows
Configuring workflows consists of defining statuses and transitions between them.
When defining several workflows, it is possible to reuse statuses. However, one status is always shared - the status that starts the workflow.
Defining several workflows means that users will be able to choose the workflow when performing an action in MDM Web App.
To define a workflow:
-
Open the MDM Engine project in ONE Desktop.
-
Double-click the GUI Configuration project node. Select Workflow Configuration tab.
-
Under Statuses:
-
Define the statuses that the workflow will contain.
-
Make sure to select Enable for all of them.
-
Mark one of the statuses as First. This is the status with which the workflow starts.
-
-
Under Workflows:
-
Add a workflow Name and Label.
-
Make sure to select Enable.
-
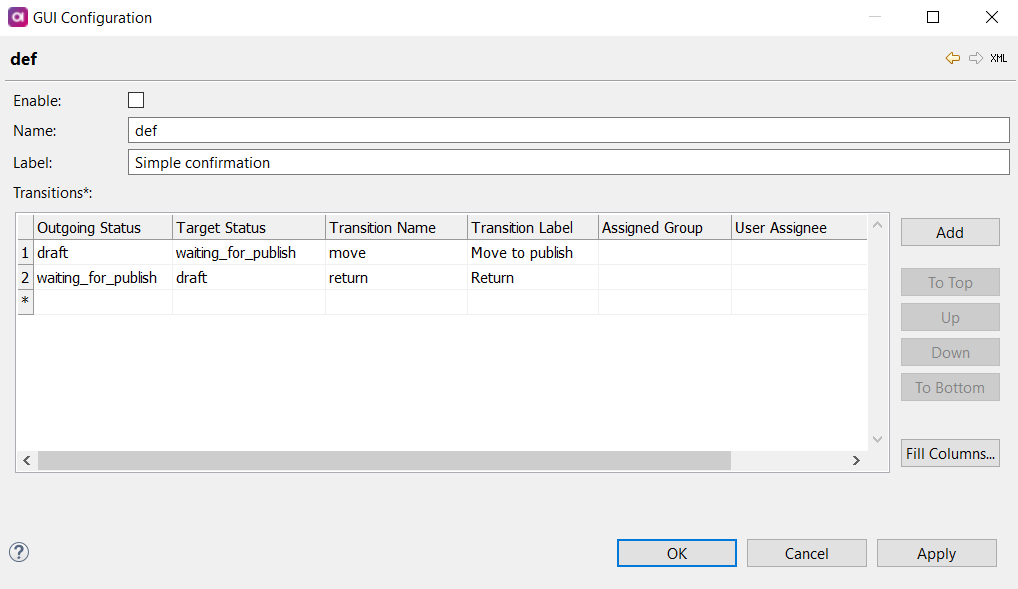
Open the row detail and define all necessary Transitions between statuses.
Assigned Group and User Assignee are a group of people or one person to which the task is automatically assigned for a specific transition.
-
-
Right-click GUI Configuration and select Generate. Now the
mda-workflow.gen.xmlfile has been updated with the new configuration, and you can deploy it to the application server running the MDM Engine.
|
Prior to deploying a workflow change, we recommended processing all existing tasks (that is, either publishing or deleting all pending records). Otherwise, the workflow change might prevent MDM from starting after deployment. In such cases, the MDM hub reports an error such as: |
Configuring a custom permission scheme
-
Open the MDM Engine project in ONE Desktop.
-
Double-click GUI Configuration and navigate to the Permissions tab. First, clear the Default Permissions option.
It is possible to use both default and custom permissions, but if a role defined in the following steps in Custom Permissions has the same name as a Default Permissions role, it will be automatically overridden. -
Select Custom Permissions and open Custom Permissions Settings by selecting the composite element link.
-
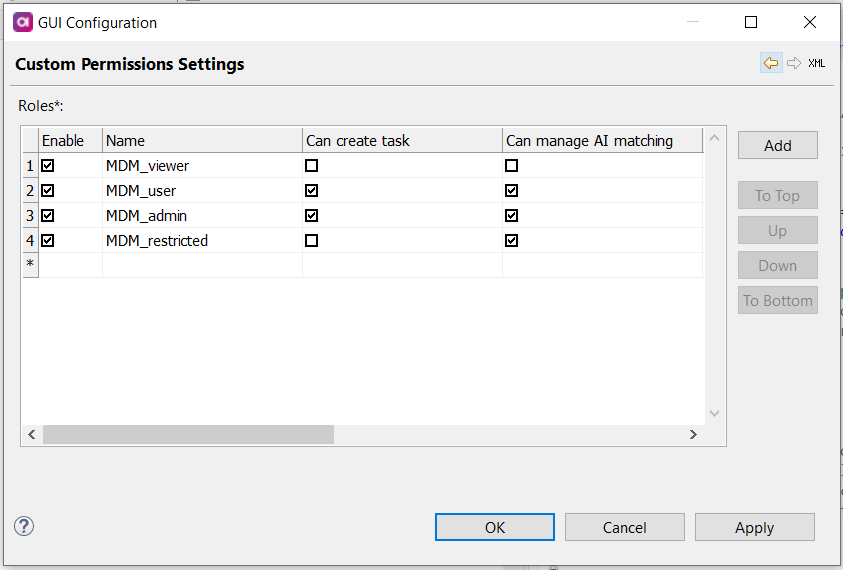
On the Roles screen that opens, select Add. Double-click the number next to the newly added role to define permission settings.
-
On the Role screen, define the following:

-
Name: Name of the role.
-
Description (optional): Description of the role.
-
Can create task: Specifies if the role can create tasks.
Users with any form of modification permissions (edit, create, update, delete) can implicitly create tasks to perform necessary data changes. There are no visibility restrictions on tasks based on Assignee or Assignee group settings. All roles can view tasks even if they do not have edit permissions or are not assigned to the task. Currently, tasks are also visible to users who do not have view permissions. This issue will be resolved in later versions. Task deletion permission is configured in the Workflow section, see Workflows.
-
Can manage automated task (only for admin role): Specifies if the role can manage automatic tasks.
Users with automated task creation permissions must also have view permissions for all entities and columns that are used in the automatic tasks they created. Otherwise, these users cannot view the task detail. -
Can manage AI matching: Specifies if the role can manage AI matching.
Users that train AI or review training must have full view permissions on the training entity both for columns and rows. The absence of column permissions can cause inadequate matching decisions, and the absence of row permissions can result in error. -
Workflows: Workflow permissions. Includes permissions for Steps and Transitions.
-
Instance layer: Instance layer permissions by entity. Includes Row permissions, Columns, and Steps.
-
Master layer: Master layer permissions by entity. Includes Row permissions, Columns, and Steps.
-
Datasets: Dataset permissions by entity. Includes Row permissions, Columns, and Steps.
-
Matching proposal layer: Matching proposal permissions by entity. Includes view and reject permissions.
Select Enabled to enable every permission possible for the corresponding role. Use Fill Columns to quickly populate the Columns section with all available names.
-
-
Once you have filled all the necessary details, generate the project to save them. Right-click on GUI Configuration and select Generate.
-
Finally, in Keycloak, assign the newly created roles to Users as required.
|
Starting from version 14.5.1, you can define multiple roles for each role type. 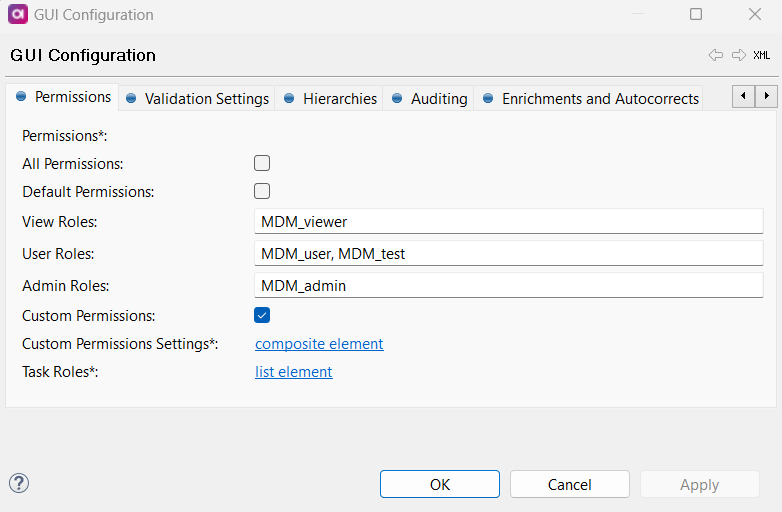
|
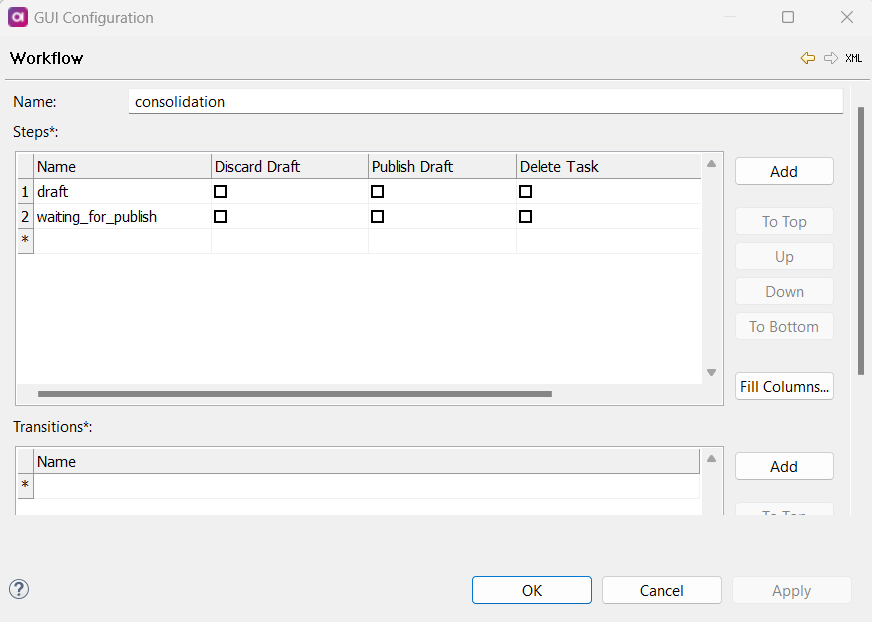
Workflows
-
Name: Name of the workflow.
-
Steps: If a role contains a workflow step, the role can view tasks in this state. If the option is selected for that workflow step, the role can perform these actions on tasks in this step.
For example, if Publish Draft is selected for that workflow step, the role can publish drafts in this state.
-
Discard Draft: If enabled, the role can discard the entire draft, including all changes made within it. This action cannot be reverted. -
Publish Draft: If enabled, the role can publish the entire draft, including all changes made within it, making the proposed changes visible to other users and consuming systems. -
Delete Task: If enabled, the role can delete a task within a specified workflow step.
-
For more information about workflows, publishing, discarding, and deleting tasks, see Publishing Workflow and Resolving Tasks.
| Currently, the role with only View and Publish Draft or Discard Draft permissions cannot see the Preview and Preview changes options in the Draft detail. |
-
Transitions: If a role contains a workflow transition, the role can execute this transition (move tasks to another state).
Instance layer
Select View Permission for All Entities to allow this role to view all entities on the instance layer (no other actions are allowed).
To define permissions for specific entities, Add an entity, and double-click the number next to the added entity.
The following screen appears:
Define the following:
-
Name: Name of the instance layer entity.
-
Export (Boolean): If enabled, the role can export items in the instance layer entity.
-
Row Permissions: Row permissions are defined using SQL
WHEREconditions (supported operators and syntax depend on the database).If an entity contains a row permission, the role can only view what is defined in the permission. If a role does not contain a row permission, it can see all rows.
If a user has more than one role, they have the row permissions of all assigned roles.
-
Data Override Permissions All Columns (Boolean): If enabled, data override permissions are applied to all columns in that instance layer entity for this role.
-
View Permissions for All Columns (Boolean): If enabled, view-only permissions are applied to all columns in that instance layer entity for this role.
-
Columns: Define data override permissions on a column by column basis, for the specified instance layer entity for the specified role.
-
Name: The name of the column. -
Data Override: If enabled, the role can override data on this column on this instance layer entity.
-
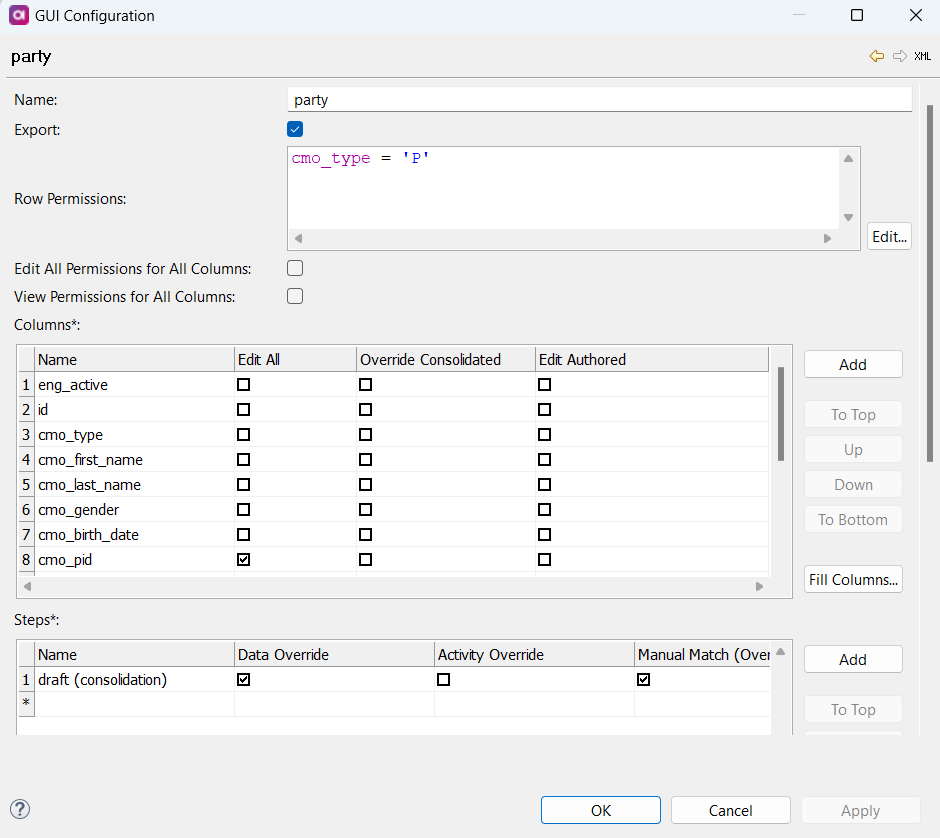
Master layer
To define permissions for specific master layers, Add a master layer, and double-click the number next to the added layer.
The following screen appears:
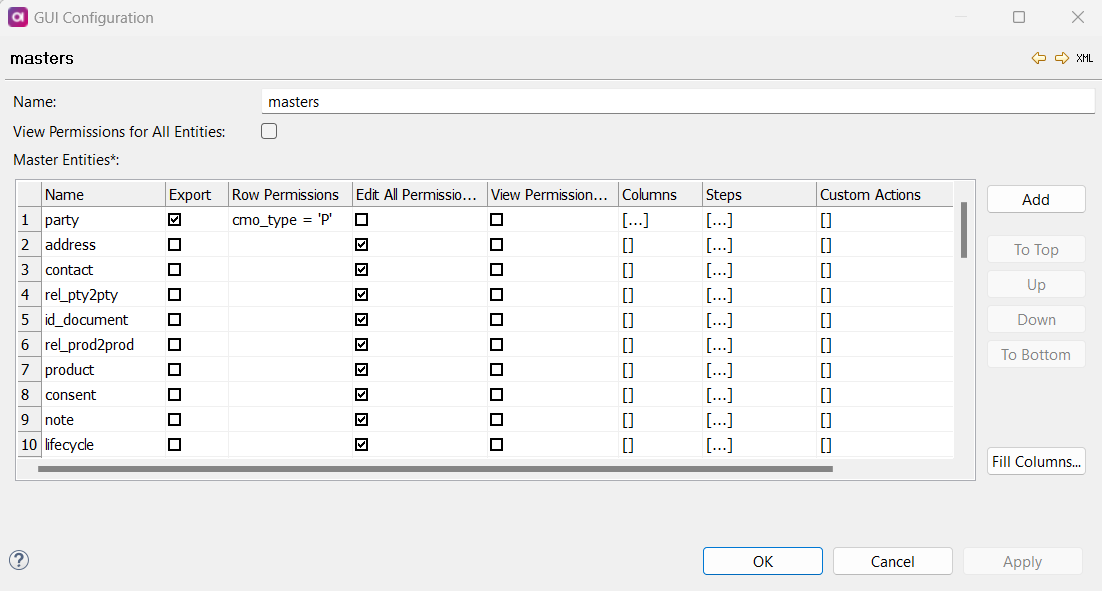
Define the following:
-
Name: Name of the master layer.
-
View Permissions for All Entities: If enabled, the role can view all entities on the master layer (no other actions are allowed).
-
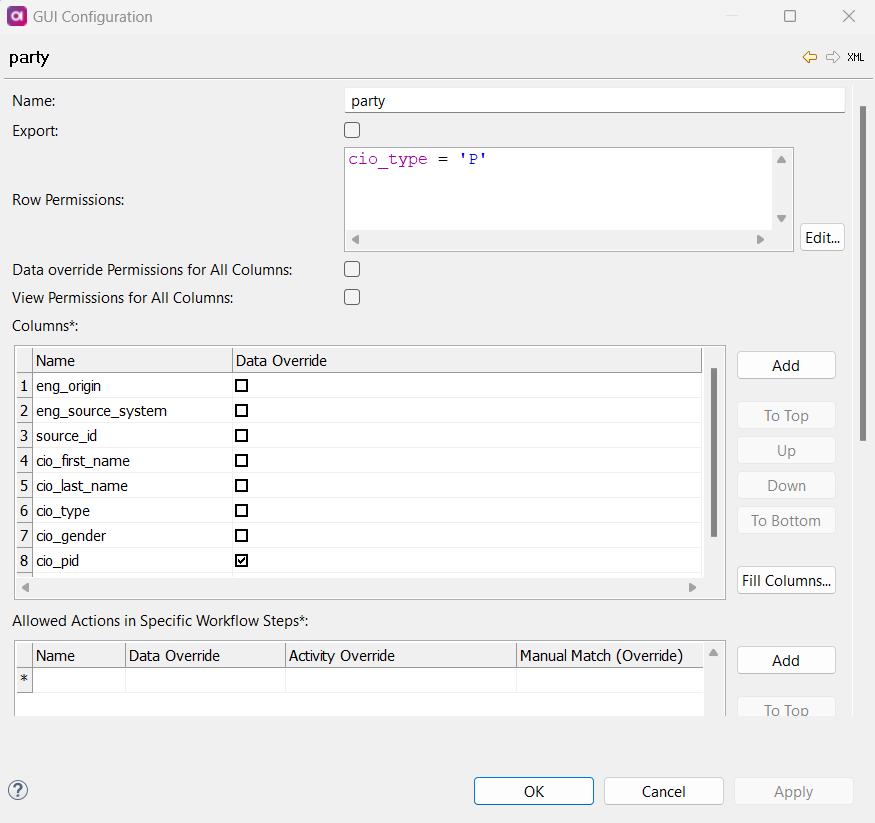
Master Entities: To add permissions on an entity by entity basis, select Add and double-click the number next to the added entity. The following screen appears:
Define the following:
-
Name: Name of the master layer entity.
-
Export (Boolean): If enabled, the role can export items on this layer.
-
Row Permissions: Row permissions are defined using SQL
WHEREconditions (supported operators and syntax depend on the database).If an entity contains a row permission, the role can only view what is defined in the permission. If a role does not contain a row permission, it can see all rows.
If a user has more than one role, they will have the row permissions of all assigned roles.
-
Edit All Permissions for All Columns: If enabled, the role has Edit All permissions for all columns of the specified entity.
-
View Permission for All Columns: If enabled, the role can view all columns of the specified entity (no other actions are allowed).
-
Columns: If a column is listed, the role has view permissions by default. Other options grant editing permissions on the specified column. The role must have permissions for a specific action (Edit All, Override Consolidated, Edit Authored); otherwise, the column cannot be edited.
-
Edit All: If enabled, the role can override consolidation records and edit authored records in Mixed style. Individual Override Consolidation and Edit Authored settings are not required. -
Override Consolidated: If enabled, the role can override consolidated records in the specified column. -
Edit Authored: If enabled, the role can edit authored records in Mixed style in the specified column.
-
|
Make sure that all related entities have the appropriate foreign key columns defined. If an entity does not have the foreign key column linking it to the parent entity, the related entity will not be displayed in the parent entity record details. For example, if you define both party and address entities in a permission role, but the address entity does not have a foreign key column that references the party entity, the address entity will not be visible in the party record details. |
-
Steps: Define permissions on a step by step basis, for that master layer entity for that role. Different actions are available depending on whether records are authored or consolidated.
-
For consolidated records,
Override,Activity Override, andManual Match (Override)are available.-
Override: If enabled, the role can perform data override actions (see Editing Values) in the specified workflow step. -
Activity Override: If enabled, the role can override the activity status of the record: set as active or inactive and remove activity overrides (see Activating and Deactivating Records) in the specified workflow step. -
Manual Match (Override): If enabled, the role can perform manual match (merge/split) actions (see editing-master-data:merging-and-splitting-records.adoc[]) in the specified workflow step. .
-
-
For authored records,
Edit Authored,Create Authored, andDelete Authoredare available. If enabled, the role can execute these actions on items in this step master layer (see Editing Values) for items in this step on this master layer entity.-
Edit Authored: If enabled, the role can edit authored records on a master layer in the specified workflow step. Within this action, the role can edit only columns where Edit Authored or Edit All are allowed. -
Create Authored: If enabled, the role can create authored records on a master layer in the specified workflow step. Within this action, the role can populate only columns where Edit Authored or Edit All are allowed. -
Delete Authored: If enabled, the role can delete authored records on a master layer in the specified workflow step.
-
-
| If you add Create Authored permission on the entity, make sure to add Edit Authored or Edit All permissions to all foreign columns on this entity. Missing edit permissions on foreign columns can cause exceptions in case you wish to create this entity from the parent entity in MDM Web App. |
| Permissions set in the Columns field must match those defined in the Steps field for that role, otherwise an error is thrown. |
Datasets
Select View Permissions for All Datasets to allow this role to view all datasets (no other actions are allowed).
To define permissions for specific datasets, Add a dataset, and double-click the number next to the added dataset.
The following screen appears:
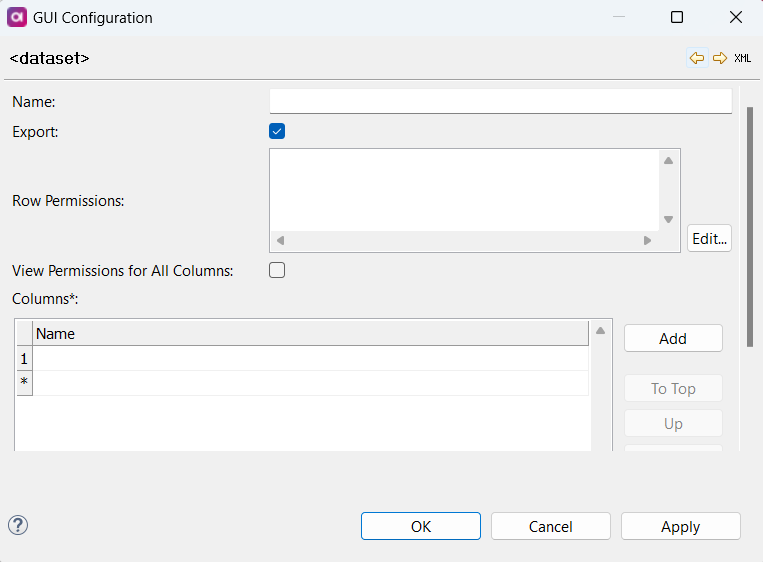
Define the following:
-
Name: Name of the dataset.
-
Export (Boolean): If enabled, the role can export items in this dataset.
-
Row Permissions: Row permissions are defined using SQL
WHEREconditions (supported operators and syntax depend on the database).If an entity contains a row permission, the role can only view what is defined in the permission. If a role does not contain a row permission, it can see all rows.
If a user has more than one role, they have the row permissions of all assigned roles.
-
View Permissions for All Columns: If enabled, the role can view all columns of the specified dataset (no other actions are allowed).
-
Columns: If a column is listed, the role has view permissions by default.
Permissions set in the Columns field must match those defined in the Steps field for that role, otherwise an error is thrown.
Matching proposal layer
On this level, you can define view and reject permissions for matching proposals for the role.
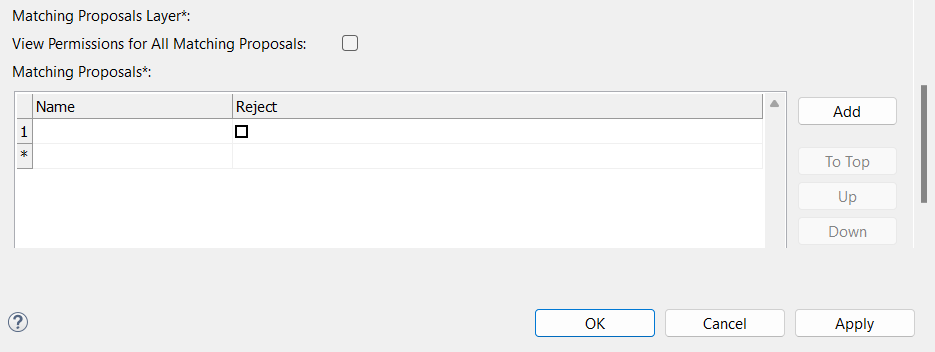
Select View Permissions for All Matching Proposals to allow this role to view all matching proposals (no other actions are allowed).
-
Matching proposals: To add entities, select Add and provide the following:
-
Name: Name of the matching proposal entity that the role can view.
-
Reject: If enabled, the role can reject matching proposals on the specified entity.
-
Alternatively, you can specify the entity name and reject rights by double-clicking the number of the row and filling in the table that opens.
Was this page useful?