
Security Configuration
The Configuration Service supports using a JSON Web Token to secure the communication between the configuration server and its clients. When using JWT, you can generate a JWT secret directly on the configuration server.
These tokens are later reused to authenticate communicating ONE modules.
However, if needed, it is also possible to generate JWT secrets without relying on the Configuration Service.
In that case, the connection between ONE modules is configured directly through the tokens provided in their local configuration files (<module>/etc/application.properties).
Enabling JWT authentication
Establishing a connection between the Configuration Service and ONE modules consists of generating a JWT secret for the given module in the Configuration Service and supplying the same token in the module’s local etc/application.properties file.
On the configuration server
-
In the Configuration Service, go to the Deployments tab and select the deployment that you want to work with.
If you are configuring a new deployment, JWT Authentication can be specified after providing basic information about the deployment (Deployments > Create).
-
Click Add JWT Secret.
-
In the dialog that appears, provide a name for the key, for example,
dpm-dev-key.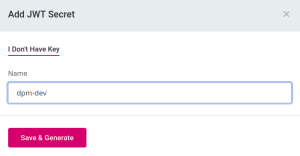
-
Click Save and Generate.
-
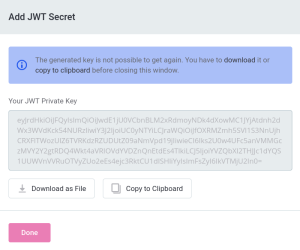
As the same key cannot be generated again, choose between the following actions:
-
Download as File. In this case, a JSON file containing the private key and the information about the deployment is downloaded to a location of your choice.
-
Copy to Clipboard. Make sure to paste and save the content to a suitable location for future reference.
-
-
Click Done.
The JWT Secret fingerprint is displayed along with the key name and the creation date.
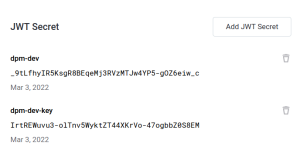
You can add multiple JWT keys.
To delete a key that you no longer want to use, click the Delete icon, and then confirm.
On the configuration client
-
Open
<module>/etc/application.properties. -
Configure the property
ataccama.authentication.internal.jwt.generator.key. The value should match the JWT key provided to the configuration server.application.propertiesataccama.authentication.internal.jwt.generator.key="JWTKey"The configuration file
etc/application.propertiesneeds to contain the following properties as well:-
ataccama.config-service.runtime -
ataccama.client.connection.configservice.host -
ataccama.client.connection.configservice.grpc.port
For more information, see configuring-the-configuration-service.adoc, section Configuration Service Client Configuration.
-
-
Save the changes.
Once the module is running, it should appear listed under Replicas when viewing deployment details in the Configuration Service.
Authenticating without the configuration service
When working with an automated deployment, you can generate JWT tokens without relying on the Configuration Service.
|
In this guide, we are using the open-source generator mkjwk to create the tokens. If you prefer to generate the tokens locally, the same tool is available as a command-line utility or a library. You can also choose any other generator provided that it uses the P256 elliptic curve for asymmetric encryption. The example shows how to establish communication between Data Processing Module (DPM) and Data Processing Engine (DPE) modules. The same procedure needs to repeated for any other pair of communicating modules:
For more information, refer to the corresponding Installation Guides. |
|
Prerequisite
Make sure that the communication with the Configuration Service is disabled for all modules that you want to configure this way. To do so, in the <module>/etc/application.properties configuration file, set the following property to off: |
-
To generate a token for DPM, do the following:
-
Go to mkjwk.org/.
-
Switch to the EC tab.
-
Provide the following arguments:
-
Curve: P-256
-
Key Use: Signature
-
Algorithm: ES256 (ECDSA using P-256 and SHA-256)
-
Key ID: SHA-256
-
Show X509: No
-
-
Select Generate.
-
Copy the generated Public and Private Keypair and save it to a dedicated text file.
Alternatively, you can keep the browser tab open until you are finished with step 3.
-
-
Supply the JWT key to DPM:
-
Open the file containing the Public and Private Keypair (generated in step 1).
Keep the file open as the information stored in it is reused in step 3. -
Copy the keypair and base64 encode it.
-
Open the
dpm/etc/application.propertiesconfiguration file. -
Configure the following property using the base64 encoded value for Public and Private Keypair (obtained in step 2b).
dpm/etc/application.propertiesataccama.authentication.internal.jwt.generator.key=<generated_key>
-
-
Provide the DPM deployment information to DPE:
-
Open the
dpe/etc/application.propertiesconfiguration file. -
Configure the following properties:
-
ataccama.one.platform.deployments.<deployment_name>.module: The module type, in this casedpm. -
ataccama.one.platform.deployments.<deployment_name>.environment: The name of the environment, for example,dev. -
ataccama.one.platform.deployments.<deployment_name>.security.jwt-keys.key.fingerprint: Copy the key identifier (kid) value from the file containing the Public and Private Keypair. -
ataccama.one.platform.deployments.<deployment_name>.security.jwt-keys.key.content: Copy the Public and Private Keypair from the file used in the previous step and removedanduseparameters. The value must use JSON syntax and be provided on a single line. -
ataccama.one.platform.deployments.<deployment_name>.security.jwt-keys.key.is-revoked: Set tofalse. -
ataccama.one.platform.deployments.<deployment_name>.security.roles[0]: The user role (as defined in Keycloak) used to create the service identity during authentication. Set toIMPERSONATION. This value is used for all modules except for AI Core, in which case it should be set toMMM_admin.Use one name per deployment and make sure that this name is consistent across all modules, for example,
dpm-dev. You can set the value of<deployment_name>to any string consisting of alphanumeric characters and dashes.dpe/etc/application.propertiesataccama.one.platform.deployments.dpm-dev.module=dpm ataccama.one.platform.deployments.dpm-dev.environment=dev ataccama.one.platform.deployments.dpm-dev.security.jwt-keys.key.fingerprint=vcjAli5Xm_pvtE8ItBkd3aT_FWi_23WieMf5f-lppBI ataccama.one.platform.deployments.dpm-dev.security.jwt-keys.key.content={kty":"EC",crv":"P-256","kid":"vcjAli5Xm_pvtE8ItBkd3aT_FWi_23WieMf5f-lppBI","x":"Hbs53V5zC-1DjNf5RtJ1bNHlxvzM5jST7J1ADVePV9g","y":"4pVfzrF7FMHt_Xx2FgLauvLZuJqbpL9crdOxvTXWb64","alg":"ES256"} ataccama.one.platform.deployments.dpm-dev.security.jwt-keys.key.is-revoked=false ataccama.one.platform.deployments.dpm-dev.security.roles[0]=IMPERSONATION
-
-
-
To generate a token for the DPE module, follow these steps:
-
Go to mkjwk.org/.
-
Switch to the EC tab.
-
Provide the following arguments:
-
Curve: P-256
-
Key Use: Signature
-
Algorithm: ES256 (ECDSA using P-256 and SHA-256)
-
Key ID: SHA-256
-
Show X509: No
-
-
Select Generate.
-
Copy the generated Public and Private Keypair and save it to a dedicated text file.
Alternatively, you can keep the browser tab open until you are finished with step 6.
-
-
Supply the JWT key to DPE:
-
Open the file containing the Public and Private Keypair (generated in step 4).
Keep the file open as the information stored in it is reused in step 6. -
Copy the keypair and base64 encode it.
-
Open the
dpe/etc/application.propertiesconfiguration file. -
Configure the following property using the base64 encoded value for Public and Private Keypair (obtained in step 5b).
dpe/etc/application.propertiesataccama.authentication.internal.jwt.generator.key=<generated_key>
-
-
Provide the DPE deployment information to DPM:
-
Open the
dpm/etc/application.propertiesconfiguration file. -
Configure the following properties:
-
ataccama.one.platform.deployments.<deployment_name>.module: The module type, in this casedpe. -
ataccama.one.platform.deployments.<deployment_name>.environment: The name of the environment, for example,dev. -
ataccama.one.platform.deployments.<deployment_name>.security.jwt-keys.key.fingerprint: Copy the key identifier (kid) value from the file containing the Public and Private Keypair. -
ataccama.one.platform.deployments.<deployment_name>.security.jwt-keys.key.content: Copy the Public and Private Keypair from the file used in the previous step and removedanduseparameters. The value must use JSON syntax and be provided on a single line. -
ataccama.one.platform.deployments.<deployment_name>.security.jwt-keys.key.is-revoked: Set tofalse. -
ataccama.one.platform.deployments.<deployment_name>.security.roles[0]: The user role (as defined in Keycloak) used to create the service identity during authentication. Set toIMPERSONATION. This value is used for all modules except for AI Core, in which case it should be set toMMM_admin.Use one name per deployment and make sure that this name is consistent across all modules, for example, dpe-dev. You can set the value of<deployment_name>to any string consisting of alphanumeric characters and dashes.dpm/etc/application.propertiesataccama.one.platform.deployments.dpe-dev.module=dpe ataccama.one.platform.deployments.dpe-dev.environment=dev ataccama.one.platform.deployments.dpe-dev.security.jwt-keys.key1.fingerprint=kHSzWkPiZKfSKAgdIkCdXfAAKs7x23jszQLkTOzQTEM ataccama.one.platform.deployments.dpe-dev.security.jwt-keys.key1.content={"kty":"EC","crv":"P-256","kid":"KBv0lrEO88ISAnmwXn6Y5jYjG9TvemuZA0yQlq7QpG0","x":"KsJKpmDA03Js3o8JWWiH5tyUfv80kaJy60_7BOrwmKo","y":"7kfcrUzl95MQEZnCjhWA0dIIhzK-jvdaAtGRAuBzZbk","alg":"ES256"} ataccama.one.platform.deployments.dpe-dev.security.jwt-keys.key1.is-revoked=false ataccama.one.platform.deployments.dpe-dev.security.roles[0]=IMPERSONATION
-
-
-
Start the modules in the following order: DPM, DPE. DPE is now able to register with DPM without the Configuration Service.
The following messages are shown in the DPM and DPE logs respectively:
dpm/log/spring-boot-logger.json.log
{"@timestamp":"2021-04-14T11:26:03.234+02:00","@version":"1","message":"eventId=registerEngine engineId=0031debd-6130-4b4a-8eaf-7a834555cf33, engine=EngineAddress(hostname=user-VirtualBox, port=8532), engineConstraints=(requirements: {} capabilities: { ... } priorities: []), message=New engine registered.","logger_name":"com.ataccama.dpm.registry.EngineRegistryServiceImpl","thread_name":"grpc-default-executor-0","severity":"INFO","level_value":20000,"authenticatedUser":"ServiceIdentity(module=dpe, id=dpe-dev, roles=[IMPERSONATION])","correlationId":"0031debd-6130-4b4a-8eaf-7a834555cf33","eventId":"registerEngine","engineId":"0031debd-6130-4b4a-8eaf-7a834555cf33","engine":"EngineAddress(hostname=user-VirtualBox, port=8532)","engineConstraints":"(requirements: {} capabilities: { ... } priorities: [])","message":"New engine registered.","application":"oneApplication"}

{"@timestamp":"2021-04-14T11:26:03.804+02:00","@version":"1","message":"eventId=setEngineStatus engine=Engine(id=0031debd-6130-4b4a-8eaf-7a834555cf33, address=EngineAddress(hostname=user-VirtualBox, port=8532)), oldStatus=NEW, newStatus=READY","logger_name":"com.ataccama.dpm.registry.EngineRegistryServiceImpl","thread_name":"scheduling-1","severity":"INFO","level_value":20000,"correlationId":"0031debd-6130-4b4a-8eaf-7a834555cf33","eventId":"setEngineStatus","engine":"Engine(id=0031debd-6130-4b4a-8eaf-7a834555cf33, address=EngineAddress(hostname=user-VirtualBox, port=8532))","oldStatus":"NEW","newStatus":"READY","application":"oneApplication"}
dpe/log/spring-boot-logger.json.log
{"@timestamp":"2021-04-14T11:14:37.280+02:00","@version":"1","message":"eventId=register dpmUrl=localhost:8531, message=Engine registered.","logger_name":"com.ataccama.dpe.service.StatusChecker","thread_name":"scheduling-1","severity":"INFO","level_value":20000,"correlationId":"7b87a034-536b-4650-979b-62a27c575430","eventId":"register","dpmUrl":"localhost:8531","message":"Engine registered.","application":"oneApplication"}
Was this page useful?