Self-Managed DPE Deployment in Ataccama Cloud
With Ataccama Cloud deployments, you can deploy containerized, self-managed Data Processing Engines (DPEs) separately from the rest of the platform to a Kubernetes cluster managed by your organization.
|
Currently, the following managed Kubernetes service types are supported:
|
If you choose this option, the installation and management of your self-managed DPEs can be done in an entirely self-service manner. It is also possible to combine both self-managed and Ataccama-managed DPE deployments in a single platform environment.
| Self-managed DPEs are installed as part of Data Quality & Catalog. They are only available in the Professional, Enterprise, and Universal tiers of the Ataccama Cloud offering. |
When to run DPE in hybrid mode with Ataccama Cloud?
You might want to consider this type of DPE deployment in the following scenarios:
-
You want to minimize the amount of data leaving the premises of your organization for the purposes of data processing through Ataccama ONE.
-
Your organization needs to make its data sources available to the Ataccama ONE Platform in a way that does not expose their endpoints to the public internet.
-
Your organization requires a private connection between your data sources and Ataccama ONE Platform.
-
It is impractical to access all your organization data sources using a single DPE instance (due to network boundaries, multi-cloud presence, or other reasons).
When to choose an alternative setup?
In some scenarios you might be better served with an Ataccama-managed DPE deployment:
-
The transfer of data to an Ataccama-managed solution is not prevented by existing localization or other requirements.
-
Your organization utilizes data sources which are already accessible on endpoints exposed to the public internet (and are sufficiently protected through other means).
-
Your organization appreciates the convenience and scalability of letting Ataccama take full care of the data processing.
-
Your organization uses DPE to integrate with a self-managed Spark cluster (Cloudera or others).
-
Your organization requires DPE to use legacy authentication methods (Kerberos or others).
To accommodate these situations, the following solutions could be better suited for your needs:
-
Let Ataccama operate and manage DPEs in the cloud.
-
Deploy DPEs using the existing Ansible installers and ZIP assemblies. Depending on the complexity of the use case, this might require additional professional support from Ataccama for proper configuration on virtual machines or servers provided by your organization.
Operational responsibilities
To support the self-managed DPE deployment, operational responsibilities are shared between Ataccama and your organization.
Ataccama
To allow your organization to install, run, and integrate self-managed DPEs, Ataccama provides up-to-date versions of the following artifacts:
- Container images
-
The software implementation of the images comprising the self-managed DPE.
- The default Helm charts
-
The default specification of the self-managed DPE deployment in your cluster.
- The default value file
-
-
To configure the default chart.
-
Contains environment-specific secrets for instant integration.
-
To support the deployment, Ataccama lets you keep track of self-managed DPE installations through the Ataccama Cloud configuration interface (Cloud Portal).
Ataccama keeps track of whether self-managed DPE deployments are in accordance with the agreed-upon licensing.
Your organization
In relation to the self-managed DPE deployment, your organization is responsible for the following:
-
Maintenance and operation of the cluster.
-
Connectivity to the following services:
-
Ataccama cloud.
-
Data sources.
-
-
Security within your perimeter, which includes the following:
-
Control of access to the components deployed on the premises of your organization.
-
Preventing the component misuse, targeting either the environment of your organization or Ataccama cloud in general.
-
-
Extensions and modifications.
-
Relative to the received deployment artifacts and configuration (Helm charts, images, value files).
-
-
Timely upgrades and patches.
-
According to the agreed-upon upgrade and patching policy.
-
-
Any costs incurred by those responsibilities.
Prerequisites
The following prerequisites need to be met before proceeding with an installation of a self-managed DPE in your cluster.
Connectivity
See the following topics for an overview of connectivity prerequisites.
Connectivity to the installation artifacts registry
For the local installation, the only supported way of distributing the common installation artifacts (Helm charts and container images) is through a globally available repository.
Outbound connectivity to the repository has to be allowed from the installation site and the relevant Kubernetes cluster subnet, to allow for downloading of the installation artifacts and their deployment to the cluster. The Ataccama repository address is: https://atapaasregistry.azurecr.io. It is shown during the installation wizard walkthrough and is a part of the shown installation command as well.
By default, the Helm installer and the subsequent Kubelets utilize the secure HTTPS protocol on the standard port 443 to download the Helm charts and container images respectively.
Installing DPE does not require any artifacts that could not be sourced from Ataccama. This ensures your organization only needs to allow connection to the Ataccama repository.
Optionally, you can also mirror the available repository content in a repository of your choosing and distribute it to your cluster from there, after customizing the installation commands and the image sources to reflect this.
Connectivity between DPE and data sources
The installed DPE connects to data sources through its embedded connectors or through installed extensions. The nature of the connection varies from connector to connector, and depends on the driver or client that the connector ultimately employs to connect to the data sources. Ataccama connectors are predominantly based on and wrapping around canonical drivers or SDKs, and the exact dependencies are listed for you depending on which integrations your organization requires.
As the connection is usually implemented through a third-party dependency, the exact capabilities and restrictions of the underlying components apply. This can include the ability to utilize secure connectivity, execute TLS termination, proxying, and others.
To allow for sufficient throughput, low latency, stability, and other characteristics depending on the exact nature of the data processing or access, a reliable network connection between the DPE and the target data sources is required.
To handle the incoming connections and requests from DPE given the use cases and expected parallelization, the data sources must have enough capacity in terms of available connection slots, operational memory, and any other relevant parameters.
To allow for granular security measures and avoid network congestion and other undesirable conditions preventing efficient reading of data from the data sources, we advise employing good judgment in the design of local networking and isolating the data sources and DPEs into their own subnet.
Connectivity between each DPE and the platform core
DPE does not require any inbound connection and all communication is done through connections created from DPE towards the platform core situated in the Ataccama-managed cloud. Therefore, only outbound connections have to be permitted from the deployed DPE pods.
There are two targets: connection to the Data Processing Module (DPM) and connection to ONE Object Storage (MinIO). You can find these in the configuration interface of your environment in Ataccama Cloud.
Connection to DPM
The first target is the cloud endpoint of the Data Processing Module (DPM). DPM is the component which controls DPEs within the platform deployment and there is one such service per environment. For more information about DPM, see DPM and DPE Configuration in DPM Admin Console.
The outbound connections created from DPE towards DPM are used to poll for commands from DPM (for data access or data processing), and to pass event messages reporting on job processing states, with optional payloads, including processing results or references to those so that they can be later downloaded by DPM or the end client.
The connection is made exclusively through the gRPC protocol, served over TLS to ensure data integrity, communication confidentiality, and authenticity of the public DPM endpoint. The trust between the components is established by preshared JWTs (automated through Local installation).
To batch the received commands and transfer them without reestablishing the connection anew, and to reduce the average latency for the interactive data access commands, the polling mechanism relies on advanced features of the gRPC protocol, such as bidirectional streaming. This means that if any sort of SSL bumping or TLS termination is required by your organization, the terminating proxy has to have robust support of the gRPC protocol.
Connection to ONE Object Storage
The second target is the environment Object Storage server. The storage is used by DPEs to upload and download larger chunks of results data and job inputs, which are impractical to send over through discrete gRPC messages.
The client relies on the standard HTTPS protocol, with the server cloud endpoint exposed on the standard port 443.
Additional considerations
The exact DPM and Object Storage endpoints can be retrieved from the configuration interface (Cloud Portal) by locating them on the environment Service tab.
They conform to the same pattern: https://dpm-grpc-<ONE instance hostname> and https://minio-<ONE instance hostname> respectively.
Because the addresses rely on DNS resolution, make sure that the (upstream) DNS server utilized by the cluster where the DPE is installed can resolve those addresses.
It is possible to utilize IP allowlisting to restrict the connectivity to the environment only from certain addresses. If enabled for your organization and required, the list has to be extended with the IP ranges associated with the installed DPEs.
To do this, navigate to the configuration interface of your environment, and extend the existing list with the range of public IP addresses which are expected to pose as the source of the TCP/IP packets for the outbound DPE connectivity towards the platform.
Sizing and resource requirements
By default, self-managed DPEs share the same sizing requirements as their Ataccama-managed counterparts. The exact requirements per one replica can be obtained in advance when you expand the Service sizing table on the Settings tab of your environment configuration interface.
These are the default sizing values for existing tiers:
| S tier | M tier | L tier | |
|---|---|---|---|
CPU request (per replica) |
600 m |
1000 m |
1000 m |
CPU limit (per replica) |
1500 m |
2000 m |
2000 m |
RAM request (per replica) |
3000 Mi |
5000 Mi |
5000 Mi |
RAM limit (per replica) |
3000 Mi |
5000 Mi |
5000 Mi |
Disk space (per replica) |
350 Gi |
600 Gi |
600 Gi |
Replicas |
2 |
2 |
4 |
Under some conditions, such as deploying particularly demanding extensions to your self-managed DPE, or when the standardized sizing does not match your existing licensed resources before migrating to the self-managed DPE, an exceptional sizing can be set (if allowed by Ataccama) as value override to the default values provided in the DPE installation wizard in the configuration interface.
As temporary working space, the self-managed DPE requires only an ephemeral volume, usually a generic ephemeral volume of size as specified in the Disk space column in the previous table, backed by a storage class of suitable parameters (same as the volumes provisioned for the existing self-managed deployment).
| To accommodate rolling updates of DPE (in case the parameters of the deployment are changed during editing or upgrade), your cluster has to be sized for n + 1 number of replicas, where n is the chosen number of operated replicas. |
Software requirements
As a dependency for the deployment relying on Helm charts, the following requirements are mandatory:
-
Helm installation able to operate on the target cluster in version 3.13.x (subject to change).
-
AKS or EKS cluster with support for Kubernetes version 1.27.x (subject to change).
Installation
Adding a self-managed DPE performs the necessary changes in the Ataccama Cloud portion of the environment and provides you with the Helm values required to install the DPE Helm chart in your cluster.
The generated values are the minimum requirements for installing and connecting DPE to the cloud-managed DPM service. You can apply custom changes with additional overlay of Helm values if necessary.
Create a regular environment
It is not possible to install a self-managed DPE during the initial creation of an environment. Create an environment first.
To create an environment in Cloud:
-
Go to Ataccama Cloud Portal, that is, your configuration interface.
-
Select Create environment.
-
Configure your new environment as needed.
-
Select Create environment.
Add a self-managed DPE to an existing environment
If you are the environment owner or organization admin with access to Ataccama Cloud, you can add multiple DPEs.
| How many engines can be installed is defined in the organization contract and is applied to each environment. |
To add a self-managed DPE:
-
Go to Ataccama Cloud Portal, that is, your configuration interface.
-
Select an environment from the list of Environments.
-
Select the Settings tab.
-
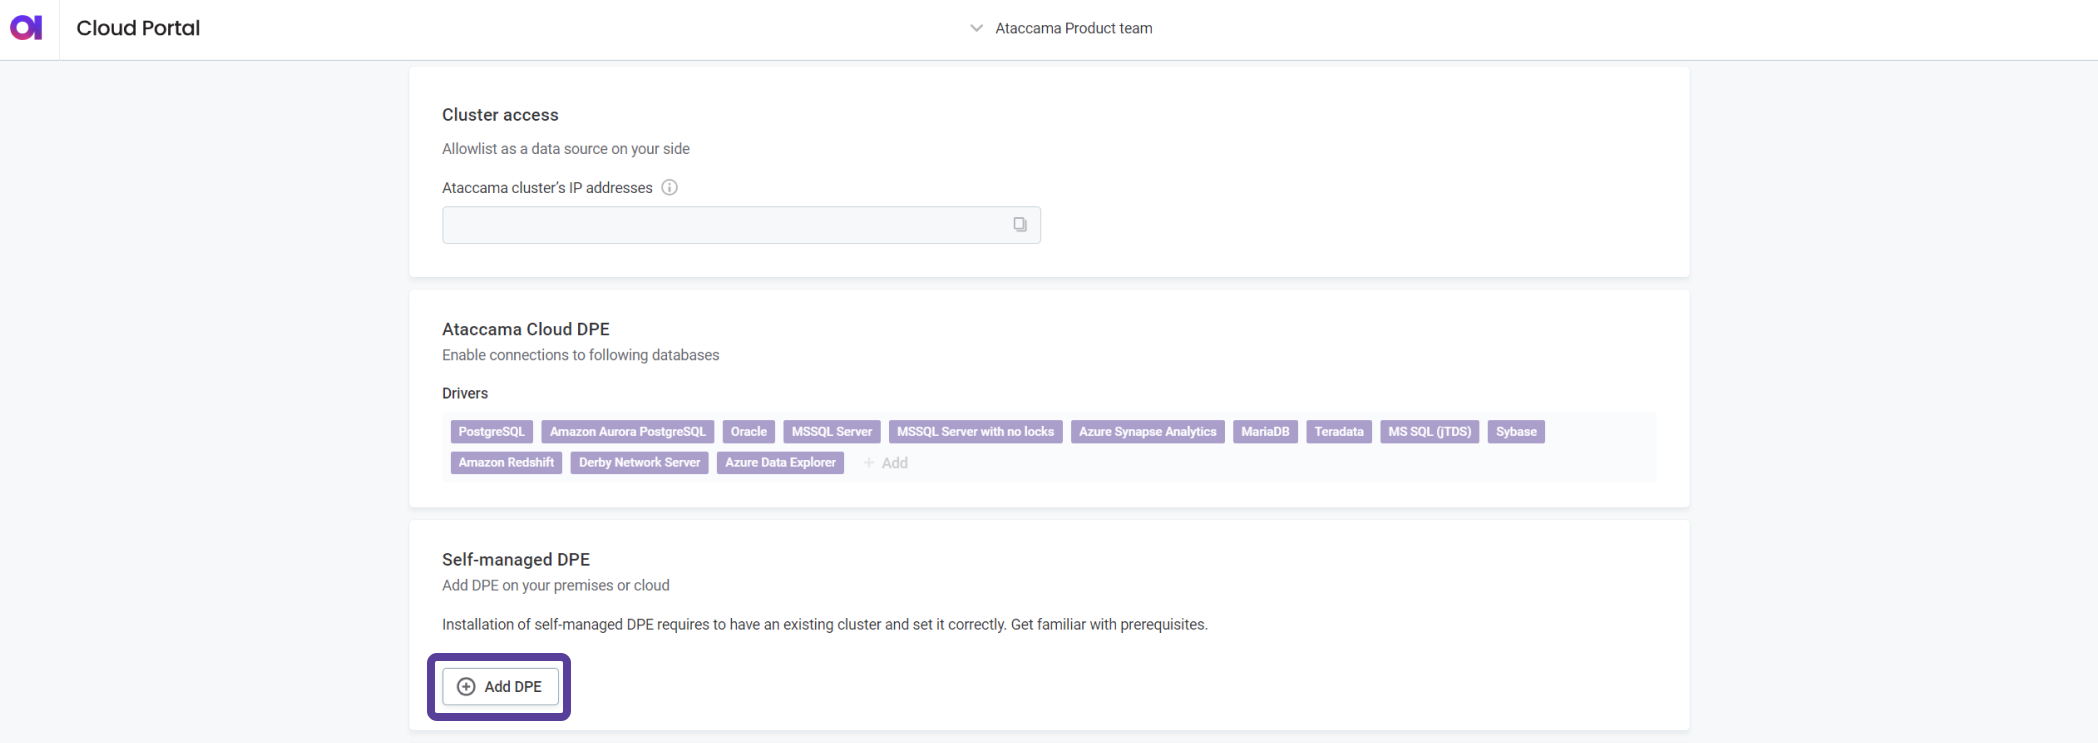
In Self-managed DPE, select Add DPE.
-
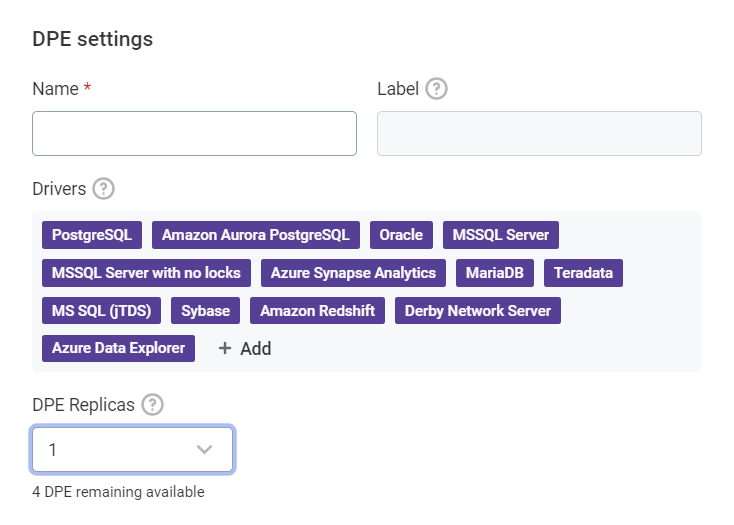
Configure the DPE settings as follows:
-
Name: Enter a name for your DPE.
The label of your DPE is derived from the name you provide in this field. It is an important value in certain contexts and cannot be changed later. See Name and label.
-
(Optional) In Drivers, choose which drivers are enabled for this installation. See Drivers.
-
(Optional) Choose the number of DPE Replicas. See Replicas.
-
-
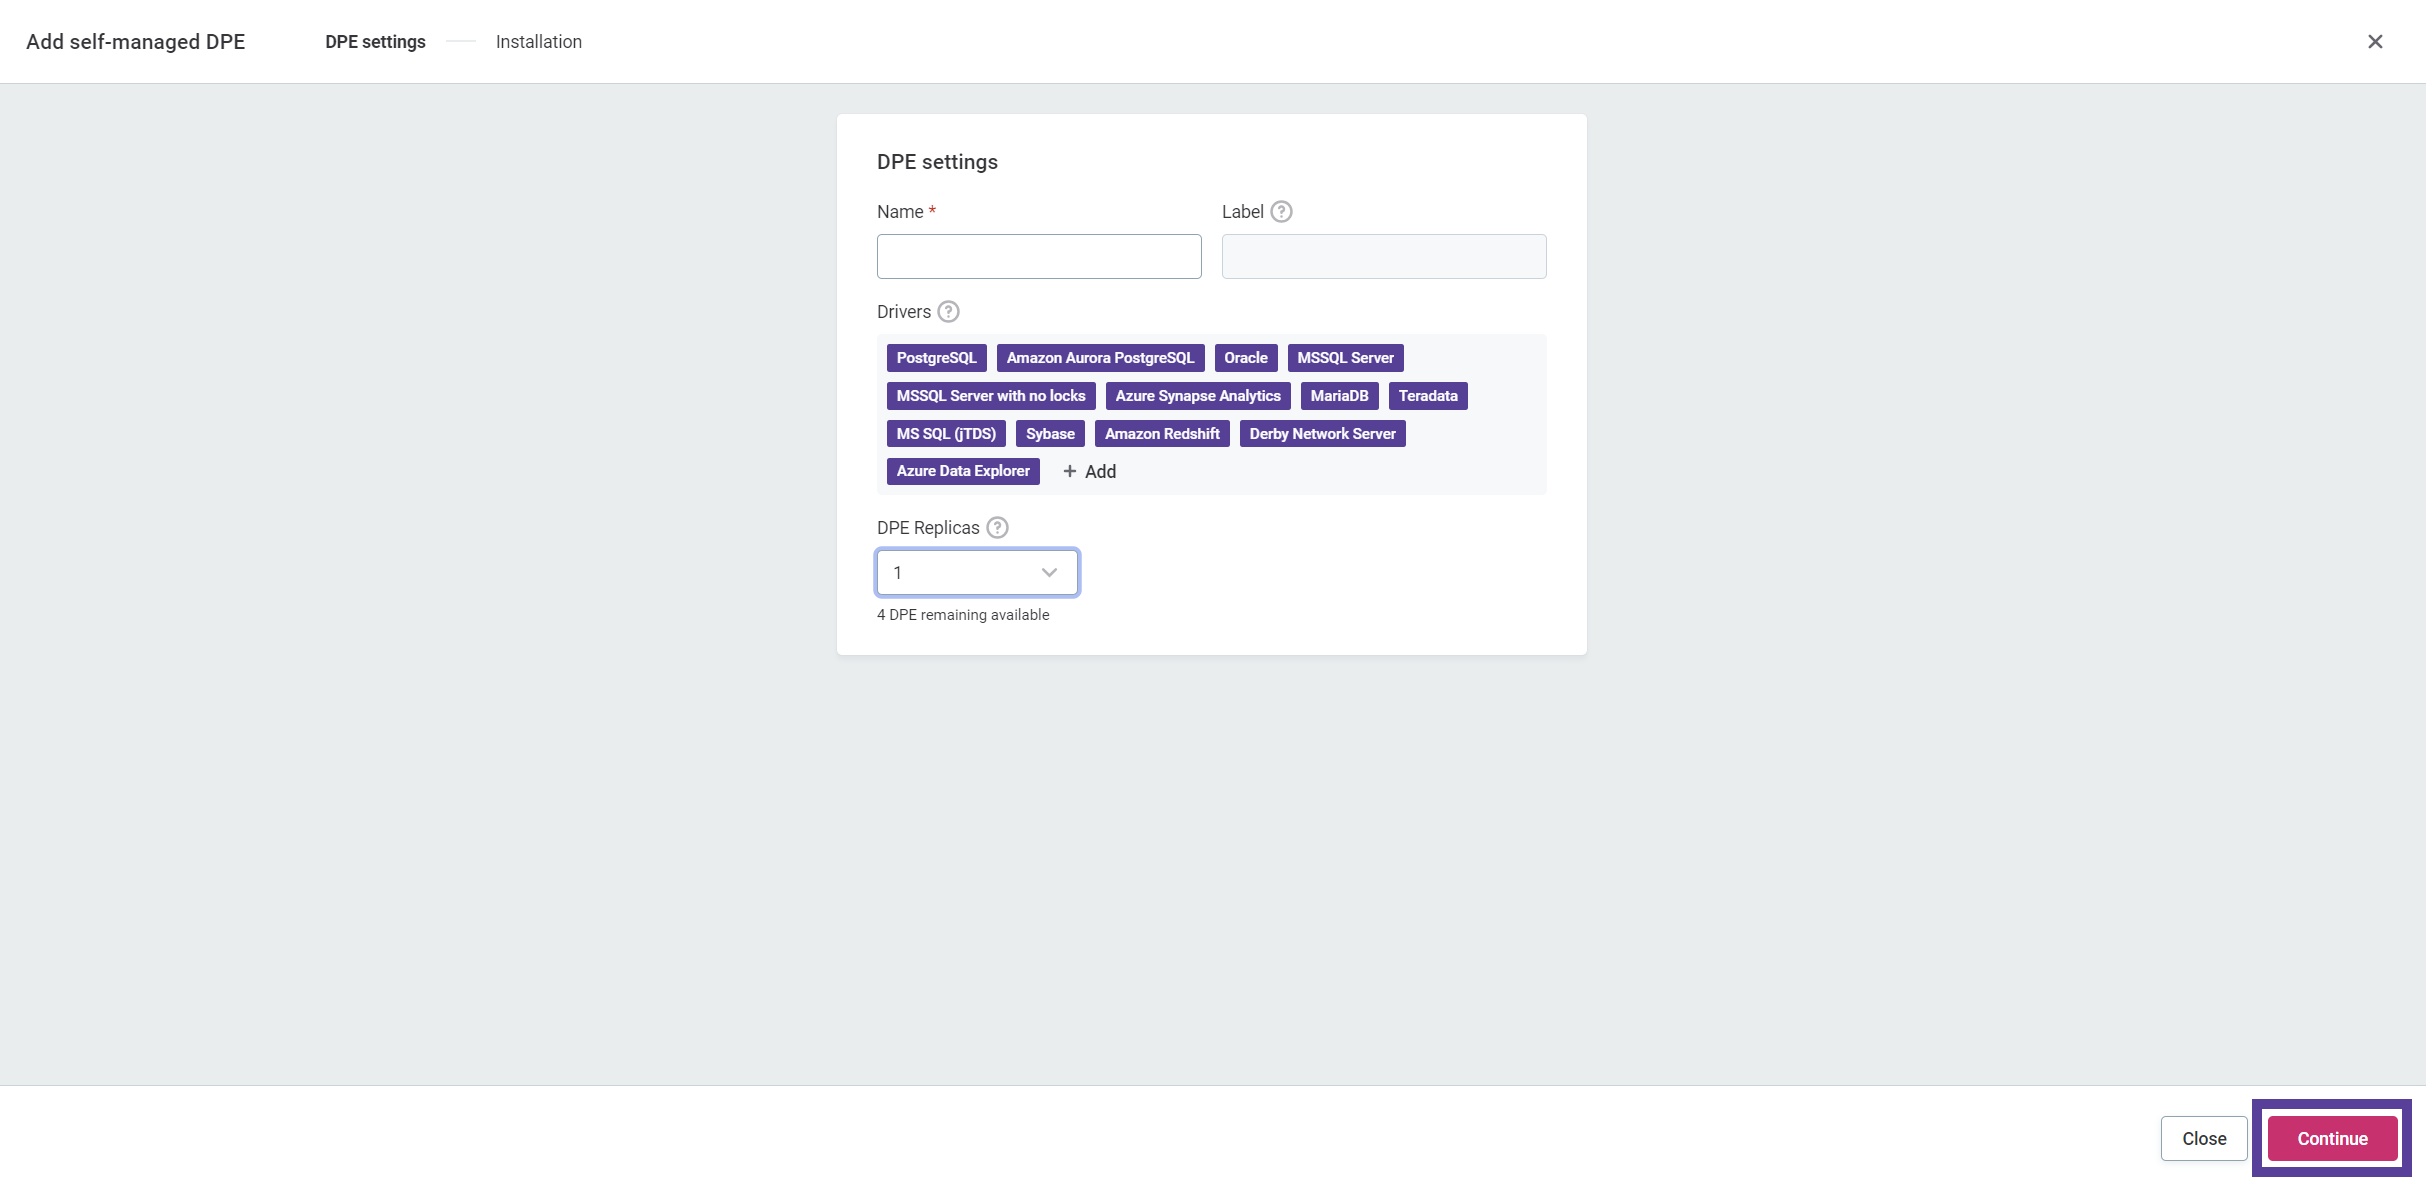
Select Continue. This generates the necessary installation commands.
-
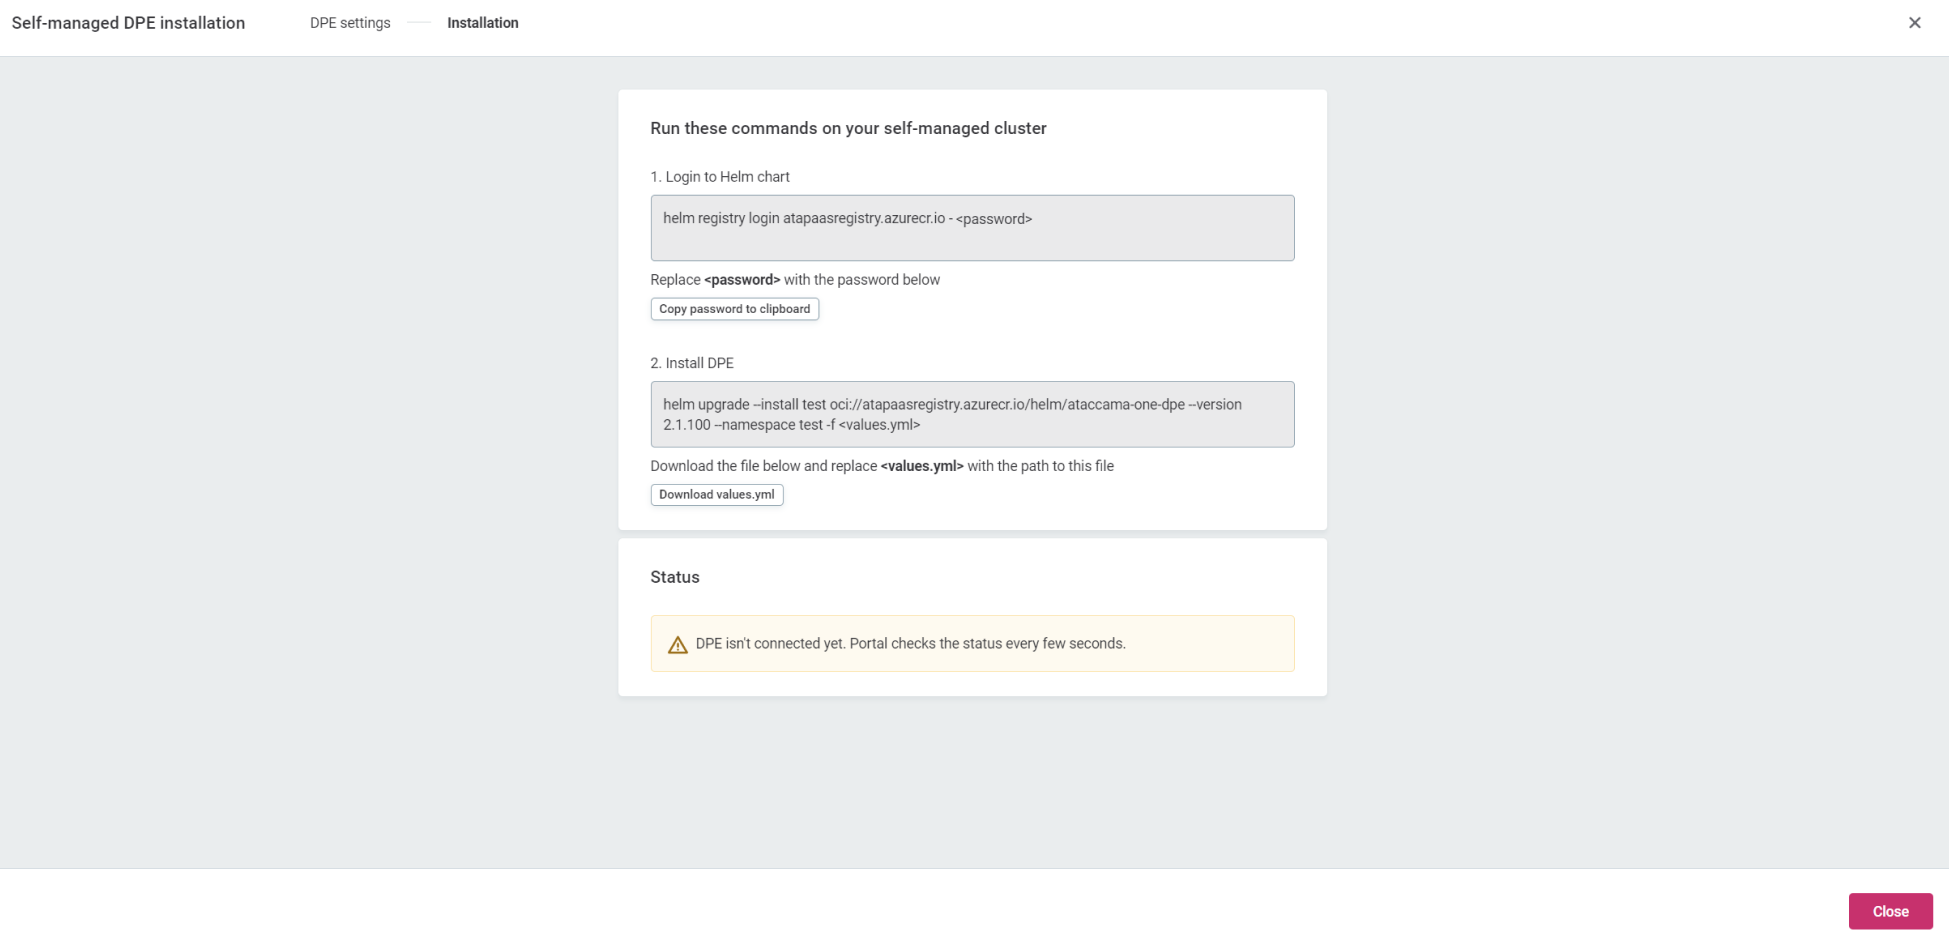
After the installation commands are generated, you can access them in one of the following ways:
-
From the original Self-managed DPE installation window.
-
On the Settings tab of your environment, under the added DPE in the Self-managed DPE section.
-
-
You can now use the generated commands and files to install and connect your self-managed DPE to Ataccama Cloud from your self-managed cluster.
-
Configure the DPE to use the keystore:
Starting from version 15.3.0, ONE Desktop and self-managed DPEs require some additional properties to ensure secure communication using unique encryption keys. For more information, see Unique Encryption Keys.
-
For new installations: The keystore and its configuration are included in the
values.yamlfile generated by Ataccama Cloud Portal. No additional steps are required. -
For existing installations: You need to modify the
application.propertiesfile to include keystore properties.To configure the keystore for an existing installation:
-
Open the
etc/application.propertiesfile in your DPE installation directory. -
Add the following properties:
properties.encryption.keystore=[PATH_TO_DOWNLOADED_KEYSTORE_FILE]
properties.encryption.keystore.password=[KEYSTORE_FILE_PASSWORD]
properties.encryption.keyAlias=initial_peripheral
internal.encryption.keystore=[PATH_TO_DOWNLOADED_KEYSTORE_FILE]
internal.encryption.keystore.password=[KEYSTORE_FILE_PASSWORD]
internal.encryption.keyAlias=initial_peripheral
Replace
[PATH_TO_DOWNLOADED_KEYSTORE_FILE]with the actual path to your keystore file, and[KEYSTORE_FILE_PASSWORD]with your keystore password.Ensure that your keystore file and passwords are stored securely to prevent unauthorized access.
-
-
-
Continue to Local installation.
Name and label
The label of your DPE is derived from the name you assign to the DPE.
The label is important in the following contexts:
-
It identifies the particular DPE installation for additional configuration purposes and determines which DPE replicas are part of the same deployment and therefore share the same configuration.
-
It identifies the DPE replicas for the purposes of monitoring.
-
It is used to derive the default release name in the commands suggested for the Helm installation.
Therefore, the following constraints apply to the DPE label:
-
It cannot be changed later.
-
It must be unique among all DPE installations associated with the environment and should be descriptive enough to allow you to associate the configuration of the DPE with its intended use case.
-
It must uniquely identify the Helm DPE release for the purposes of local installation into the cluster, and any subsequent editing and upgrades. Therefore, we recommend not using any segments specific to the platform release versions in the label name.
Drivers
The images required for installing DPE contain a starting set of connectors to allow for instant integration with the most common data sources. The environment admin can adjust which of them are enabled or disabled for the particular installation. You can also change this later as part of the installation update.
The settings of the enabled connectors can be further configured from the DPM Admin Console. To access it, locate it on the Services tab of your environment in Ataccama Cloud.
Custom drivers
You can also deploy additional connectors and drivers compatible with the self-managed DPE. You can consider this in the following cases:
-
The drivers required cannot be distributed by Ataccama due to general licensing conditions or due to being exclusively licensed to your organization by the driver publisher.
-
The drivers required cannot be deployed in the Ataccama cloud (for example, they are not generally supported, tested, or vetted by Ataccama). In the case of legacy drivers, they might have known security issues which can be mitigated in the local deployment tailored to and operated by your organization.
-
The drivers require further customization and configuration not supported by the centralized configuration interface of the DPM Admin Console.
This functionality is not available in the configuration interface of Ataccama Cloud and instead requires:
-
Uploading the drivers to a dedicated space in ONE Object Storage.
-
A local signature setup in the used values to confirm their installation and protection against misuse.
-
Potentially further adjustments in the DPM Admin Console.
How to deploy custom drivers?
To deploy custom drivers, you need a single .zip archive that follows the standard structure for adding custom drivers through additional properties and JAR files.
At the root of the file hierarchy, there must be a drivers folder, containing configs and drivers folders.
For each additional custom driver, a folder of the same name must appear in both the configs and drivers folders.
The drivers/configs/<custom driver> folder has to contain a <custom driver>.properties file with driver configuration properties (can be retrieved from an existing deployment of the DPE).
The drivers/drivers/<custom driver> has to contain .jar and other classpath files of the connector driver.
When naming the <custom driver>, use only letters of either case (a-z or A-Z).
|
For example, when adding a custom driver for Aurora PostgreSQL, the folder hierarchy could look as follows:
-
drivers
-
configs
-
auroraPostgres
-
auroraPostgres.properties
-
-
-
drivers
-
auroraPostgres
-
postgresql-42.4.1.jar
-
-
-
By default, the archive is expected to be located in the custom-drivers bucket in ONE Object Storage (MinIO) of your environment.
| Make sure the custom drivers remain within their permitted and supported use when deployed using multiple DPE replicas or self-managed DPEs. |
To provision this bucket in Ataccama Cloud:
-
Go to Ataccama Cloud Portal, that is, your configuration interface.
-
Select your environment.
-
Go to the Services tab.
-
Access ONE Object Storage configuration environment (MinIO Web Console).
-
Upload the
zip.file containing the custom drivers. -
(Optional) Change any existing content.
Optionally, it is possible to enable content verification of the drivers obtained from the environment Object Storage by defining the expected SHA-256 digest in the Helm values:
customJdbcDrivers:
	enabled: true
	sha256: '8cbafd07b6948268ac136affaaa98510bdc435fc4655562fd7724e4f9d06b44c'
To compute the digest for the uploaded files (in this example, drivers.zip), you can use OpenSSL:
openssl dgst -sha256 drivers.zipOn DPE startup, the archive is downloaded from the environment Object Storage. If a digest has been provided for the drivers, the contents of the downloaded pack with custom drivers are validated to prevent DPE from loading any unexpected drivers. If no digest has been provided, the drivers are loaded into DPE once DPE is initialized without any further verification.
Replicas
Each DPE can be deployed in multiple replicas. Your organization can set the desired number of replicas to increase the general throughput and help DPEs operate more smoothly.
The number of replicas used is counted towards the limit set for the entire environment. The number of allowed replicas is shared between all self-managed DPEs and Ataccama-managed DPEs. This total limit is subject to the licensing agreement between your organization and Ataccama.
For the self-manged DPE deployment, the replicas correspond to the number of replicas of a Kubernetes Deployment workload. For more information, see the official Kubernetes documentation.
Therefore, each extra self-managed replica requires additional resources from your organization so that it can be successfully scheduled to your cluster. As the installation on your organization premises relies solely on standard means, there are no preflight checks implemented (which would prevent the operator to attempt deployment on an undersized cluster), and no additional feedback mechanism.
The operator executing the installation must have access to the Helm standard and error output, be able to observe the events within the Kubernetes cluster, have access to DPE pod logs, and be able to check the deployment state of the DPE pods.
Local installation
Follow the installation instructions generated along with the necessary commands and files. These comprise of the following:
-
The access token required to obtain the Helm chart for the purposes of the local installation and for the cluster to download the needed container images.
-
A generated value file, containing installation-specific data, such as the corresponding cloud endpoints, license parameters, replicas count, set sizing, access secrets, and other important information.
|
Generated Helm values ( We recommend downloading the file from the configuration interface and then securely delivering it to the local environment used solely for the purpose of the installation. |
If required by your organization, you can customize the generated installation instructions. Certain alterations are to be expected and therefore allowed:
-
Your organization can use the access token to retrieve the required artifacts and cache them in your own repository and adjust the distributed Helm chart accordingly.
-
You can make adjustments to allow mounting of directories containing private CAs (to allow SSL bumping).
-
If they differ from the corresponding standard tier, you can make adjustments to the resources required per the exact contract stipulations.
If you require more significant adjustments, contact Ataccama Professional Services.
After the installation is completed, and DPE successfully connects to the platform and to DPM on startup, the configuration interface is notified.
The installation status turns from orange to green and the displayed status message changes from DPE isn’t connected yet to DPE is connected successfully.
The interface checks the status every few seconds.
Edit a self-managed DPE
After installation, you can change the enabled drivers and the number of DPE replicas. However, any changes to a self-managed DPE in Ataccama Cloud requires that you redeploy the edited DPE.
During this process, actions including accessing and processing data on the targeted DPE can be disrupted. Therefore, we advise making these changes in a scheduled timeframe communicated within your organization.
After you apply any edits in Ataccama Cloud, an updated set of installation commands and files is generated. To apply the changes, you have to go through a new set of installation steps as self-managed DPE instances do not update automatically.
To edit an existing self-managed DPE:
-
Go to Ataccama Cloud Portal, that is, your configuration interface.
-
Select your environment.
-
Go to the Settings tab.
-
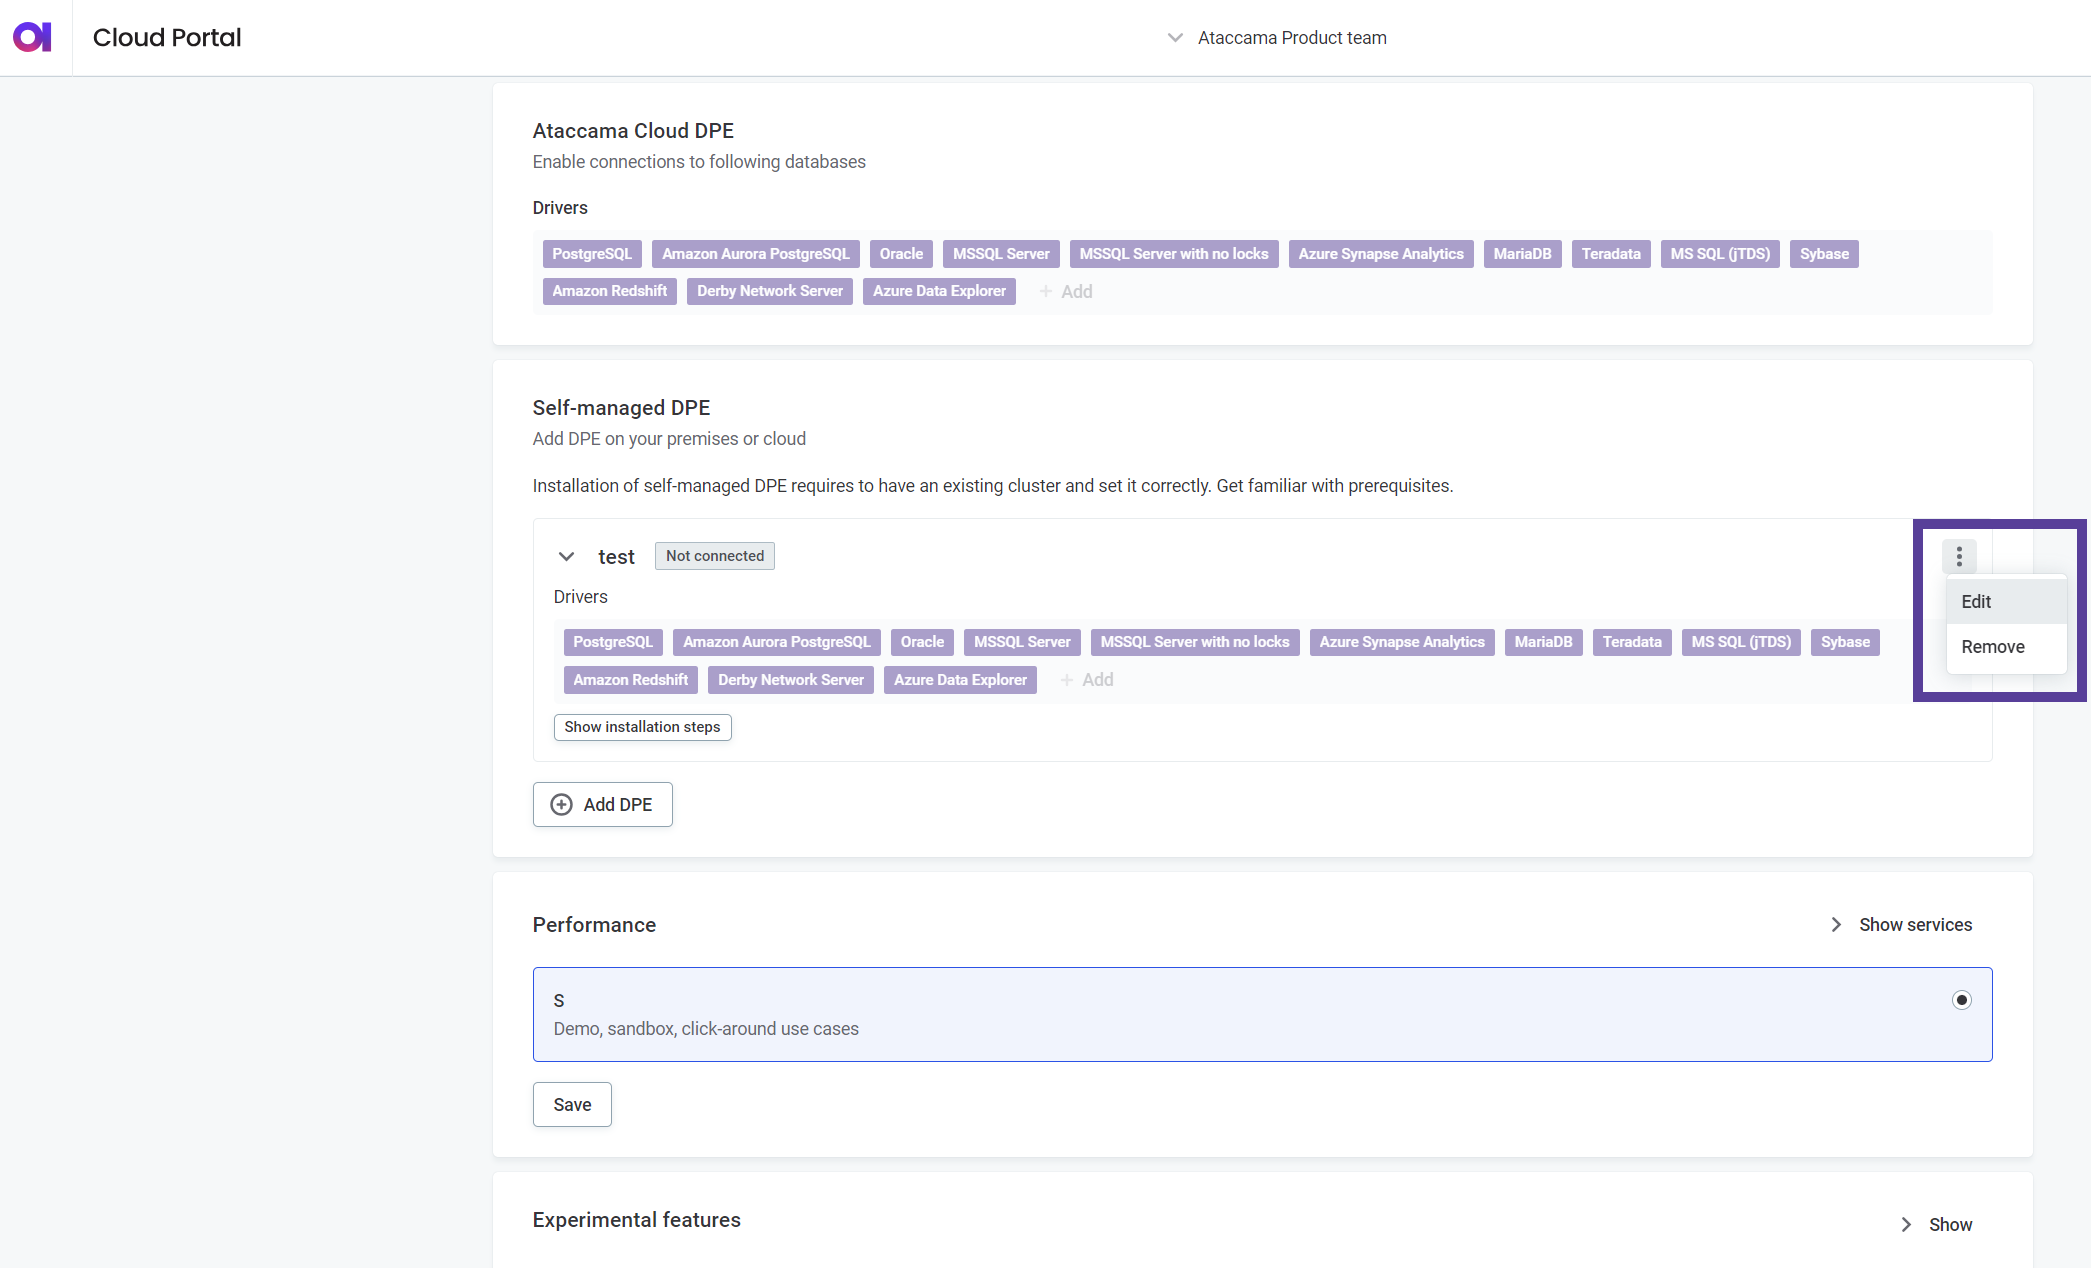
In Self-managed DPE, select Edit from the three dots menu of the relevant DPE.
-
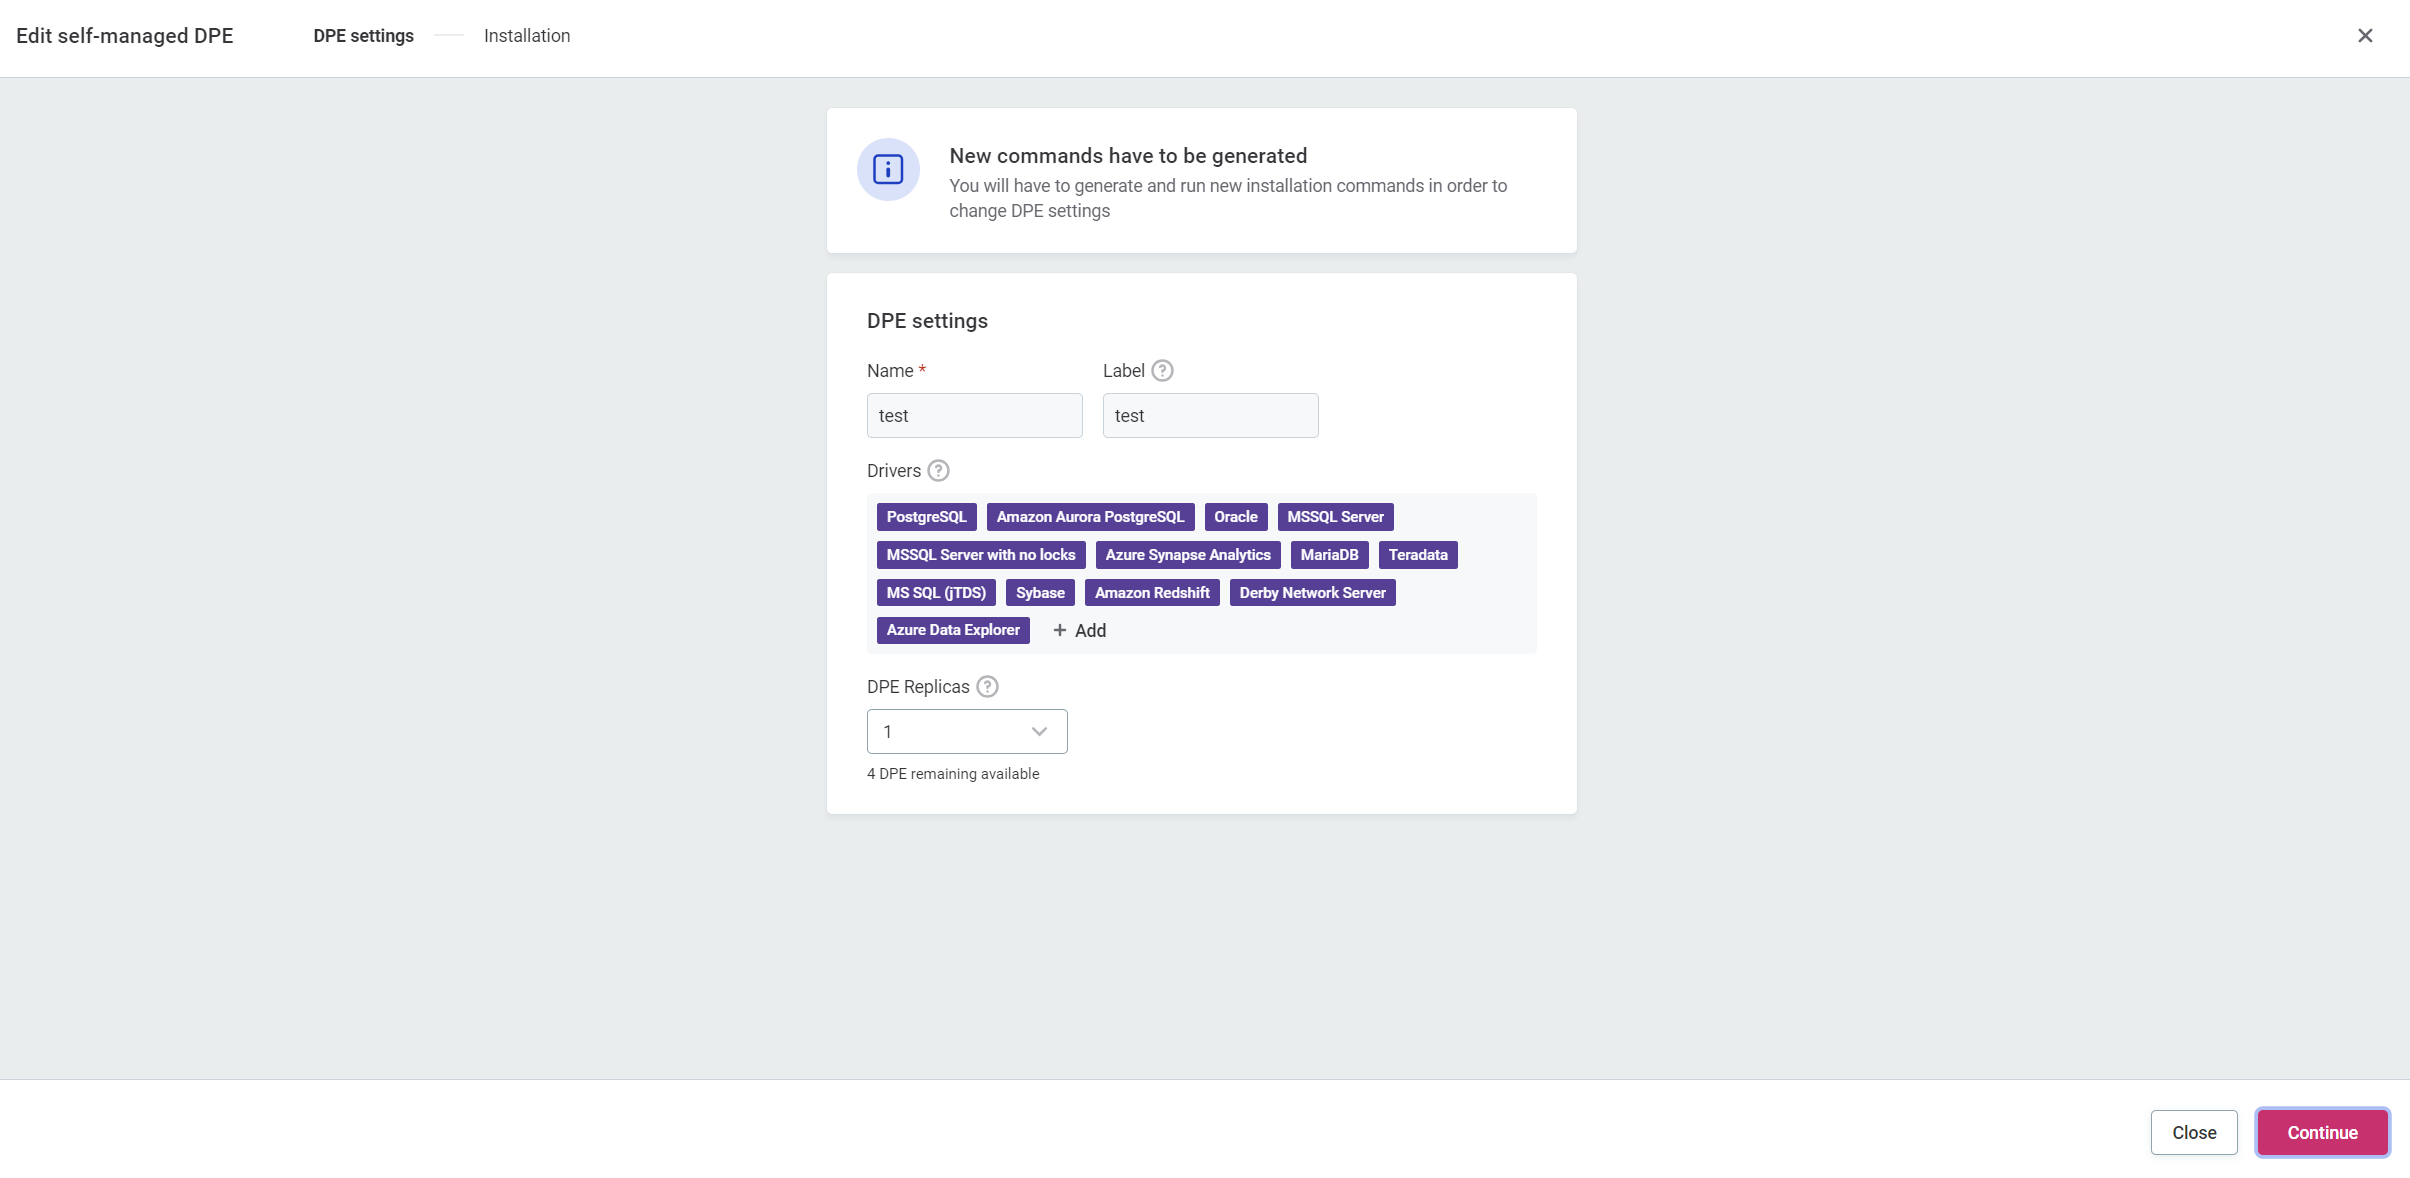
Make any necessary changes:
-
Add or remove enabled drivers.
-
Change the number of DPE replicas.
-
-
Select Continue. A new set of installation commands is generated.
-
You can access the new installation commands from one of the following locations:
-
In the original Self-managed DPE installation window.
-
On the Settings tab of your environment, under the added DPE in the Self-managed DPE section.
-
-
Use the new commands and steps to update and reconnect your self-managed DPE to Ataccama Cloud from a self-managed cluster. You can follow the same steps as described in Local installation.
Self-managed DPE upgrades
The version of a self-managed DPE can differ from the platform version unless there are changes introduced on the platform side that would make the DPE upgrade a requirement. However, we strongly recommend keeping your self-managed DPEs up-to-date along with the rest of the platform to ensure the best possible performance, access to new features, and high security standards.
Ataccama Cloud alerts you in case of a mismatch between DPE and DPM versions. The exact versions of both DPE and DPM can be found in the DPM Admin Console.
The process of upgrading DPE is almost identical to the initial installation and editing.
The only difference is that a new version of the Helm chart is used along with a newly generated values.yml file.
The new values.yml file might have additional values.
This means that if you reuse an outdated configuration file, the upgrade can fail.
| The upgrade might result in disrupting DPE operations and temporarily disabling certain Ataccama Cloud capabilities. |
If your deployment includes local customizations, your cluster operator is responsible for resolving any differences.
To upgrade an outdated self-managed DPE:
-
Go to Ataccama Cloud Portal, that is, your configuration interface.
-
Select your environment.
-
Go to the Settings tab.
-
In the Self-managed DPE section, select Show upgrade steps of the self-managed DPE flagged as Outdated.
-
Use the generated update commands and steps to upgrade and reconnect your self-managed DPE to Ataccama Cloud from a self-managed cluster. You can follow the same steps as described in Local installation.
Remove a self-managed DPE
You can remove self-managed DPE deployments you no longer need. This frees up the DPE replicas allocated to the self-managed deployment and makes them available for use elsewhere (for example, for cloud DPEs, or for a new self-managed DPE deployment).
| You cannot restore a self-managed DPE once removed. Instead, you would have to deploy a new self-managed DPE with identical configuration. |
To remove a self-managed DPE:
-
Go to Ataccama Cloud Portal, that is, your configuration interface.
-
Select your environment.
-
Go to the Settings tab.
-
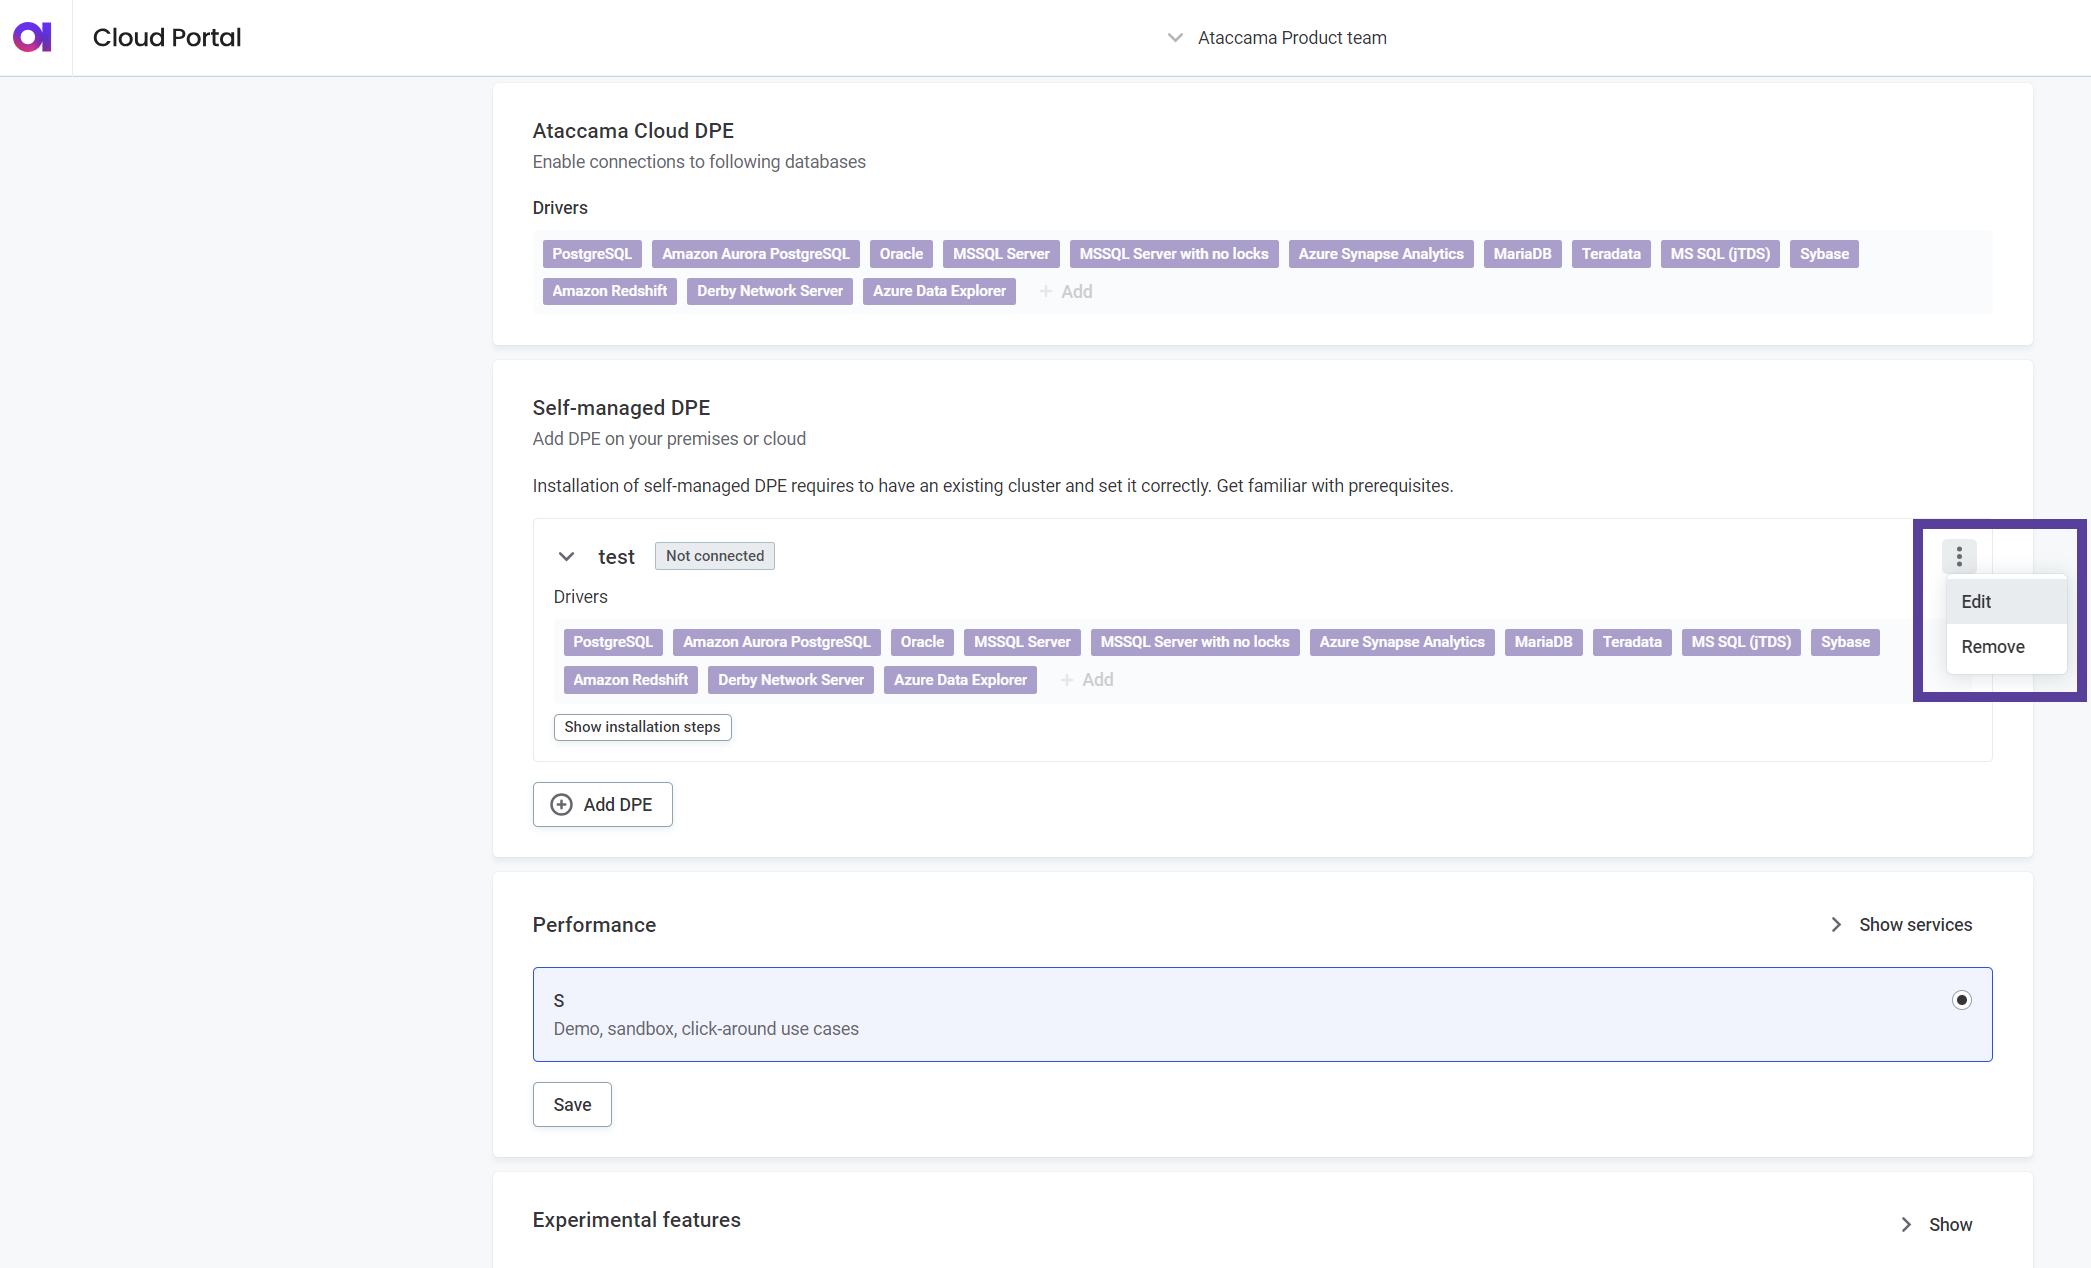
In the Self-managed DPE section, select Remove from the three dots menu of the relevant DPE.
-
When prompted, select Remove from Portal.
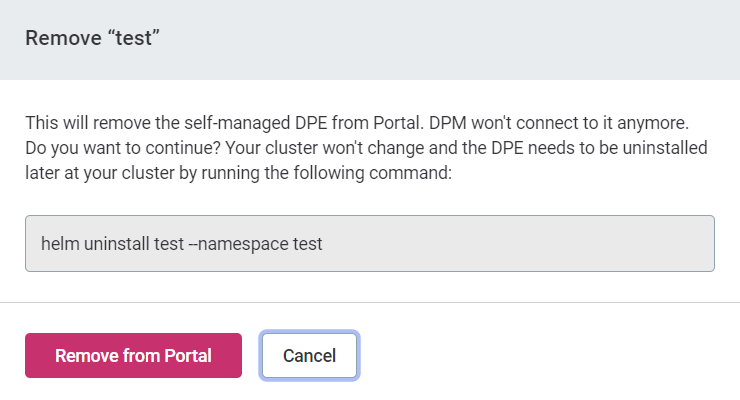
The information about the removal cannot be automatically propagated to your self-managed cluster. Your cluster operator must uninstall the DPE manually.
Was this page useful?
