Publishing Changes in RDM
Publishing changes made to reference data is the final step of an edit lifecycle. After publishing, all users with the viewing permission for the given table can view new or updated records and can no longer see deleted records.
Records can also be rejected, which returns them to the Edit workflow state. Depending on your situation, publishing can be done in one of these ways:
-
From the Create and Edit dialog.
-
From the Publish tab.
Keep in mind you can publish only valid records (see Working with Records in RDM, section Record validation for details).
| You must have a Publish permission to publish records of a given table. |
Publish from Create and Edit dialog
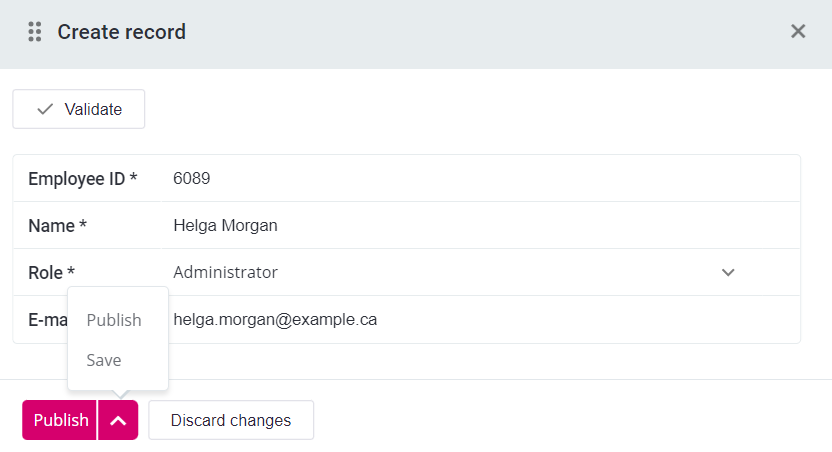
You can publish changes immediately after creating or editing a record. In this case, Move to publish and Publish actions are performed automatically and the record is moved directly to the Published state.
To publish changes from the Create or Edit dialog, select Publish or choose Publish from the actions menu.

This functionality is particularly useful for smaller teams with no dedicated roles for approving changes.
The option is displayed if you have the Publish permission for the given entity.
|
If the Publish action results in an error, you are likely missing publishing permissions for one of related entities or a custom workflow is defined for one of related entities and the entity cannot be moved directly to the published state. Typically, this occurs if you are propagating changes recursively (option Edit recursively). To fix this, check the workflow and move the entities through additional states as needed, then publish them manually. |
The Publish tab
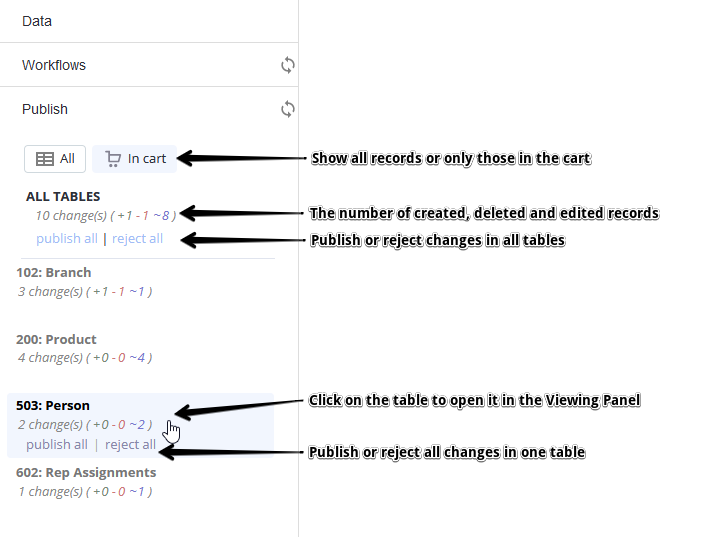
All record changes that were sent for approval and are in Waiting for publishing state are listed on the Publish tab in the Navigation Panel.

Publishing scope
Publishing and rejecting records can be done on a different scale:
-
All tables in the reference data repository under < ALL TABLES > (see the previous image).
-
Table by table (see the previous image).
-
Individual records in a selected table (described in the following section).
Publish and reject individual records
After you select a table from the Navigation Panel on the Publish tab, the Publishing tab opens in the Viewing Panel.
The main action options are Publish and Reject. Other options, Filters and Columns setup, are used for more convenient data viewing. For details, see Viewing Data in RDM, sections Filters and Columns Setup respectively.

- To publish individual records
-
-
Select the desired table in the Navigation Panel. The records available for publishing appear in the Viewing Panel.
-
Select the records.
-
Select Publish.
-
(Optional) Add tags, which can be used for filtering records in the ALL_HISTORY mode.
-
Confirm. Now the record is visible in the Published mode.
In case the data has not published, see the Action History link on the System tab of the Navigation Panel, where a log is saved.
-
- To reject individual records
-
-
Select the desired table in the Navigation Panel. The records available for publishing appear in the Viewing Panel.
-
Select the records.
-
Select Reject.
The record is now has the [ State ] value equal to Edited.
-
Records participated in bulk operation
When performing publish or reject actions in RDM, you might receive the following message: "Records participated in bulk operation. Should I apply action on whole bulk operation?"
This means that the record on which you are trying to perform publish or reject operation has been edited or deleted recursively, affecting child records. Therefore, RDM is asking whether you want to perform the current action on the affected child records as well (that is, recursively). In most cases, you need to confirm.
For more details, see Working with Records in RDM, section Editing records and Deleting records respectively.
Was this page useful?
