
Workflows
Workflows streamline the processes that require approval from team members with higher access levels, such as requesting access to data, reviewing changes to data assets, and publishing these changes in ONE.
There are two types of workflows in ONE:
-
Request Data Access workflow is used to ask for a higher level of access to an asset. For more information about access levels, see Access Levels.
-
Review workflow is used to request a review of changes made to data assets and publish these changes in ONE.
When you start a workflow, a new task is created: either Access Request task for Request Data Access workflows, or Review Request task for Review workflows. The task is then resolved (i.e., your request is approved or rejected) by the assignee defined in the workflow. For more information about tasks, see Tasks.
|
There is an additional workflow called Before this is done, you cannot proceed with the review and publishing of request tasks and the Waiting for complete configuration state is displayed on review request tasks. For more information, see the Upgrade Guide. |
How to access workflows
View launched workflows
To view the list of active and finished workflows, go to Tasks and Workflows > Launched workflows tab.
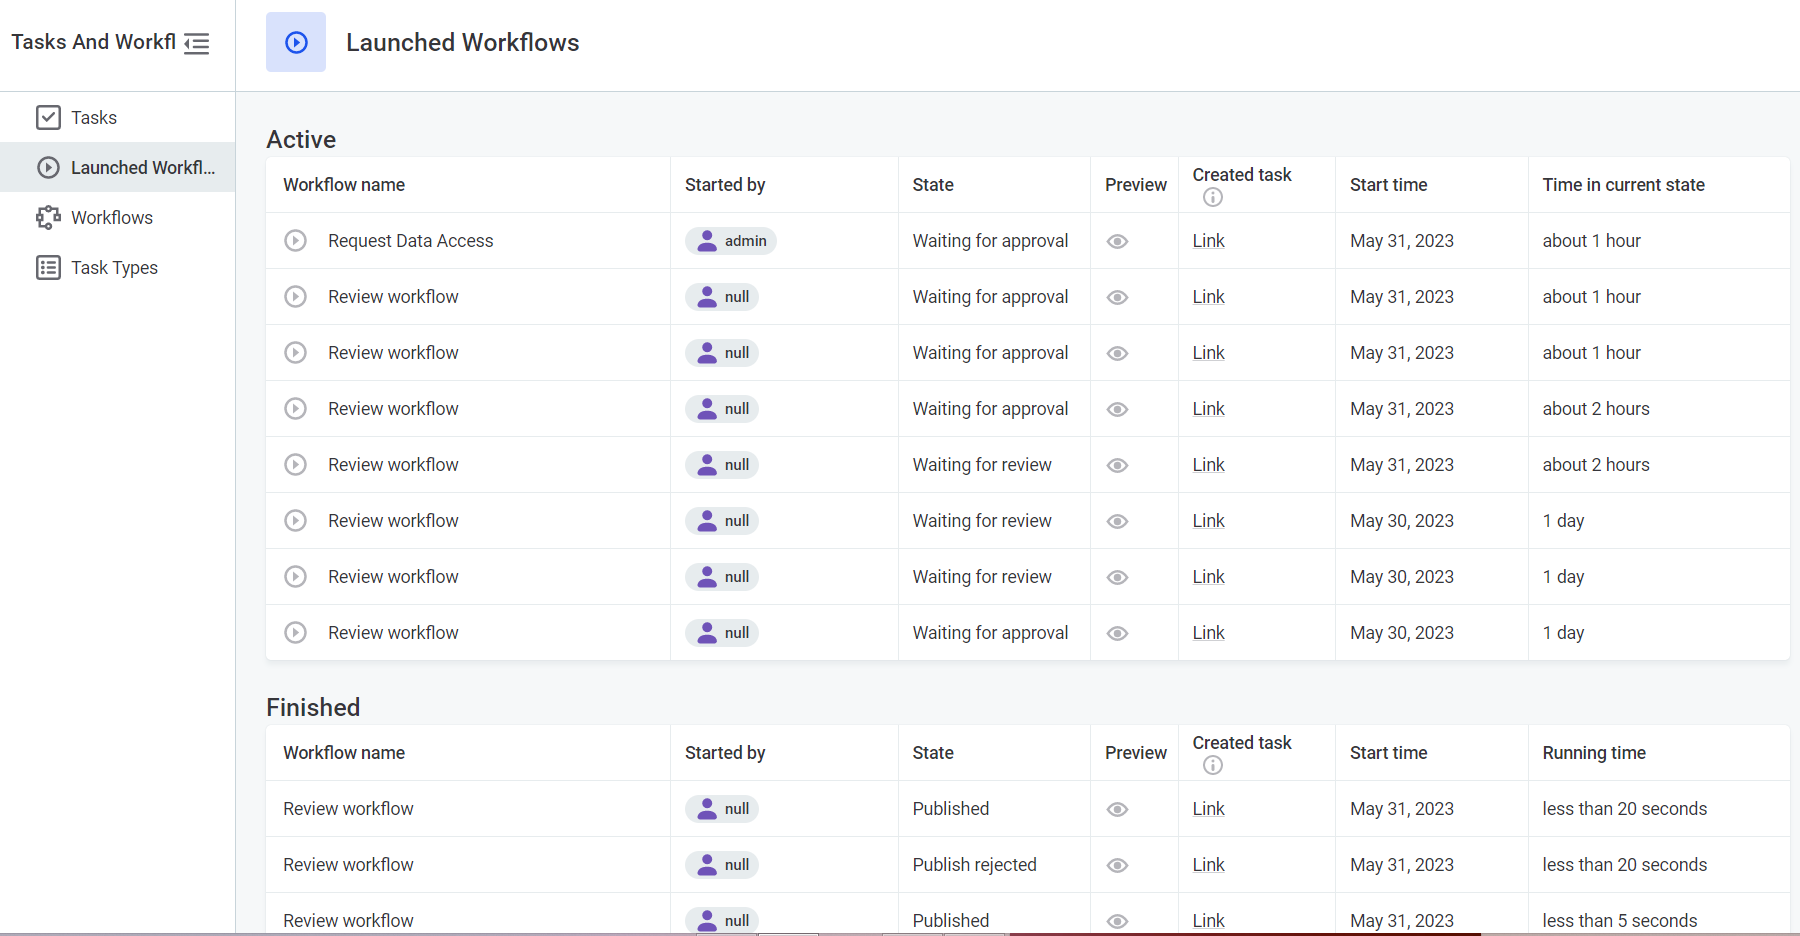
From the Launched workflows tab you can:
-
See all active and finished workflows. All new requests are listed under the Active section, while the processed ones are listed under the Finished section.
-
See the workflows details by the parameters:
-
Workflow name: Name of the workflow.
-
Started by: The creator of the request.
-
State: Current state of the task.
-
Access Request tasks can have one of these states: Waiting for approval, Permission granted, Permission declined.
-
Review Request tasks can have one of these states: Waiting for review, Published, Publish rejected. To see the list of possible states for a workflow, hover over the eye icon under Preview.
-
-
Created task: Open the link to view the related task.
-
Start time: The date when the task was created.
-
Time in current state: How long the task has been in the current state.
-
Running time: Time from starting to resolving the workflow.
-
View workflow configuration
To view the configuration of the access request workflow, go to Tasks and Workflows > Workflows tab.

From the Workflows tab you can see the default settings of the workflow and edit the assignee:
-
Workflow name: Request Data Access, Review workflow, and, if the review workflow migration was not completed, Approval Workflow migration.
-
Owner: system. This means that you cannot delete the workflow as it is a default one, it doesn’t represent workflow assignee permissions. For more information about how to change the workflow assignee, see Edit Request Data Access workflow and Edit Review workflow.
-
Preview: Hover over the eye icon to see the list of all possible states of the task.
-
Last run date: The date when the workflow was last run.
-
Active run: Number of unprocessed requests.
-
Archive run: Number of processed requests.
Request Data Access workflow
Enable Request Data Access workflow
To be able to request access to an asset, make sure that the workflows:ableToStartRequestDataAccess trait is enabled on this entity.
For more information, see Traits.
Requesting data access can be enabled only on the following entities:
-
catalogItem -
source -
location -
connection -
monitoringProject
Edit Request Data Access workflow
You can change the default assignee of the Request Data Access workflow. The default assignee can either manage the request or redirect the task to another user.
Only users with MMM_admin identity provider role can change the default assignee of workflow requests.
|
To change the default assignee of all Request Data Access workflows:
-
Go to Tasks and Workflows > Workflows.
-
In the three dots menu next to the Request Data Access workflow select Edit.
-
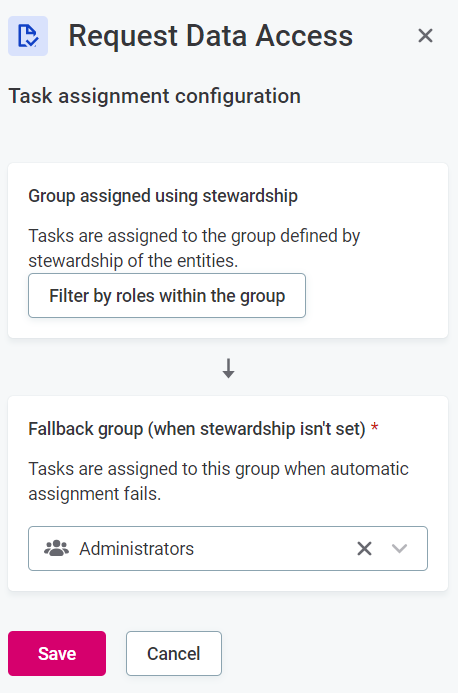
Specify the assignee of the Request Access task:
-
Group assigned using stewardship: Tasks are automatically assigned to the group defined by the stewardship of the assets. Anyone from the group can resolve the task.
To assign the task to a specific role within the group, select Filter by roles within the group, choose one or multiple roles, and define the order in which they are assigned the task if the group from the stewardship has no relevant role.
-
Fallback group (when stewardship isn’t set): If the assignment using stewardship fails, the tasks are assigned to the fallback group which you select here.
Request access to data
To request a change in your access permissions to an asset:
-
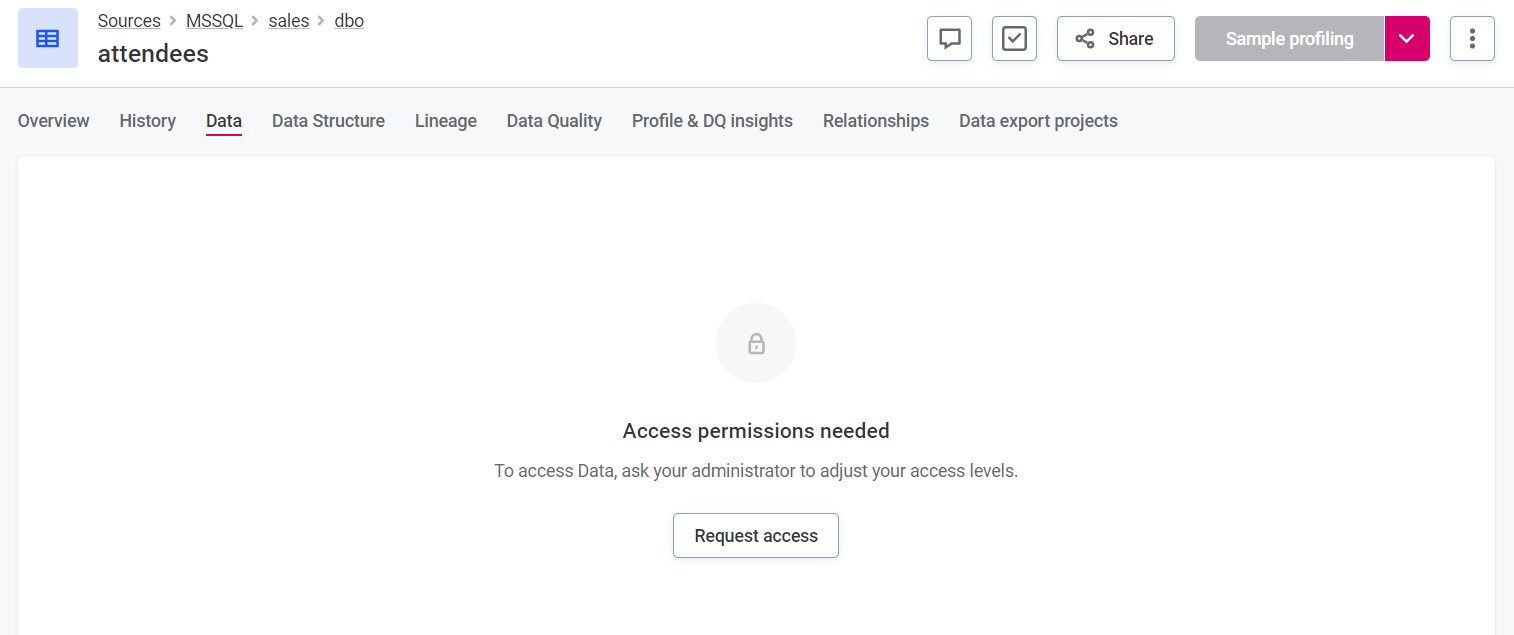
Select Request access:
-
From tabs that contain data: Users with the View metadata access level cannot see the content of the tabs that contain data. To request access from such tabs, select Request access.
-
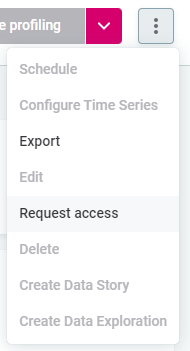
From an asset you want to change your access permissions for: Select the three dots menu and then Request access.
-
-
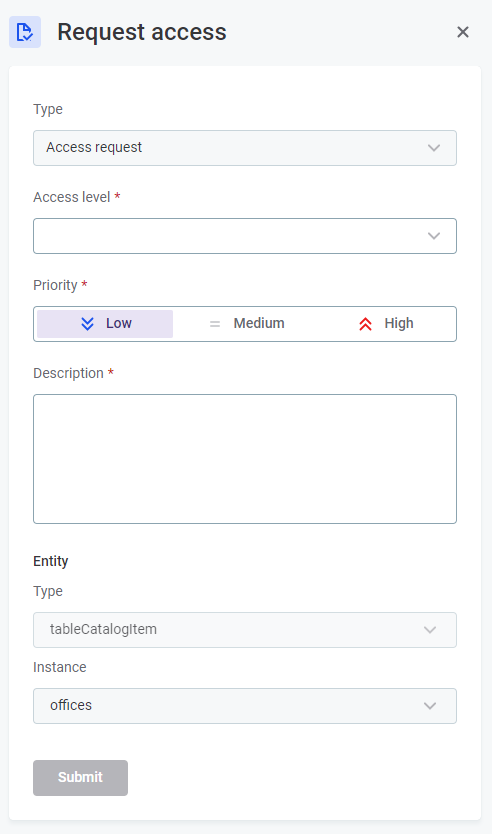
Review the following information:
-
Type: Prefilled task type.
-
Access level: The access level you want to get on this asset.
-
Priority: The priority of the task.
-
Description: The reasons for providing the requested access level.
-
Entity: Prefilled asset type and instance for which you are requesting access changes.
-
-
Select Submit.
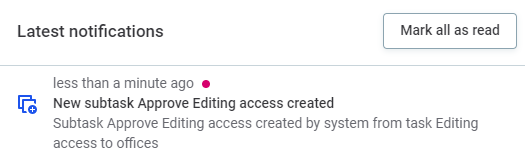
After submitting the task, both the creator and assignee see:
-
A notification about the new task in the Notification Center.
-
The task on the kanban board. For more information about working with the kanban board, see Tasks.
-
The task in the Active state on the workflows overview tab.
-
Approve or reject access request
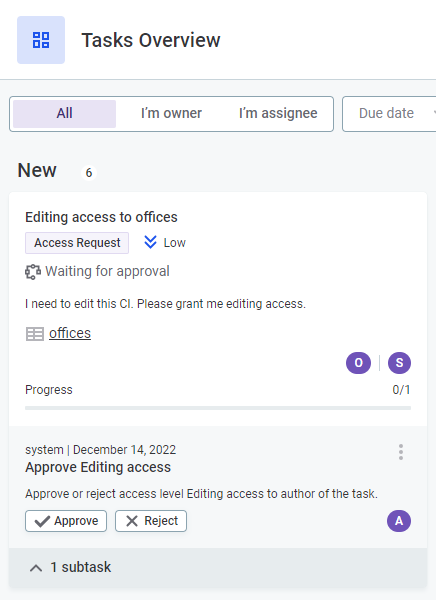
When a new task of the Access Request type is added to the kanban board, the assignee can do the following:
-
Go to the kanban board or to the task detail view from the board or from the Notification Center. The new task has the Waiting for approval status.
-
In the subtask, select one of the following to change the task status:
-
Approve to automatically grant access to the creator of the task on the specified asset. This changes the task status to Permission granted.
-
Reject to reject granting access. This changes the task status to Permission declined.
-
-
Optionally, you can change the task assignee. For more information, see Tasks.
After approving or rejecting the access, the task is automatically moved to the Complete column. The workflow is also moved to the Finished list on the Workflows Overview tab.
Review workflow
If a workflow is enabled on an asset, any changes made to the asset need to be approved by an admin or another user with full access level. Depending on the configuration, changes can include the following:
-
Assigning a glossary term to a catalog item or a catalog item attribute.
-
Editing an asset, for example, a catalog item, attribute, glossary term, or rule.
-
Reviewing a finished documentation flow, regardless of whether new job tasks and flow actions have been created or not.
-
Creating a new glossary term.
-
Creating a new rule.
Enable Review workflow
By default, some entities have the hasNoWorkflow trait assigned that turns off the review workflow (and lets you publish changes without a review process).
To enable Review workflow on an entity, remove the hasNoWorkflow trait:
-
Go to Metadata Model > [your entity] > traits.
-
Remove the trait and publish your changes.
For more information about traits, see Traits.
By default, this trait is assigned to the following entities:
-
connection -
location -
source -
credential -
connectionWithCredentials -
relationshipType -
catalogItemRelationship -
termRelationship -
globalRole -
group -
observabilityIssue -
dataQualityIssue -
dataQualityAnomalyIssue -
anomalyDetectionIssue -
volumeIssue -
schemaChangeIssue -
termDetectionIssue
Edit Review workflow
In Review workflow, you can define one or multiple workflow steps.
Each step definition consists of three parts: approver, conditions, and businessState.
By combining these parts, you can create workflow steps to adjust the default workflow to your needs (for example, to specify different workflow steps on different entities, or to specify that the step should apply only to a specific subset of an entity).
The order in which the steps are defined in the configuration determines the order of the approval steps in the workflow.
Only users with MMM_admin identity provider role can edit the workflow configuration.
|
To change the default Review workflow configuration:
-
Go to Tasks and Workflows > Workflows tab.
-
In the three dots menu of the Review workflow, select Edit.
-
Change the Configuration using the Configuration properties. To view sample workflow configurations, see Configuration examples.
-
In Backup workflow settings, specify a group that can manage the task in case the configured approver is not available.
-
Select Save.
Configuration properties
approver
Defines who will be assigned to the task. The assignee can manage the request or reassign the task to another user.
When first configuring the workflows during the migration, the approver type is set to migrated to indicate that it needs to be specified, otherwise, the migration is not completed.
|
You can choose from two approver types:
-
stewardship: The tasks are assigned to the group according to the stewardship definition of the asset. You can further specify the assignee role using theglobalRolesIdsproperty. This option is used in the default review workflow. All users within the stewardship group (or role, if specified) have access to the task and can resolve or reassign it.All the tasks are also visible to MMM admins and users who created the task. Properties used with the
stewardshipapprover type:-
globalRolesIds(optional): In Global Settings > User Management > Governance Roles, select a role, and copy the role ID from the URL:…/userManagement/globalRole/<globalRoleId>/.
Configuration options of the
approverelement:-
Assign tasks to the
stewardshipgroup with no roles defined."approver": { "type": "stewardship", "globalRoleIds": [] }, -
Assign tasks to a specific role (Data Stewards) within the
stewardshipgroup."approver": { "type": "stewardship", "globalRoleIds": ["36ed325c-0000-7000-0000-00000008a894"] },For full workflow configuration examples, see Configuration examples.
-
-
group: The tasks are assigned to the group specified bygroupId. You can further narrow down the assignees to the users in a specific role within the group using the optionalglobalRoleIdproperty. All users within the group (or role, if specified) have access to the task and can resolve or reassign it.To assign tasks to a specific user, use the optional
userIdproperty. The specified user can access the task regardless of their role. In addition, the user sees the task as a direct assignee in the I’m assignee tab on the Tasks Overview screen.All the tasks are also visible to MMM admins and users who created the task. Properties used with the
groupapprover type:-
groupId(mandatory): In Global Settings > User Management > Groups, select a group, and copy the ID from the URL…/userManagement/group/<groupId>/. -
globalRoleId(optional): In Global Settings > User Management > Governance Roles, select a role, and copy the role ID from the URL:…/userManagement/globalRole/<globalRoleId>/. -
userId(optional): In Global Settings > User Management > Users, select a user, and copy the value of the User Id property.
Configuration options of the
approverelement:-
Assign tasks to a group using
groupId."approver": { "type": "group", "groupId": "15bbce34-0000-7000-0000-00000047025b" }, -
Assign tasks to a role within the group using
groupIdandglobalRoleId."approver": { "type": "group", "groupId": "15bbce34-0000-7000-0000-00000047025b", "globalRoleId": "36ed325c-0000-7000-0000-00000008a87d" }, -
Assign tasks to a user using
groupIdanduserId."approver": { "type": "group", "groupId": "15bbce34-0000-7000-0000-00000047025b", "userId": "a24b2b3a-6abf-4324-9103-c7f888099857" }, -
Assign tasks to user within the group with a specific role using
groupId,globalRoleId, anduserId."approver": { "type": "group", "groupId": "15bbce34-0000-7000-0000-00000047025b", "globalRoleId": "36ed325c-0000-7000-0000-00000008a87d", "userId": "a24b2b3a-6abf-4324-9103-c7f888099857" },
-
| For full workflow configuration examples, see Configuration examples. |
conditions
Define entities (entityType) on which you want to enable the workflow.
If the workflow should only apply to a subset of entities, use a filter to select these entities.
By default, review workflow is enabled only on policies and terms.
-
entityType: Specify any entity on which you want to configure the workflow. -
filter: Specify the condition under which the workflow is triggered using AQL expressions. For more information, see Search using AQL Expressions.To find the list of properties you can use in the AQL expression, open the entity details in Metadata Model and see its properties. For example, go to Metadata Model > term >
validationRulesproperty > objecttermValidationRulesto see the properties you can use in the filter (booleanenabledand arrayruleInstances).
Configuration examples
The following examples show the most common use cases of the Review workflow configuration.
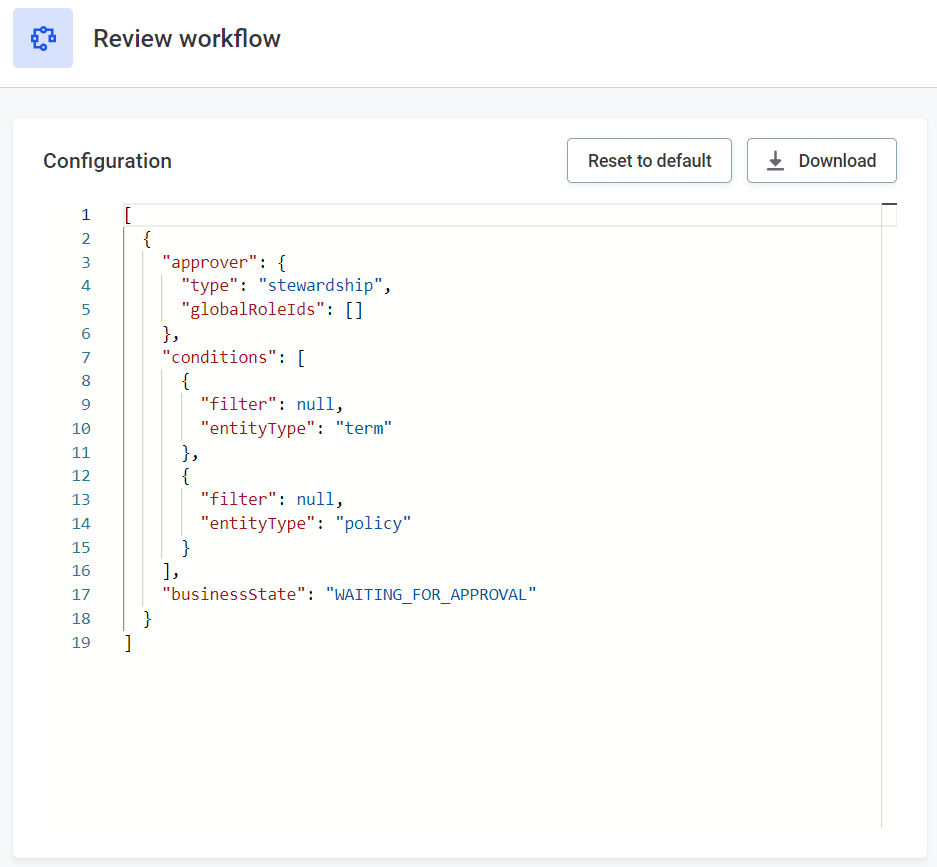
Example 1 - Default workflow definition
This workflow has one approval step--Waiting for review--that is enabled for the entities term and policy, without any filters applied.
The tasks on this step are assigned to the stewardship group of the asset undergoing the review.
[
{
    "approver": {
      "type": "stewardship",
      "globalRoleIds": []
      },
"conditions": [
{
"filter": null,
"entityType": "term"
},
{
"filter": null,
"entityType": "policy"
}
],
"businessState": "Waiting for review"
}
]Example 2 - Use AQL filter to define a specific step for a subset of assets
This workflow has two approval steps defined:
-
The first approval step
Waiting for reviewis enabled for the entitiestermandpolicywithout any filters applied. The tasks on this step are assigned to thestewardshipgroup of the asset undergoing the review. -
The second approval step
Waiting for data officeis enabled for the entityterm, and only for the assets fulfilling the filter conditions: 'there are DQ validation rules linked to the term'. The terms that have no validation rules applied are not assigned to this approval step. The tasks on this step are assigned to theData Officegroup specified by thegroupId.
[
{
"approver": {
"type": "stewardship",
"globalRoleIds": []
},
"conditions": [
{
"filter": null,
"entityType": "term"
},
{
"filter": null,
"entityType": "policy"
}
],
"businessState": "Waiting for review"
},
{
"approver": {
"type": "group",
"groupId": "15bbce34-0000-7000-0000-00000047025b"
},
"conditions": [
{
"filter": "validationRules.enabled = true and validationRules.ruleInstances.count() > 0",
"entityType": "term"
}
],
"businessState": "Waiting for data office"
}
]Example 3 - Assign a workflow step to a specific role within stewardship definition (such as Data Owner) and to the selected user group
This workflow has four approval steps defined:
-
The first approval step
Waiting for reviewis enabled only for thepolicyentity. The tasks on this step are assigned to thestewardshipgroup of the policy undergoing the review.Steps 2, 3, and 4 are enabled for the
termsentity. -
The second approval step
Data steward reviewis assigned to thestewardshipgroup for the term undergoing the approval and to the Data Stewards within this group (specified byglobalRoleIds). -
The third approval step
Marketing reviewis assigned to the selectedMarketinggovernance group and all users within it for an extra round of approval. -
The fourth approval step
Data owner reviewis assigned to thestewardshipgroup for the term undergoing the approval and to theData Ownerswithin this group.
[
{
"approver": {
"type": "stewardship",
"globalRoleIds": []
},
"conditions": [
{
"filter": null,
"entityType": "policy"
}
],
"businessState": "Waiting for review"
},
{
    "approver": {
      "type": "stewardship",
      "globalRoleIds": ["36ed325c-0000-7000-0000-00000008a894"]
      },
"conditions": [
{
"filter": null,
"entityType": "term"
}
],
"businessState": "Data steward review"
},
{
"approver": {
"type": "group",
"groupId": "15bbce34-0000-7000-0000-00000047025d"
},
"conditions": [
{
"filter": null,
"entityType": "term"
}
],
"businessState": "Marketing review"
},
{
"approver": {
"type": "stewardship",
"globalRoleIds": ["36ed325c-0000-7000-0000-00000008a87d"]
},
"conditions": [
{
"filter": null,
"entityType": "term"
}
],
"businessState": "Data owner review"
}
]Example 4 - Assign a workflow step to a specific user within the governance group
This workflow has one approval step--Abbreviation review--that is enabled for the term entity for assets where abbreviation is not populated.
The tasks on this step are assigned to the jane.smith user (specified by userId) within the Data Office group (specified by groupId).
The users from the Data Office group have access to the task as well.
[
  {
    "approver": {
      "type": "group",
      "userId": "a24b2b3a-6abf-4324-9103-c7f888099857",
      "groupId": "15bbce34-0000-7000-0000-00000047025b"
    },
    "conditions": [
      {
        "filter": "abbreviation is null",
        "entityType": "term"
      }
    ],
    "businessState": "Abbreviation review"
  }
]
If you need the user assignee to have a specific role within the group (such as Data Owner), add globalRoleId to the step definition:
[
  {
    "approver": {
      "type": "group",
      "groupId": "15bbce34-0000-7000-0000-00000047025b",
      "globalRoleId": "36ed325c-0000-7000-0000-00000008a87d",
			"userId" : "a24b2b3a-6abf-4324-9103-c7f888099857"

    },
    "conditions": [
      {
        "filter": "abbreviation is null",
        "entityType": "term"
      }
    ],
    "businessState": "Abbreviation review"
  }
]
Request review of changes
For information about creating a review request, approving the request, and publishing the changes, see Publish Changes.
Was this page useful?