
Getting Started with RDM
This article describes how to log in into RDM, as well as the user interface and the relevant concepts and features of RDM.
Logging in
RDM is accessed through your browser. When you type in the application address, the login screen appears.
After a successful login, the RDM home screen appears.
| It is not possible to log in with two different usernames simultaneously in the same browser on one machine. If you need to do this, use a different browser for each login. |
User interface
The user interface of RDM consists of the Navigation Panel on the left and the Viewing Panel on the right.

Navigation Panel
The Navigation Panel is organized in an accordion and contains various features for working with and publishing reference data, as well as for tracking changes, synchronization, and troubleshooting. The number of functions you might use or perform depends on the role you’re assigned.
The Navigation Panel contains the following tabs:
- Data
-
Involves defined tables, views, hierarchies, categories, and related problems.
- Workflows
-
List of defined workflows, which control how table data is processed.
- Publish
-
List of changes made to reference data intended for publishing.
- Synchronization
-
Communication with defined systems connected to central authority tables.
- Change Log
-
List of performed changes in the reference data, based on the filters you enter.
- System
-
Error log information including data problems, action history, and long operation data.
| Some of the links and associated screens are available only for users with higher access privileges: supervisors, managers, and administrators. |
Viewing Panel
The Viewing Panel is the main working space in RDM. After you select an item in the Navigation Panel, the Viewing Panel is where you view details, edit and publish records, perform synchronizations with targets systems, and other actions.
The Viewing Panel is organized similarly to a web browser: all the different features and tables are opened in separate tabs.
The Toolbar above a displayed table contains various viewing-mode-dependent functions.
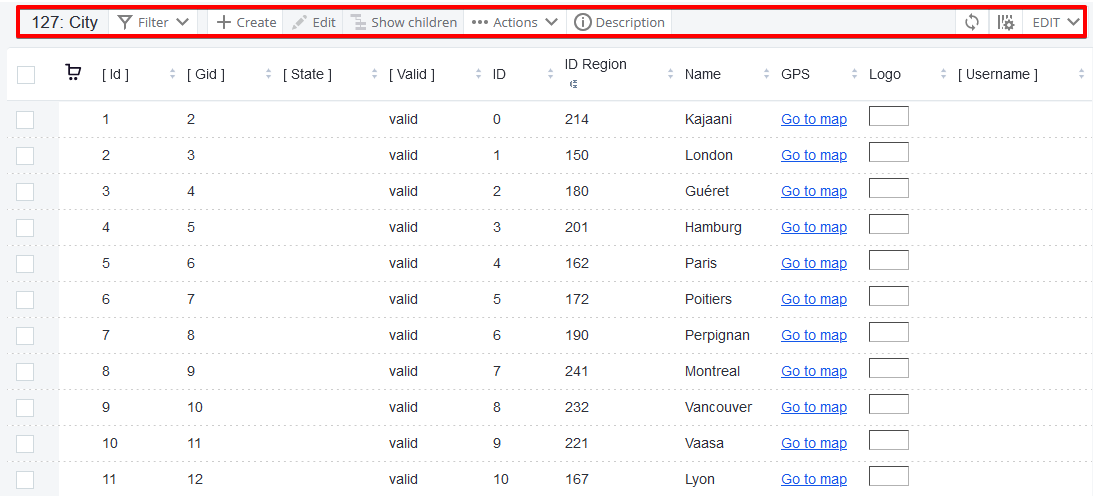
Default columns
In addition to the attributes imported from the database, RDM adds its own system attributes called default columns. These are enclosed in square brackets, for example, State. The visibility of specific default columns depends on the data-viewing mode.
See the full list of default columns and their meaning (without the brackets):
-
Id: Unique record identifier.
-
Gid: Group ID (used with record versioning: same GID and different ID mean a different version of the record). See Versioning Records in RDM.
-
State: Workflow state.
-
Valid: Validity flag. See Record validity.
-
User: The user that made the change.
-
Date from (in HISTORY and ALL_HISTORY modes): Attribute values are effective from this date.
-
Date to (in HISTORY and ALL_HISTORY modes): Attribute values are effective until this date.
-
Tags (in ALL_HISTORY mode): Lists the tags used during record publishing.
Record edit states
To assist in identifying edited records (prior to their publication), as well as viewing them from the historical point of view (which records are obsolete or still valid), the RDM Web Application includes color-coded dots to reflect the type of process that was initiated:
-
Green: The record was newly created.
-
Orange: A change was performed on an existing record.
-
Red: An existing record was deleted.
If a color-coded dot is present next to the record or attribute value, it shows which changes have been performed on the specific record if any, in the context of the given mode or feature.
Record validity
Some attributes in RDM tables are subject to validity conditions, which define if the input value is valid. The conditions are checked when you create or edit records in RDM.
Two kinds of validations are used:
-
Instantaneous validations are performed automatically when you enter an attribute value (the conditions can be, for example, regular expressions or string size).
If the input value does not meet the conditions, an INVALID message appears next to the attribute field.
-
Online validations are based on more complex conditions and are initiated manually by selecting Validate in the Create detail or Edit detail dialog or upon closing it. They are performed by ONE plans (that use, for example, phone number or address lookups) or SQL queries in RDM.
If the input value does not meet the conditions, a Warning message appears next to the attribute field.
Records that do not satisfy online validation conditions or are imported to RDM with invalid inputs have the INVALID value in the Validity default column and cannot be published.
Record validity conditions and validations are defined by the administrator in the RDM backend and cannot be changed directly in the web application.
Was this page useful?