
Configuring Plans for Exporting Data from RDM Hierarchies
RDM lets you export data from a configured hierarchy. The configuration produces a plan for each hierarchy.
Step 1 Generate the plan
Expand RDM Logical Model > Hierarchies, right-click one of the existing hierarchies, and select Generate export plan.
The plan naming convention is [hierarchy_name]_export.plan.
|
Step 2 Configure the plan
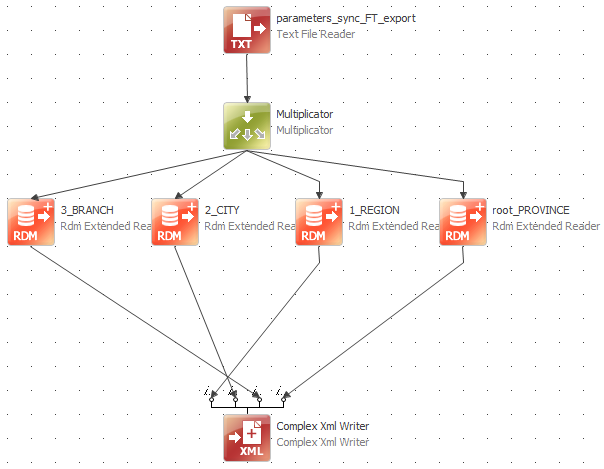
When a plan for exporting data from a hierarchy is generated for the first time, it contains the following steps:
-
Multiplicator for making input parameters available to all Extended Readers.
-
RDM Extended Reader times the number of levels in the hierarchy for exporting data from RDM.
-
Complex XML Writer for writing data into an XML file.
Complete the plan:
-
Right-click the hierarchy for which the plan has been generated in the previous step and select Open export plan.
-
Add an input step (for example, a Text File Reader or JDBC Reader) containing parameters for RDM Extended Reader.
The data source should have one row of data containing the following data (the column names are up to you: they are mapped to configuration fields in the RDM Reader steps): * username (Optional: if you are passing credentials manually) - A valid RDM user with read permissions to the table. * password (Optional: if you are passing credentials manually) - User password. * timestamp - The date as of which to export data.
+ .Example parameters file
username;password;timestamp
betty;5ecurePassword;2016-01-01 00:00:00
+ NOTE: Leaving the
timestampattribute empty is treated as "now".+ IMPORTANT: The date format in the example is the recommended date format.
-
Connect the input step with parameters to Multiplicator.
-
For each RDM Extended Reader step, double-click the step and configure it.
On the General tab, map the timestamp column from your parameters input to the Timestamp attribute of the step.
-
(Optional: if you are passing credentials manually) From the step navigation tree, select Credentials and configure the credentials:
-
In the User field, enter the name of the attribute containing the username.
-
In the Password field, enter the attribute containing user password.
-
The plan is ready to be tested and deployed.
Was this page useful?