
Manage Permissions of Users and Roles
This guide provides an overview of permissions, how to assign them to users and roles, and how to configure custom permissions. Before working with permissions management in ONE, it is important to understand the following concepts:
-
Permissions of Users and Roles can be regulated by assigning and removing pre-configured Capabilities. A capability refers to composed permissions that can regulate access to multiple entity instances across a hierarchy. Role capabilities can be defined in the application by adding the role to one of the Operation Sets. For default capabilities, see Default permissions.
-
Capabilities are composed of Operation Sets and Operations. You can think of operation sets as the most granular permissions that can be assigned to users and roles. For more details, see Configuring custom permissions. There are three pre-defined operation sets that determine what the user can do with the node: Owner, Viewer and Editor. In the ONE Web Application, within entities, you can assign or add operation rights to roles. For more information, see sharing and revoking permissions.
Default permissions
Default permissions for the Ataccama ONE web app are loaded to the application on the first start and contain permissions definition through the designation of capabilities and operation sets to roles. There is a default configuration for users and roles, permissions (represented by capabilities and operation sets), and permissions assigned to users and roles.
| For more information on capabilities and operations sets, see Configuring custom permissions. |
The logic is as follows: each role has predefined capabilities, which have predefined operation permissions (Owner, Editor or Viewer) set on a node by node basis.
For example, the role MMM_data_manager has the following capabilities:
-
application-user -
source-admin -
catalog-admin -
rule-admin -
component-admin -
lookup-item-admin -
term-viewer -
governance-viewer
Each of the capabilities defined for this role in turn has it’s own operations definitions for each node in the application. For example the operation set for catalog-admin is Owner on catalog item
Users of the application (known as persons) are then mapped to roles and inherit the permissions for these roles.
There are two universal Keycloak roles for application permissions MMM_admin and MMM_user.
The MMM_admin role must be assigned to at least one user, i.e. a superuser who should have full access and editing rights across the whole application.
The MMM_user role must be assigned to every user, in order for them to have view access to navigation.
However these roles are composite roles so it is actually the associated roles admin and default that will be assigned to users (consequently assigning MMM_admin and MMM_user).
For the permissions by entity for these roles, see Application permissions.
Application permissions
| Application admin | Application user | |
|---|---|---|
View and access all items in the navigation |
x |
x |
View Organization settings |
x |
x |
Access Processing Center |
x |
x |
Access Notification Center |
x |
x |
Access My account |
x |
x |
View Persons |
x |
x |
Edit Persons |
x |
|
View Roles |
x |
x |
Edit Roles |
x |
|
View Relationship types |
x |
x |
Edit Relationship types |
x |
|
View Navigation |
x |
x |
Edit Navigation |
x |
|
View Metadata model |
x |
x |
Edit Metadata model |
x |
|
View Metadata model graph |
x |
x |
View Configurations |
x |
x |
Edit Configurations |
x |
|
View DQ Dimensions |
x |
x |
Edit DQ dimensions |
x |
|
View Profiling configurations |
x |
x |
Edit Profiling configurations |
x |
|
View Documentation flow configurations |
x |
x |
Edit Documentation flow configurations |
x |
Entity Permissions
Custom Entities
| Owner | Editor | Viewer | |
|---|---|---|---|
Access entity |
x |
x |
x |
View metadata |
x |
x |
x |
Remove entity and all its children |
x |
x |
|
View access |
x |
x |
x |
Edit access |
x |
||
Edit metadata |
x |
x |
|
Create draft |
x |
x |
|
View draft |
x |
x |
|
Publish Changes |
x |
||
Discard changes |
x |
x |
|
Comment |
x |
x |
x |
View history |
x |
x |
x |
Compare changes |
x |
x |
x |
Source
| Owner | Editor | Viewer | |
|---|---|---|---|
Access source |
x |
x |
x |
View source metadata |
x |
x |
x |
Remove source and all its children |
x |
x |
|
Use saved credentials |
x |
x |
|
Save credentials |
x |
x |
|
Use default credentials |
x |
x |
|
Change default credential |
x |
x |
|
View access |
x |
x |
x |
Edit access |
x |
||
Add / Change / Remove Location |
x |
x |
|
Add / Change / Remove Connection |
x |
x |
|
Edit metadata |
x |
x |
|
Create draft |
x |
x |
|
View draft |
x |
x |
x |
Publish Changes |
x |
||
Browse Data |
x |
x |
x |
Preview |
x |
x |
|
Assign Term |
x |
x |
|
Comment |
x |
x |
x |
Import |
x |
x |
|
Profile |
x |
x |
|
Documentation |
x |
x |
|
Scan Lineage |
x |
x |
|
Schedule available actions |
x |
x |
|
View history |
x |
x |
x |
Credentials
| Owner | Editor | Viewer | |
|---|---|---|---|
Access credentials |
x |
x |
|
Change default credential |
x |
||
Edit |
x |
x |
|
Publish Changes |
x |
||
Remove |
x |
x |
|
Save credentials |
x |
x |
|
Use default credentials |
x |
x |
|
Use saved credentials |
x |
x |
|
View credentials |
x |
x |
Connections
| Owner | Editor | Viewer | |
|---|---|---|---|
Access Connection |
x |
x |
x |
View metadata |
x |
x |
x |
Remove connection and all it’s children |
x |
x |
|
Use saved credentials |
x |
x |
|
Save credentials |
x |
x |
|
Use default credentials |
x |
x |
|
Change default credential |
x |
x |
|
View access |
x |
x |
|
Edit Access |
x |
||
Edit metadata |
x |
x |
|
Create draft |
x |
x |
|
View draft |
x |
x |
|
Publish changes |
x |
||
Browse data |
x |
x |
x |
Assign term |
x |
x |
|
Comment |
x |
x |
x |
Import |
x |
x |
|
Profile |
x |
x |
|
Documentation |
x |
x |
|
Calculate lineage |
x |
x |
|
Schedule |
x |
||
View history |
x |
x |
x |
Catalog Items
| Owner | Editor | Viewer | |
|---|---|---|---|
Access catalog item |
x |
x |
x |
View metadata |
x |
x |
x |
Remove |
x |
x |
|
View access |
x |
x |
x |
Edit access |
x |
||
Edit metadata |
x |
x |
|
Add attributes |
x |
x |
|
Create draft |
x |
x |
|
View draft |
x |
x |
x |
Publish changes |
x |
||
Browse data |
x |
x |
|
View profile |
x |
x |
x |
View anomalies |
x |
x |
x |
View DQ |
x |
x |
x |
View relationships |
x |
x |
x |
View lineage |
x |
x |
x |
Comment |
x |
x |
x |
Assign term |
x |
x |
|
Remove terms |
x |
x |
|
Resolve term suggestion |
x |
x |
|
Edit relationships |
x |
x |
|
Import |
x |
x |
|
Profile |
x |
x |
|
Resolve anomalies |
x |
x |
|
Evaluate DQ |
x |
x |
|
Scan lineage |
x |
x |
|
Schedule |
x |
x |
|
Use catalog item in DQ Projects |
x |
x |
x |
View history |
x |
x |
x |
Business Terms
| Owner | Editor | Viewer | |
|---|---|---|---|
Access term |
x |
x |
x |
View metadata |
x |
x |
x |
Remove |
x |
x |
|
View access |
x |
x |
x |
Edit access |
x |
||
Edit metadata |
x |
x |
|
Create draft |
x |
x |
|
View draft |
x |
x |
x |
Publish changes |
x |
x |
|
View DQ |
x |
x |
x |
View relationships |
x |
x |
x |
Comment |
x |
x |
|
Resolve term suggestion |
x |
x |
|
Edit relationships |
x |
x |
|
Edit synonyms |
x |
x |
|
Evaluate DQ |
x |
x |
|
Schedule |
x |
x |
|
View history |
x |
x |
x |
View occurrence statistics |
x |
x |
x |
Add detection rules |
x |
x |
|
Enable / disable AI detection |
x |
x |
|
Add table level rules |
x |
x |
|
Add DQ rules |
x |
x |
|
Assign this term to other entities |
x |
x |
x |
Rules
| Owner | Editor | Viewer | |
|---|---|---|---|
Access rule |
x |
x |
x |
View metadata |
x |
x |
x |
Remove |
x |
x |
|
View access |
x |
x |
x |
Edit access |
x |
||
Edit metadata |
x |
x |
|
Create draft |
x |
x |
|
View draft |
x |
x |
x |
Publish changes |
x |
||
View relationships |
x |
x |
x |
Comment |
x |
x |
x |
Edit relationships |
x |
x |
|
View history |
x |
x |
x |
View occurrence statistics |
x |
x |
x |
View implementation |
x |
x |
x |
Edit implementation |
x |
x |
|
Use rule |
x |
x |
x |
Debug |
x |
x |
x |
Components
| Owner | Editor | Viewer | |
|---|---|---|---|
Access component |
x |
x |
x |
View metadata |
x |
x |
x |
Remove |
x |
x |
|
View access |
x |
x |
x |
Edit access |
x |
||
Edit metadata |
x |
x |
|
Create draft |
x |
x |
|
View draft |
x |
x |
x |
Publish Changes |
x |
||
Comment |
x |
x |
x |
View history |
x |
x |
x |
View occurrence statistics |
x |
x |
x |
View implementation |
x |
x |
x |
Edit implementation |
x |
x |
|
Use component in rules |
x |
x |
x |
Change workflow states |
x |
x |
Lookups
| Owner | Editor | Viewer | |
|---|---|---|---|
Access lookup |
x |
x |
x |
View metadata |
x |
x |
x |
Remove |
x |
x |
|
View access |
x |
x |
x |
Edit access |
x |
||
Edit metadata |
x |
x |
|
Create draft |
x |
x |
|
View draft |
x |
x |
|
Publish changes |
x |
||
Comment |
x |
x |
x |
View history |
x |
x |
x |
View occurrence statistics |
x |
x |
x |
Build / update lookup |
x |
x |
|
Use lookups in rules |
x |
x |
x |
DQ Projects
| Owner | Editor | Viewer | |
|---|---|---|---|
Access project |
x |
x |
x |
View metadata |
x |
x |
x |
View results |
x |
x |
x |
Remove |
x |
x |
|
View access |
x |
x |
x |
Edit access |
x |
||
Edit metadata |
x |
x |
|
Create draft |
x |
x |
|
View draft |
x |
x |
x |
Publish changes |
x |
||
Comment |
x |
x |
x |
View configuration history |
x |
x |
x |
View run versions |
x |
x |
x |
Edit configuration |
x |
x |
|
Add / remove items |
x |
x |
|
Add / remove checks |
x |
x |
|
View alert settings |
x |
x |
x |
Set-up alerts |
x |
x |
|
Schedule |
x |
x |
|
Run ad-hoc monitoring |
x |
x |
|
Edit notification settings |
x |
x |
Granting, sharing and revoking permissions
| After making changes to permissions settings, you need to re-index Catalog Item Search for items to be displayed correctly for users. For more information, see xref:[Re-index Catalog Item Search] section. |
Viewing permissions on an entity
To view permissions on a particular entity, select the required entity and navigate to the Access tab. Using the Access tab users can also share and set permissions on entities.
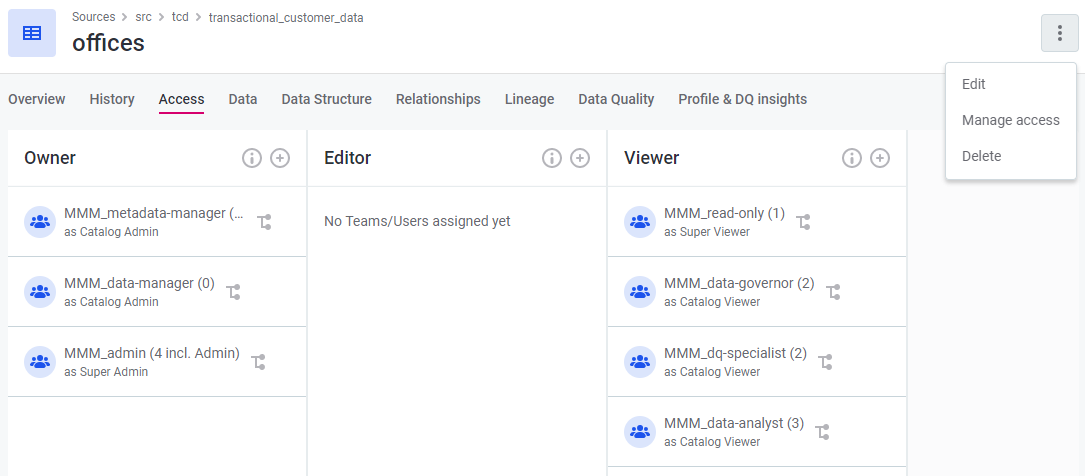
Granting permissions on entities
| Every user can have multiple roles which come with different sets of permissions, as well as different roles on different entities. Adding a role as in the Access tab extends the capabilities of that role. As a result, for newly added roles you will see the display name for the added capability, based on whether the role has been added as Owner, Viewer or Editor, and whether this permission applies just to the entity or also on child entities. If the permission applies to the asset and any children, you will see the title 'Owner/Viewer/Editor Everywhere'. If the permission is not inherited by child assets you will see the title 'Owner/Viewer/Editor Here and Owner/Viewer/Editor on Children.' |
To set permissions on an entity, select the desired entity and navigate to the Access tab.
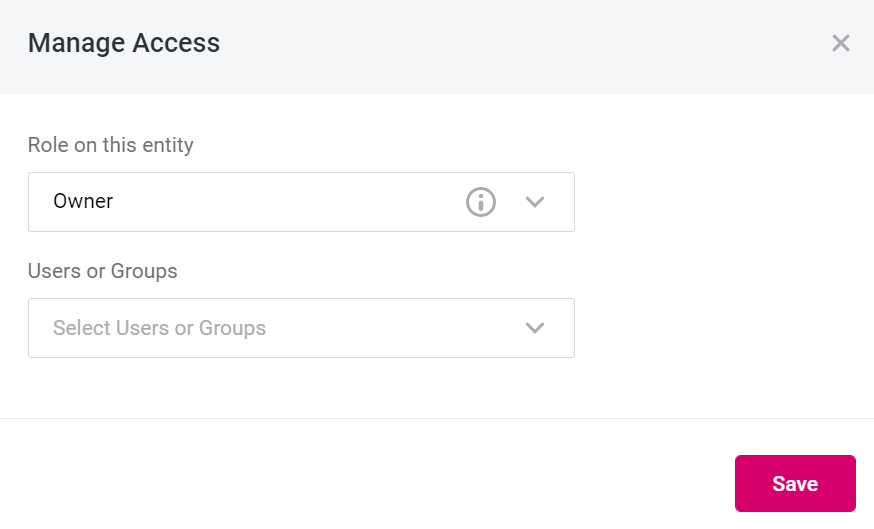
To start assigning permissions, either navigate to each role and select (+), or select Manage access on the top right-hand side of the screen. You will then need to select Owner, Viewer or Editor and which roles this applies to in the dialog box.
-
Role on this entity: select from the possible roles
-
Viewer
-
Basic role providing view access to the metadata asset. Can’t edit the asset.
-
Can access assets in published state only.
-
Has no permissions for workflow transitions. **Editor
-
Can access assets in all states.
-
Provides view access and the ability to edit the metadata asset.
-
Can’t publish changes
-
Can’t manage access to the asset
-
-
Owner
-
Can publish changes on the specific asset
-
Can manage access to the asset
-
Provides full permissions for the metadata asset.
-
Can access assets in all workflow states.
For all entities except Source and Location, permissions will be inherited for any children or attributes of that entity. For example if you are the owner on a catalog item, you will also be the owner of attributes. For Source and Location, see step 2.
-
-
-
Roles on child entities (Source and Location only): select from the following inheritance options.
-
Owner. Owner everywhere
-
Editor. Owner here and Editor on all children
-
Viewer. Owner here and Viewer on all children
-
-
Users or Groups: specify the usernames or groups you would like to have these permissions on this entity.
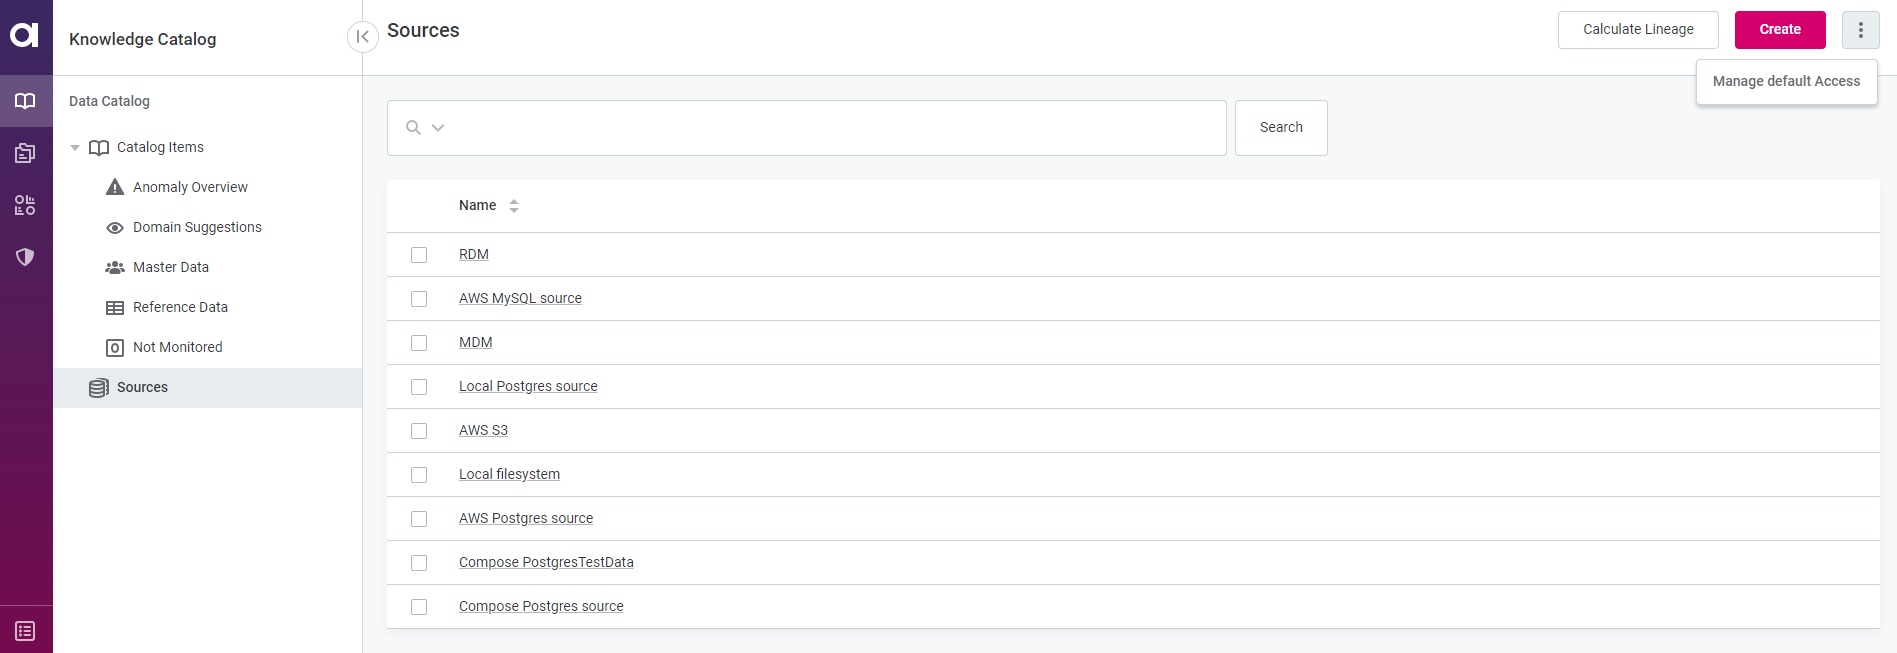
Managing access for top-level entities
It is possible to set the default permissions on any embedded array entity in the application on top-level entities, such as sources, rules, terms, etc., which are propagated to all root entities (to all sources, all rules, all terms).
For example, if you edit the default access for Sources, all changes will be propagated to all available sources in the list because the Source entity is a top-level entity.
To assign the default permissions, do the following:
-
Navigate to the entity you want to change permissions for (in the example below, the array embedded entity is source, which refers to the Sources page).
-
Using the three dots menu, select Manage default access.
-
Configure the default access on the right-hand sidebar.
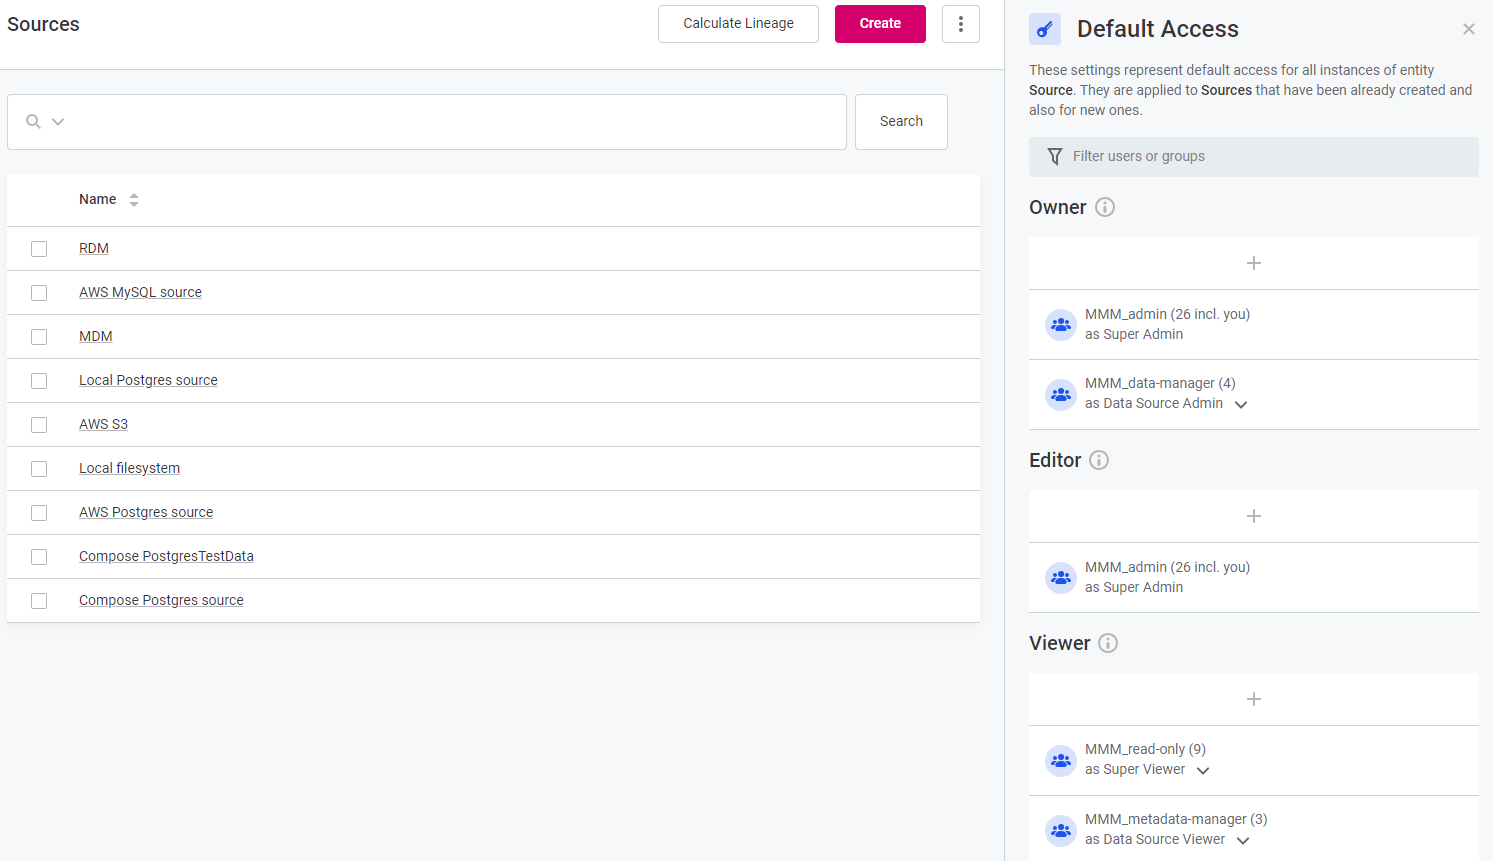
| If you cannot see a required capability, such as Editor, it means the capability was not configured on this entity. This is done in Global Settings > Permissions: see Configuring custom permissions. |
Removing permissions on entities
To remove roles from the default permissions on top-level entities, the permissions need to be deleted from the permissions.json file.
For more information, see Configuring custom permissions.
To remove roles you have added to the default access on entities, use the trash icon and select Remove. The role will be immediately unassigned.
Configuring custom permissions
Permissions of Users and Roles can be regulated by assigning and removing pre-configured Capabilities. It is possible to configure capabilities directly from the ONE web app via the permissions configuration section. Capabilities are composed of Operation sets and Operations. Operation sets are more granular than Capabilities, which are defined only on entity type and cannot be assigned directly. Every installation comes with a default configuration, which can be amended. It is, therefore, possible to adjust existing Capabilities and Operations Sets as well as create new ones.
To create custom permissions you need to:
-
Work with the
permissions.jsonfile in ONE web app. -
Know the structure of the
permissions.jsonfile, what changes can be achieved, and the existing operations list. -
Publish changes safely using the Recalculate button and resolve possible issues.
Accessing the permissions model
To configure custom role permissions in the application, navigate to the Organization > Permissions Model.
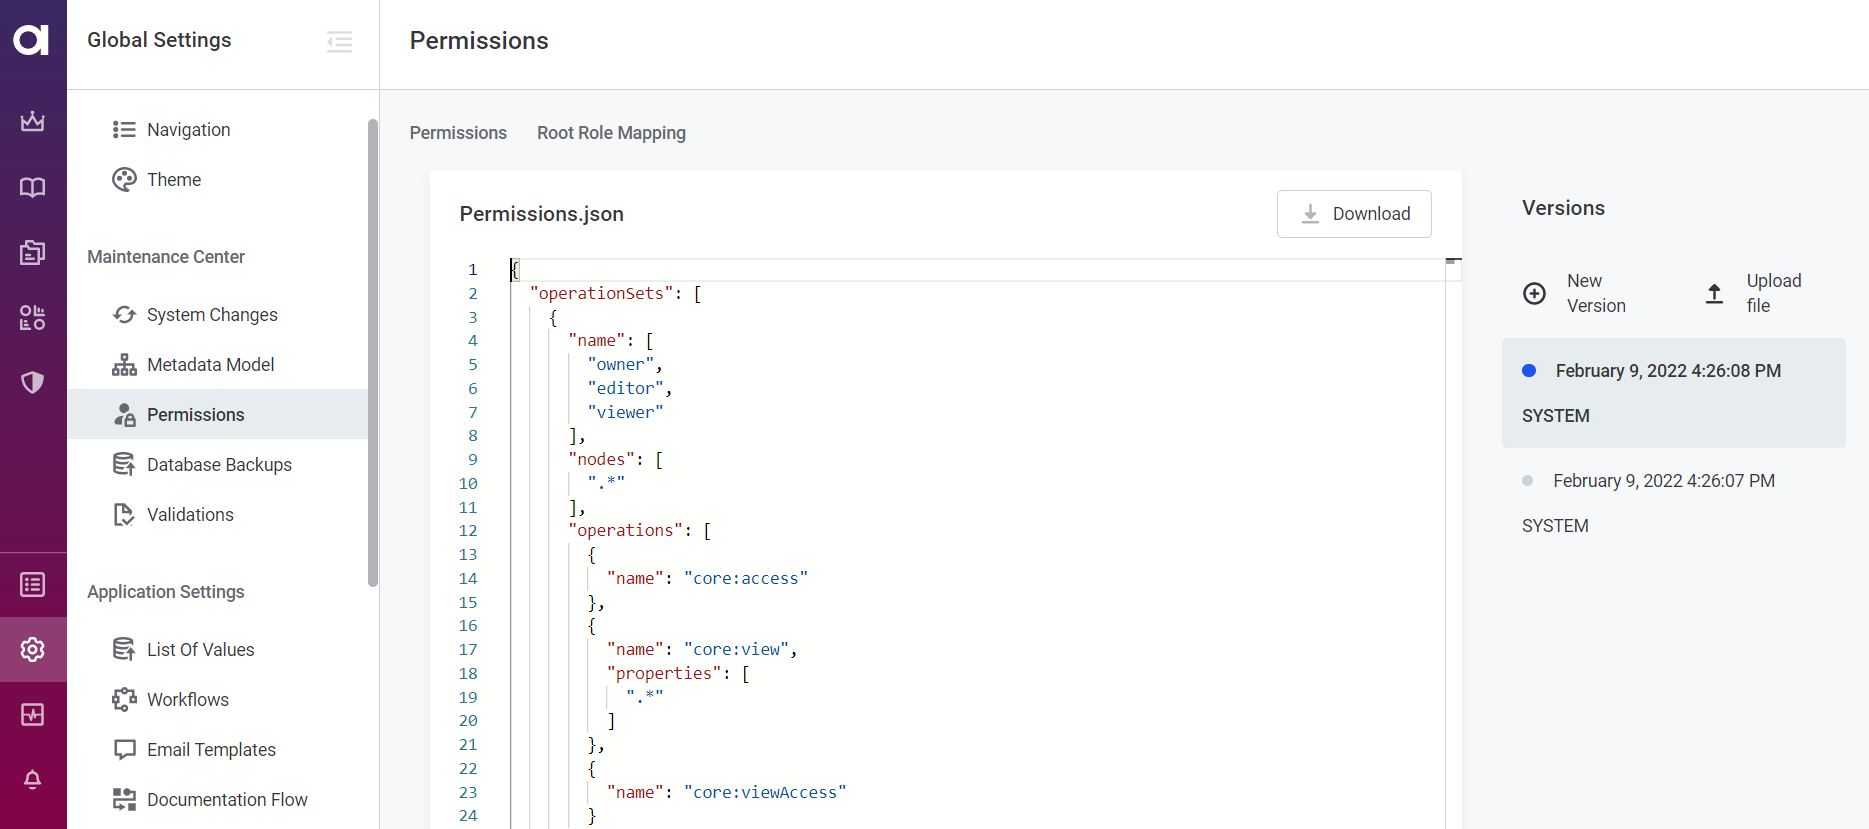
Here you will see the permissions.json file, which can be configured directly in the application and published from the MD mode or uploaded to the application.
For more information on the MD mode, see xref:metadata-model:system-changes.adoc.
On the right-hand side, there are the versions of the permissions.json file.
To edit, click New version.
An editable draft of the file opens.
Configuring permissions.json
permissions.json consists of two parts:
-
Operation Sets, where it is possible to set permissions by assigning operations on entities by nodes. Under operation sets there are two different kinds of definitions:
-
Definition of the Operation sets (Owner, Editor, Viewer).
-
definition of what those operation sets can do.
-
-
Capabilities, where it is possible to set permissions on entities by node paths.
Through the configuration of the permissions.json file, it is possible to make the following changes:
-
Change the names of the Operation Sets and their description.
-
Change the Capabilities of the role on a node.
For example, if you want to grant Editors the rights to publish changes on Catalog Item attributes, add the Editors to the list of roles for this action.
To change capabilities, configure them in the capabilities array. In the following example, the Editor’s capabilities on attributes, that are embedded objects of catalogItems, were changed.
{
      "name": "attributeAdmin",
      "displayName": "Attribute Admin",
      "description": "<description>",
      "available": true,
      "nodePaths": [
        "/sources/locations/catalogItems/attributes"
      ],
      "operationSets": [
        {
          "nodePaths": [
            ""
          ],
          "operationSet": "editor"
        }
      ]
    }
The procedure is the same for default and custom entities.
The
nodePathcan be either a full path or the one which is the Metadata Model root path.If you are not sure under which capability to add a new path, you can add it underneath the general roles' capabilities, for example, underneath "Owner Everywhere", "Editor Everywhere", etc.. But in that case you will be granting those permissions to all users that have that “general” capability already.
-
Manage the roles and capabilities of Operations sets.
-
Delete default roles from the Operations Sets.
Operations
Operations are actions that can be used in operation sets to define permissions of users and roles. An operation itself cannot be assigned to a user or role. Most operations are set on nodes, but some operations are set on properties only.
Operation name is composed from a namespace (ie. “catalog”), colon (“:”) and name of the operation (ie. “preview”).
Operations on nodes
| Operations | Description |
|---|---|
|
This property is getting anomalies for Catalog Items, if there are any anomalies in found in backend. |
|
Specifies what attributes you are interested in for checking by sending IDs of attributes. |
|
Specifies what attribute profiles you are interested in for checking by sending IDs of attributes. |
|
Update feedback on whether anomaly was identified correctly by AI (whether it is confirmed by user or not in Profile Inspector). It is updating feedback on bulk attribute profiles. |
|
Update feedback on whether anomaly was identified correctly by AI (whether it is confirmed by user or not in Profile Inspector). It is updating feedback on single attribute profile. |
|
Update feedback on whether anomaly was identified correctly by AI (whether it is confirmed by user or not in Profile Inspector) on a Catalog Item profile. |
|
Retrieves information on the partitions from backend to show in the overview widgets. |
|
Defines, if the data preview is shown. Preview is a live view of a data source. |
|
Reads data from the data source. |
|
Confirms a successful uploading of components. In an uploading job failure case the error will be shown. |
|
Enables downloading of components' files. |
|
Enables creating templates of the components. |
|
Enables uploading of component’s files. |
|
Refers to a simple access permissions and determines whether the node should be available for a role. Someone who does not have an access to a node, won’t see this node (for example, catalog item) in the listing (Catalog items list) and when trying to access the node via link, the error will appear saying that the user has no permissions. |
|
Defines whether the role can create a copy of a node. If there is no permission, there will be no create copy button in the application. |
|
Defines if the role is allowed to create the delete draft when deleting something on a node, including buttons delete instantly. |
|
Defines if the role is allowed to destroy the draft of the node changes. When the draft is discarded, the node is reverted to a previously published version. |
|
Determines if the role can change permissions on the Access page. |
|
Defines if the role is allowed to publish drafts. When changes are published, it is no longer possible to edit that version. |
|
Restores previous version on history. |
|
Determines if the role can view permissions on the Access page. |
|
Browses a data source. |
|
Tests connection to a multiple data sources simultaneously. |
|
Starts documentation flow on a source. |
|
Generates authorization refresh token for connecting to data source. When plugin is triggered, the backend passes supplied credentials details (clientid/secret/endpoint/…) to particular provider and gets the refresh token which is used later for connecting to the data source. |
|
Imports selected catalog items into catalog. |
|
Previews data from a catalog item. |
|
Controls whether the Run preview button is available at the SQL Catalog Item creation and editing workflow. If the operation is present, the preview of the catalog item is shown for the query. |
|
Triggers the metadata import for the SQL Catalog Item. Controls whether it is possible to create or edit a SQL Catalog Item. When it is present, the Save button is available and the metadata import for the SQL Catalog Item can be done. |
|
Tests connection to a specific data source. |
|
Checks whether evaluation is available for attributes. If there are validations rules specified for terms on attributes, then DQ evaluation is available. |
|
Checks whether evaluation is available for catalog items. If there are validations rules specified for terms on catalog items, then DQ evaluation is available. |
|
Checks whether evaluation is available for terms. |
|
Triggers DQ evaluation jobs for attributes. |
|
Triggers DQ evaluation jobs for Catalog Items. |
|
Triggering DQ evaluation jobs for terms. |
|
Enables exporting drill through to CSV. |
|
Retrieves information from back end for invalid samples page in monitoring projects. |
|
Enables canceling of the running jobs. |
|
Confirms the lookup was uploaded. |
|
Creates lookups. |
|
Creates lookup file on the fly, when business friendly rule needs a lookup which does not exist. |
|
Enables uploading lookup files. |
|
Starts Manta lineage processing. |
|
Enables applying rule suggestions in monitoring projects. |
|
Randers attributes that have some anomaly. This is mainly used in invalid sampling listing. |
|
Shows project main page for the latest processing in the monitoring project. |
|
Gets the rules suggestions for Catalog Items in monitoring project. |
|
Gets the rules suggestions for the whole monitoring project (for all CIs in project). |
|
Removes all DQ-checks that were created by rule suggestions for Catalog Items in the monitoring project. |
|
Removes all DQ-checks that were created by rule suggestions for the monitoring project (for all CIs in project). |
|
Enables running the project. |
|
Enables copying configuration from one project to another. If projects have the same structure, then copying will be available. |
|
Upgrades the rules and writes it in the history. If the new version of rules is available, there will be an option to upgrade the rules and it will set the new history version. |
|
Checks the compatibility of the different projects before copying configuration from one to another. If the structure is not the same, it will not be possible to create a copy. |
|
Runs the DQ-checks. If you are able to run the monitoring project, when problems appear, the corresponding notes will be displayed. It works with all sorts of validation checks every time when monitoring project is run. |
|
Starts profiling for multiple catalog items. |
|
Retrieves profiling data. |
|
Starts profiling for a specific catalog item. |
|
Lists partition information, if available, for specific catalog item. |
|
Enables rdm deployment. |
|
Submits job to debug component and aggregation rules. |
|
Debugs specific rule condition for simple rules. |
|
Debugs simple rules. |
|
Translates business friendly rules into DQ-expressions. |
|
Recovery property makes it possible to recover the search results from the application. For more information on recovery functionality, see Configure Full-text Search. |
|
Reindex property makes it possible to reindex the search results from the application. It is also carried out periodically to ensure proper functioning of the search. For more information on reindex functionality, see Configure Full-text Search. |
|
Renders statistics widgets. Programmable configurable extensions of mmd notes. |
|
Enables applying terms suggestions by bulk assignment. |
|
Synchronizes term suggestions. |
|
Gets results of transaction data analysis for selected |
|
Runs transaction data analysis for selected Catalog Item with |
|
Creates NOTE: This operation is intended for development purposes only. |
Operations on node properties
For the following operations it is necessary to configure which properties the operations are applied for. Properties of the nodes can be found in the metadata model under each node.
Set properties to .* to set operation on all existing properties of a node.
| Operations | Description |
|---|---|
|
Defines if the role is allowed to create the draft of the node by changing some of its properties. |
|
Defines if the role is allowed to change the value of the properties from A to B. |
|
Refers to a simple view permissions and defines whether the role is able to see the value of a certain property. |
Operation sets
Operation sets are defined by operations and the set of nodes on which they are applied. Operation sets are then combined underneath the capabilities and can be assigned to users in the application.
To define new a operation set, specify the following:
-
Name of the OperationSet.
-
Nodes, where this OperationSet applies.
-
Operations, the actions that are available for the roles who have this OperationSet.
{
  "name": [
    "source-admin"
  ],
  "nodes": [
    "metadata"
  ],
  "hidden": false,
  "operations": [
    {
      "name": "core:createNewDraft",
      "properties": [
        "sources"
      ]
    }
  ]
},
Capabilities
Capabilities are composed permissions which can be assigned to users and roles, and defined by operation sets and tree of entities on which they are applied. Capabilities work as a grouping of operation sets and allow you to set permissions on locations by specifying "nodePaths".
It is necessary, for example, for working with VCIs.
To define a new capability, specify the following:
-
Name of the Capability.
-
nodePaths, which means a direct path to a specific node.
{
      "name": "super-viewer",
      "displayName": "Super Viewer",
      "description": "People with this role have full access but no edit permissions for the application configuration and all assets in the application.",
      "available": true,
      "nodePaths": [
        "/"
      ],
      "operationSets": [
        {
          "nodePaths": [
            "**"
          ],
          "operationSet": "viewer"
        }
      ]
    },
permissions.json syntax
Node Paths Syntax
The path can be:
-
Relative (does not start with /).
-
Absolute (starts with /).
It consists of multiple components delimited by /.
Each component is either:
-
Empty, in which case it is ignored.
-
Literal, an embedded property name traversing from parent to child.
-
Asterisk, one level traversal via embedded property of any name.
-
double asterisk, any number of levels of traversal via properties of any name; this includes zero traversals too. It is possible to force at least one level traversal by
/*.
-
-
Regular expression, matches on embedded property name; beware that the regular expressions should never match
/.
A node path filter can be prefixed with ! which negates it; at least one positive match and no negative match is required.
Resolving issues in permissions.json
The permissions.json file always has two versions: the system and the user version.
When the user version conflicts with the system version, the changes are highlighted, where:
-
Red highlight indicates lines that are not present in the user version.
-
Green highlight shows additions to the user version.
By clicking on the light bulb next to a highlighted section, and selecting Revert this change, you can revert the change to the system version.
If you agree with the changes, click Confirm Changes to resolve the conflict between the user and system versions of the file.
Resolving issues with role mapping
During the upgrade procedure, inconsistencies between roles in Keyckloak and their permissions can be found. In that case, the Root role mapping tab will appear in Permissions model. The tab shows any inconsistencies.
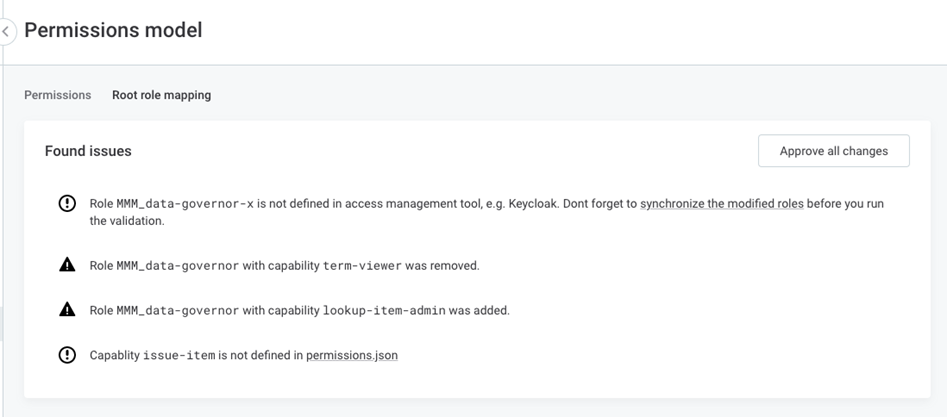
To ignore the inconsistencies between the versions, click Approve all changes button.
Publishing changes
To publish the changes, the user needs to switch to the MD mode in the Upgrade Center. For more information, see System Changes.
-
Select Publish.
-
After the changes are published, select Recalculate.
This will recalculate the permissions for all entities in the application. After the recalculation process is finished you can switch back to the Application Mode: track the progress in the Application Log in the Upgrade Center.
Was this page useful?