
Import and Export
The Import and Export option in one lets you easily transfer custom sets of your data assets, including ONE Object Storage data, between multiple one instances using a compatible meta-metadata (MMD) model. The following export options are available:
-
Export selected entities.
-
Export all entities of a specific type.
-
Export a content pack.
| A content pack is a predefined set of entities that is used to move specific application content between environments. |
What data can be exported is configured using export plans. Currently, the feature is pre-configured for glossary term, and search configuration nodes as well as for content packs. Additional export plans can be provided as needed (see [Export Plans]).
On import, data is validated against the meta-metadata (MMD) model before any changes are published. If a validation error is detected, depending on the import configuration, assets either remain in draft state or the whole import fails and no changes are applied. You then need to resolve the issue manually and reattempt the import. For more information, see Import.
As a support tool for data management, the feature is best suited for managing the application upgrades as well as working with demo data or industry-specific content packs.
| The feature is not intended for data backups. If you want to back up your data, create a database snapshot instead. For more information, see Metadata Backup. |
|
Limitations:
|
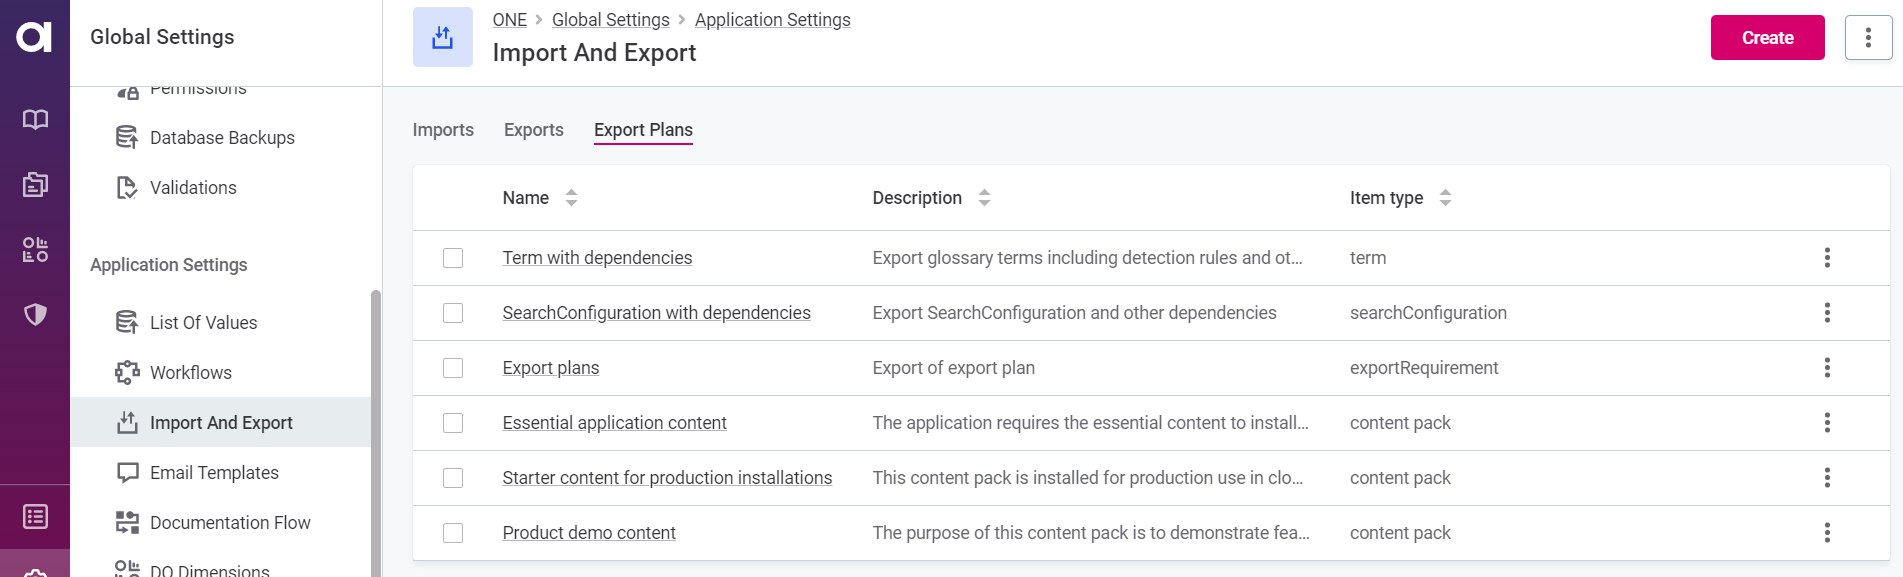
Export plans
Export plans are configurations provided in JSON format that define which metadata is exported as well as how it is imported in the target environment. This includes entities and entity properties as well as various filters that select specific data for export (for example, version selectors, identifiers, matching and reference keys).
Export plans can be defined for entities (particular node type) or content packs (sets of nodes). While you can export entities either as a listing (all entities) or a subset of those entities, you can only export content packs as a whole. In other words, to modify what is exported as a content pack, you need to edit the corresponding export plan.
In the current version, ONE provides out-of-the-box export plans for the following:
-
Glossary terms and their dependencies, such as associated detection rules, DQ dimensions, and other related entities.
-
Search configurations and their dependencies, such as indexed nodes and search filters.
-
Essential application content: Used only for application provisioning during installation (cannot be imported to a running application). This includes the MMM model and key default metadata (search and profiling configurations, DQ dimensions, relation types, email templates).
| Essential application content is not included in other content packs and must always be loaded separately. |
-
Starter content for production installations: Used only for application provisioning during installation in cloud or self-managed environments (cannot be imported to a running application). This includes metadata (terms, rules, and policies) and reference data (lookups, validation rules).
-
Product demo content: Used for small projects demonstrating platform features and user flows. This includes sample data sources, imported and profiled catalog items, pre-populated DQ and anomaly projects, and workflows in different statuses.
-
Export plans: Lets you share export plans.
You can modify, download, or remove existing export plans as needed, or create a new plan. In addition, when you open an export plan, you can also view its history (History) or manage its permissions (Access).
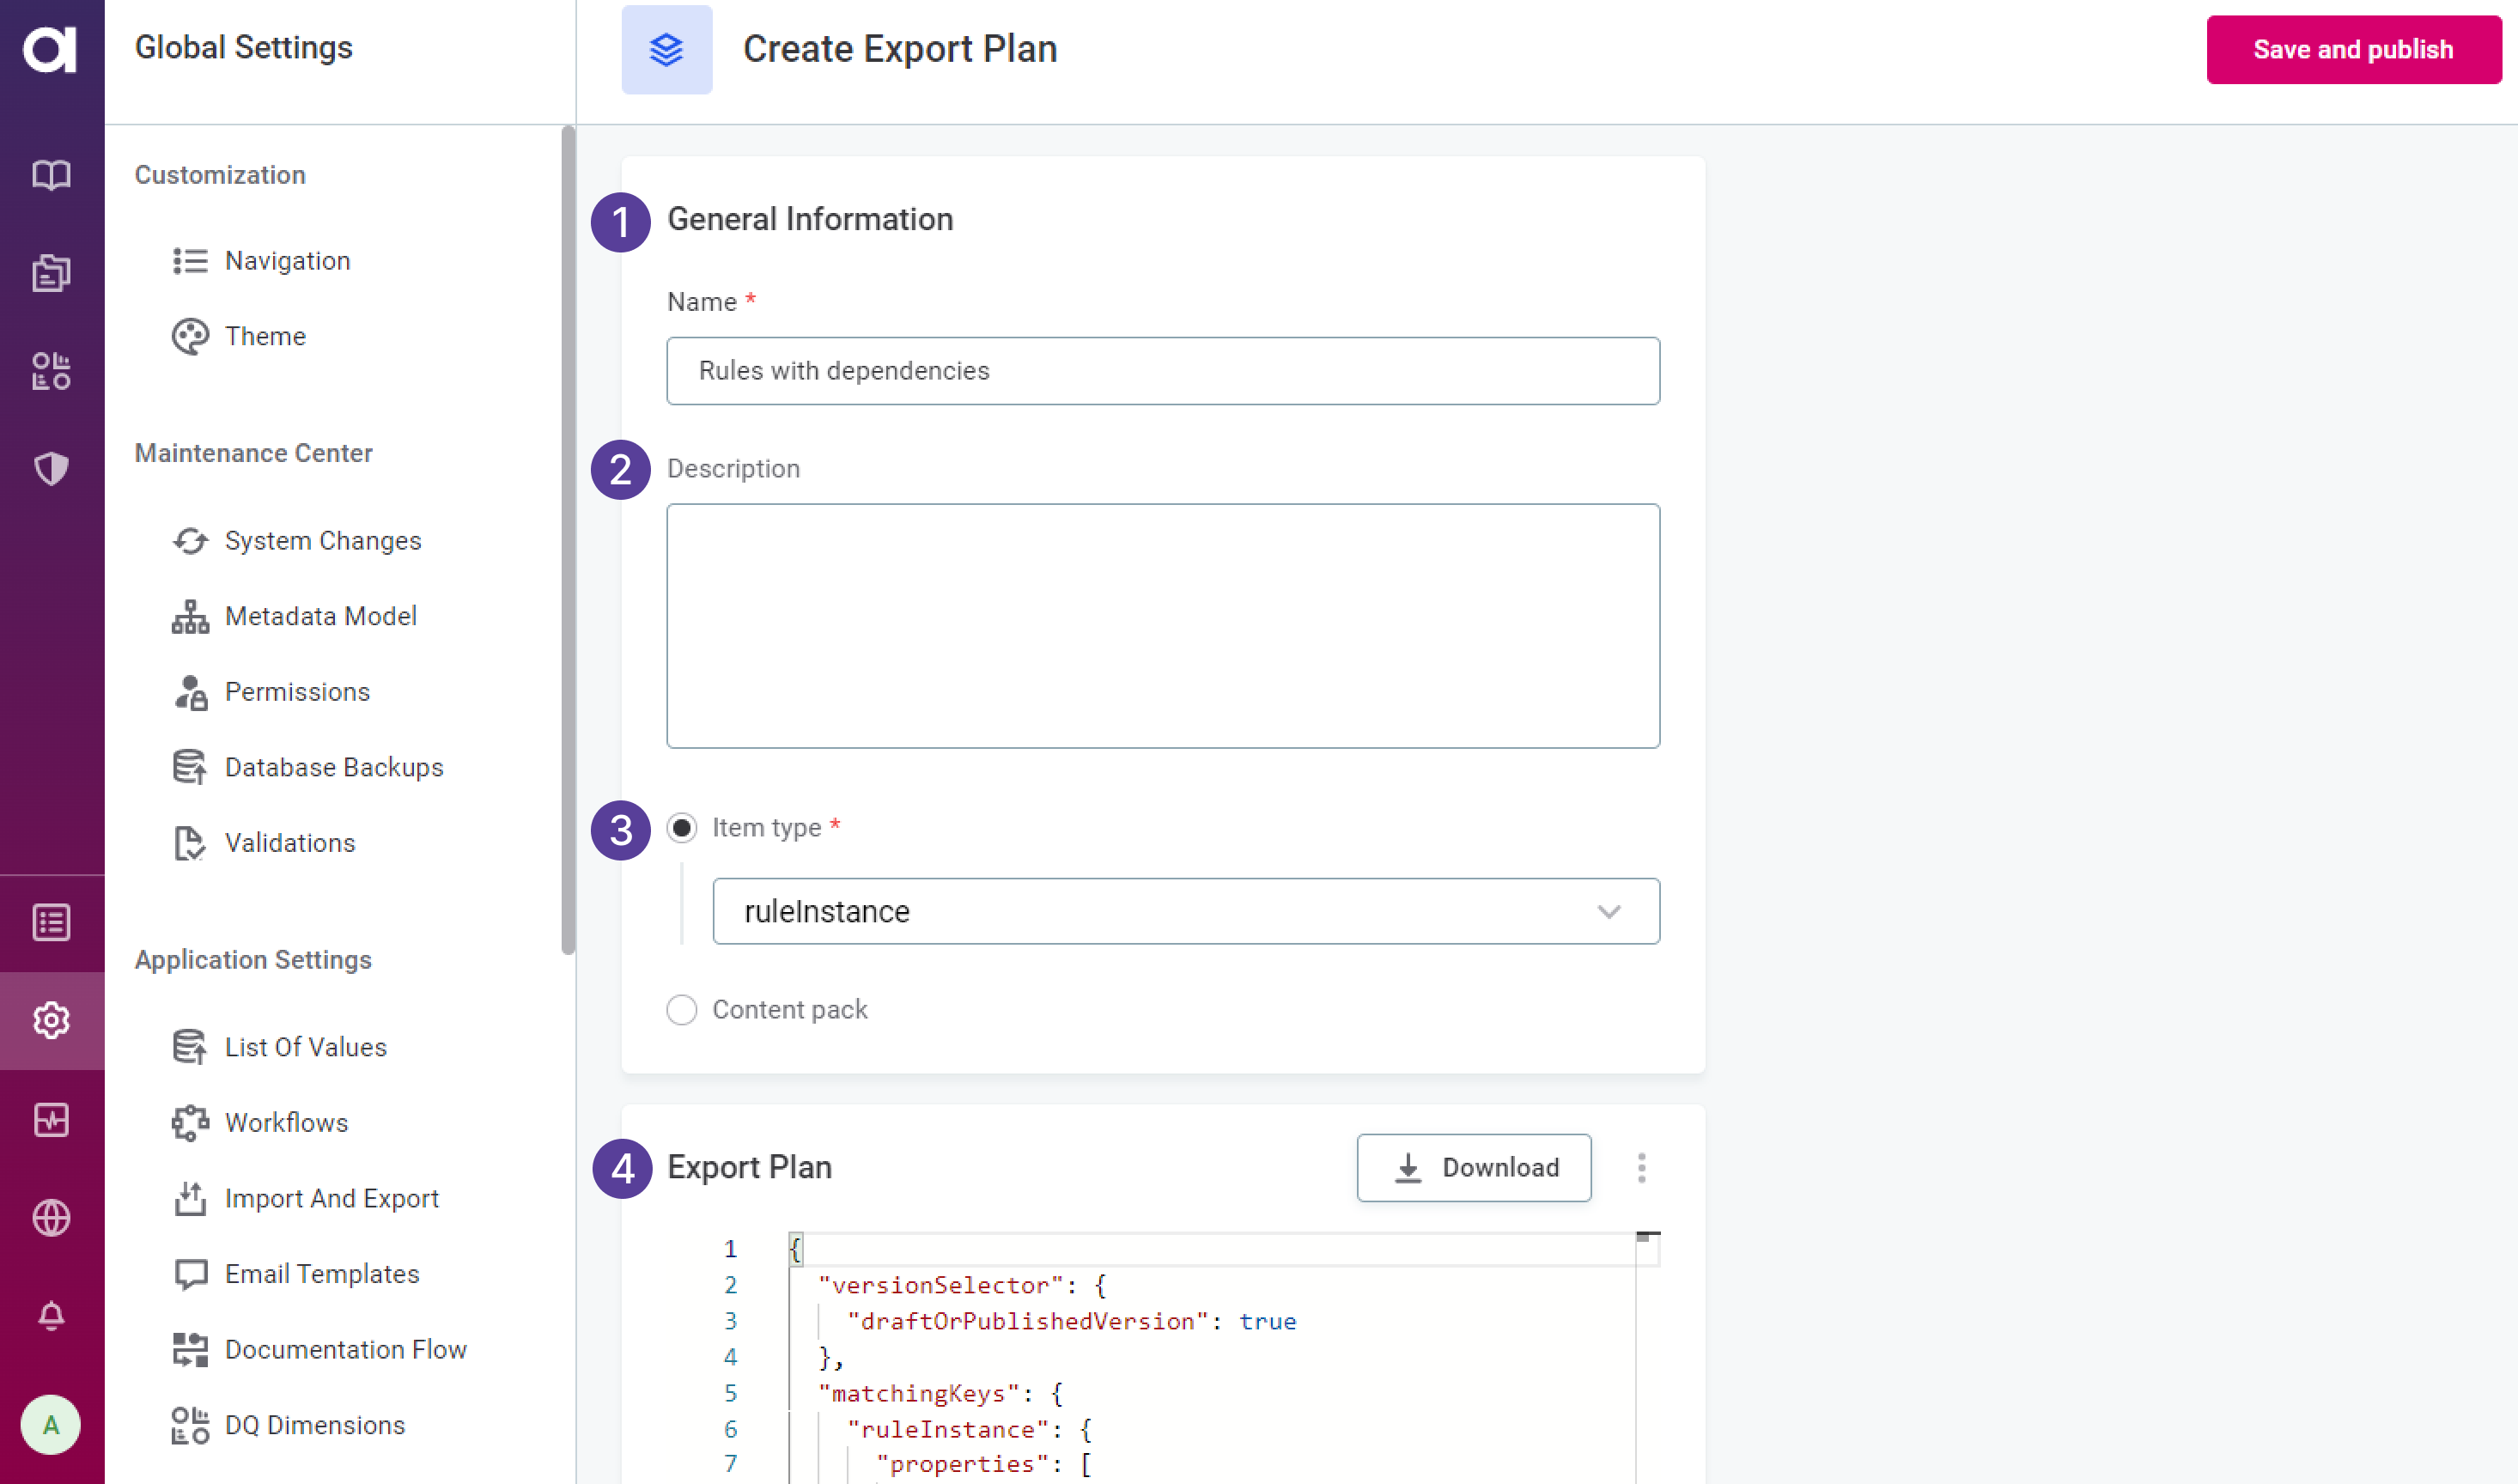
Create export plan
-
To create a new export plan, in ONE, navigate to Global Settings > Application Settings > Import and Export.
-
Switch to Export plans and select Create.
-
Provide the following information:
-
Name (1): Required. The unique name of your export plan.
-
Description (2): Describe the purpose of the export plan.
-
Select the export plan type (Required):
-
Item type (3): Select the node to which the export plan is assigned. Once the export plan is published, this enables the Export list of items option on the relevant tab. You can have multiple export plans per node type.
-
Content pack: Choose this option if you want to create a new export plan for content packs.
-
-
Export plan (4): Required. Enter export instructions directly in the application (Write manually) or select a previously prepared export plan (Upload).
-
As only valid export plans can be saved and published, JSON syntax is verified on input. Make sure to resolve all reported errors before continuing.
-
For detailed information about how to write an export plan, refer to the
README-export-file-format.mdfile in the MMM installation folder (one/mmm-backend/doc/import_export).
-
-
-
Save your changes (Save and publish). Your export plan is now ready for use.
Export
To export data, the following conditions need to be met:
-
There is an export plan available for the node type or the content pack that you want to export.
-
You have the Viewer permissions on the data that you want to export.
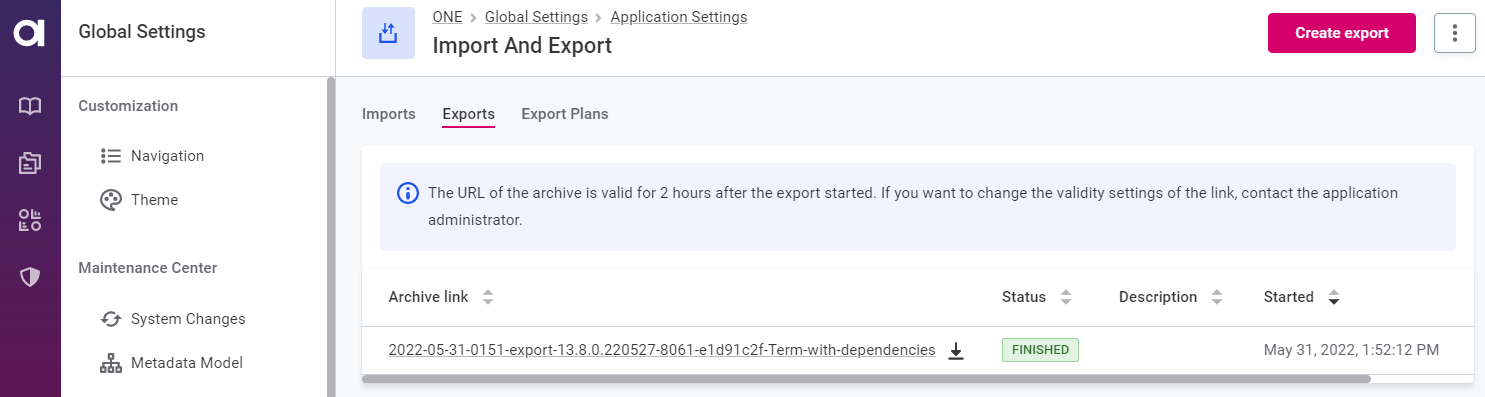
Assets are exported in the form of an encrypted and password-protected ZIP file that holds exported entities, the export plan, as well as the export metadata. Depending on the size of the export, the content might be split into several directories (groups) within the archive.
Finished exports are automatically uploaded to the export bucket in ONE Object Storage from where they can be downloaded for a limited period of time.
-
Depending on what you want to export, proceed with one of the following options:
-
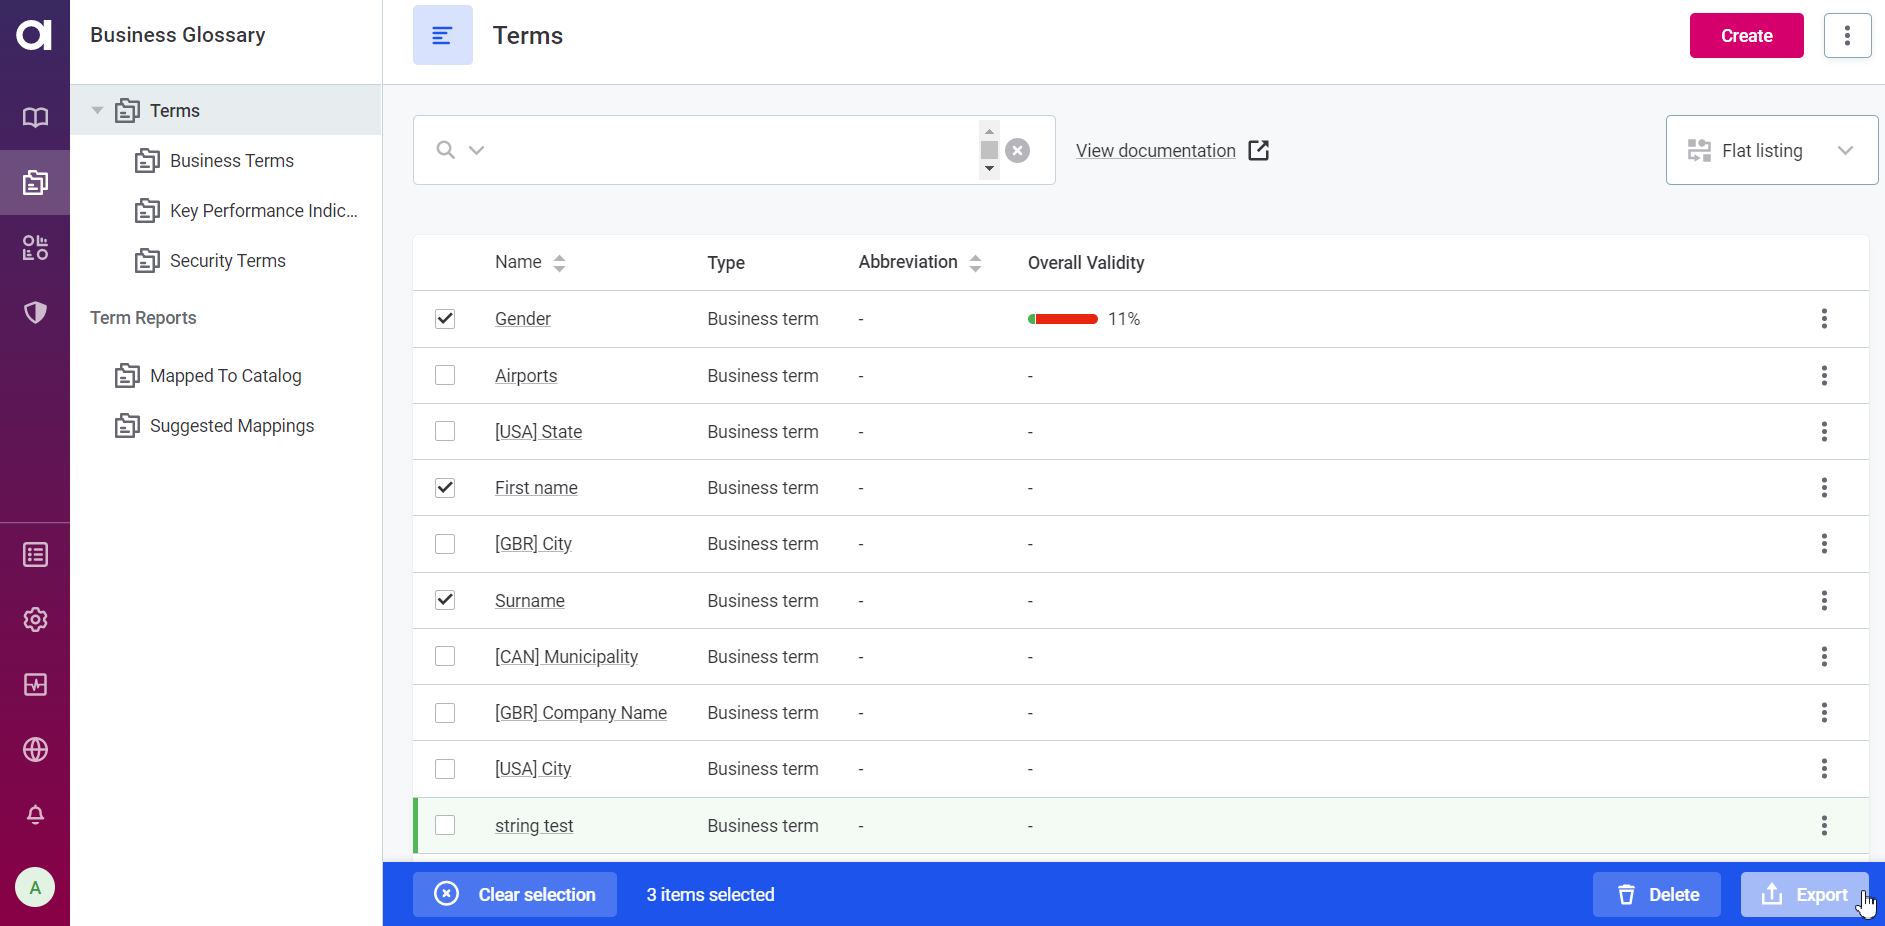
Export selected entities
-
In ONE, choose the asset type that you want to work with and navigate to the corresponding tab (for example, Business Glossary > Terms).
-
Search for and select the entities you want to export.
-
Select Export.
-
-
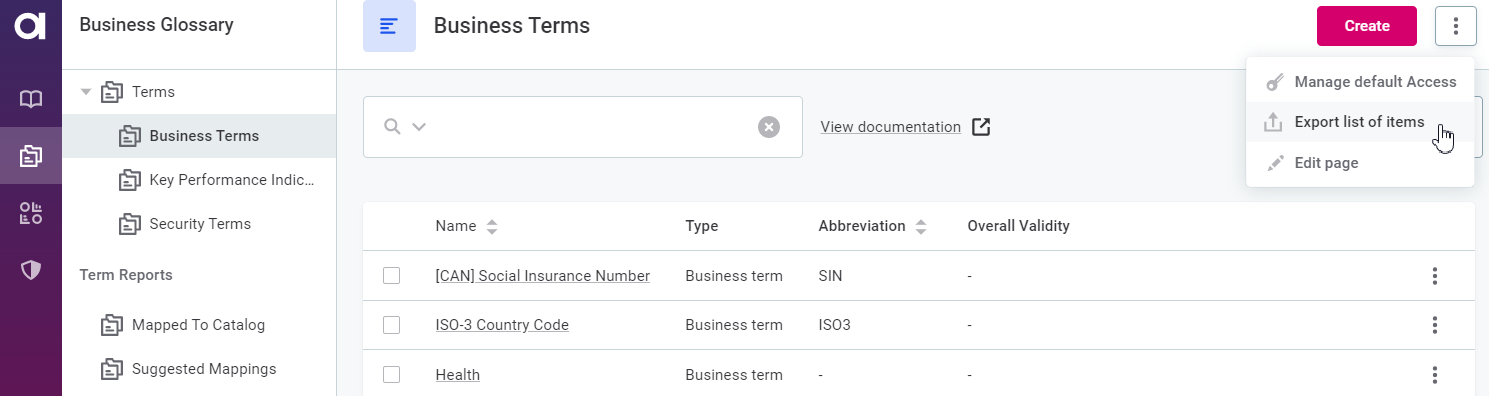
Export entity listing
-
In ONE, choose the asset type that you want to work with and navigate to the corresponding tab (for example, Business Glossary > Terms).
-
Expand the more options menu and select Export list of items.
-
-
Export content pack
-
Navigate to Global Settings > Application Settings > Import and Export.
-
Select Create export.

-
-
-
Configure your export.
-
File name (1): Required. Provide a meaningful name for your export.
-
Description (2): Describe the purpose of the export.
-
Export plan (3): Select the export plan that you want to use. Depending on the data that you are exporting, only the appropriate export plans are shown.
When exporting content packs, this is where you define which data is exported (Essential application content, Product demo content, or Starter content for production installations). -
Data security: Choose the suitable level of encryption and provide a password for the export.
-
Select data encryption (4)
-
256-bit AES encryption: The strongest and recommended level of data encryption, especially when transferring exports between different environments.
Keep in mind that in this case you need a third-party tool to decrypt data (for example, 7-Zip or WinZip) as the cipher is not supported by the standard applications available with Mac OS or Windows OS.
-
128-bit AES encryption: A relatively fast and strong encryption method. However, compared to the 256-bit AES cipher, it is less secure.
-
ZIP 2.0 encryption: The standard encryption method that is compatible with all OS and all environments. However, the encryption level is insufficient for effective data protection and therefore not recommended.
-
No encryption: Not recommended. Suitable only when working with publicly accessible data.
-
-
Set the password (5)
-
By myself: Provide your own password. Make sure the password is unique and sufficiently strong, without any personal information.
-
Generate for me: Use the built-in password generator to create a random password. Make sure to save the password to a suitable location, preferably a password manager.
Keep in mind that the password is generated again whenever you switch to the By myself mode.
-
-
-
-
Select Export to finish exporting your data.
-
A notification appears once the export is available. To download it, open the Notification Center and select Download archive.
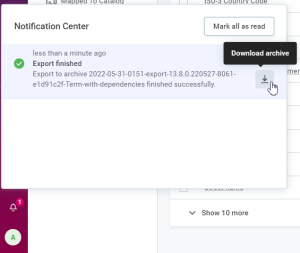
Alternatively, you can click the notification, which takes you to Import And Export > Export, and select the archive link.
Your data can now be imported into another instance of ONE.
Keep in mind that the archive URL remains valid only for 2h following the export. After this period expires, the export can no longer be accessed and you need to export your data again.
The link validity can be configured as needed using the property
plugin.object-storage.ataccama.one.exportimport.archive.retention.time.
Import
When data is imported in ONE, its structure is validated against the MMD model before permanent changes are made. If the entities that are being imported already exist in the application, a new version of those entities is created only if the data has been modified in the meantime. If you try to import entities that were deleted from the application, these entities are then restored with the same identifier after the import (only applies to entities imported by ID).
|
The Import functionality is mainly intended for Ataccama consultants and we do not recommend uploading the custom data packages without their supervision to avoid corrupting the MMD model. There are known limitations to the Import functionality:
|
| Permissions are assigned on imported data based on the permissions of the user who started the import. |
Exports are imported in their original format (ZIP), without extracting. They are then uploaded to ONE Object Storage, where they are unpacked and sent back to ONE. If the export is password-protected (all levels of data protection except No encryption), you need to supply the password to complete the import.
-
To import data in ONE, navigate to Global Settings > Application Settings > Import and Export.
-
Switch to Import and select Import.
-
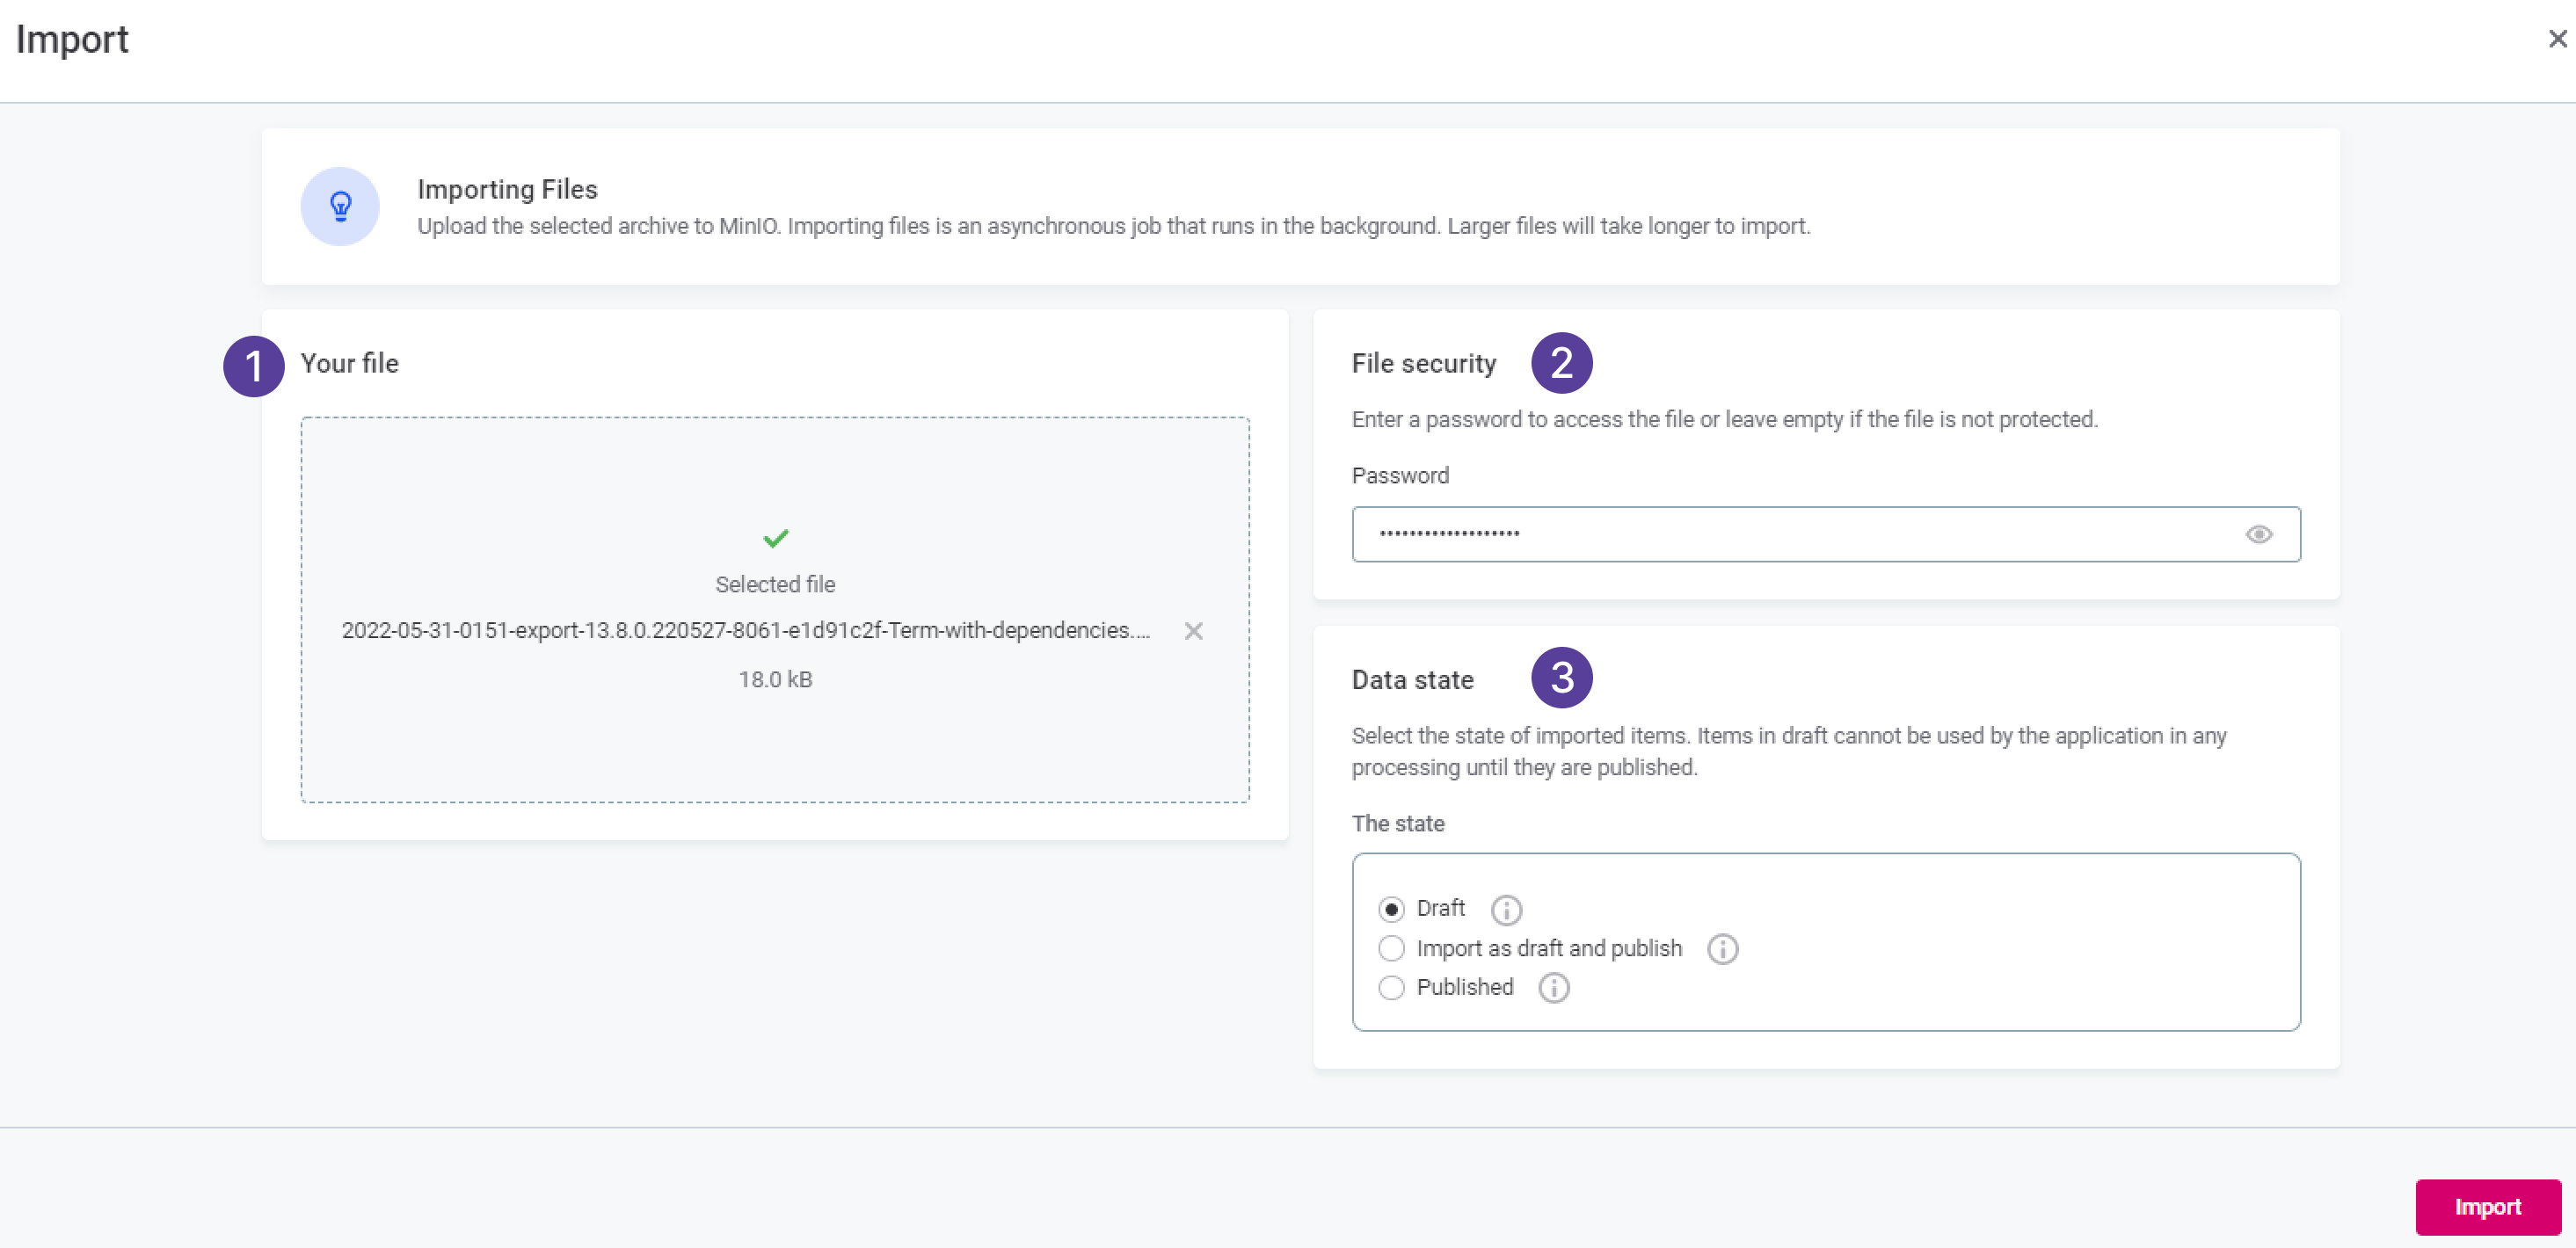
Configure your import settings.
-
Your file (1): Select the export that you want to use.
-
File security (2): Provide the password if the export is password-protected. Otherwise, leave empty.
-
Data state (3): Choose how the data is imported.
-
Draft: Entities are imported as draft versions and each asset must then be manually published.
-
Publish as draft and then publish: Entities are imported as drafts and automatically published. In case of a validation error, the entity remains in the draft state unless the issue is manually resolved.
-
Published: Entities are imported in the published state. If any entity cannot be validated, the whole import fails.
-
-
-
Select Import.
-
Once the import finishes, a notification appears.
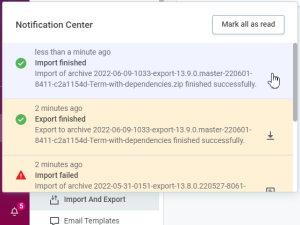
To view import details, click the notification. This takes you to the Import tab.
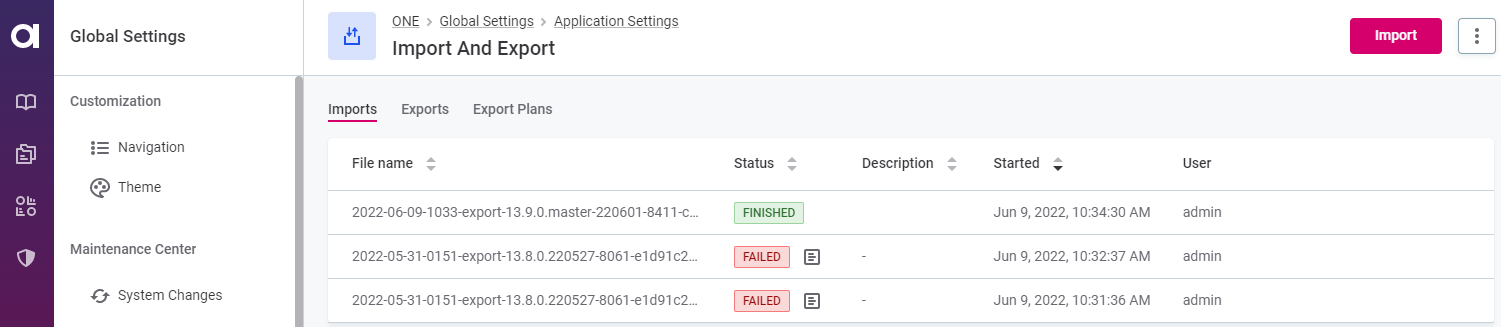
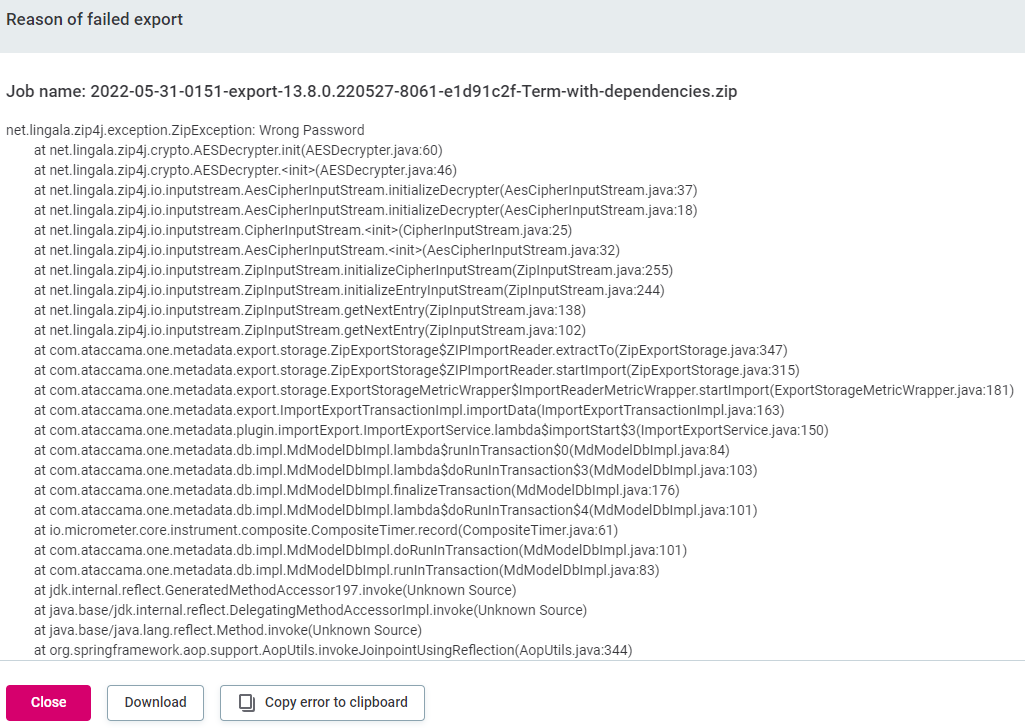
In case the import fails, you can view error details directly from the notification. This helps you troubleshoot and fix the problem.
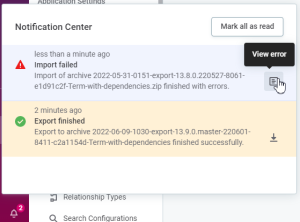
Alternatively, you can open the error message from the Import tab.
Was this page useful?