
Upgrade Center
When publishing changes in the metadata model configuration, it is necessary to use the Upgrade Center to apply the changes. This guide outlines how to use the Upgrade Center to successfully update your metadata model.
In Organization > Upgrade Center, you can do the following:

-
(1) See the status of the previous changes in Upgrade Centre.
-
(2) See in which mode the application is working right now.
-
(3) Find information on the current state of the application in Info about running app section.
ONE switches between required modes automatically as you apply changes. You can also switch between modes manually as needed. See Application Modes. -
(4) Switch to single-user mode by selecting the mode in the Upgrade Mode section.
-
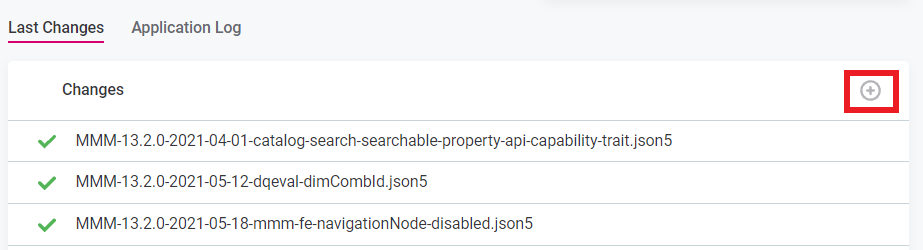
(5) See the list of the Last Changes.
-
(6) See the Application Log.
Overview
The Upgrade Center let you seamlessly update the metadata model, manage how the changes made to the model are published, or upgrade the application to a new system version. This is done through JSON-based instructions that are either generated automatically by the application or uploaded by users.
Depending on their impact, there are two types of system changes:
-
System upgrade commands: Used when installing a new system version in the application. Such commands must be successfully executed as without them the new version of the application does not start.
In addition, given their key role in migrating between different versions, system upgrade commands cannot be deleted.
More information about how system upgrade commands fit into the whole upgrade process, and version-specific upgrade notes, can be found in the ONE Gen2 Upgrade Guide, ONE Web Application upgrade section. -
User changes: Used when changes are made to the metadata model. As these changes are optional, users can decide when and whether to apply them.
The commands can be provided in one of the following ways:
-
Generated automatically after the metadata model has been modified: For example, this includes adding a new entity or editing a trait.
When the metadata model is edited through the web application, any changes are first represented as draft versions and appropriate update commands for publishing the drafts are created.
The new commands are then added to the list of changes (Pending Changes section in the Upgrade Center), where they are collected until users choose to publish the changes. Once an update command has been executed, it is moved to the Applied Changes list in the Upgrade Center.
-
Uploaded by users through the Upgrade Center: In this case, the list of update commands is synchronized with the metadata model.
Once the application detects commands for which there are no corresponding draft versions, it automatically switches to the read-only mode (No Model Mode) and creates the necessary drafts based on the list of changes.
-
In both user and system migration, metadata model changes are published and propagated to the database only after the metadata model has been successfully validated. If the model cannot be validated, the application remains in the No Model Mode and users are prompted to resolve the issues reported.
At this point, you can add new update commands, modify existing ones, or reorder the list of commands. For example, in case there is a conflict caused by the application attempting to create an entity that already exists, you can fix the issue by adding a custom command that deletes the existing entity before it is created again.
If the update finished successfully, the application switches to Application Mode.
| You can track how update commands are synchronized and executed by monitoring the status of the list of changes as any warnings are shown in the list itself. |
Upgrade the application
It is possible to upgrade the application to a new version directly from the application. Upgrading is running in MMD mode, while the required prerequisite of database snapshot is available in No Model mode only.
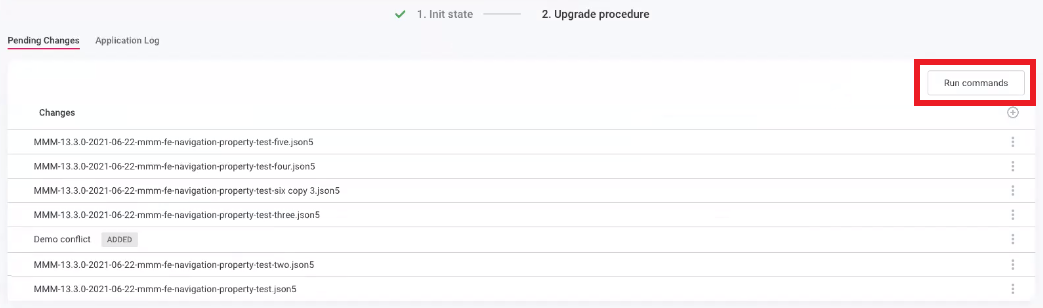
The Upgrade procedure consists of two steps:
-
Init state, where the prerequisites for the upgrade need to be fulfilled.
-
Upgrade procedure, where the upgrade commands are run.
Work with upgrade steps
To upload the new upgrade step, do the following:
-
Go to Upgrade Center > Last Changes.
-
Select the Plus icon.
-
Click on the Upload file button and select the
jsonfile with the command.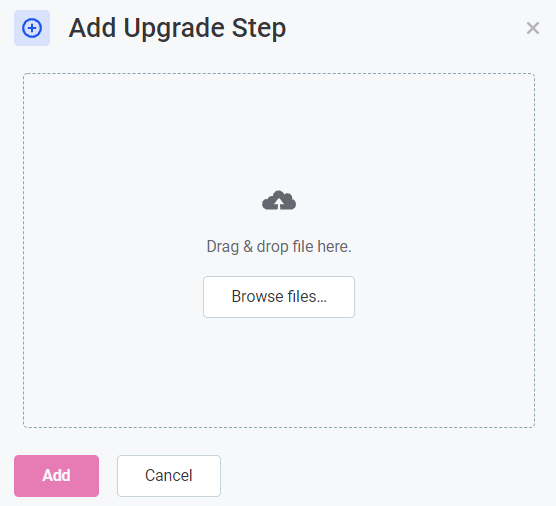
-
Select the sequence of the upgrade steps, move the command to one of the following positions:
-
The Top of the list.
-
Before another command from the list.
-
After another command from the list.
-
The Bottom of the list.
-
-
Click Save and Publish to apply changes to the upgrade command.
To edit the upgrade steps, do the following:
-
Expand the three dots menu menu of the particular command and select Edit. The Edit Upgrade step tab will open on the right-side of the screen.
-
To change the content of the upgrade command, do the following:
-
Click on the Cross icon to delete the uploaded upgrade file.
-
Upload the new file by clicking Upload file and selecting the json file with the command.
-
-
Change the sequence of the upgrade steps.
-
-
Click Save and Publish to apply changes to the upgrade command.
Run and publish changes
Click Run Commands to run the Upgrade Procedure. Each Change is going through the Running state to the final state, which is either Success or Conflict.
|
If the step has ended with the Conflict state, you can see the error message by expanding the step: 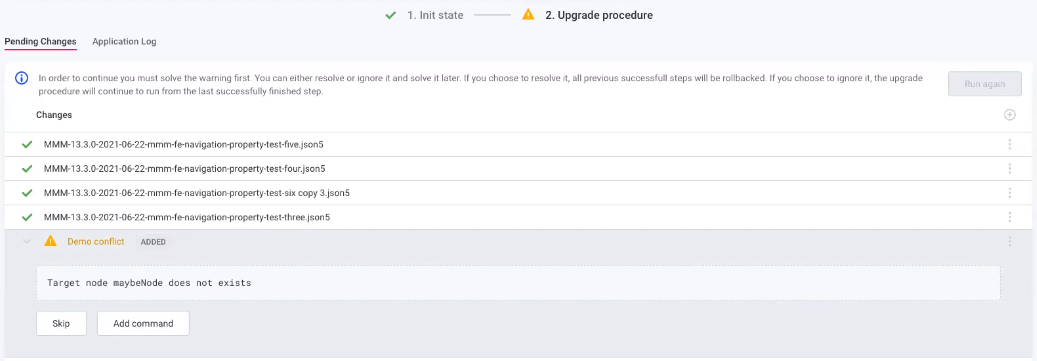
To solve the error, do one of the following:
|
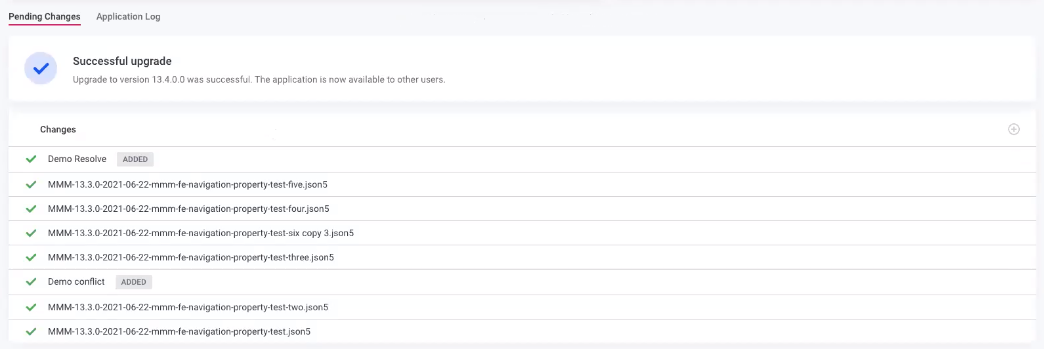
After all of the changes run successfully, the application will need a couple more minutes to run the changes in backend. When all the changes are in place, the Successful upgrade note will appear.
After finishing the upgrade procedure, make sure there are no permissions conflicts.
To do that, navigate to the Organization > Permissions Model page, and check that there no conflicts notes.
For more information on permissions conflicts see the Resolving Issues in permissions.json section on the manage-permissions-users-roles.adoc page.
|
Was this page useful?