
Ataccama Edge Deployment Guide
This guide describes how to deploy Ataccama edge instances in customer-owned AWS accounts to process sensitive data within your own infrastructure.
|
Work in Progress: This deployment documentation is still being refined. If you notice areas for improvement or have suggestions, please share your feedback by filling in Was this page useful survey. We appreciate your help in shaping our documentation. |
Deployment overview
Edge instances are deployed as virtual private clouds (VPCs) with configured AWS services and Ataccama workloads for processing data from edge-configured data sources.
|
We recommend using dedicated AWS accounts for edge instances to avoid conflicts with other workloads. See the Shared Responsibility Model for details about operational responsibilities. |
Deployment process
The deployment requires completing these steps in order:
-
Configure AWS networking - Set up VPC with subnets and gateways.
-
Create S3 bucket and IAM role - Configure storage for processing results.
-
Set up Edge instance in Cloud Portal - Register and deploy the edge instance.
-
Configure data sources - Configure data sources to use edge processing.
Step 1: Configure AWS networking
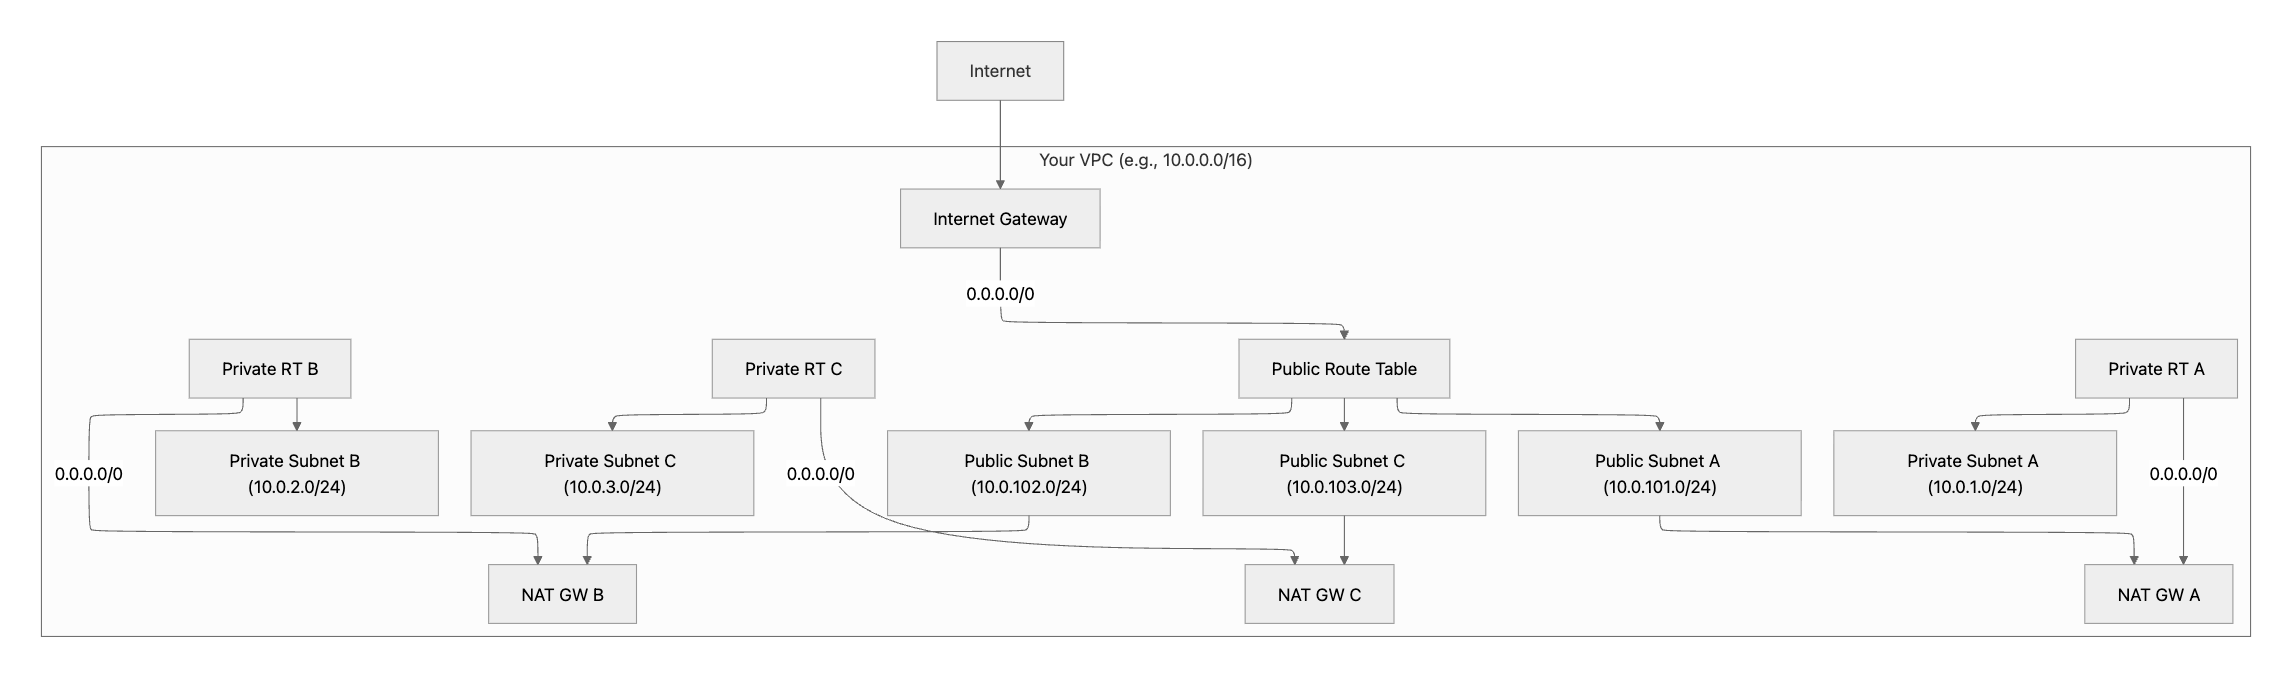
Goal: Provide a well-configured VPC with public and private subnets across three availability zones (AZs), an Internet Gateway for ingress/egress, and NAT Gateways so private workloads have outbound access.
This configuration is suitable for both production and non-production environments. The final setup should look similar to the following diagram.
|
Production: Deploy one NAT gateway per availability zone for high availability. Non-production: Use a single shared NAT gateway to reduce costs (creates a single point of failure). |
Planning
Before starting, determine:
-
AWS Region and AZs: For example,
us-east-1with zonesa,b,c. -
CIDR allocation:
-
VPC:
10.0.0.0/16(65,536 IPs). -
Public subnets:
10.0.101.0/24,10.0.102.0/24,10.0.103.0/24. -
Private subnets:
10.0.1.0/24,10.0.2.0/24,10.0.3.0/24.
-
-
NAT strategy: Multiple for production, single for non-production.
|
Ensure CIDR blocks don’t overlap with existing corporate networks or peered VPCs to avoid routing conflicts. |
Configuration steps
-
Create VPC:
-
In the console: VPC > Create VPC > IPv4 CIDR
10.0.0.0/16> Enable DNS hostnames and DNS resolution.
-
-
Create Subnets (3 public, 3 private; 1 pair per AZ).
-
In the console: Subnets > Create > Assign each to a different availability zone.
-
-
Create & attach Internet Gateway
-
In the console: Internet Gateways > Create > Attach to your VPC.
-
-
Create route tables & associate
-
Public route table: Add default route
0.0.0.0/0 > Internet Gateway; associate to all public subnets. -
Private route tables: Create one per AZ (recommended), associate to private subnets (route to NAT in step 6).
-
-
Allocate Elastic IPs (for NATs)
-
In the console: Elastic IPs > Allocate (one per NAT).
-
-
Create NAT Gateway(s) in Public Subnets
-
Prod: Create three NATs (A/B/C) in each public subnet with its Elastic IP.
-
Non-prod: Create one NAT in one public subnet.
-
-
Add default routes in private route tables to the NAT(s)
-
In the console: Route tables > Private RT A/B/C →
0.0.0.0/0 → NAT_A/B/C.
-
-
Configure subnet settings
-
Public subnets: Auto-assign public IPs can be turned on (for ALB/bastion as needed).
-
Private subnets: Ensure auto-assign public IPs is turned off.
-
-
Tag resources
-
Apply
Name,Environment(prod/nonprod),Application=edge,Owner,CostCenter.
-
Validation checklist
Verify the following before proceeding:
-
VPC configuration
-
VPC exists with CIDR
10.0.0.0/16. -
DNS hostnames and DNS resolution are enabled for the VPC.
-
-
Subnets
-
Three public subnets (
10.0.101/102/103.0/24) and three private subnets (10.0.1/2/3.0/24) deployed across three AZ (required for production deployments). -
Auto-assign public IPs:
-
Turned off for private subnets.
-
Turned on only as needed for public subnets.
-
-
-
Internet Gateway and public routing
-
An Internet Gateway is attached to the VPC.
-
The public route table:
-
Contains
0.0.0.0/0 → Internet Gateway. -
Is explicitly associated with all public subnets.
-
-
-
NAT Gateways and private routing
-
NAT Gateways are created in public subnets, not private subnets.
-
Each NAT Gateway has an allocated and attached Elastic IP.
-
Private route tables:
-
Contain
0.0.0.0/0 → NAT Gateway. -
Are explicitly associated with all private subnets.
-
Production requirement: each private route table for AZ A routes to NAT Gateway A (same AZ) to avoid cross-AZ dependencies.
-
-
-
Connectivity checks
-
From an instance in each private subnet, verify outbound HTTPS works:
curl -I https://example.com
-
-
Tagging
-
All resources have consistent tags and names to support future automation and auditability.
-
Step 2: Create S3 bucket and IAM role
Configure storage for sensitive processing results by creating an S3 bucket and IAM role with appropriate permissions.
Requirements
Edge requires:
-
S3 bucket: Stores processing results and temporary data.
-
IAM role: Allows edge services to access the bucket.
-
Trust policy: Enables services within your account to assume the role.
-
Access policy: Grants read/write permissions to the bucket.
Prerequisites
-
AWS permissions for S3 and IAM resource creation.
-
Your AWS Account ID.
-
Edge instance name (for example,
edge-aws-instance-ahxahf).
Create S3 bucket
-
Navigate to S3 Console.
-
Select Create bucket.
-
Configure settings:
-
Bucket name:
<edge-instance-name>-s3-<random-suffix>.S3 bucket names must be globally unique. Add a random suffix to ensure uniqueness.
-
Region: Match your VPC region.
-
Block Public Access: Keep all blocks enabled.
-
Versioning: Enable for audit trail and data protection.
-
Tags:
-
ataccama:edge:customer-provided:instance-name:<edge-instance-name>. -
Your standard organizational tags.
-
-
-
Create bucket and note the name and ARN.
Create IAM trust policy
Create trust-policy.json.
Replace <ACCOUNT_ID> with your AWS Account ID.
{
  "Version": "2012-10-17",
  "Statement": [
    {
      "Effect": "Allow",
      "Principal": {
        "AWS": "arn:aws:iam::<ACCOUNT_ID>:root"
      },
      "Action": [
        "sts:AssumeRole",
        "sts:TagSession"
      ]
    }
  ]
}
Create S3 access policy
Create s3-access-policy.json.
Replace <BUCKET_NAME> with your bucket name.
{
  "Version": "2012-10-17",
  "Statement": [
    {
      "Effect": "Allow",
      "Action": "s3:*",
      "Resource": [
        "arn:aws:s3:::<BUCKET_NAME>",
        "arn:aws:s3:::<BUCKET_NAME>/*"
      ]
    }
  ]
}
Create IAM role
-
Navigate to IAM Console > Roles.
-
Select Create role.
-
Configure trusted entity:
-
Type: AWS account.
-
Account: This account.
-
Account ID: Your AWS Account ID.
-
-
Skip permissions selection.
-
Set role details:
-
Role name:
<edge-instance-name>-s3-role. -
Description: Role for Ataccama Edge S3 access.
-
Tags:
-
Key:
ataccama:edge:customer-provided:instance-name, value:<edge-instance-name>.
-
-
-
Select Create role.
Attach access policy
-
Open the created role.
-
Navigate to tge Permissions tab.
-
Select Add permissions > Create inline policy.
-
Switch to JSON editor.
-
Paste the S3 access policy.
-
Select Review policy.
-
Name the policy
s3access. -
Select Create policy.
Step 3: Configure edge in Portal
After preparing your AWS infrastructure, configure the edge instance in Ataccama Cloud Portal.
Access Cloud Portal
-
Navigate to portal.ataccama.com.
-
Authenticate and select your tenant.
-
Go to Settings and locate the Edge section.
Connect AWS account
Provide account details
-
Select Connect AWS account.
-
Enter configuration:

-
AWS account ID: Your 12-digit account ID.
-
Display name: Descriptive name for this account.
-
-
Select Continue.
Apply CloudFormation template
The Portal provides a CloudFormation template to create the required IAM role for Ataccama automation.
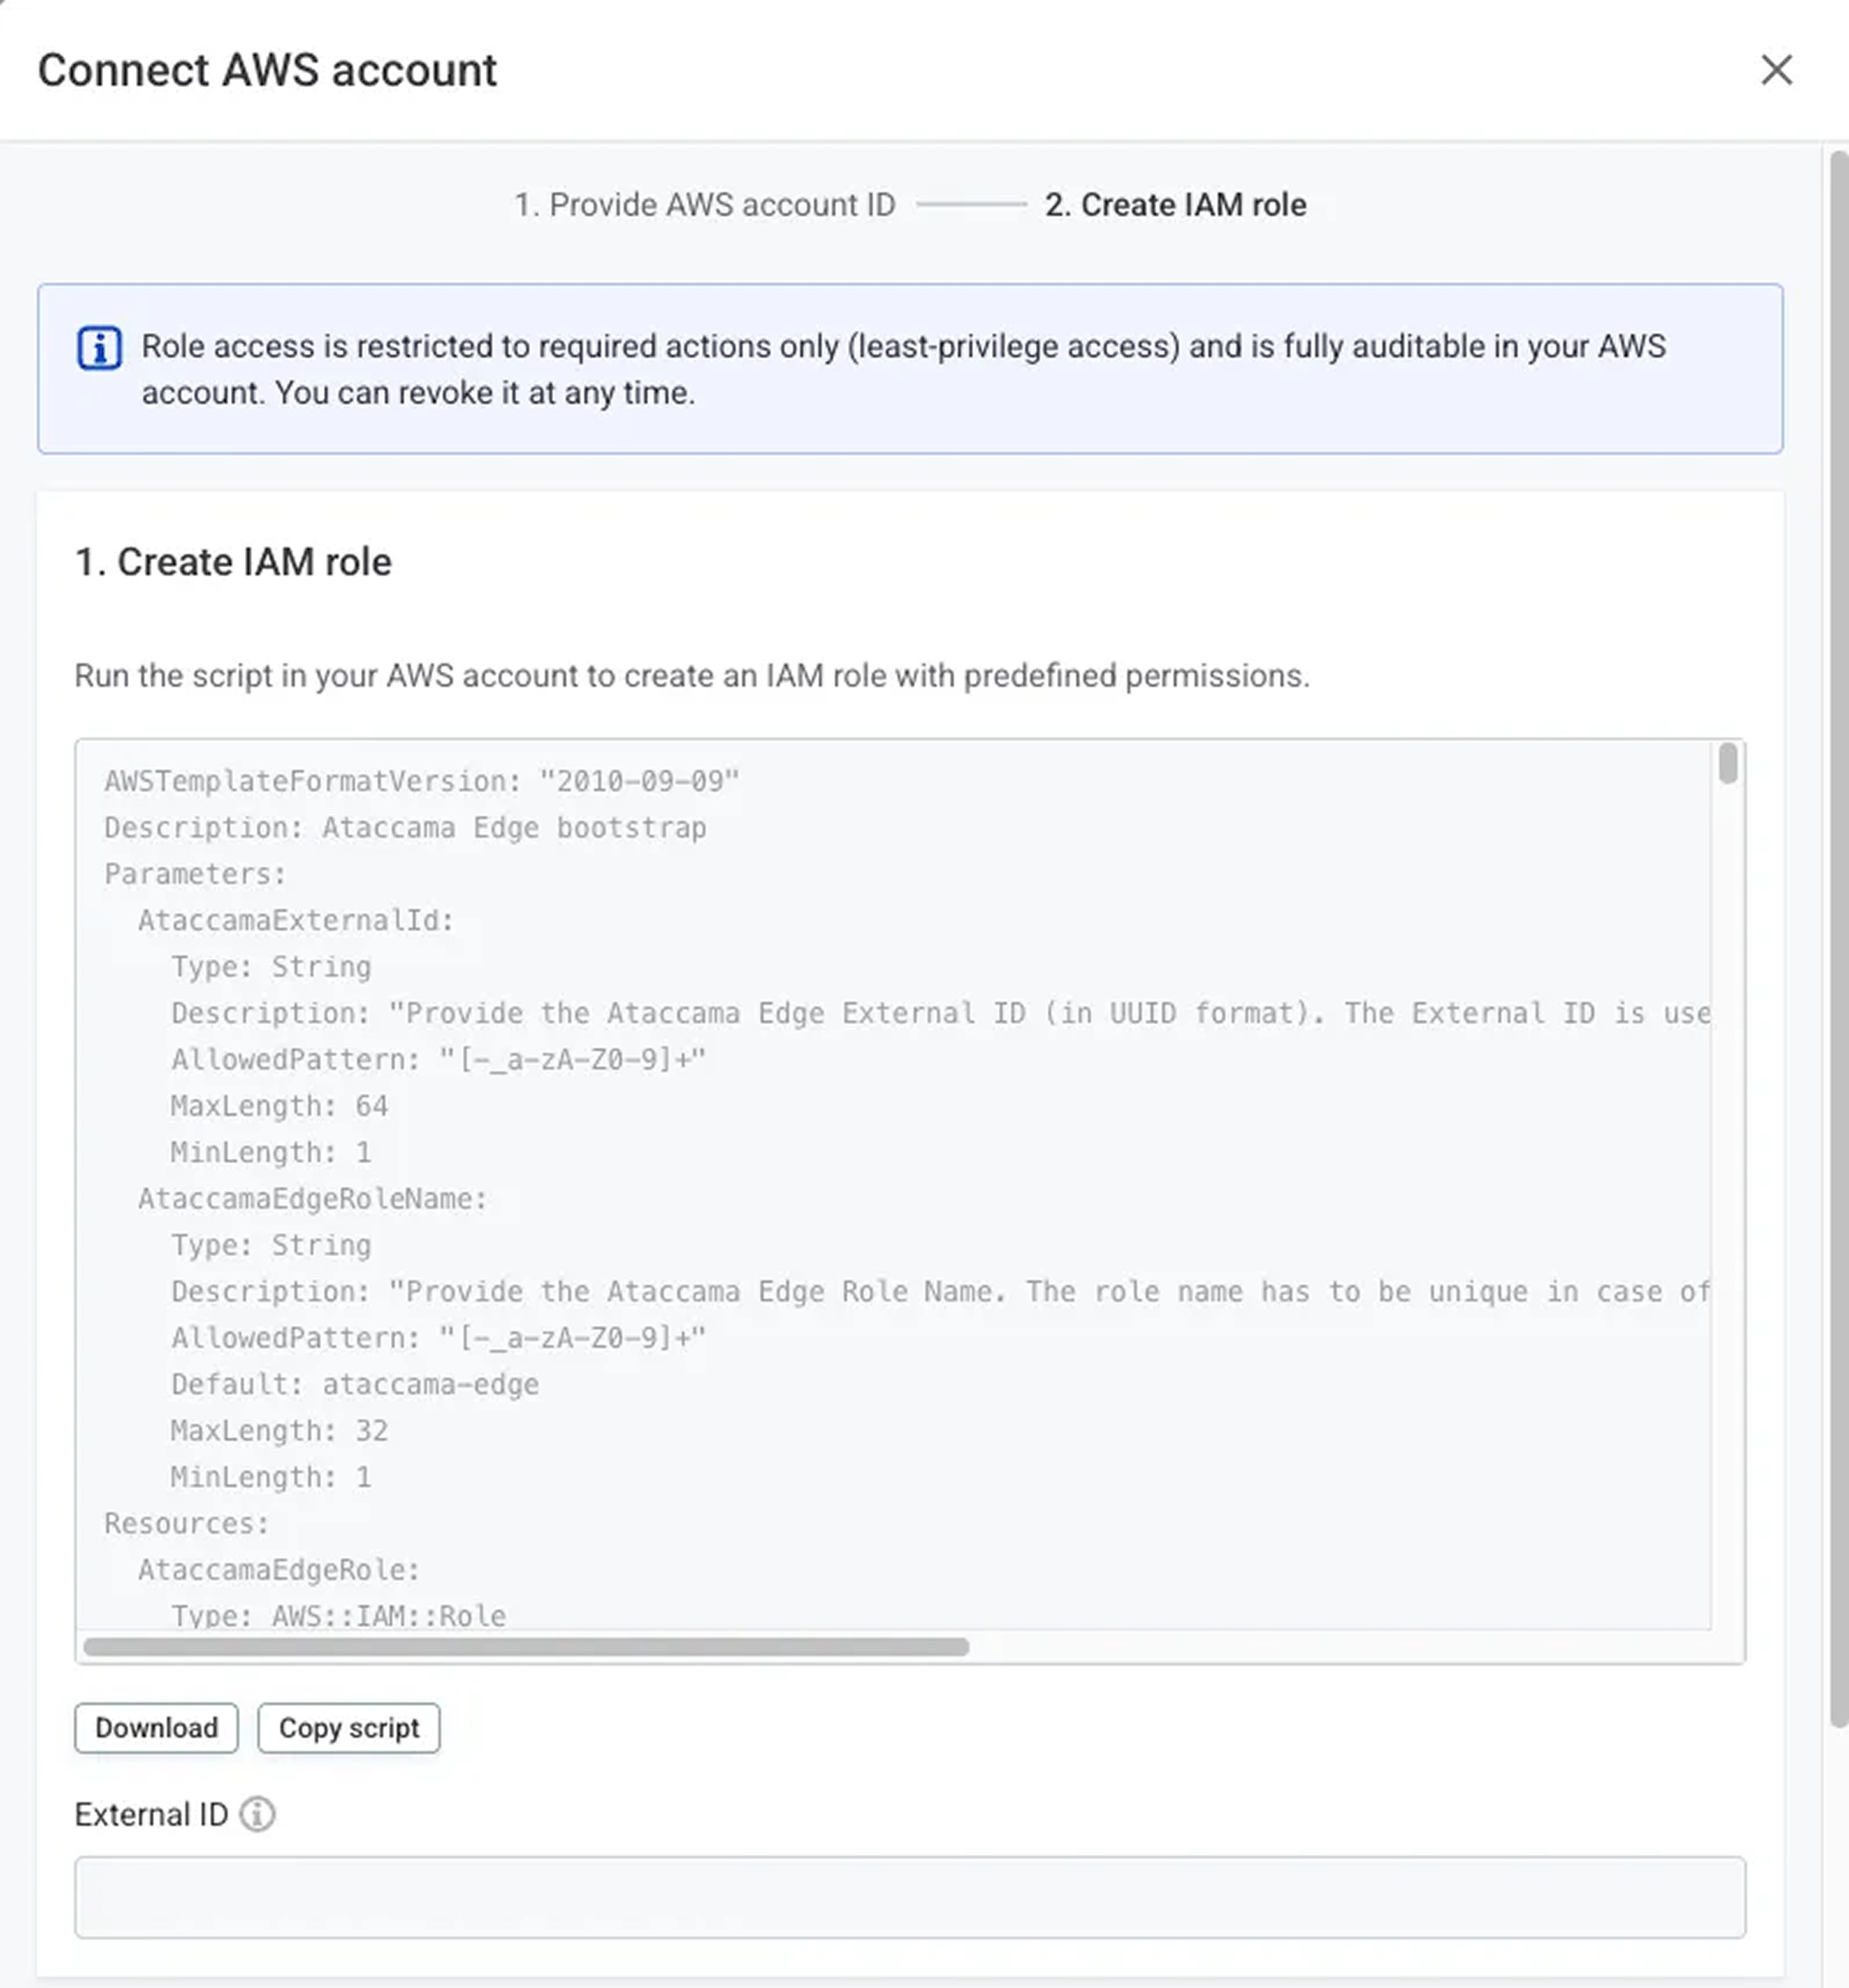
-
Download or copy the template.
-
Note the External ID parameter.
-
In AWS Console:
-
Navigate to CloudFormation.
-
Create stack with the template.
-
Set the External ID parameter.
-
Complete stack creation.
-
-
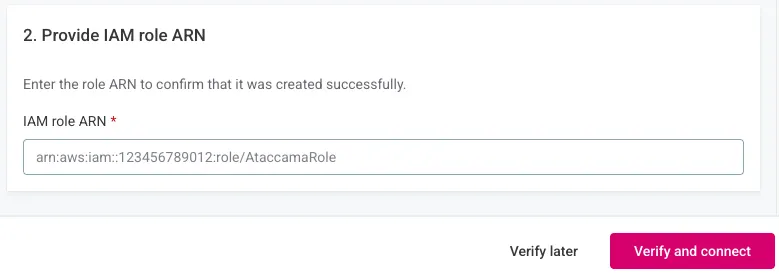
Copy the resulting IAM Role ARN.
|
If you need to delegate this task, select Verify later. Return to complete verification when ready. |
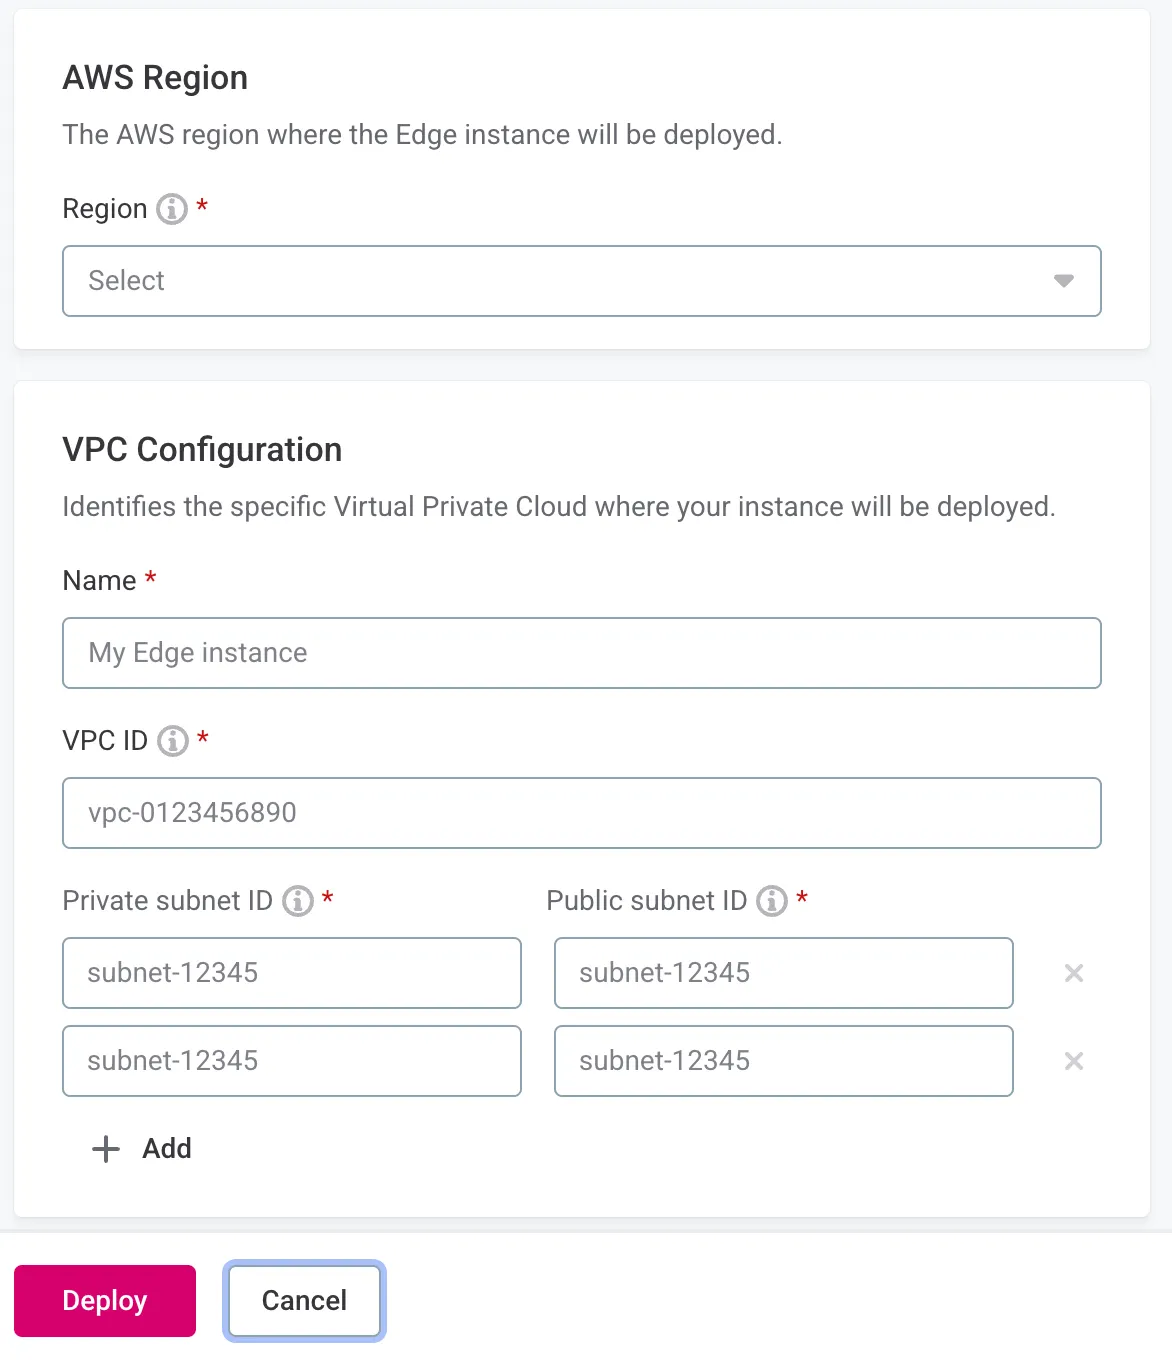
Deploy edge instance
Configure deployment
-
Select Deploy edge instance
-
Configure AWS settings:
-
Region and VPC:
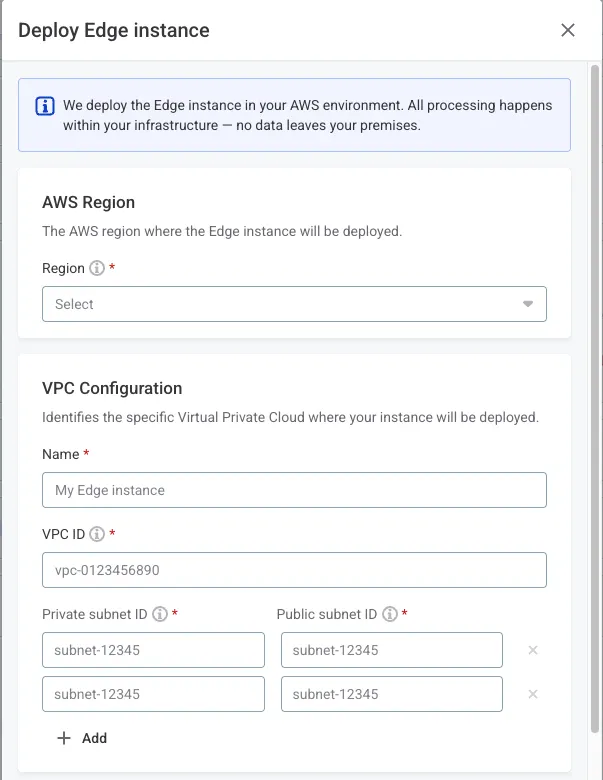
-
AWS Region: Select your prepared region.
-
VPC Name: Descriptive name for the instance.
-
VPC ID: Your VPC identifier.
-
Private subnet IDs: Add all private subnet IDs.
-
Public subnet IDs: Add all public subnet IDs.
-
-
S3 Configuration:
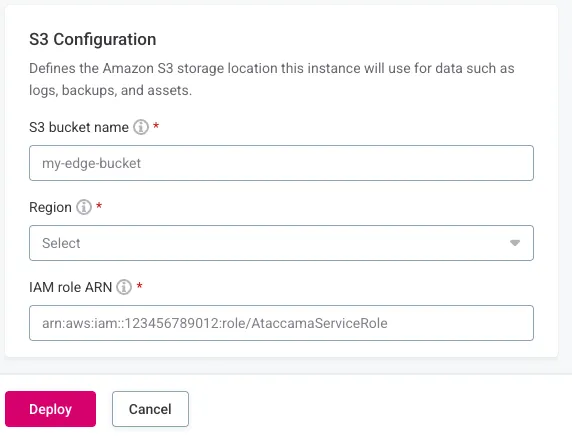
-
S3 bucket name: Your created bucket.
-
Region: Bucket region.
-
IAM role ARN: Role for S3 access.
-
-
Complete deployment
Select Deploy and wait for the Running tag to appear.
|
If deployment fails, verify:
Contact Ataccama Support if issues persist. |
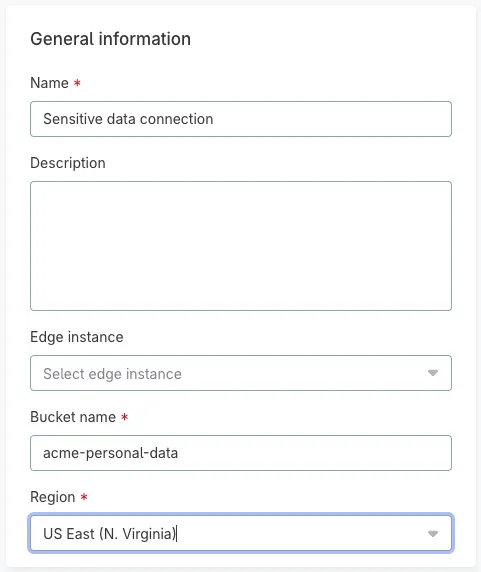
Step 4: Configure data sources to use edge
In the connection settings for your data source, pick the edge instance from the list in the Create connection dialog. All edge instances available for your tenant appear in this list.
|
Ensure network connectivity exists between your edge VPC and data sources. |
Test and save the connection and then browse metadata to confirm that all settings are correct:
-
Select Test connection and make sure it’s successful.
-
Select Save and then browse metadata for the connection. It should show the structure of the data source.
-
Pick a schema, table, or file and select Import metadata.
-
A new catalog item is imported to the Catalog items listing in Catalog.
If any of these steps result in an error, contact Ataccama Support.
Was this page useful?