
Relational Database Connection
Follow this guide if you want to connect to a relational database such as Oracle, PostgreSQL, or Snowflake. For a full list of supported relational databases, see Supported Data Sources.
Create a source
To connect to a relational database:
-
Navigate to Knowledge Catalog > Sources.
-
Select Create.
-
Provide the following:
-
Name: The source name.
-
Description: A description of the source.
-
Deployment (Optional): Choose the deployment type.
You can add new values if needed. See Lists of Values.
-
| Alternatively, add a connection to an existing data source. See Connect to a Source. |
Add a connection
-
Select Add Connection.
-
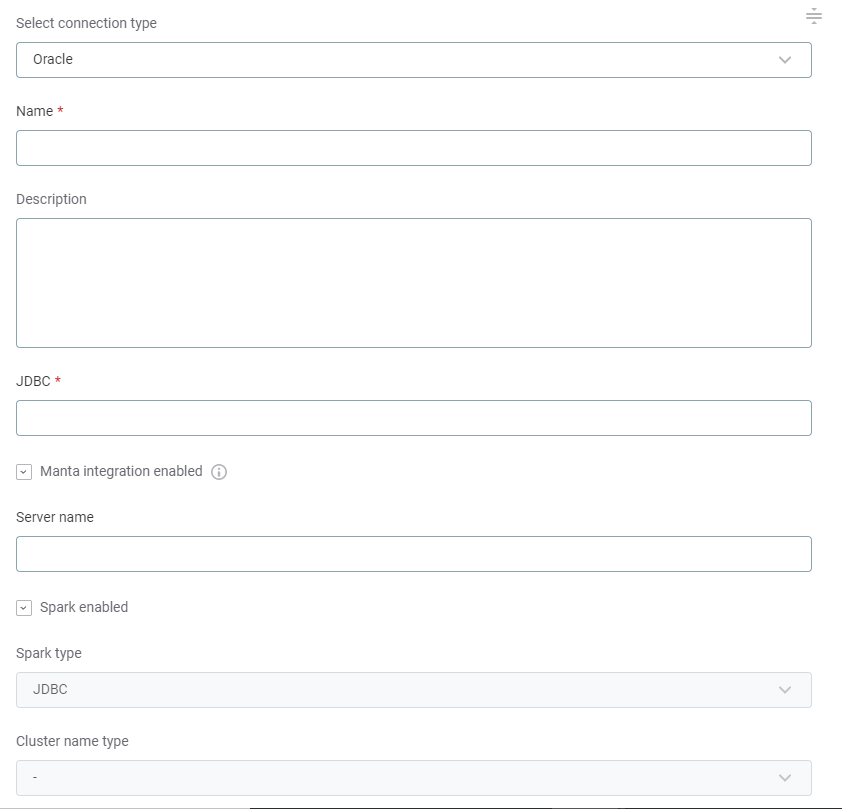
In Connection type, choose Relational Database > [your database type].
-
Provide the following:
-
Name: A meaningful name for your connection. This is used to indicate the location of catalog items.
-
Description (Optional): A short description of the connection.
-
JDBC: A JDBC connection string pointing to the IP address or the URL where the data source can be reached. For a list of supported sources and JDBC drivers, see Supported Data Sources.
Depending on the data source and the authentication method used, additional properties might be required for successful connection. See Add Driver Properties. -
Manta integration enabled: Select this option to enable using MANTA, which is needed to calculate Lineage.
Manta is a data lineage platform bringing data lineage capabilities to ONE and is integrated during ONE deployment. -
Server name (related to Manta integration): The server of the database. This value is automatically filled after a successful connection to MANTA has been established.
-
Spark enabled: Enable Spark if you want to process large volumes of data using your Spark cluster. This improves how ONE works with relational databases during profiling and data quality tasks.
-
If selected, choose the Spark processing method:
-
JDBC: ONE Spark DPE creates a number of JDBC connections directly to the database to process data in parallel.
-
SPARK_CONNECTOR: ONE Spark DPE sources the data via another data provider, such as an ADLS Gen2 container or Amazon S3 bucket. This method might be faster for very large datasets.
-
-
Select the Spark cluster to process your data.
Only previously configured clusters are shown in ONE.
To add and configure a new cluster, refer to Metastore Data Source Configuration and Metastore Connection.
-
-
-
Proceed to Add credentials.
Add credentials
| OAuth 2.0 authentication can only be used for Snowflake. |
-
Select Add Credentials.
-
Choose an authentication method and proceed with the corresponding step:
-
Username and password: Basic authentication using your username and a password.
-
Integrated credentials: For some data sources, you can use, for example, Azure AD or Azure Key Vault. This requires configuring additional driver properties.
-
OAuth credentials: Use OAuth 2.0 tokens to provide secure delegated access. Available only for some data sources.
-
Username and password
-
Provide the following:
-
Name (Optional): A name for this set of credentials.
-
Description (Optional): A description for this set of credentials.
-
Username: The username for the data source.
-
Password: The password for the data source.
To access the password directly from the Azure Key Vault storage:
-
Set the password to
keyvault:SECRET:<name_of_stored_secret>. Make sure to provide the actual name of the secret instead of the placeholder. -
Authenticate to Azure Key Vault (see Azure Active Directory Key Vault Authentication).
-
-
-
If you want to use this set of credentials by default when connecting to the data source, select Set as default.
One set of credentials must be set as default for each connection. Otherwise, monitoring and DQ evaluation fail, and previewing data in the catalog is not possible. -
Proceed with Test the connection.
Integrated credentials
| As a prerequisite, you need to set up additional driver properties. See Add Driver Properties. |
-
Provide the following:
-
Name (Optional): A name for this set of credentials.
-
Description (Optional): A description for this set of credentials.
-
-
If you want to use this set of credentials by default when connecting to the data source, select Set as default.
One set of credentials must be set as default for each connection. Otherwise, monitoring and DQ evaluation fail, and previewing data in the catalog is not possible. -
Proceed with Test the connection.
OAuth credentials
Use OAuth2 tokens to provide secure delegated access.
-
Provide the following:
-
Name (Optional): A name for this set of credentials.
-
Description (Optional): A description for this set of credentials.
-
Client ID: The OAuth 2.0 client ID.
-
Client secret: The client secret used to authenticate to the authorization server.
-
Authorization endpoint: The OAuth 2.0 authorization endpoint of the data source. It is required only if you need to generate a new refresh token.
-
Token endpoint: The OAuth 2.0 token endpoint of the data source. Used to get access to a token or a refresh token.
-
Refresh token: The OAuth 2.0 refresh token. Allows the application to authenticate after the access token has expired without having to prompt the user for credentials.
Select Generate to create a new token. Once you do this, the expiration date of the refresh token is updated in Refresh token valid till.
-
-
If you want to use this set of credentials by default when connecting to the data source, select Set as default.
One set of credentials must be set as default for each connection. Otherwise, monitoring and DQ evaluation fail, and previewing data in the catalog is not possible. -
Proceed with Test the connection.
Test the connection
To test and verify whether the data source connection has been correctly configured, select Test Connection.
If the connection is successful, continue with the following step. Otherwise, verify that your configuration is correct and that the data source is running.
Save and publish
Once you have configured your connection, save and publish your changes. If you provided all the required information, the connection is now available for other users in the application.
In case your configuration is missing required fields, you can view a list of detected errors instead. Review your configuration and resolve the issues before continuing.
Next steps
You can now browse and profile assets from your connection.
In Knowledge Catalog > Sources, find and open the source you just configured. Switch to the Connections tab and select Document. Alternatively, opt for Import or Discover documentation flows.
Or, to import or profile only some assets, select Browse on the Connections tab. Choose the assets you want to analyze and then the appropriate profiling option.
Was this page useful?