
Enabling Issue Management
This article explains how to enable data issue management functionality in MDM Web App. Issue management brings the ability to create, assign, and resolve data issues in. Issues can be both generated by MDM Engine and created manually in MDM Web App.
Configure the Issue Tracker Backend
-
Prepare a database schema where issue metadata will be stored. Add a connection to that schema to the runtime configuration used by the MDM Engine server.
-
From the MDM Engine project, modify the issue management configuration files in Files > etc > issue_management to your needs:
-
Roles in both
metadata.xmlandworkflows.xml -
Authentication configuration in
config.xmlSee Issue Management Configuration Files for the reference of the issue management configuration files.
-
-
Open Files > etc > mdm.serverConfig and make sure your MDM Engine server configuration contains Dqit Server Component.
<component class="com.ataccama.server.component.dqit.DqitServerComponent">
    <configFile>issue_management/config.xml</configFile>
</component>
The only configuration property <configFile> should point to the config.xml configured in the previous step.
The component creates the Issue Management repository structure (database tables) automatically after the first server startup.
The tables are created in the database specified in config.xml.
|
-
Make sure your MDM Engine server configuration contains Dqit Mda Server Component.
<component class="com.ataccama.epp.mda.DqitMdaServerComponent"> </component> -
Open Files > etc > mda-permissions.xml and list the roles that can have issues assigned to them. Users having one of these role will appear in the Assign to dropdown in MDM Web App.
mda-permissons.xml<permissions> ... <issueRoles> <role name="MDM_viewer"/> <role name="MDM_user"/> <role name="MDM_admin"/> </issueRoles> ... </permissions>
Post Action Call after Transitions
The post action is an event that is triggered at the end of a transition, typically involving a message that the system sends to a predefined individual or group of individuals. In most cases, the message informs the recipients of an important action that occurs, such as an issue resolution approval.
To create a DQIT post action, that calls a CSV service, use the configuration defined in the CDI example.
-
In Files > Components, create new component,
dqitIssueEvent.comp. Here you can choose what will happen to the issue information: in the example all issue columns are written to a Text File.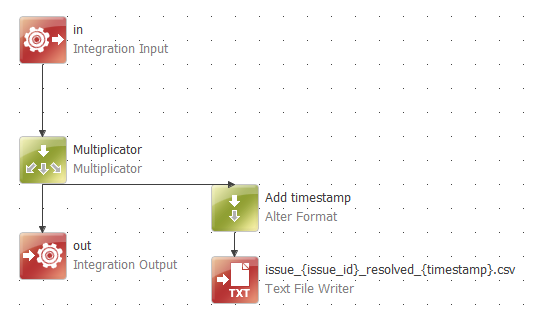
-
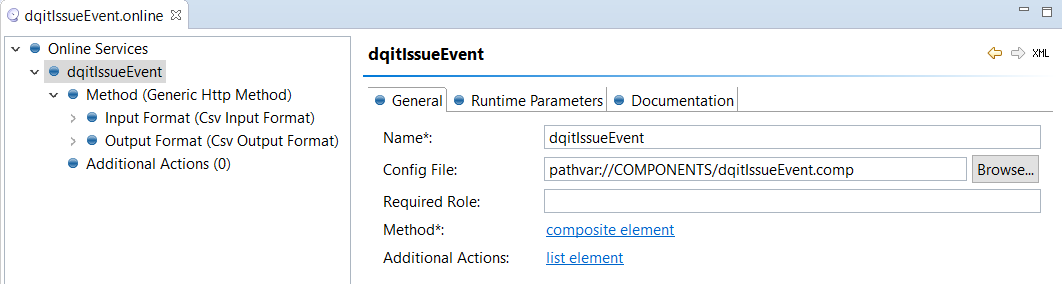
In Files > Services, create new Online Service,
dqitIssueEvent.onlineand define issue columns on input and output. Map service to the component you created in step 1.
-
In
mdm.serverConfig, define deployment context for service name. In CDI example:<identityProvider configName="keycloak-local" clientId="one-mda-im" pattern="/dqitIssueEvent"/>. -
In
mdm.runtimeConfig, define path using service name. In CDI example:<url name="dqitPostAction" url="http://localhost:8888/dqitIssueEvent" user="admin" password="admin" />. -
In
workflows.xml(Files > etc > issue_management) you can define post actions for transitions. In the example below, when an issue is moved from For Resolution to Resolved, the file defined in your component will be generated to Files > data > out.
   <transitions>
                <transition id="resolve" label="Resolve" originId="1" targetId="2">
                    <conditions>
                        <condition class="com.ataccama.epp.contrib.security.UserIsInRole" roles="MDA_im_steward,MDA_superuser"/>
                    </conditions>
                    <validators/>
                    <postActions>
                        <postAction class="com.ataccama.epp.contrib.wf.postactions.CsvCallPostAction">
                            <urlResourceName>dqitPostAction</urlResourceName>
                        </postAction>
                    </postActions>
                </transition>
MDM Engine and MDM Web App Configuration
Configure an event handler plan publisher for each issue type. Issues types can be based on the Filter Expression in Advanced Settings. At the moment, issues on the masters level are supported.
| Sample publisher and plan configurations can be found in the tutorial project. See MDM Example Project for more information on the tutorial project. |
Was this page useful?