
RDM Example Project on macOS
| Available from 16.3.1. |
The following guide shows you how to install and run the latest RDM example project on macOS. The example project provides a preconfigured environment for working through RDM tutorials.
For Windows instructions, see RDM Example Project on Windows.
Prerequisites
-
Install and run Docker Desktop.
-
Make sure ports
8060,8061,8083, and5432are available on your machine.To check if a port is in use, run lsof -i :<port_number>in Terminal. No output means the port is available.
Step 1: Download PostgreSQL and Keycloak Docker images
Use PostgreSQL and Keycloak Docker images to easily deploy the services needed for the RDM example project.
|
The Docker images are intended for demonstration purposes only and are not meant for production environments. By using these, you are accepting Keycloak and PostgreSQL licenses. Keep in mind that the third-party software used in the Docker images might not be up-to-date and might therefore pose a security risk. |
Download MDM and RDM Example Project Plugins from the Support Service Desk.
Step 2: Download and extract builds
Download the corresponding build packages of RDM (web application and the server, Linux variant) and ONE Desktop (macOS variant) from the Support Service Desk.
Extract packages
-
Install ONE Desktop. Double-click the downloaded ONE Desktop package and drag it to the Applications folder instead.
-
Create the required folders in the ONE Desktop installation directory:
cd "/Applications/ONE Desktop.app/Contents/Eclipse"
mkdir -p macos-example rdm pginit
Replace
macos-examplewith your preferred workspace folder name. -
Extract the downloaded packages:
unzip path/to/rdm-assembly-xxxxx.zip -d rdm
unzip path/to/pginit17.zip -d pginit
Replace
path/to/with the location of your downloaded files andxxxxxwith the version number of your packages. -
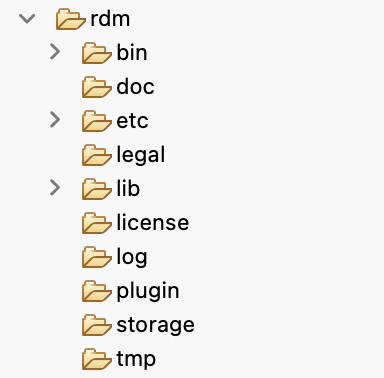
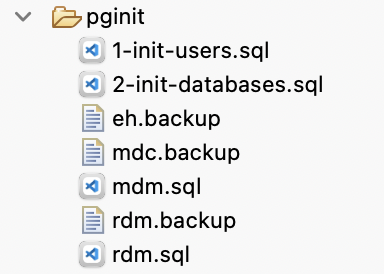
Verify the folder structure:
ls rdm pginitYour folder structure should match the following. This ensures the scripts in the example project Files > bin work without issues.
Details
-
Grant the necessary permissions:
cd "path/to/macos-example"
chmod -R 777 workspace
chmod -R +x rdm/bin
Replace
path/to/macos-examplewith the absolute path to your folder (for example,/Applications/ONE Desktop.app/Contents/Eclipse/macos-example).This sets full read, write, and execute permissions for all users on the folder contents. This is acceptable for a local demo environment but is not advisable in production.
Step 3: Configure RDM
Navigate to rdm/etc and open application.properties.
This is the main configuration file for RDM.
Define the license path to point to the correct location, save, and exit.
Step 4: Start the Docker containers
Load and run the Keycloak and PostgreSQL Docker containers.
-
Navigate to the folder where you downloaded the Docker images and load them into your local Docker image store:
docker load -i kcMac.tar
docker load -i pg17Mac.tar
If loading was successful, the following output appears:
Loaded image: harbor.ataccama.dev/one/keycloak:26.2.0-14 Loaded image: postgres:17 -
Run the PostgreSQL container:
docker run -d --name pg \
  -p 5432:5432 \
  -e POSTGRES_PASSWORD=Testtest1 \
  -v "path/to/macos-example/pginit:/docker-entrypoint-initdb.d" \
  postgres:17
Replace
path/to/macos-examplewith the absolute path to your folder (for example,/Applications/ONE Desktop.app/Contents/Eclipse/macos-example).If the command was successful, the container ID is returned in response.
If you get a "mounts denied" error, you need to allow Docker to access the workspace folder. See Docker file sharing documentation for instructions. -
Run the Keycloak container:
docker run -d --name kc \ -p 8083:8080 \ -e KC_CLIENTS_REDIRECT_URIS_WILDCARDED=true \ -e KC_CLIENTS_WEB_ORIGINS_WILDCARDED=true \ -e KC_TEST_USERS_INCLUDED=true \ -e KC_SSL_REQUIRED=NONE \ harbor.ataccama.dev/one/keycloak:26.2.0-14 \ start --db=dev-file -
Verify that both containers are running:
docker psThe expected output is as follows:
CONTAINER ID   IMAGE                                            CREATED              STATUS                PORTS                                       NAMES
6bcffaf2c5e2   harbor.ataccama.dev/one/keycloak:26.2.0-14       10 seconds ago       Up 10 seconds         0.0.0.0:8083->8080/tcp                      kc
a3c16a14aecc   postgres:17                                      About a minute ago   Up About a minute     0.0.0.0:5432->5432/tcp                      pg
Step 5: Start the example project
|
If you are preparing a project for Ataccama Cloud and you need to add new server or runtime configuration, you need to switch from the default configuration to a For more information, see deployment-guide:rdm-project-runtime-configurations.adoc. |
-
Start ONE Desktop. Confirm that you want to run the application.
For detailed instructions, see Install ONE Desktop. -
When prompted to select your workspace, point it to the folder you created earlier (for example,
macos-example). -
In the upper-right corner, switch to the ONE Desktop perspective.

-
In the Model Explorer, select New and then Model Project.
-
In Use template, select
Reference Data Manager - Banking Exampleand select Finish.If you choose a custom project name, avoid using spaces to simplify working with file paths. If your project name contains spaces, make sure to enclose paths in quotes. -
Once the project loads in the Model Explorer, navigate to
Files/bin.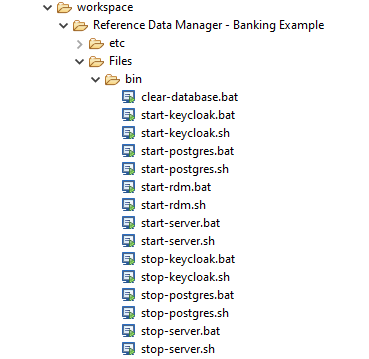
-
Open
start-server.shin a text editor and replace the last line (the start command) with the following:"/path/to/macos-example/rdm/bin/start.sh" -config="/path/to/macos-example/workspace/<project_name>/Files/etc/rdm.serverConfig" startReplace
path/to/macos-examplewith the absolute path to your workspace folder (for example,"/Applications/ONE Desktop.app/Contents/Eclipse/macos-example") and<project_name>with the name of your project folder (by default,Reference Data Manager - Banking Example). -
Open
start-rdm.shin a text editor and replace the last line (the start command) with the following:/path/to/macos-example/rdm/bin/start.shReplace
path/to/macos-examplewith the absolute path to your workspace folder (for example,/Applications/ONE Desktop.app/Contents/Eclipse/macos-example).Save and close both files before proceeding. If a file is still open in ONE Desktop, you cannot run it. -
Start the RDM Server. Open a Terminal window and run:
bash "path/to/macos-example/workspace/<project_name>/Files/bin/start-server.sh"Replace
path/to/macos-examplewith the absolute path to your workspace folder and<project_name>with the name of your project folder.The RDM Server is ready once the following message appears:
Started ... in <number> seconds -
Start the RDM Web Application. Open a new Terminal window and run:
bash "path/to/macos-example/workspace/<project_name>/Files/bin/start-rdm.sh"Replace
path/to/macos-exampleand<project_name>as before.The RDM Web Application is ready once the following message appears:
Started ... in <number> secondsYou can also run the scripts from ONE Desktop by double-clicking them in Files/binin the Model Explorer. However, as ONE Desktop displays one script at a time in the console, you can stop the running process usingCtrl+Cor by finding and shutting it down (see Stop a process manually). -
Once everything starts, open one of the following in your browser:
-
http://localhost:8060— RDM Web Application -
http://localhost:8060/admin— RDM Admin Console
-
-
Log in with the following credentials:
-
Username:
admin -
Password:
admin
-
-
To access the RDM Online Server Web Console, open
http://localhost:8061in your browser.
Configure resources (optional)
For additional work on configuration, in the File Explorer perspective, define the following resources:
-
Database resource
rdm_dbwith attributes:-
Host:
localhost -
Port:
5432 -
Database name:
rdm -
Username:
rdm -
Password:
rdm
-
-
Server resource
rdmappwith attributes:-
URL:
http://localhost:8060/admin -
User:
admin -
Password:
admin
-
-
Server resource
serverwith attribute:-
URL:
http://localhost:8061
-
Step 6: Stop the example project
When you are finished working with the RDM example project:
-
Stop the RDM Server and Web Application by closing their terminal windows.
-
Stop the Docker containers by running:
docker stop kc
docker stop pg
Tips and troubleshooting
Restart after the initial setup
If you have already completed the initial setup and just need to restart:
-
Start the Docker containers:
docker start pg docker start kc -
Start ONE Desktop, then run
start-server.shandstart-rdm.shas described in Step 5: Start the example project.
Was this page useful?