Build Workflows
As with ONE plans, ONE Desktop provides a convenient way for developing and testing plans on a local machine before deploying them to testing and production servers. This article provides an overview of the common actions performed when building, configuring, and running workflows in the Workflow Editor.
The Workflow Editor
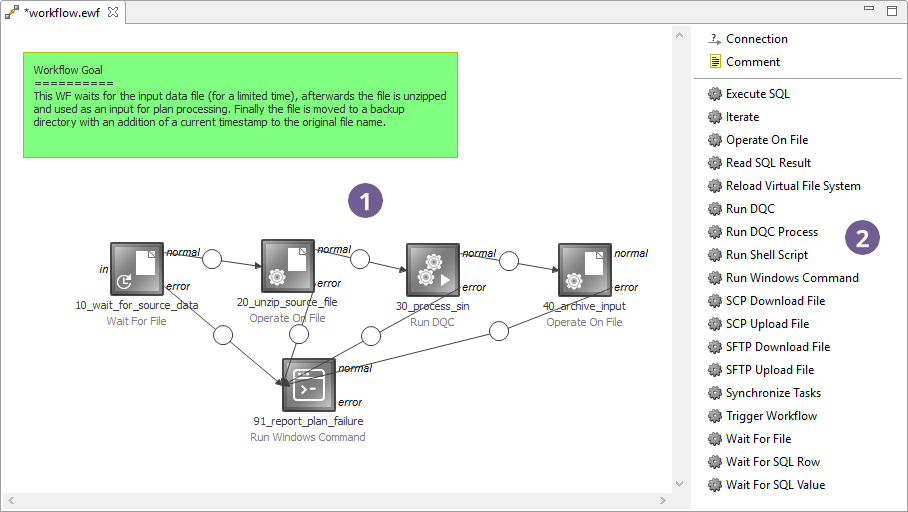
The following image shows a workflow in the Workflow Editor. The Workflow Editor opens every time you create or open a workflow. Similarly to the Plan Editor, it consists of the Canvas and the Palette.

Create a workflow
To create a new workflow:
-
Launch ONE Desktop.
-
Right-click a project or folder in the File Explorer and select New > Workflow.
-
Specify the Name of the workflow and the location (Container) for storing it.
-
Select Finish. A workflow file opens in the Workflow Editor.
Add and connect tasks
To add a task to the canvas, do one of the following:
-
Drag the task from the palette to the canvas.
-
Press Ctrl+I or Insert and select the task from a filterable list.
To connect one task to another, drag from either the normal or error endpoint to the in endpoint of another task. To learn about the difference between the endpoints, see Workflow Basics.
Enable error endpoints
By default, if any task in the workflow fails, the workflow itself fails and no other tasks are run. In order to allow tasks to fail and enable the error links:
-
Open global workflow properties by double-clicking the canvas.
-
If necessary, switch to the Parameters node from the navigation tree on the left.
-
Select the Continue on Failure property.
Now the error links are made active and a failed task does not cause the whole workflow to fail.
See Workflow States and Evaluation for reference information about the states of tasks, links, and workflows.
Add a condition to a link
Links in workflows can be conditioned. The target task of the link is run only if the condition on the link is satisfied.
To add a condition to a link:
-
Double-click the link.
-
Write a Boolean expression.
-
Select Debug to check whether your expression works as expected. For details, see Debugging Expressions and Steps.
-
Select OK to save changes.
Edit task properties
Most workflow tasks need some configuration to become functional.
-
To configure a task, double-click it or right-click and select Edit Properties.
-
Configure the general properties of the task on the General tab. See Global Workflow Properties for reference about general task properties.
-
Configure the specific properties of the task on the Configuration tab. See the Workflow Tasks section in the documentation for reference about the specific task properties.
Some specific task properties support the use of the following features:
-
Expressions in Workflows and Workflow Variables - These properties have "expression" or "semi-expression" in the Expression support column.
-
Wildcards in Workflow Tasks - These properties have "supports wildcards" in the Description column.
-
-
If necessary, configure task resources on the Resources tab. See Workflow Resource Management for information about configuring task resources.
Bypass tasks
Bypassing a task temporarily makes it inactive without breaking connections with tasks that come before and after the bypassed task.
This feature is useful for testing the data flow and the final result of the workflow processing without the task.
The bypassed task behaves as if it was a Synchronize task, that is, it always returns FINISHED_OK state.
The task preserves its accept mode settings and the task state is available to the ewfgettaskstate workflow function.
To bypass a task, right-click the task and select Bypass. Bypassed tasks acquire a red arrow:

Disable tasks
Disabling a task temporarily makes a task inactive while breaking connections with tasks that come before and after the inactive task. It is predominantly used to avoid deleting a task entirely and losing the task configuration.
You can place an inactive task anywhere on the canvas for later use.
To make a task inactive, right-click the task and choose Disabled. Such tasks are discolored.

Edit global workflow properties
Each workflow has a few Global Workflow Properties that you can modify, such as the multiplicity limitation.
To edit these global properties, double-click the canvas or right-click and select Edit properties. If necessary, switch to the Parameters node in the navigation tree on the left.
Define variables
Workflows support the use of variables for different purposes, such as passing external information to the workflow or passing a variable value from the workflow to a ONE plan. For more information, see Workflow Variables.
To define an input or derived variable:
-
Open global properties by double-clicking the canvas.
-
In the navigation tree on the left, switch to variables.
-
Define your variables:
-
For derived variables, enter the Name and Expression.
-
For input variables, enter the Name and, optionally, Comment.
-
-
To debug a derived variable, double-click the row number with the derived variable.
-
Select Debug.
-
Debug your expression in the Expression tree, which shows the results of the evaluation in each part of the expression. Debugging in the W*orkflow Editor* works the same way as in the Plan Editor. See Debugging Expressions and Steps for more information.
-
Select OK to save changes.
Execute a workflow
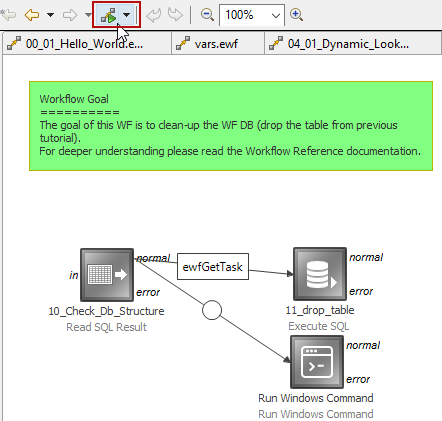
To execute a workflow from the Workflow Editor, select the Run option. Alternatively, press Ctrl+F11.

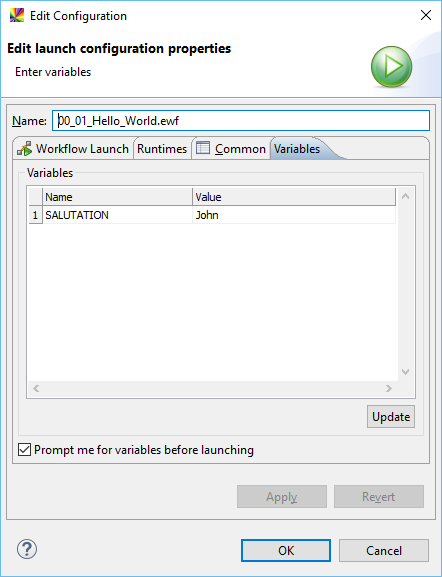
If your workflow has any input variables defined, you are prompted to enter them in the dialog that opens.

If you want the Workflow Engine to remember the variable value and do not ask again when you launch the workflow next, clear the option Prompt me for variables before launching. You can change this setting by accessing the Run Configuration dialog.
If you have added a new input variable since the last launch, select Update to get an up-to-date list of variables. For detailed information about workflow execution, see Execute Workflows.
Was this page useful?
