Authentication Configuration
By default, the product is set to authenticate users via Keycloak along with other Ataccama applications and shares an SSO session with them. After installing Keycloak, it is necessary to update client URLs in Keycloak and edit client adapter configuration files to match the installation locations of Keycloak and clients.
| Instead of Keycloak, you can also use XML Spring Security to authenticate users. See Spring Security Configuration. |
This article describes how to secure access to the ONE Runtime Server Admin content. For information about how to secure access to ONE Runtime server via command line as well as about securing online services, see Server Security.
Authentication
Configure client URLs in Keycloak
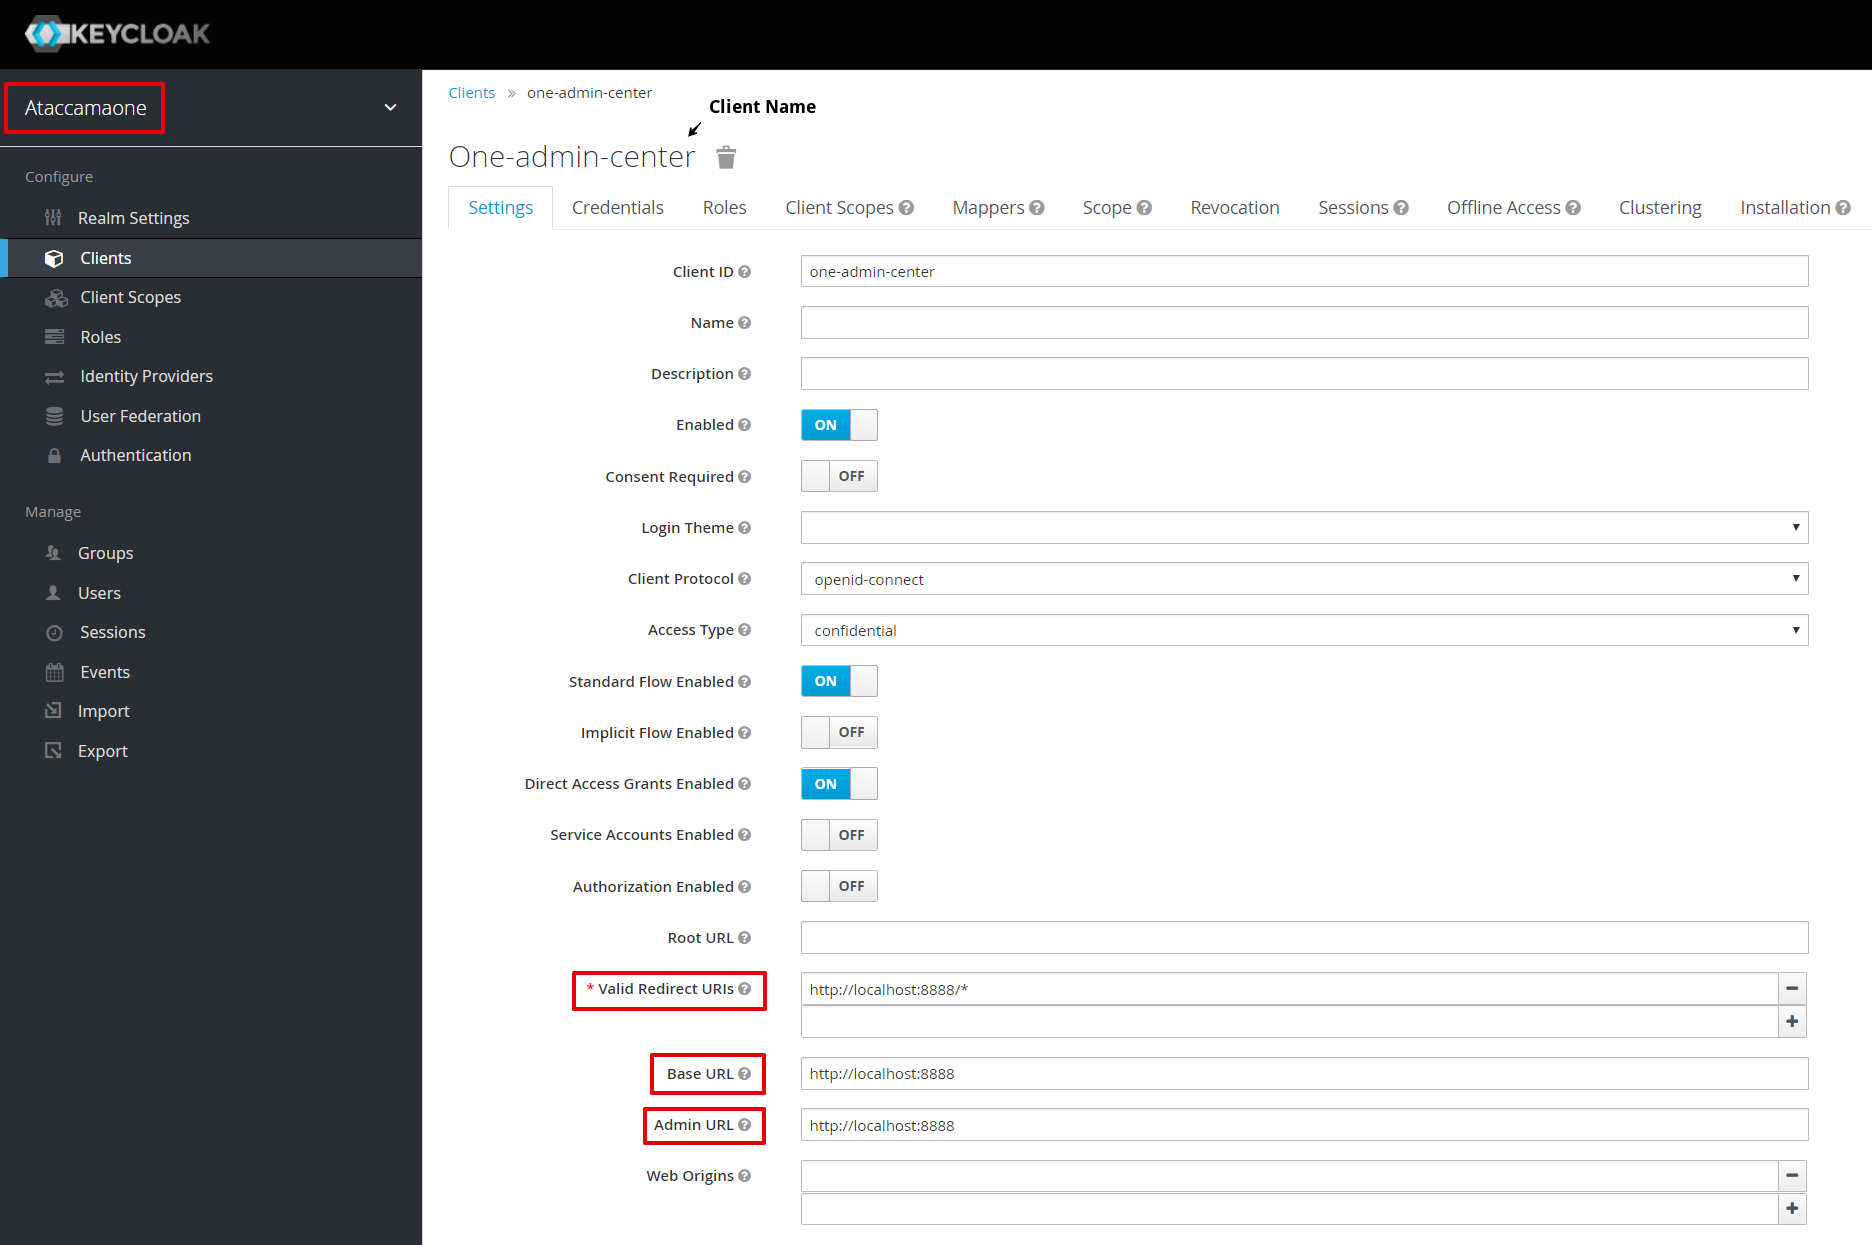
Edit the one-admin-center client in Keycloak.
-
Go to Keycloak Admin Console.
-
Make sure
Ataccamaonerealm is selected at the top of the left-hand navigation bar. -
In the navigation bar, open Clients > [client ID].
-
Depending on the client Access Type setting, different configuration fields are available and filled in.
-
Edit all filled-in fields that contain URLs, such as Valid Redirect URIs, Base URL, and Admin URL.
-
Change the
http://localhost:<port>part to the actual client location. -
Select Save.
-
-
Repeat steps 3-4 for all relevant clients.
| For basic authentication, select Direct Access Grants Enabled option for the Keycloak client. |
| To change the default client password, switch to the Credentials tab of the client configuration and select Regenerate Secret. |

Define Keycloak client configuration
Define the Keycloak client configuration so that the clients can connect to Keycloak properly.
The client configuration can be defined either in a client adapter JSON file or in the Runtime Configuration (see section Keycloak deployment connection). You can combine both options in your solution.
Via JSON client adapter configuration file
Edit the keycloak-admin-center.json client adapter configuration file located in the Files/etc project configuration directory.
The settings in the client adapter file should correspond to the Keycloak settings for the client.
In most cases, you need to modify the auth-server-url attribute, which corresponds to the base URL of the Keycloak server.
If you regenerated the client secret or created a new client in the Keycloak Admin Console, update the secret attribute as well.
Treat other settings as expert and modify only if you know what you are doing.
| Keycloak is case sensitive. Make sure to use lowercase if referring to the Keycloak server URL via hostname. |
The following is an example of the client adapter file for the ONE Runtime Server Admin:
keycloak-admin-center.json{
"realm": "ataccamaone",
"auth-server-url": "http://localhost:8083/auth",
"ssl-required": "external",
"resource": "one-admin-center",
"use-resource-role-mappings": false,
"public-client": false,
"bearer-only": false,
"autodetect-bearer-only": false,
"always-refresh-token": false,
"credentials": {
"secret": "one-admin-center-s3cret"
},
"principal-attribute": "preferred_username"
}Via the runtime configuration
To define the configuration for your Keycloak clients, add or edit the KeycloakDeploymentContributor element in the runtime configuration file.
The settings in the KeycloakDeploymentContributor should correspond to the Keycloak settings for the client.
| Keycloak is case sensitive. Make sure to use lowercase if referring to the Keycloak server URL via hostname. |
The following is an example of KeycloakDeploymentContributor configuration for the ONE Runtime Server Admin:
.runtimeConfig<config class="com.ataccama.server.keycloak.KeycloakDeploymentContributor">
<keycloakConfigs>
<keycloakConfig name="localKeycloak">
<url>http://localhost:8083/auth</url>
<realm>ataccamaone</realm>
<attributes>
<attribute name="ssl-required" value="external"/>
</attributes>
<clients>
<client id="one-admin-center">
<secret>one-admin-center-s3cret</secret>
<attributes>
<attribute name="use-resource-role-mappings" value="false"/>
<attribute name="public-client" value="false"/>
<attribute name="bearer-only" value="false"/>
<attribute name="autodetect-bearer-only" value="false"/>
<attribute name="always-refresh-token" value="false"/>
<attribute name="principal-attribute" value="preferred_username"/>
</attributes>
</client>
</clients>
</keycloakConfig>
</keycloakConfigs>
</config>Configure HTTP Dispatcher
Configure the Keycloak Security in the HTTP Dispatcher server component. The following sample of HTTP Dispatcher configuration enables access to ONE Runtime Server Admin for all authenticated users:
<component disabled="false" class="com.ataccama.dqc.web.HttpDispatcher">
    <listeners>
        <listenerBean healthstateRefreshRate="60000" maxWaitingRequests="10" backlog="50" waitingRequestsWarningThreshold="1" port="8888" threadPoolTimeout="10000" healthStateRecoveryTimeout="3600000" name="default" threads="10" servletOnly="false" ssl="false">
            <contexts>
                <listenerContext path="/">
                    <filterChains>
                        <filterChain path="/*" filters="accessLog,securityFilter">
                            <conditions/>
                        </filterChain>
                    </filterChains>
                    <securityFilter loginUrl="/sso/login" class="com.ataccama.server.http.security.keycloak.KeycloakSecurity">
                        <identityProviders>
                            <identityProvider configName="keycloak" clientId="admin-center" pattern="/**"/>
                        </identityProviders>
                        <interceptUrls>
                            <interceptUrl access="isAuthenticated()" pattern="/**"/>
                        </interceptUrls>
                    </securityFilter>
                </listenerContext>
            </contexts>
        </listenerBean>
    </listeners>
    <servletFilters>
        <servletFilter level="INFO" appendClientInfo="false" name="accessLog" class="com.ataccama.dqc.web.filters.RequestResponseTimeLogger">
            <headers>
                <header>soapAction</header>
                <header>host</header>
            </headers>
        </servletFilter>
    </servletFilters>
</component>
ONE Runtime Server Admin security
You can configure ONE Runtime Server Admin security by adding response headers (security headers) to HTTP responses from the ONE Runtime Server Admin.
| We recommend setting security headers in case your ONE Runtime Server Admin is exposed to potential security attacks. |
The following security headers are added automatically by the Spring security layer that is always used in the server: X-Frame-Options, X-XSS-Protection, X-Content-Type-Options, Cache-Control, Pragma, Expires.
To configure security headers:
-
Locate the HTTP Dispatcher server component in the Server Configuration.
-
Add the
ResponseHeadersFilterimplementation ofservletFilterand configure the headers:.serverConfig<servletFilter name="responseHeaders" class="com.ataccama.server.http.filters.ResponseHeadersFilter"> <headers> <header name="Referrer-Policy" value="strict-origin"/> <header name="Content-Security-Policy" value="default-src 'self'; style-src 'self' 'unsafe-inline'; connect-src 'self'; script-src 'self' 'unsafe-eval' 'unsafe-inline'; img-src 'self' data:"/> <header name="X-Permitted-Cross-Domain-Policies" value="none"/> <!-- for secured endpoints only --> <!-- <header name="Strict-Transport-Security" value="max-age=31536000; includeSubDomains"/> --> <!-- following headers are set to these defaults <header name="Cache-Control" value="no-cache, no-store, max-age=0, must-revalidate <header name="Expires" value="0"/> <header name="Pragma" value="no-cache"/> <header name="X-Content-Type-Options" value="nosniff"/> <header name="X-Frame-Options" value="DENY"/> <header name="X-XSS-Protection" value="1; mode=block"/> --> </headers> </servletFilter> -
Add the filter to one or multiple filter chains (
filterChainelement) to specify for which requests it should be used. For a default configuration, add the filter to a filter chain mapped to the/*path (that is, add it to all requests) and place it beforesecurityFilter:<listenerBean> ... <contexts> <listenerContext path="/"> <filterChains> <securityFilter class="FILTER_CLASS"/> <filterChain path="/*" filters="responseHeaders,securityFilter"/> <!-- other filter chain mappings --> </filterChains> ... </listenerContext> ... </contexts> </listenerBean>
CORS response headers filter
For security reasons you are not able to process cross-domain requests. This can cause problems when using services in web applications (for example, if your web application is running on one server and your API endpoint is on another server). If this is the case, Cross Origin Resource Sharing (CORS) can be used.
Add the following configuration to HTTP Dispatcher component and map the filter to the required endpoints.
<servletFilters>
      <servletFilters>
            <servletFilter name="CORSResponseHeaders" class="com.ataccama.server.http.filters.ResponseHeadersFilter">
                 <headers>
                     <header name="Access-Control-Allow-Origin" value="*"/>
                </headers>
      </servletFilter>
</servletFilters>
<filterChains>
<filterChain path="/nme-rest/*" filters="CORSResponseHeaders">
<conditions/>
</filterChain>
</filterChains>Was this page useful?
